Follow:
    Design Team Projects

    Make A Shaker Element In Minutes With These New Shaker Kits!

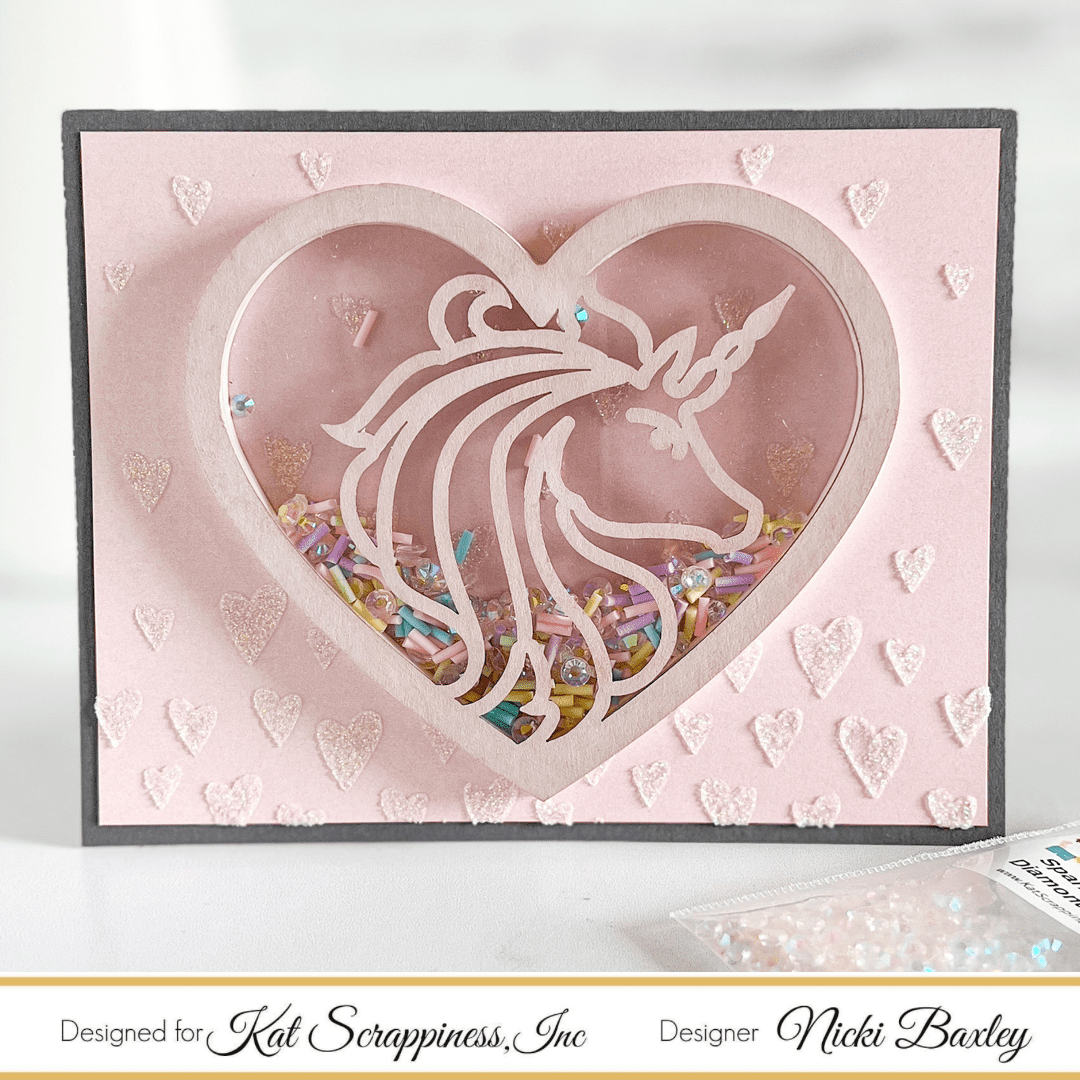
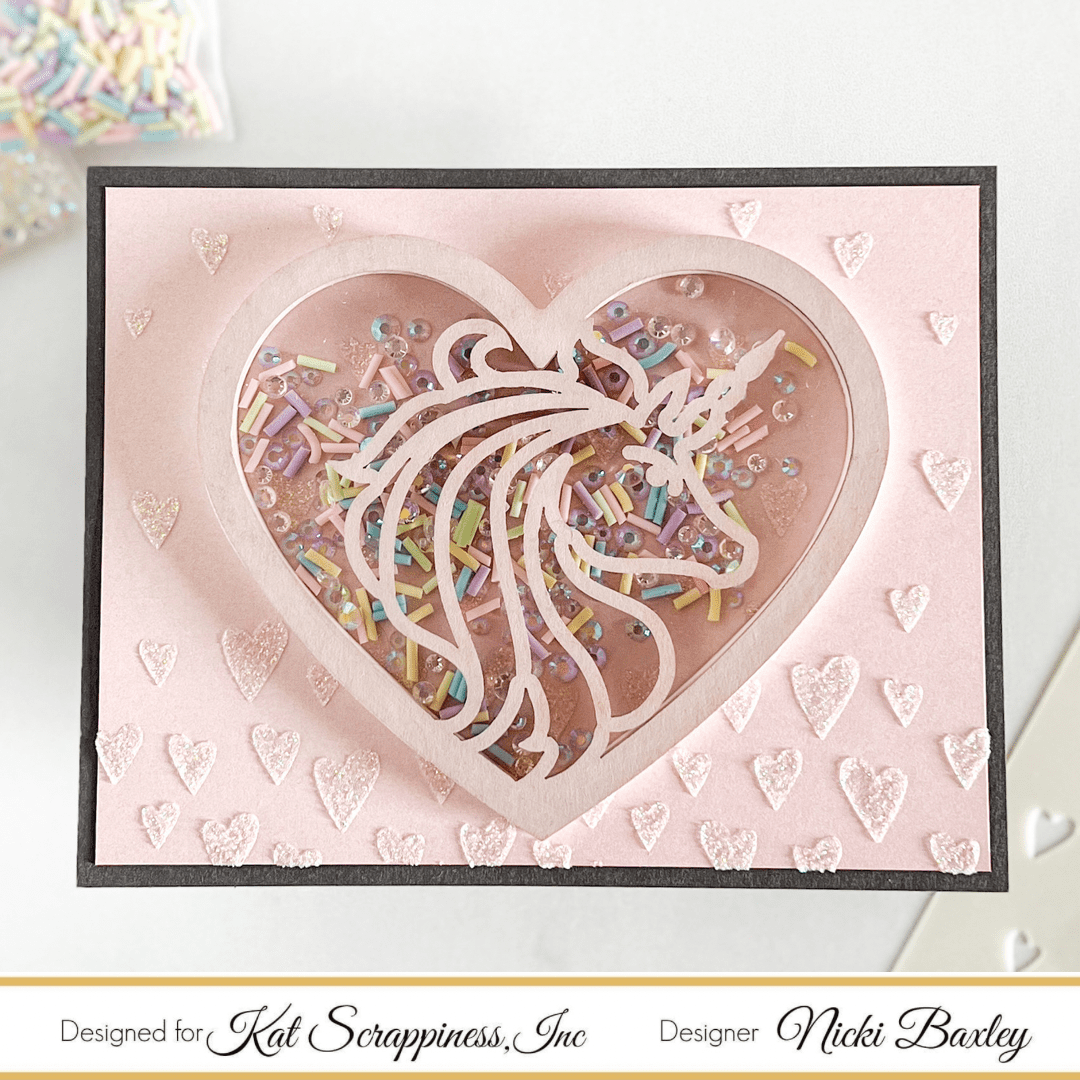
    You can make a shaker element for a card or tag in minutes with the new shaker kits from Kat Scrappiness!


    I created a background for my shaker by ink blending some Evergreen Bough distress oxide ink with the new Falling Stars stencil on white cardstock.  I trimmed it down using the acetate piece included in the kit for a template.

    I used some acrylic paint from my stash and a foam brush to add color to the gift shaker element.  I added the paint to the wood side of the shaker element and I added 3 layers, drying in between each layer.

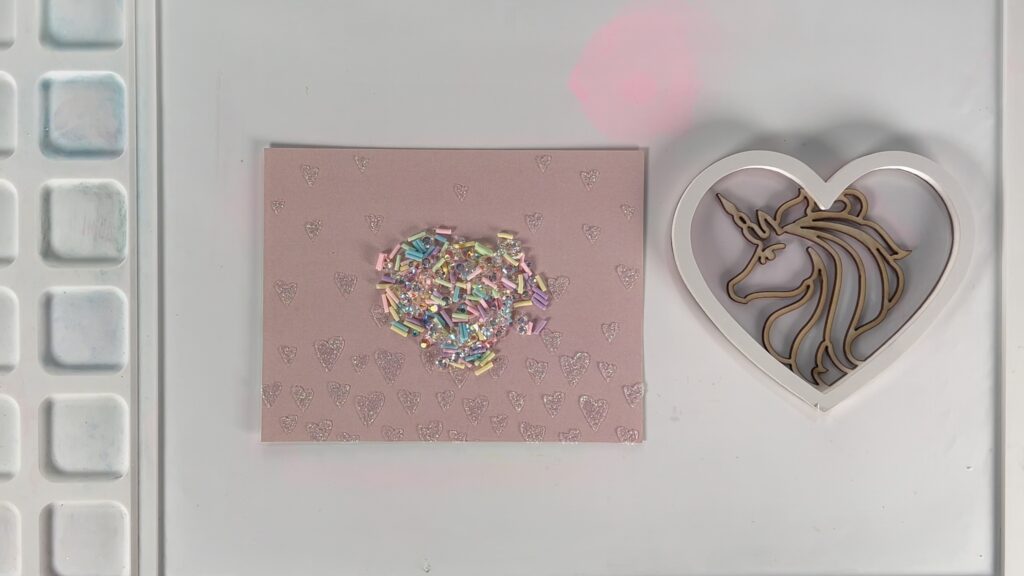
    The shaker kit has the wood element in whatever shape you have chosen.  It also includes the foam and acetate all sized and ready to go to create your shaker element!  It really took just a few minutes to create the shaker element for the top of my card.


    I added lots of shaker bits to my card.  The foam piece is about 5 mm thick so you can fit a lot of shaker bits!  I added teal seashells, aqua jewels, and small clear drops for lots of sparkle.

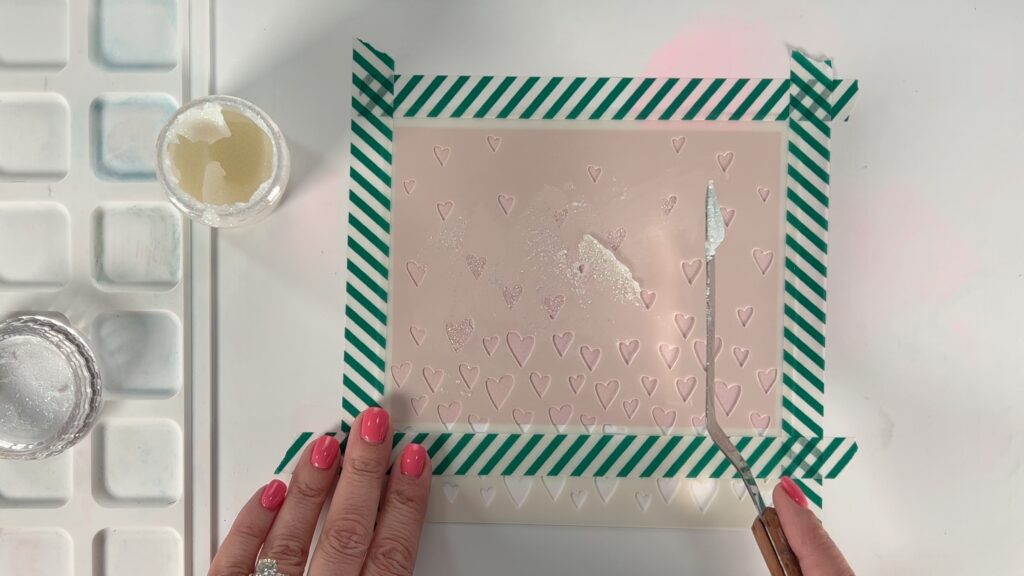
    My background has a piece of white cardstock swiped with Evergreen Bough and Peacock Teathers distress oxide.  Then I used some metallix white pearl gel from my stash and added it through the Falling Stars stencil with a palette knife.

    Make sure you give the gels and pastes at least an hour to dry.  You also want to make sure you clean your stencil, palette knife and craft mat immediately after using them.  Don’t let those sit or you may never get the dried paste off them!


    I created a video so that you can see how to use these shaker kits to create a quick and easy shaker element.


    [youtube https://www.youtube.com/watch?v=5a3VCPXXK4Q]
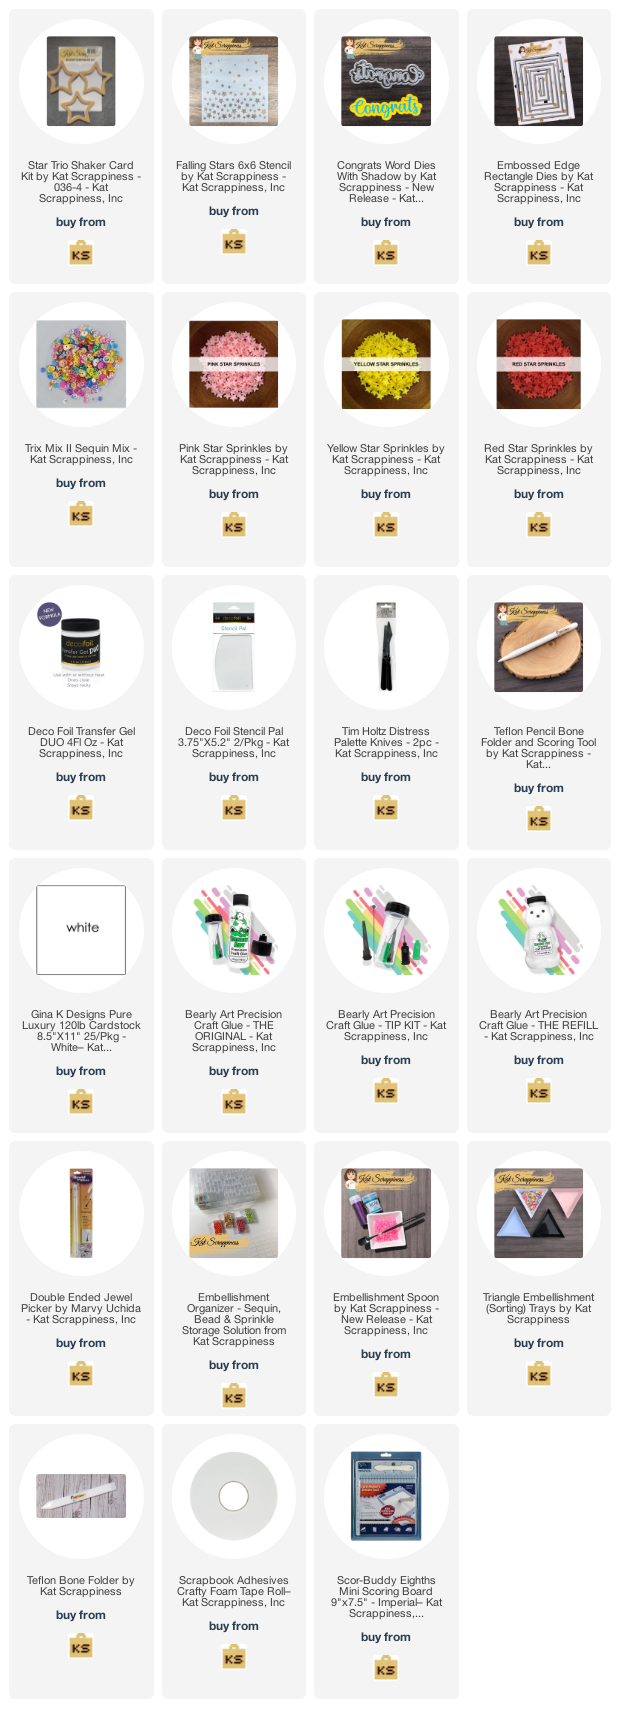
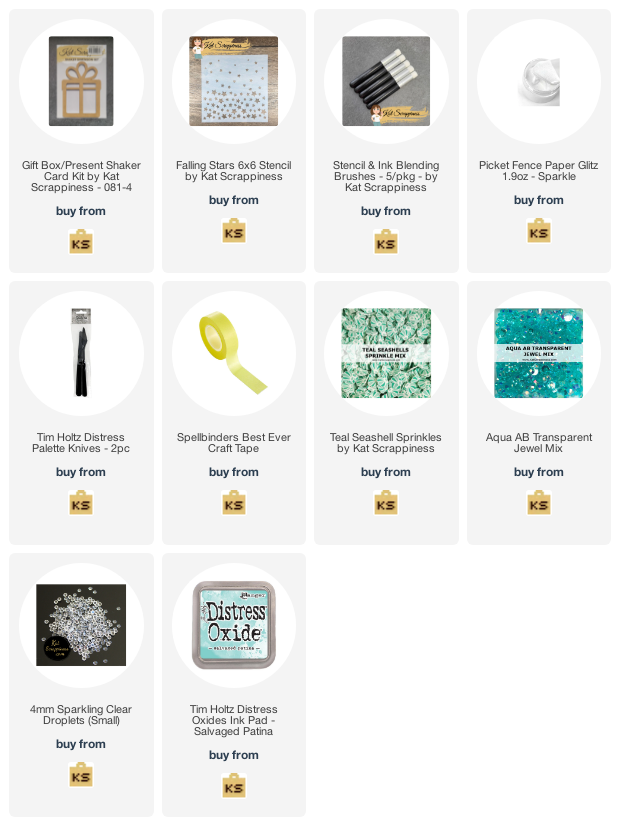
     

    Supply List:

    https://linkdeli.com/widget.js?id=f5e8378456858c916708

    Thank you for stopping by!  You can find more of my ideas and inspiration at Stamping Imperfection.

    Design Team Projects

    A Birthday Shaker Card

    Hi everyone!!! Nora here with a simple birthday shaker card using the new Kat Scrappiness Floating Dots Stencil and the Happy Birthday w/ Shadow Die. These new stencils are so fun to use and are versatile for a variety of cards.

    Here is how I created this card:

    • On a piece of 4 1/4″ by 5 1/2″ white cardstock, I used the Floating Dots Stencil to stencil green, purple, and pink ink over the card front.
    • Using the same three color inks, ink blend the ink over the the top of the stenciled dots. Lightly spritz water over the the ink and use a paper towel to blot the water off.
    • With the Kat Scrappiness Happy Birthday w/ Shadow Die, use the shadow part of the die to cut out of the front of the stenciled card front.

    I want to thank you for stopping by today. Please be sure to check back in at the Kat Scrappiness Blog for other fabulous projects by the Kat Scrappiness Design. Below is a list of supplies I used on my card. Affiliate links are used at no extra cost to you. Thank you so much for your support!!!

    Supplies:

    Design Team Projects

    Congrats Shaker Card

    Hello everyone!

    It’s Donna Idlet here featuring the NEWLY released Star Trio Shaker Card Kit.  I hope you were able to see all the newly released kits, if not you can find them here.  These shaker kits are adorable and so easy to put together.

    Here is how I created the shaker:

    • Created an A2 card 4 1/4 x 5 1/2.
    • Die cut the black layer with KS Embossed Edged Dies.
    • Used the Falling Stars 6×6 Stencil in the background, used Transfer Gel Duo with the stencil, let it dry and added foil and ran through laminator.
    • Assembled two of the Star Shakers by adding Transfer Gel Duo to the stars, let it dry and added foil to the stars and ran it through the laminator. Next attached the acetate to the stars with a tape runner, added the foam star to the stars, filled with shaker bits, created another star acetate to sealed the shaker bits and added the stars to the card.
    • Die cut the Congrats with shadow die using alcohol ink paper and added it to the card.
    Thank you so much for stopping by, please come back again soon.
    Here is a list of supplies I used on my card, Affiliate Links used at no additional cost. Thank you for your support.


    https://linkdeli.com/widget.js?id=f5e8378456858c916708

    Design Team Projects

    Sending my Love

    Hello Friends Waleska Galindo here with a new blog post for Kat Scrappiness today I wanted to share a card I created with the newest released stencil Floating Dots and some oxide inks.

    CARD DETAILS:

    I started by inking a white panel with oxide inks in colors Picked Raspberry, Wilted Violet and Blueprint Sketch I then used the floating dots stencil with white pigment ink.  I added some water splashes and some sparkly watercolor.

    I then cut the Sending Love word die and shadow from this panel and I created a no bulk shaker in the back of this panel adhering two acetate pieces together and adding some glitter inside.  I then added the word sending my love to the front of the shaker, I glue this piece to a white piece and added a black and a white cardstock.

    I finally added some White Round Confetti mix and this card is done! I hope you like this idea and remember there are 3 other designs of new stencils at the shop.  Have a great Day!

     Waleska

    Design Team Projects

    Unicorn in a Heart Shaker Kit Card

    Hi, everyone! This is Nicki from the design team here to show you how to use our shaker kits while making this fun unicorn card. For all the details make sure to watch the video!

    Let’s start by looking at the product. The pack comes with a sturdy frame, a piece of acetate cut to fit the window and a sturdy piece of foam that is the shape of the frame.

    unicorn in a heart, card making. shaker card, Nicki Hearts Cards

    For my frame, I used Tattered Rose Distress Oxide Ink. After ink blending, I attached the acetate piece with liquid glue to the frame. Next, I used liquid glue to adhere the foam to the frame. While the glue was drying, I prepared the background.

    I started with a piece of light pink paper from the Spring Fling pack. Next, I wanted to add some extra sparkle so used the Falling Hearts Stencil and some glitter paste.

    falling hearts

    After the glitter paste dried, I can start placing my shaker window. I added pastel sprinkles and sparkling clear diamond jewels to the center of the card. Next, I glued the shaker window in place over the shaker pieces.

    shaker card, unicorn in heart

    All that was left, was to back the card with dark grey card stock.

    unicorn in heart, shaker card, card making, Nicki Hearts Cards

    If you are shopping today, please make sure to go through my links to support me. These do NOT cost you anything and help support my crafty business. Thank you and Happy Crafting!

    Nicki


    https://linkdeli.com/widget.js?id=f5e8378456858c916708

    Design Team Projects

    New Stencils & A Graduation Card

    (affiliate links for most products are provided below at no additional cost to you)

    Good Morning! Today I am over on the Kat Scrappiness Blog with some graduation card inspiration for you. I am using the new stencils from Kat Scrappiness and this card features the Falling Starlight Stencil and the Proud Of You Shadow Die sentiment. All supplies for this are listed below so please feel free to shop your favorites! I have quite a few relatives graduating this year. I thought it would be fun to use the school colors on their cards.

    Card Details

    • Cut, score, and fold an A2 card base from Neenah Classic Crest Solar White 110lb card stock.
    • Cut a card panel at 4.25″ x 5.5″
    • Center the shadow from the Proud of You dies in the top third of the panel and die-cut.
    • Die-cut the words from white card stock. I used Lunar Paste and covered the words. Allow this to dry.
    • Ink blend the card panel. I used Antique Linen, Dried Marigold, Iced Marmalade, and Black Soot.
    • After the panel was dry. I added the Falling Starlight Stencil on top and put Lunar Paster over the top.
    • To the back of the dry panel add a piece of acetate slightly larger than the shadow opening. I used double-sided adhesive.
    • Add dimensional foam tape around the opening and all around the base.
    • Sprinkle in your shaker elements.
    • TIP: Once I remove the paper from the foam tape I add Bearly Arts Precision glue. This allows for adjustment when adding the card base.
    • Add your card base.
    • Add glue to your sentiment and allow it to dry.
    • I added the Black Tie Sprinkles to the shaker element and to the front of the card.

    That’s it my card for today is done! As always thanks for stopping by! Make sure you stop by the Kat Scrappiness store to pick up the NEW stencils! They are essential to anyone’s stash! Have a great day!


    https://linkdeli.com/widget.js?id=f5e8378456858c916708

    Design Team Projects

    Wedding Heart | Love | Shaker Card

    Hello KS Friends!!

    Sheri here with a festive Wedding card featuring the NEW Wedding Heart Shaker Card Kit! If you missed the Shake It Up Release this past weekend you can find the full release HERE.

    31 NEW Shaker Card Kits were added to the store and can be found HERE.  The shaker kits are super easy to assemble and just need to be filed with shaker bits of your choice.

    Steps to Create Card:

    • Create 5″ x 5″ Square Card Base (5″ x 10″, scored at 5″).
    • Cut Silver Mat: 4 3/4″ x 4 3/4″.
    • Cut White Panel: 4 5/8″ x 4 5/8″. Next you can emboss with a favorite embossing folder of your choice or create a faux embossed background like I did. To create a faux embossed background, I cut out approximately 16 hearts (smallest heart from the Layering Nested Hearts die set). I then glued them randomly on my panel.
    • Assemble the White Panel to the Silver Mat and attach it to your white card base.
    • Assemble Wedding Heart Shaker. First I painted the heart with white acrylic paint and to add a bit of shine I did emboss twice with white embossing powder, next I attached the foam heart to my card panel, filled with shaker bits, attached Acetate heart to Wood Heart and then glued it to the foam heart. I used a combination of 1/8″ double sided tape and liquid glue. My shaker is not going anywhere.
    • For a sentiment I added the word “Love” die cut in silver card stock from the Love You w/Shadow die. The sentiment is cut out twice and stacked and glued directly to the bottom of the bridal couple.

    Here’s a list of the supplies I used from the store.
    Affiliate links are used at no additional cost to you. Thank you so much for your support!


    Happy Stamping!!