Follow:
    Design Team Projects

    Celebrating St. Patty’s Day with the New Kat Scrappiness Zig Zag Dies

    Hey Crafters! Priscilla here with lots of fun St. Patty’ cards— all featuring Kat‘s new “Zig Zag” dies. I love making St. Patrick’s Day cards, I think because the bold green on them give me hope that spring is right around the corner. Plus isn’t everyone “Irish” on St. Patty’s Day? LOL!

    My first card features “Aidan,” one of the Julie Nutting dolls. Isn’t he handsome in his green and black gingham pants?

    Because Aidan is so long, I created an 8 x 4.25 card base and stamped him directly on the front. After Copic coloring his skin and hair, I paper -pieced his pants and t-shirt logo using paper from the Doodlebug  “Lots O’ Lucky”paper pad.

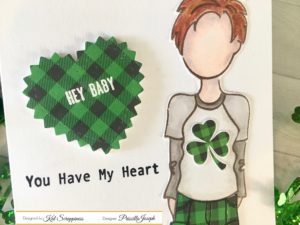
    I cut out a heart from the same Doodlebug paper pack using the Kat Scrappiness“Zig Zag Heart Dies”and white heat embossed the “Hey Baby” sentiment from Kat’s “Say it With Hearts” stamp set.


    My second card feature the new “Zig Zag Oval Dies” and a stamp set from Neat & Tangled, “So Lucky.”

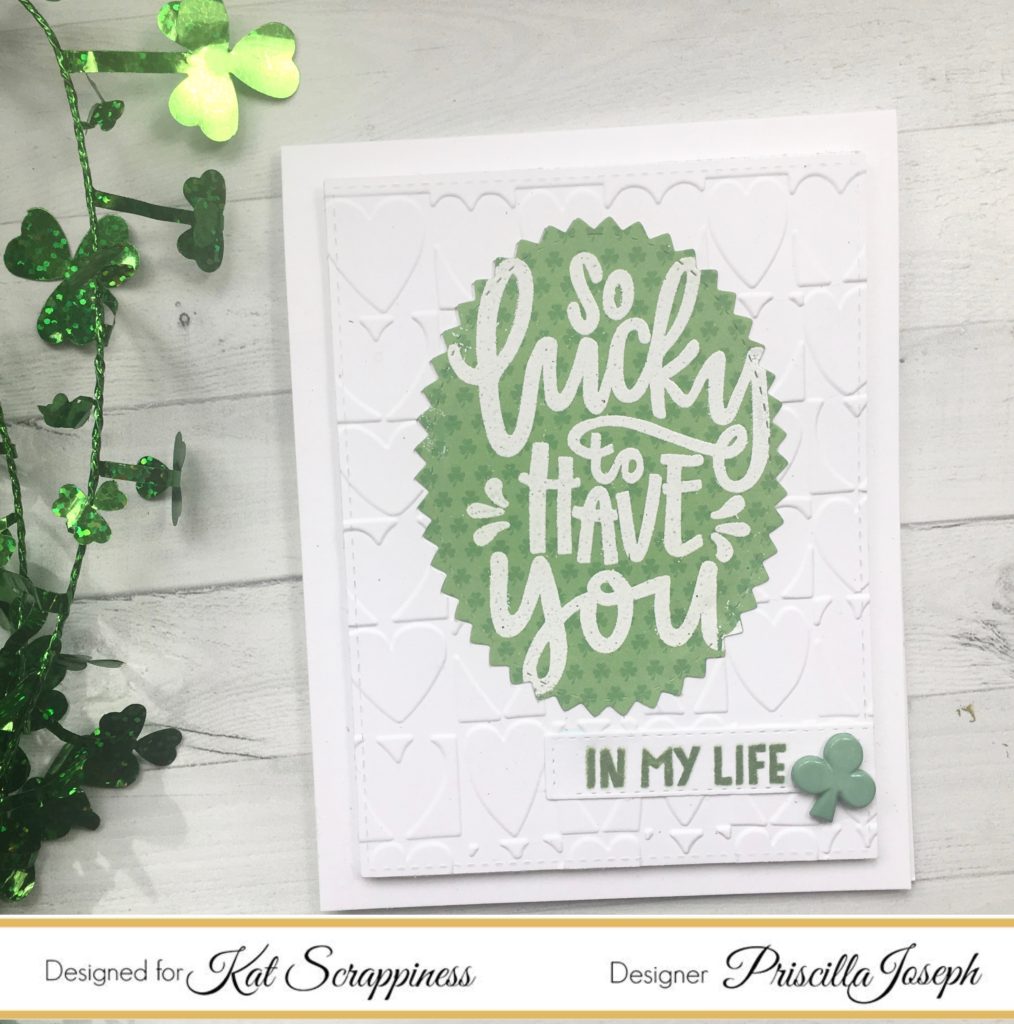
    I cut a large oval from the die set and white heat embossed the sentiment on it. I also used the same oval to die cut the center of a white “heart embossed” panel and insert the green oval inside it.


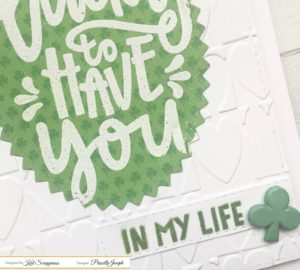
    The sentiment “In My Life,” also from the “So Lucky” set was stamped on an “Stitched Sentiment Strip”die, adhered to the front panel, and topped off with a resin shamrock from my stash.


    Speaking of shamrocks, this next card features a whole jar full of them! I used Lawn Fawn’s “How You Bean?” stamp set and coordinating diesto create the jar, and once again using the Doodlebug “Lots O’Lucky” papers.  

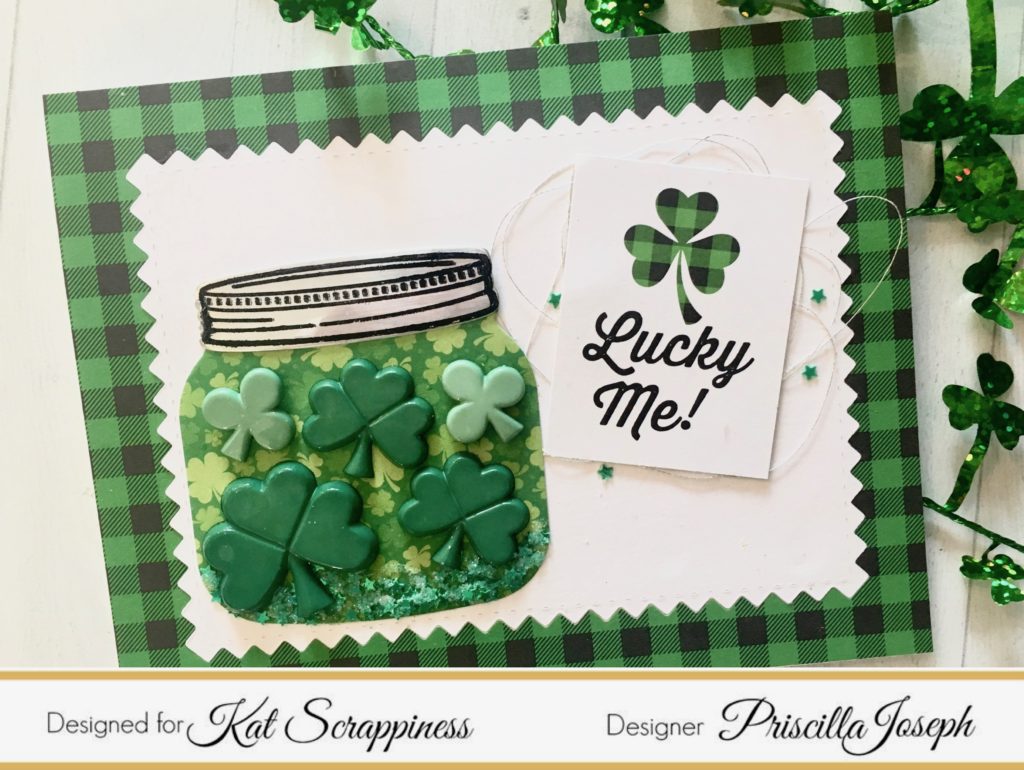
    I used the “Zig Zag Rectangle”die to create a panel for the front of the card, with some Doodlebuggingham behind it. The “Lucky Me” die cut is also from this same paper pad.

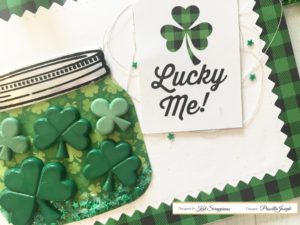
    Before “filling” the jar with shamrocks, I mixed clear glitter and Kat‘s “Kelly Green Star Solid Confetti Sequins”and adhered them to the base of the jar. Some more Kelly Green stars and silver thread provided a finishing touch for this card.


    I call this card my “Quilt Card,” and Kat’s “Zig Zag Square Dies” helped me piece it together for the front of this next card.


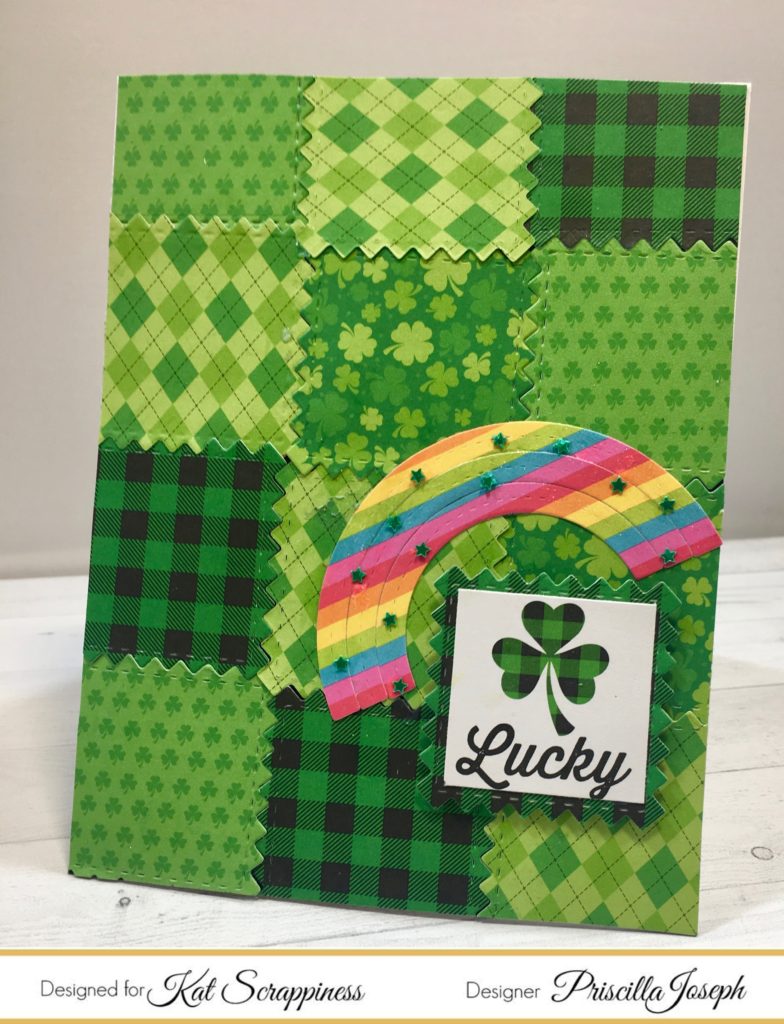
    The quilt squares, the rainbow paper, and the sentiment all  came from the Doodlebugpaper pack. Kat‘s “Kelly Green Star Solid Confetti Sequins” highlight the lucky rainbow.


    I got to play around with alcohol inks for Card #5! I mixed several shades of greensplus gold on Yupo paperto create a “marble background” for the front of this card.

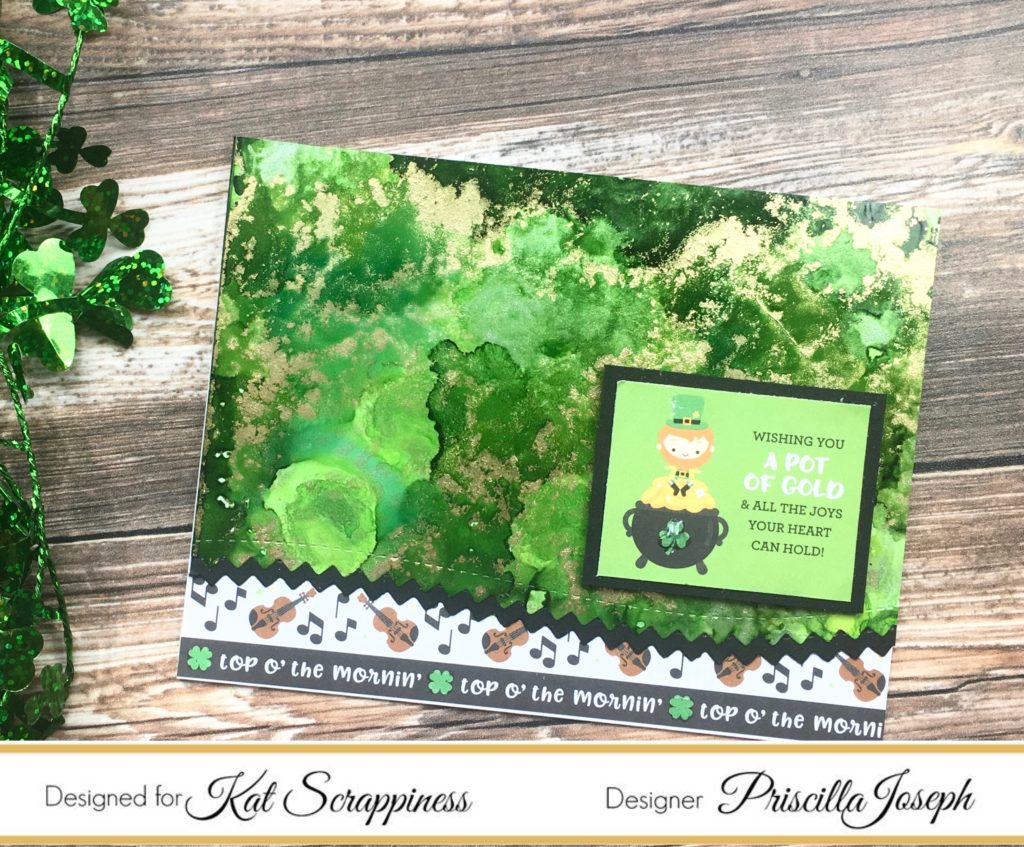
    I used one of the “Zig Zag Border Dies”to add a cool edge to the front panel that mimics the musical notes on the patterned paper strip.


    My final card is not a card at all, but a cute “St. Patty’s” tag, using three of the “Zig Zag Circle Dies.”

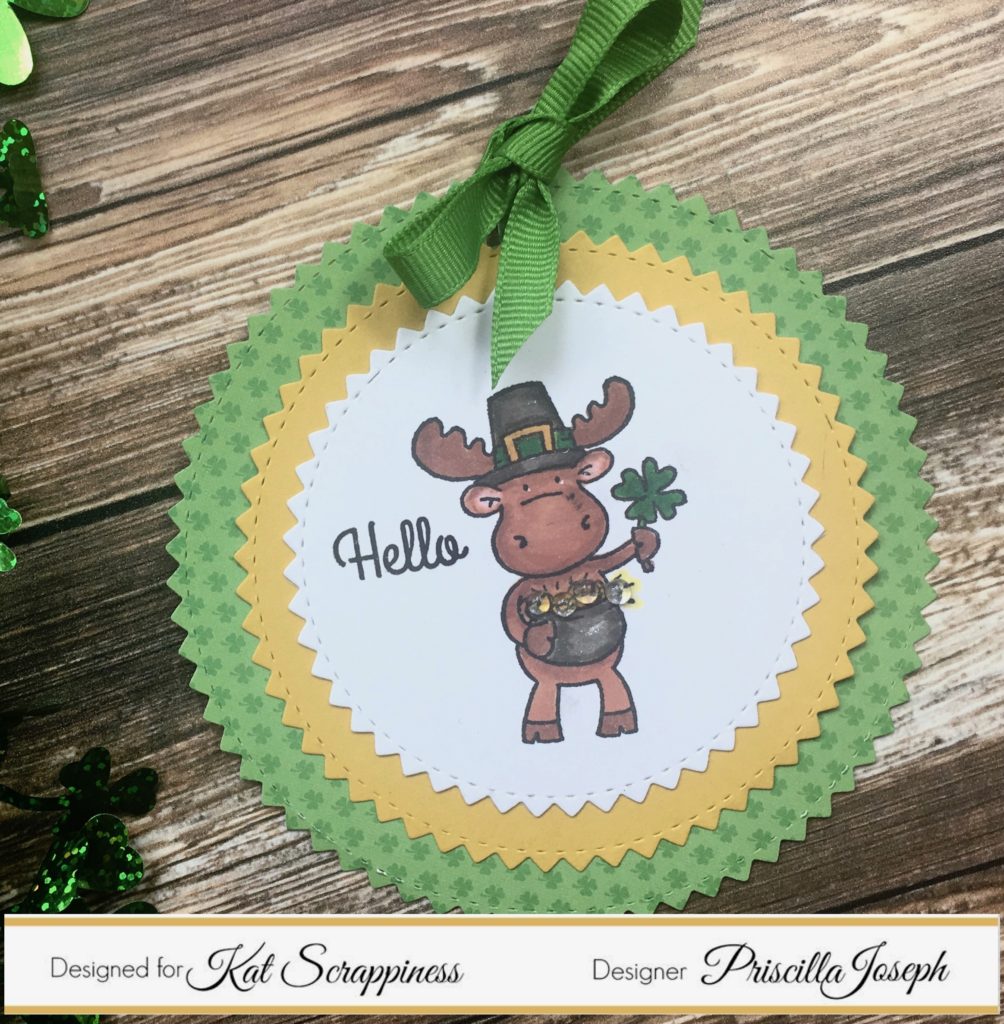
    The center features an adorable moose from the “Clover Riley”stamp set. I copic colored him and added some of Kat’s “Sparkling Clear Jewels” to his pot of gold.


    Well, that’s all for today. See you again soon!

    The supplies I used are listed and linked below.  Please don’t forget to use my coupon code “Priscilla10” for 10% off your order at the shop.

    PRISCILLA


    SUPPLIES

    Challenges & Hops, News

    March Card Challenge – Rainbows

    Hello Kat Scrappiness fans!  It’s Lisa back on the blog today to bring you another monthly challenge!  We just wanted to say thank you so much for entering our card challenge in February!  We had over 20 amazing entries and we LOVE that you are sharing your gorgeous cards with us!

    Thank you to all who entered for playing along!  The random winner of the Heart challenge from February is

    ***Lagene***

    Congratulations Lagene and thanks so much sharing your beautiful projects with us!

    You’re going to want to stay tuned to the Kat Scrappiness blog, Facebook group and Instagram to be the first to know about special discounts and giveaways!

    ***********************************************************************************

    That brings us to the March Challenge and I thought

    it would be fun to do a rainbow theme! Let’s get colorful this month! You can get creative and put a rainbow on your card, or make a rainbow background or using a repeating element in rainbow colors.  The sky is the limit and it is full of rainbows this month!

    You just might get lucky and win a $25 gift certificate to KatScrappiness.com!  While you do not “have” to use our products, we would love to see how you incorporate your Kat Scrappiness stamps and/or dies in your projects!

    This month we only have 2 easy requirements to play along.

    1. Use a rainbow theme or colors on your project
    2. Remember to link back to our challenge in your entry

    That’s it! Easy Peasy right!  To enter, submit a photo of your project below

    (Click on the “Add Your Link” button) and we will randomly pick the winner at the end of the month.  Inlinkz is requiring you to verify your email address now but don’t worry, that will just make it easier for us to contact you should you win the $25 gift certificate!

    Good Luck from the Kat Scrappiness team and we look forward to seeing your creations!

    You are invited to the Inlinkz link party!

    Click here to enter

    Design Team Projects

    Zig Zag Dies – Hearts, Squares, Circles, Ovals, Rectangles, and Borders – Oh My!

    Hi everyone!  Have you seen the new Zig Zag dies that were released this week?  I can’t stop using them!  I have several samples today using all the Zig Zag dies, and I’m featuring this Easter card where I used two of the Zig Zag Rectangle dies.


    For the smaller Zig Zag Rectangle, I used blender brushes with oxide inks to create a shaded pink panel.  I layered that onto the largest Zig Zag Rectangle that I cut out of plaid patterned paper.  I colored several images from the Sunny Studio Chubby Bunny set with Copic markers, die cut them out, and added some shimmer to the eggs and letters with a glitter pen.  I used some foam adhesive to pop up the images on the card panel.

    Zig Zag Rectangles

    Zig Zag Squares


    Zig Zag Circles

    Zig Zag Ovals

    Zig Zag Hearts

    Zig Zag Borders

    – – –– – –– – –– – –– – –– – –– – –– – –– – –– – –– – –– – –– – –– – –– – –– – –– – –– – –– – –– – –– – –– –

    Use code caren10 for a 10% discount in the Kat Scrappiness shop.

    Thanks for stopping by and happy stamping!

    – – – SUPPLIES for today’s project– – – – – – – – – – – – – – – – – – – – – – – – – – – – – – – – – – – – – – –

    Featured Card

    Zig Zag Dies

    Design Team Projects

    Bokeh Background And Zig Zag Border Dies

    Hi Everyone, its Tina here. I have a card to share with you using a Bokeh Background and the new Zig Zag Border dies. I used the Zig Zag Stitch Border dies to tone back my background. Below you will find the steps to create your own card.

    Step 1 – Trim White Cardstock  to 8 1/2″ x 5 1/2″, score at 4 1/4″ and fold in half for a vertical side fold card. (A2)

    Step 2 – Trim White Cardstock to 5 1/2″ x 4 1/4″. Using the Picket Fence Life Changing Brushes apply Distress Oxide Inks in various sizes of circles. I used Seedless Preserves, Antique Linen, Picked Raspberry, Spiced Marmalade, Barn Door.

    Step 3 – Diecut Never Ending Circles to create a stencil of various size circles. For a smaller circle use any punch or circle you have from another set. Randomly apply various sizes of circle using White Ink and a mini ink blending tool to the background created from Step 2. See photo below for finished Bokeh Background. Let Dry then adhere to card using Nuvo Deluxe Adhesive.

    Step 4 – Diecut Zig Zag Stitch Border two times using White Cardstock. Adhere to card one on top and one on the bottom using Nuvo Deluxe Adhesive. The white helps to tone down the background.

    Step 5 – Diecut sentiment and adhere to card using Collage Medium.

    Step 6 – For added interest adhere Fuschia Jewels using a Crystal Katana and collage medium.

    This card can be used for any occasion by changing the sentiment and colors. There are many new Zig Zag Stitch Dies in the store in various shapes. To receive 10% off your next order use code: TINA10 at checkout. Below is a link to all products used. Thank you for stopping by and have a wonderful day.

    Products Used:
    https://linkdeli.com/widget.js?1551106829638

    Design Team Projects

    Happy Easter with Chubby Bunnies

    Good morning Kat Scrappiness fans!

    It’s Lisa here on the blog with you today and

    I have a fun shaker card to share with you!

    Easter is right around the corner and Sunny Studios stamps

    has the most adorable stamp set called Chubby Bunny!

    The new Zig Zag dies in the Kat Scrappiness store are the perfect

    dies to show off these cute stamps.

    I used the Rectangle Zig Zag dies to frame my adorable shaker card.

    Have you seen the selection of sequins and sequin mixes available in the

    store? You won’t believe how many there are to choose from!

    For my card I used the Mixed Flower Sprinkles and the Mirrored Star Sequins.

    It’s no secret that I love to make shaker cards and with the

    wide assortment of sequin mixes, I just can’t stop!

    For my card I started by blending Cracked Pistachio and Tumbled Glass

    Distress Oxide inks to make a background for my card.

    I sponged some Tumbled Glass over a stencil at the top and

    some Cracked Pistachio over the bottom.

    The next step was to cut out the panel using the 2 largest

    Rectangle Zig Zag dies.  This gave me a frame and a

    panel for the base of the card that matched.

    I adhered some acetate to the frame and

    added foam tape around the edges. I sprinkled my

    base of the card and then covered them with the acetate

    covered frame.

    I colored the Chubby Bunny, Easter Eggs and 2 little

    Chickies with my Copic markers and popped them up on to the

    front of the card.

    I love how this card turned out and it’s like

    a breath of fresh spring air with the bright colors

    and fun shaker mix.

    Thanks so much for stopping by today and

    if you’d like to pick up any of these fun

    products in the shop, make sure to use

    code Lisa10 to save 10% on your order!

    Have a great day, I already am!

    ?Lisa ?

    Design Team Projects

    Zig Zag Die Cuts by Martha Lucia

    Hello crafty friend, Martha Lucia here with you.

    A few days ago I received the new Zig Zag Die Cuts available since today on Kat Scrappiness Store and I could not resist to show you all of them. I prepare some projects using them but I also made a video to show you all the die cuts and the creations that I will be sharing this month here on our blog. Let me start with the video and then I will show you all the details about some of the cards using the zig zag squares, circles, rectangles, hearts , ovals and borders:

    [youtube https://www.youtube.com/watch?v=SK0zd_6cw5A?rel=0]

    Now that you saw all the Stitched Zig Zag Die Cuts let me share more details about today cards. On these I used the Square Zig Zag with the inlaid technique.

    Zig Zag Die Cuts by Martha Lucia

    Directions:

    1. Cut each stitched zig zag die cut using a different tone of card stock. You can use the same line of color of mix different colors.
    2. Following the sizes of your dies create frames and keep all the negative parts.
    3. Arrange the frames created over a card base. You can work in a vertical or horizontal shape of card. My sample is horizontal.
    4. Paste the large frame on the center of the card and arrange and paste the next pieces inside of this.
    5. Finalize decorating the center with a sentiment.
    6. Personalize.Zig Zag Die Cuts by Martha Lucia

    For my next card I used all the negative parts that I suggested to keep on step 2.

    Zig Zag Die Cuts by Martha Lucia

    Directions:

    1. Arrange all the negative pieces created with the card one over a whisper white card base or cut zig zag squares in different sizes to arrange them over the card base.
    2. Paste the zig zag square using double sided foam tape.
    3. Add some Jewels in between of the white spaces.
    4. Finalize the card adding the sentiment.Zig Zag Die Cuts by Martha Lucia

    I have a third project to share today. It is a shaped card that I made using the Zig Zag Circles.

    Zig Zag Die Cuts by Martha Lucia

    All these day have a stitched border that you can use to enhance your designs. To create this sample I used two different sizes of zig zag cirlces and made the flower with the smaller size.

    Zig Zag Die Cuts by Martha Lucia

    Now I want to share with you, some of the new Sprinkler & Confections additions to the store. They come in different colors and designs that are perfect for this season. Take a look to the options available:

    Zig Zag Die Cuts by Martha Lucia

    On the above photo you can find the Pastel Girl Stars, the Mouse Ears Sprinkles, the 1980’s Star Sprinkles, the Rainbow Wheel Sprinkles, the Mixed Flowers Sprinkles and the Pink Heart Sprinkles.

    Zig Zag Die Cuts by Martha Lucia

    Here the Mixed Fruit Sprinkles, the Black & White hearts, the White Hearts and the Red Hearts.

    Zig Zag Die Cuts by Martha Lucia

    The last photo includes the Black & White Stars, Cupcake Sprinkles and White Sprinkles.

    Thank you for stopping by and I hope you enjoy a lot these new products.

    See you soon!

    Martha Lucia

    Design Team Projects

    Cards Galore with Kat Scrappiness’s New Dies!

    Hey Crafters! Priscilla here again with more card designs using the new Kat ScrappinessCoverplate and Mandala dies. I have six designs to show you today, so let’s get started!

    I made three cards today using the “Medallion Coverplate” die. It’s such a versatile die . . . you can use it as a beautifully die cut background, as a backdrop for a focal point image, or simply as an accent to a card.

    Here’s my first card . . .


    Isn’t  this die gorgeous? I white heat embossed the Neat & Tangled“Floral Wreath”stamp, used the coordinating die, and placed it as the focal point on this card.


    The Kat Scrappiness“Fuschia Jewels” added a finishing touch to this card.


    For my second card, I die cut navy blue card stock with the Coverplate and backed it with another piece of navy card stock that I had die cut with the largest of the Kat Scrappiness “Cross Stitched Rectangle”dies.


    This time I added a Papertrey Inkglobe and some books for a cute “Travel” card.


    For my next card, I again used the “Medallion Coverplate“, but this time as an accent on the top of my card design.


    I die cut a piece of Kraft card stock with the die and mounted it on a layer of deep red card stock. I then used some patterned papers  to overlay 2/3 of the die design. I gold embossed a “Happy Birthday” sentiment on one of the Kat ScrappinessStitched Sentiment Strip” dies, adhered it to the front panel, and finished the card with a scattering of some of Kat’s “Be Mine Valentine” sequin mix.

    My next two cards feature the “Mandala Frame”die. This first one uses a specialty paper from Tonic Studios.


    I love how the Kraft card stock background that peeks through the die cut openings creates such a unique look. I used Kat‘s “Happy Birthday”die to add a sentiment to the front of the card and some of her shop’s “Superhero Star Sprinkles” to finish the card.


    The next card today combines the “Mandala Frame” die with the “Mandala” die as the focal point in the center. This card features my first attempt  at using the new black Yupo Paper and the new alcohol pearl inks, recently released by Tim Holtz.

    I finished this card with some ofKat’s “Sparkling Clear Jewels.


    For my final card, I used the “Star Fusion Coverplate”die, which I used several time to make my Valentine’s Day cards inthis blog post .

    I use these Distress Oxideinks to make the bold striped layer underneath the white “Star Fusion Coverplate“layer. 

    I added a Papertrey Ink globe and suitcases for a bold focal image.


    Well, that’s all for today. See you again soon!

    The supplies I used are listed and linked below.  Please don’t forget to use my coupon code “Priscilla10” for 10% off your order at the shop.

    PRISCILLA


    SUPPLIES


    https://linkdeli.com/widget.js?1551106829638