
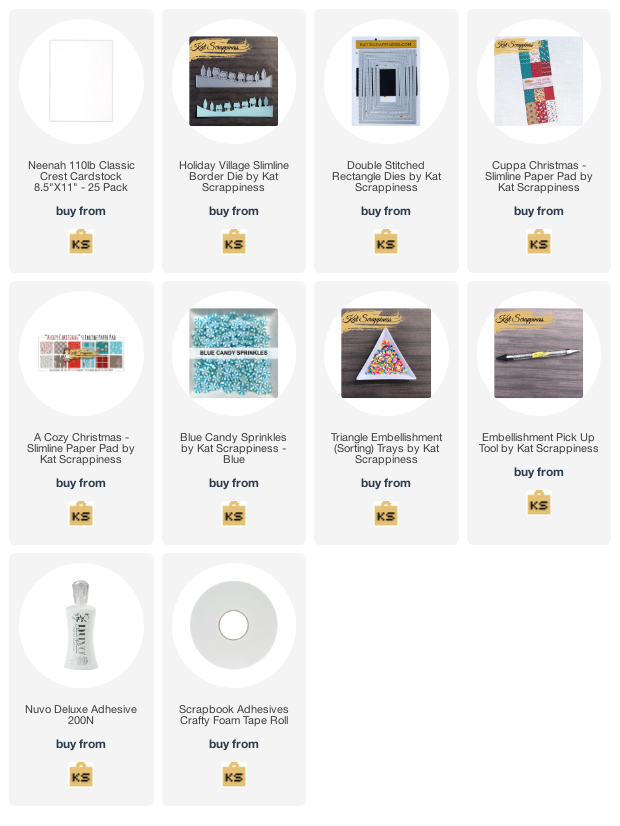
Hi everyone, it’s Tina here. Today I will show you that dies originally intended for Slimline can be used for A2 cards as well as the Kat Scrappiness Slimline Paper Pads. Below you will find the steps to create your own Happy Holidays card.

Step 1 – Trim White Cardstock to 8 1/2” x 5 1/2”, score at 4 1/4” and fold in half for a vertical side fold card. (A2)
Step 2 – Diecut Double Stitched Rectangles using A Cozy Christmas Paper Pad. Adhere to card using Nuvo Deluxe Adhesive.
Step 3 – Diecut Holiday Village using White Cardstock, another 2 using Cuppa Christmas Paper Pad in different colours. Trim off the rooftops and tree tops from the Patterned Paper diecut and adhere to the White Diecut using Nuvo Deluxe Adhesive. Trim the White diecut in half to create 2 layers. Adhere to card using Foam Tape. Add the White doors Diecuts to the back layer.

Step 4 – For added interest randomly adhere Blue Candy Sprinkles using an Embellishment Pick Up Tool and Nuvo Deluxe Adhesive.


This Holiday card didn’t take that long to make and can be mass produced. It could also be changed up using different colours for the rooftops, trees and background so each card can be original. Below is a link to all the products used. Thank you so much for stopping by and Happy Crafting!
Products Used:
https://linkdeli.com/widget.js?id=f5e8378456858c916708

1 Comment
Fab design, the fun coloured houses and trees are so cute.
November 19, 2020 at 8:41 am