Tag: stitched flag dies

  • Oh Snap! Gingerbread Man Down!

    Oh Snap! Gingerbread Man Down!

    Hi Crafty Friends,
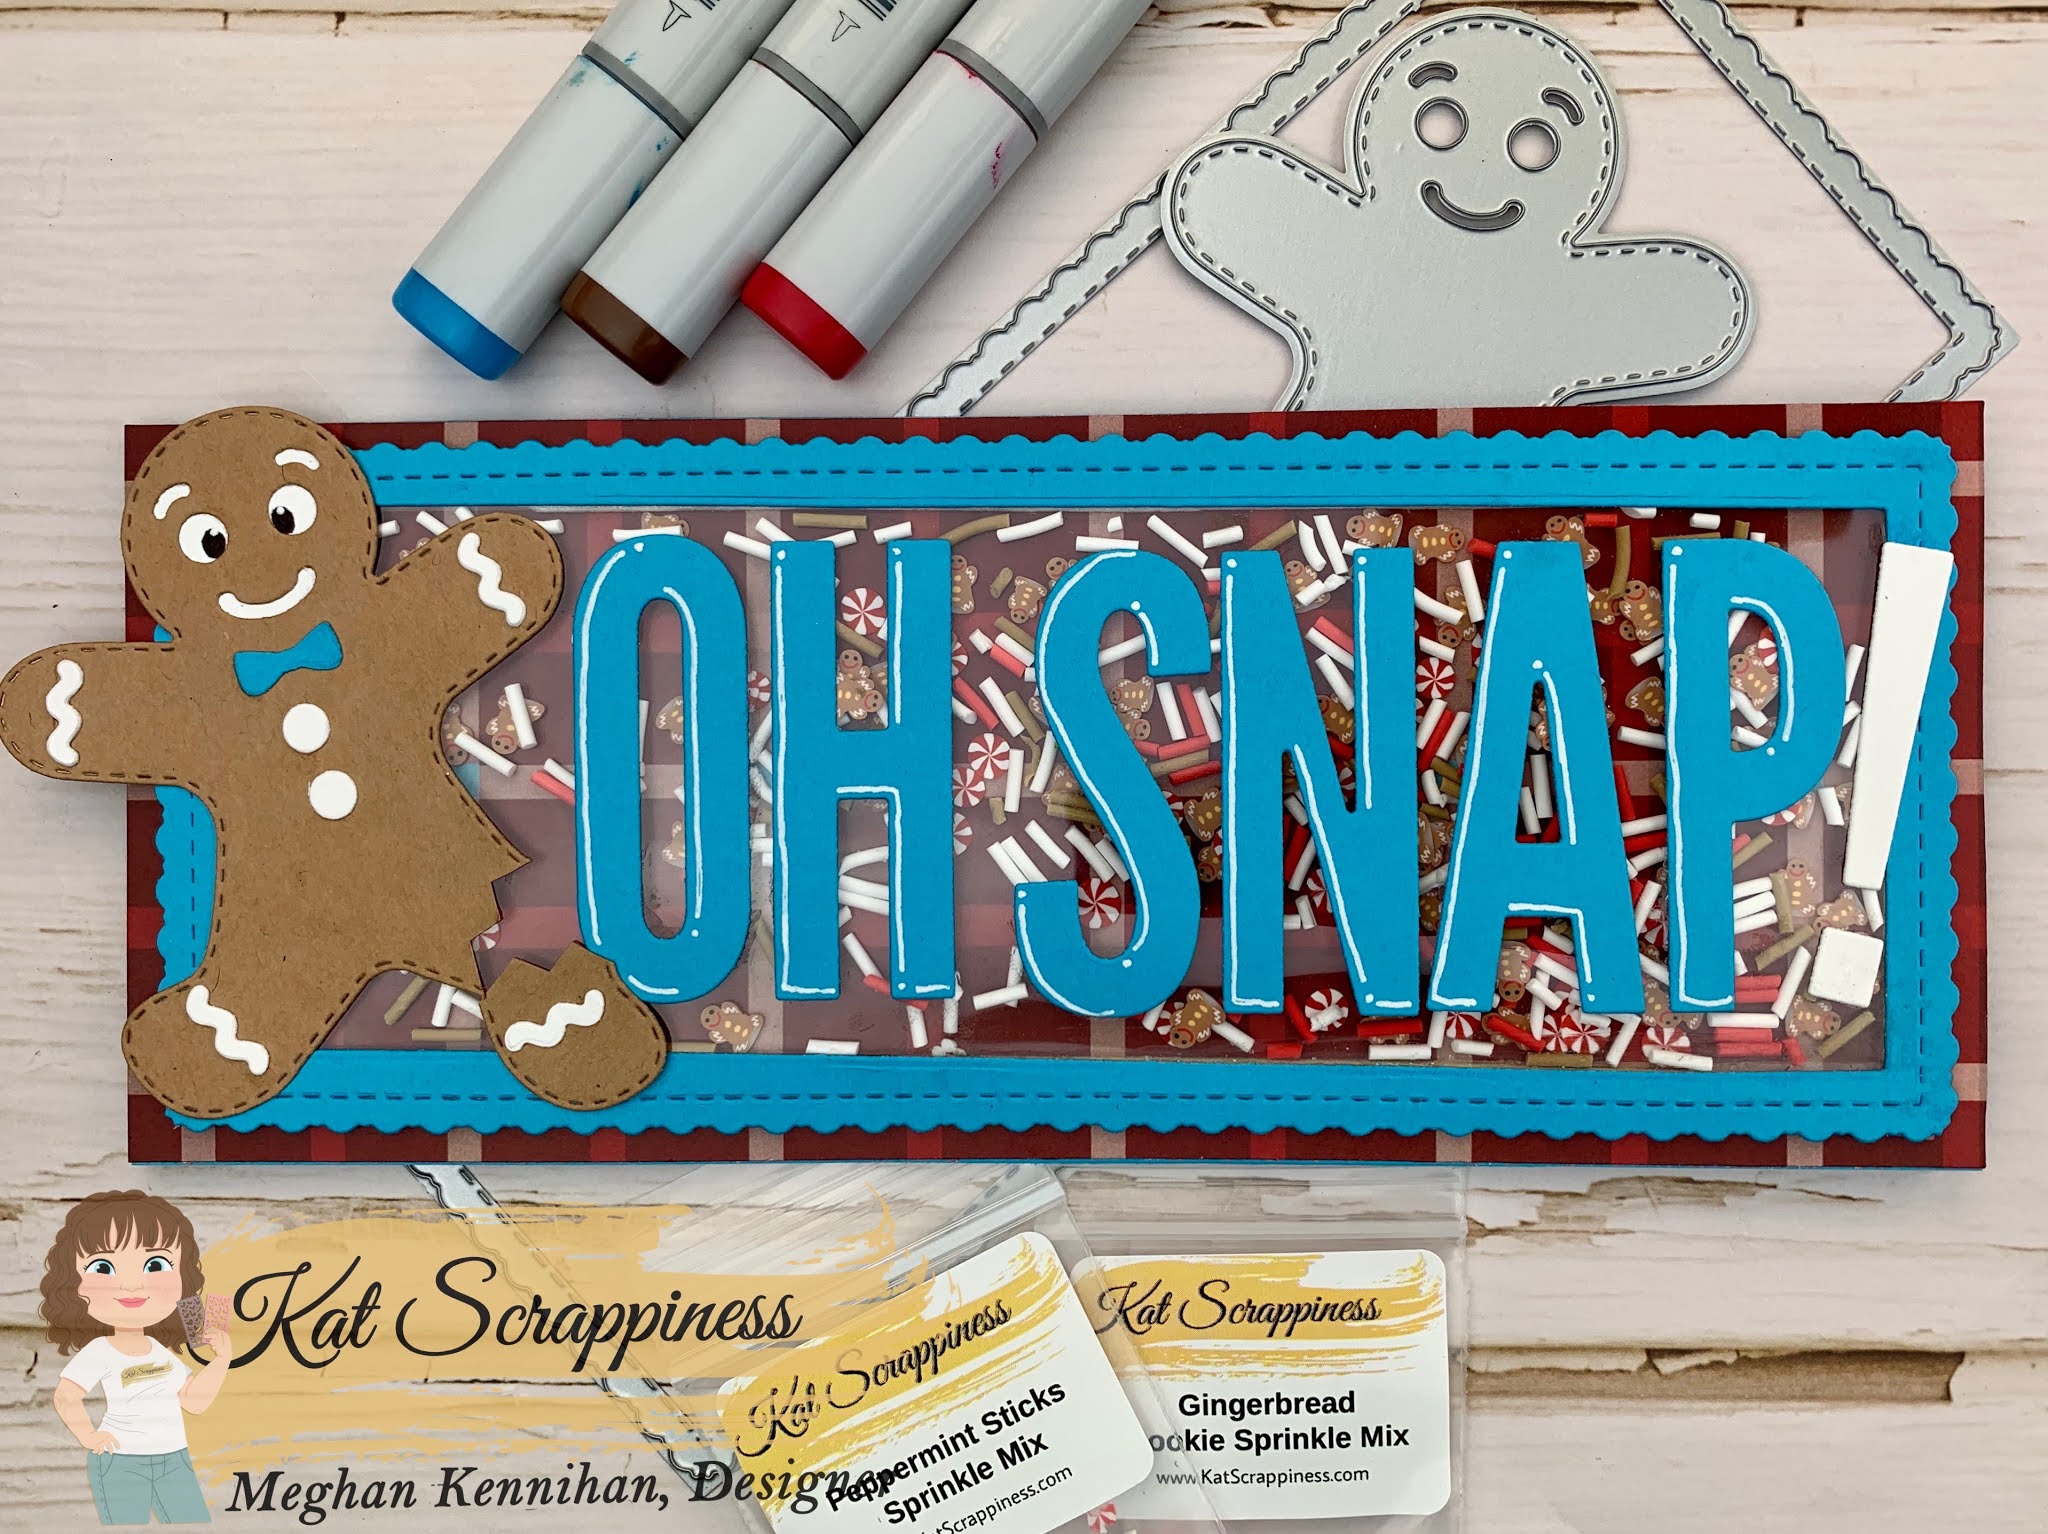
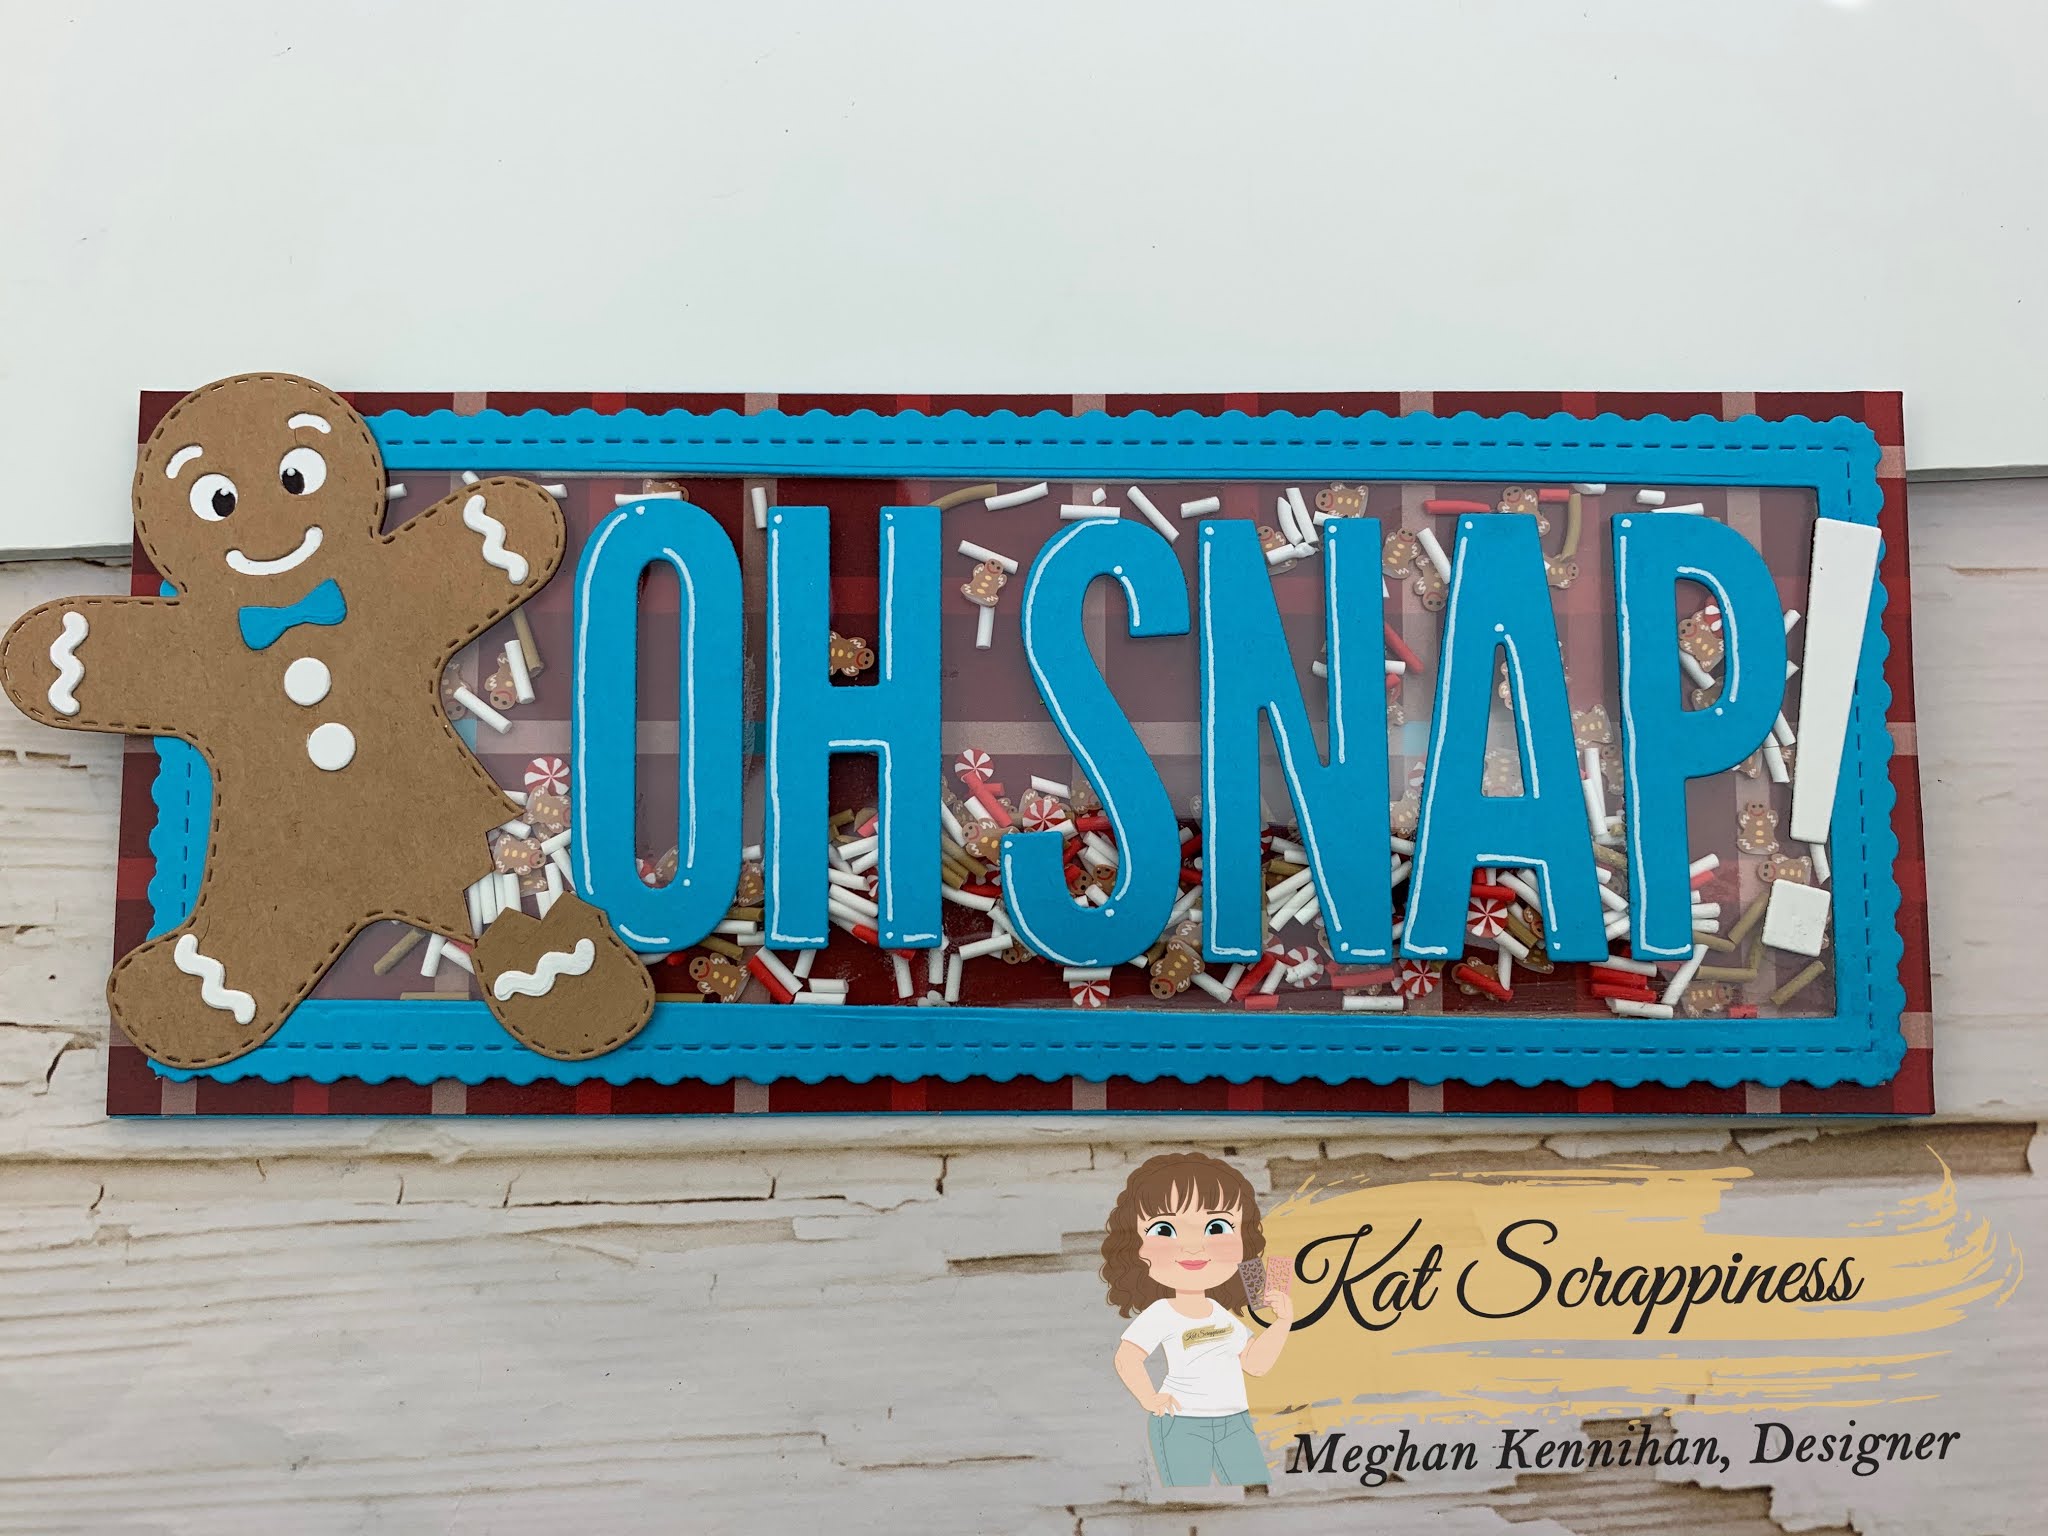
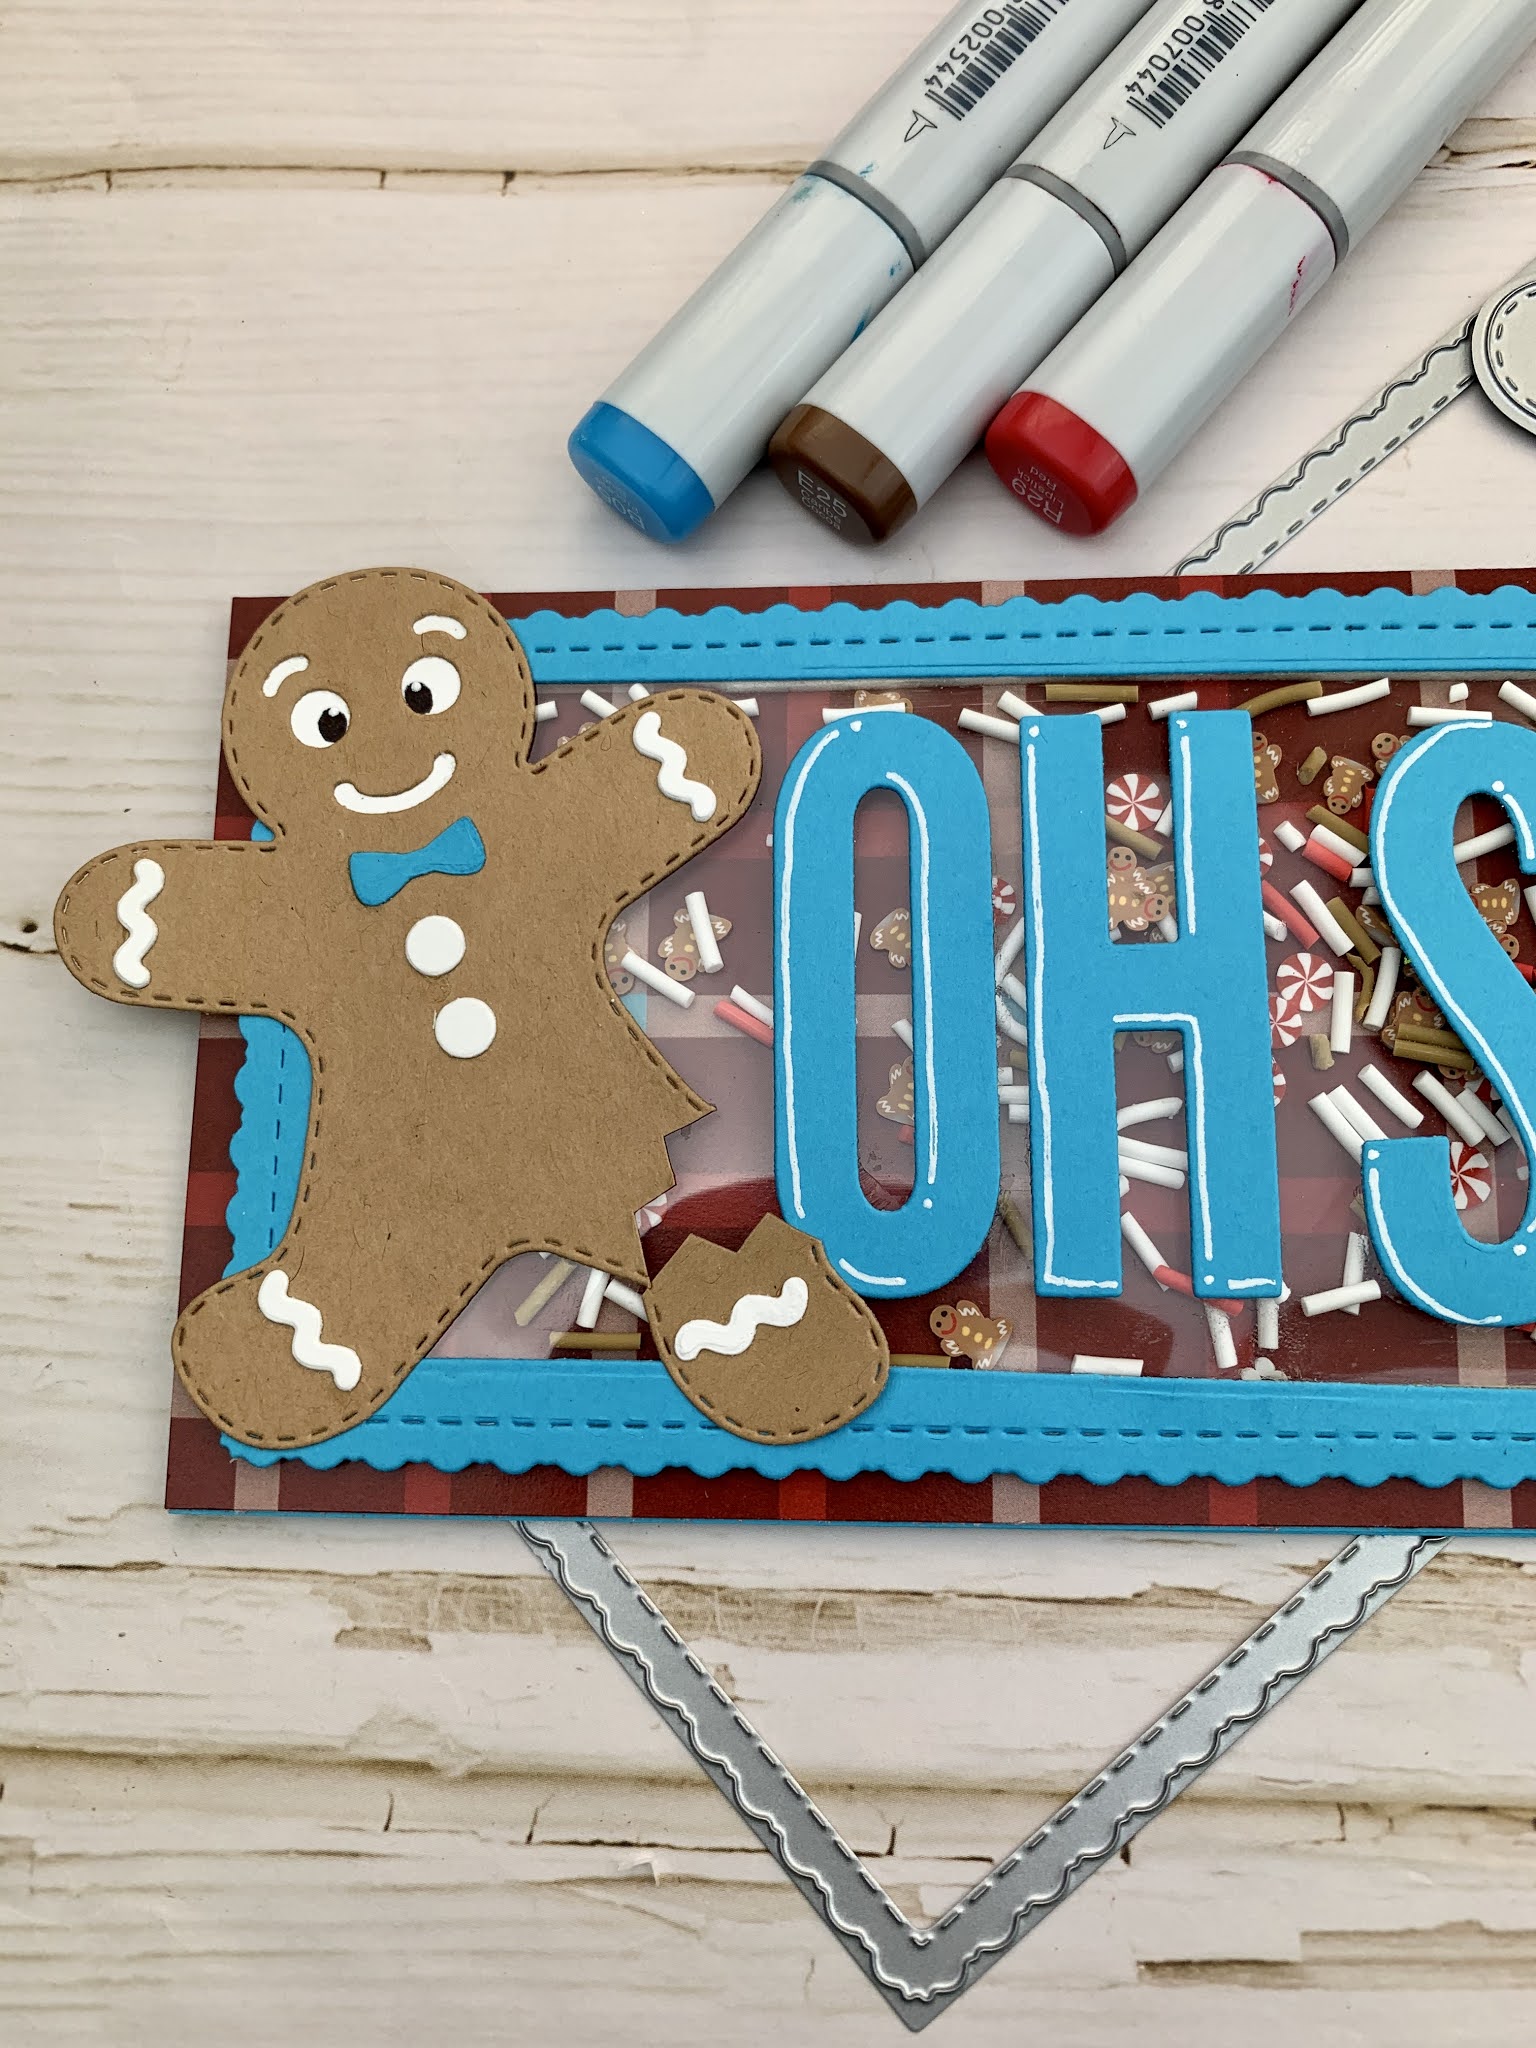
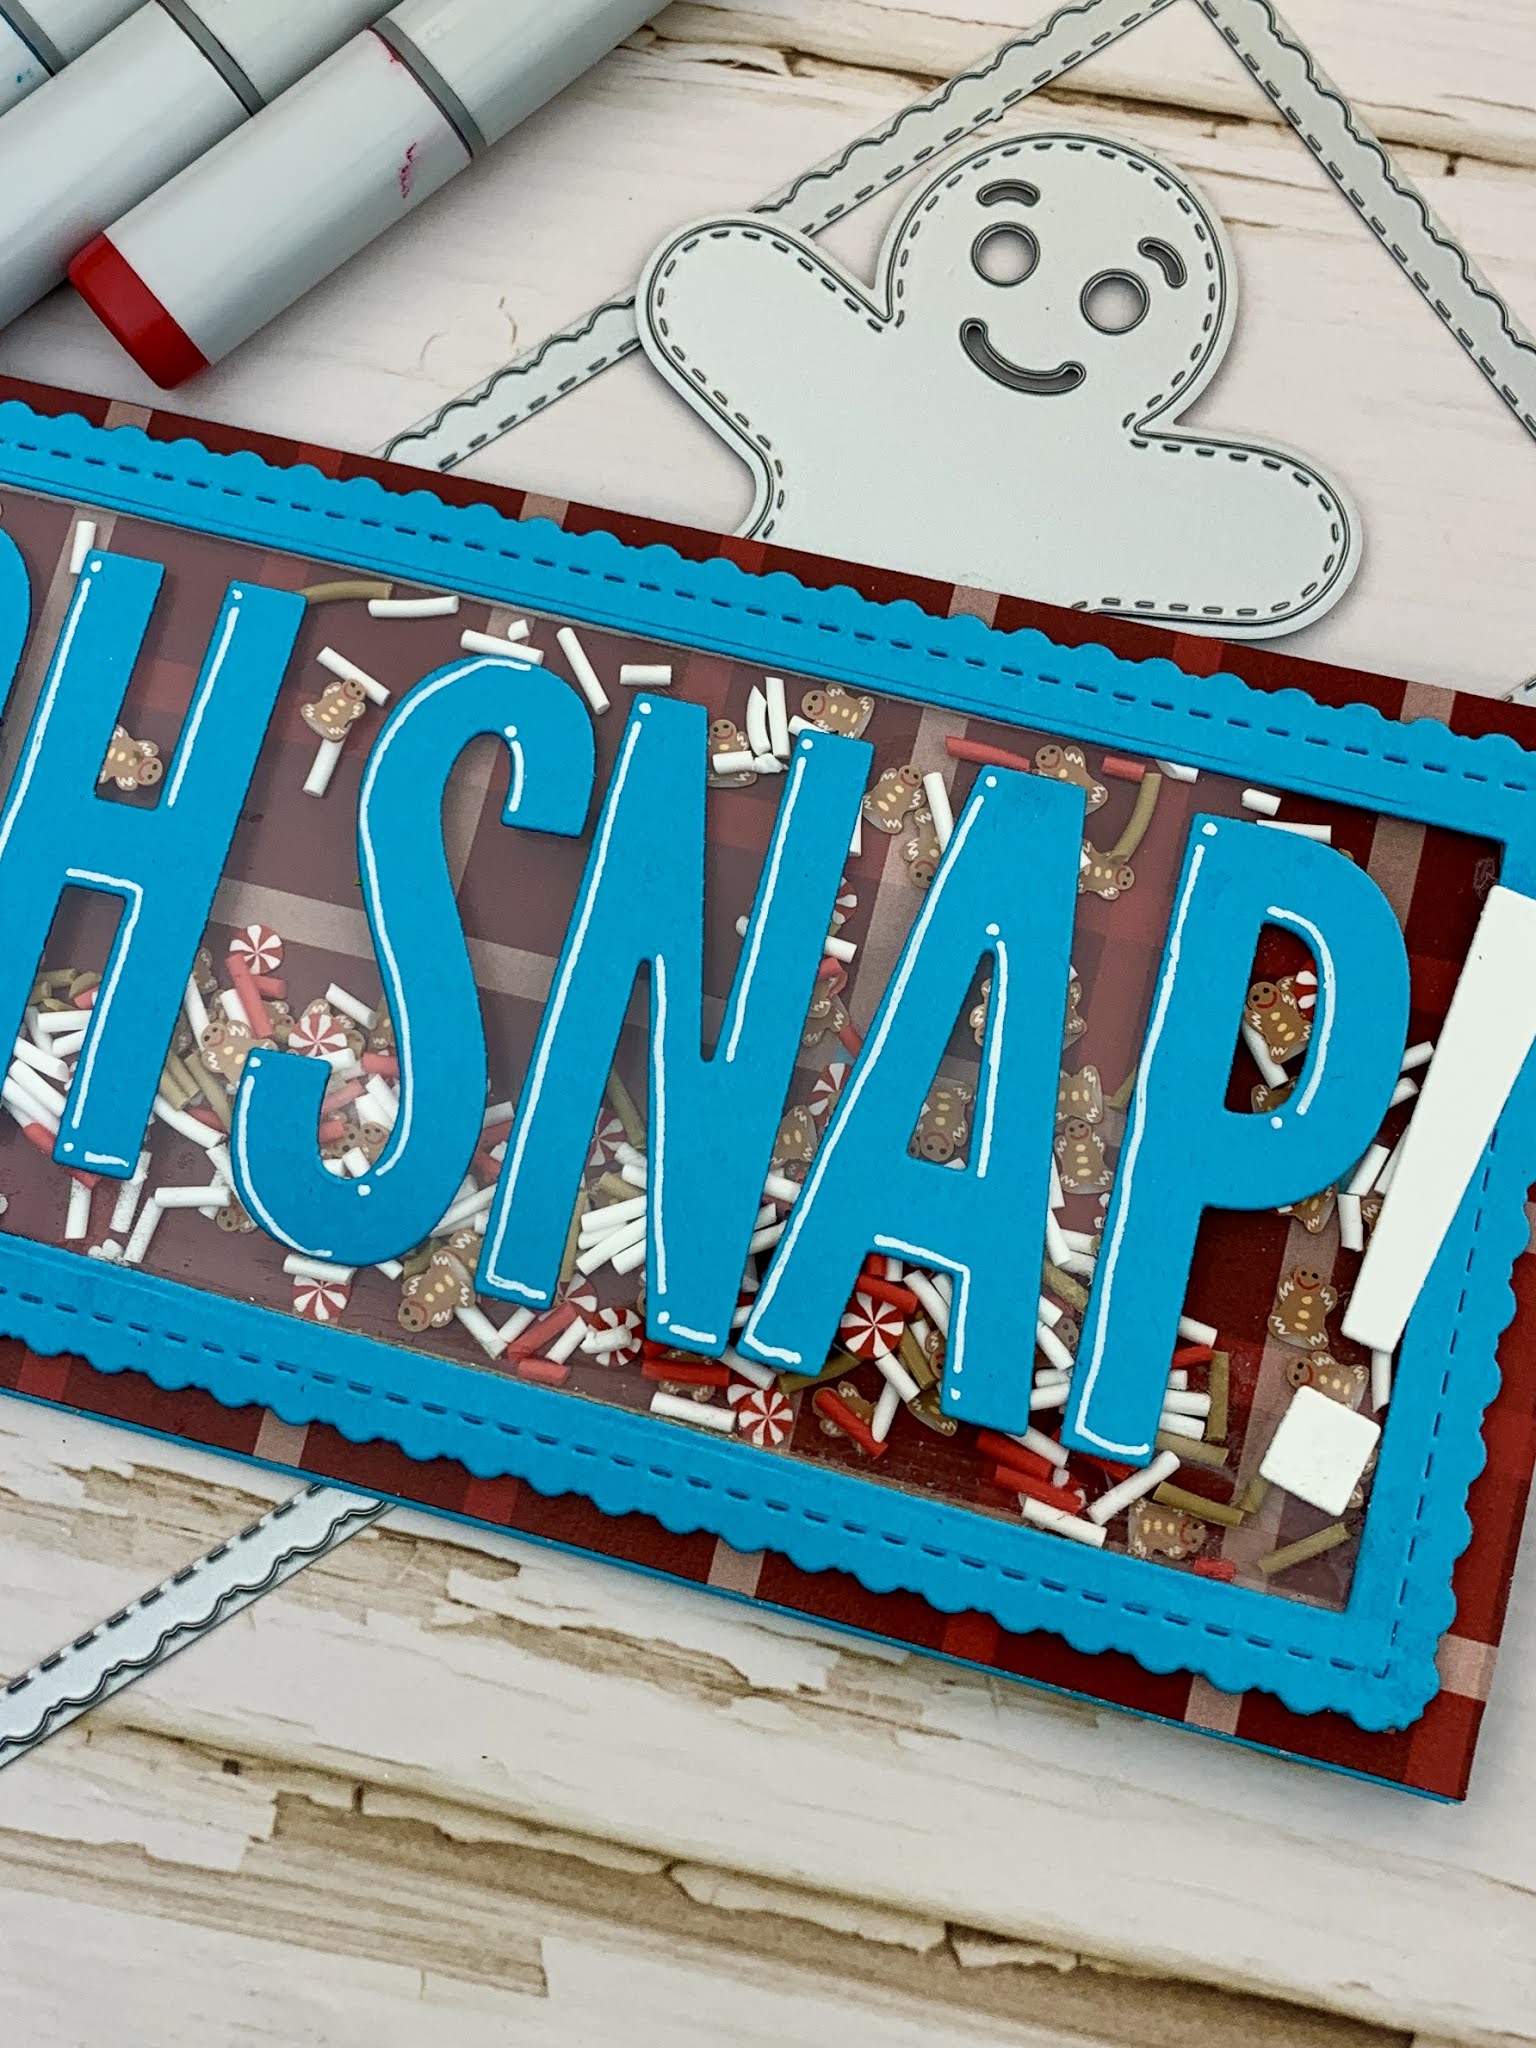
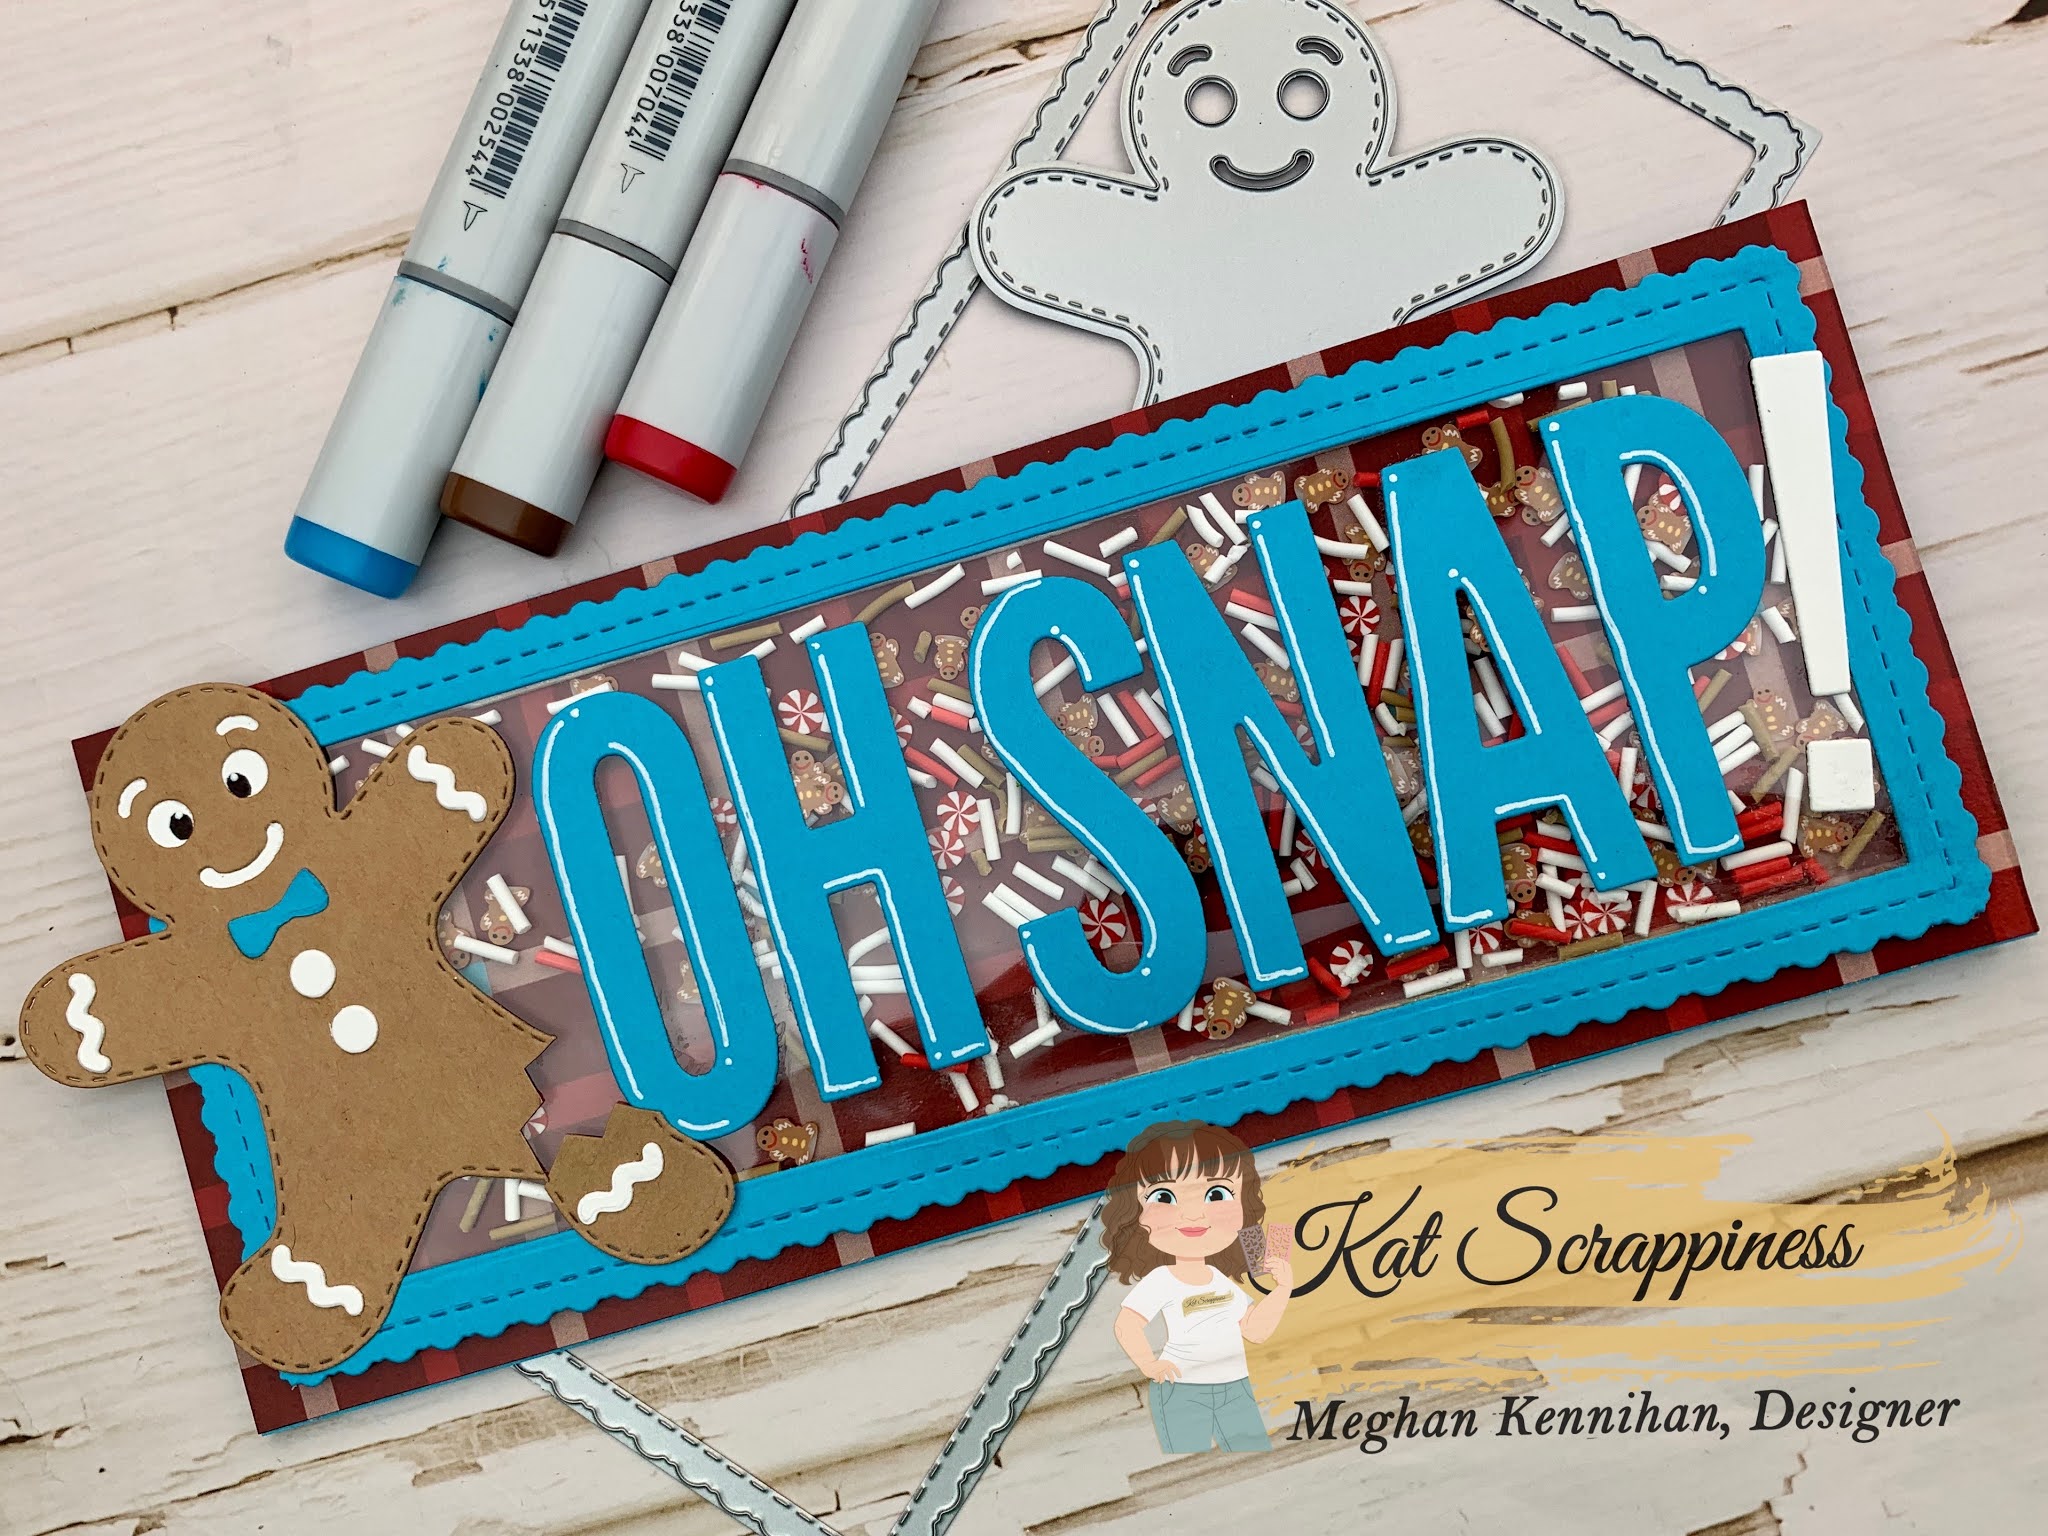
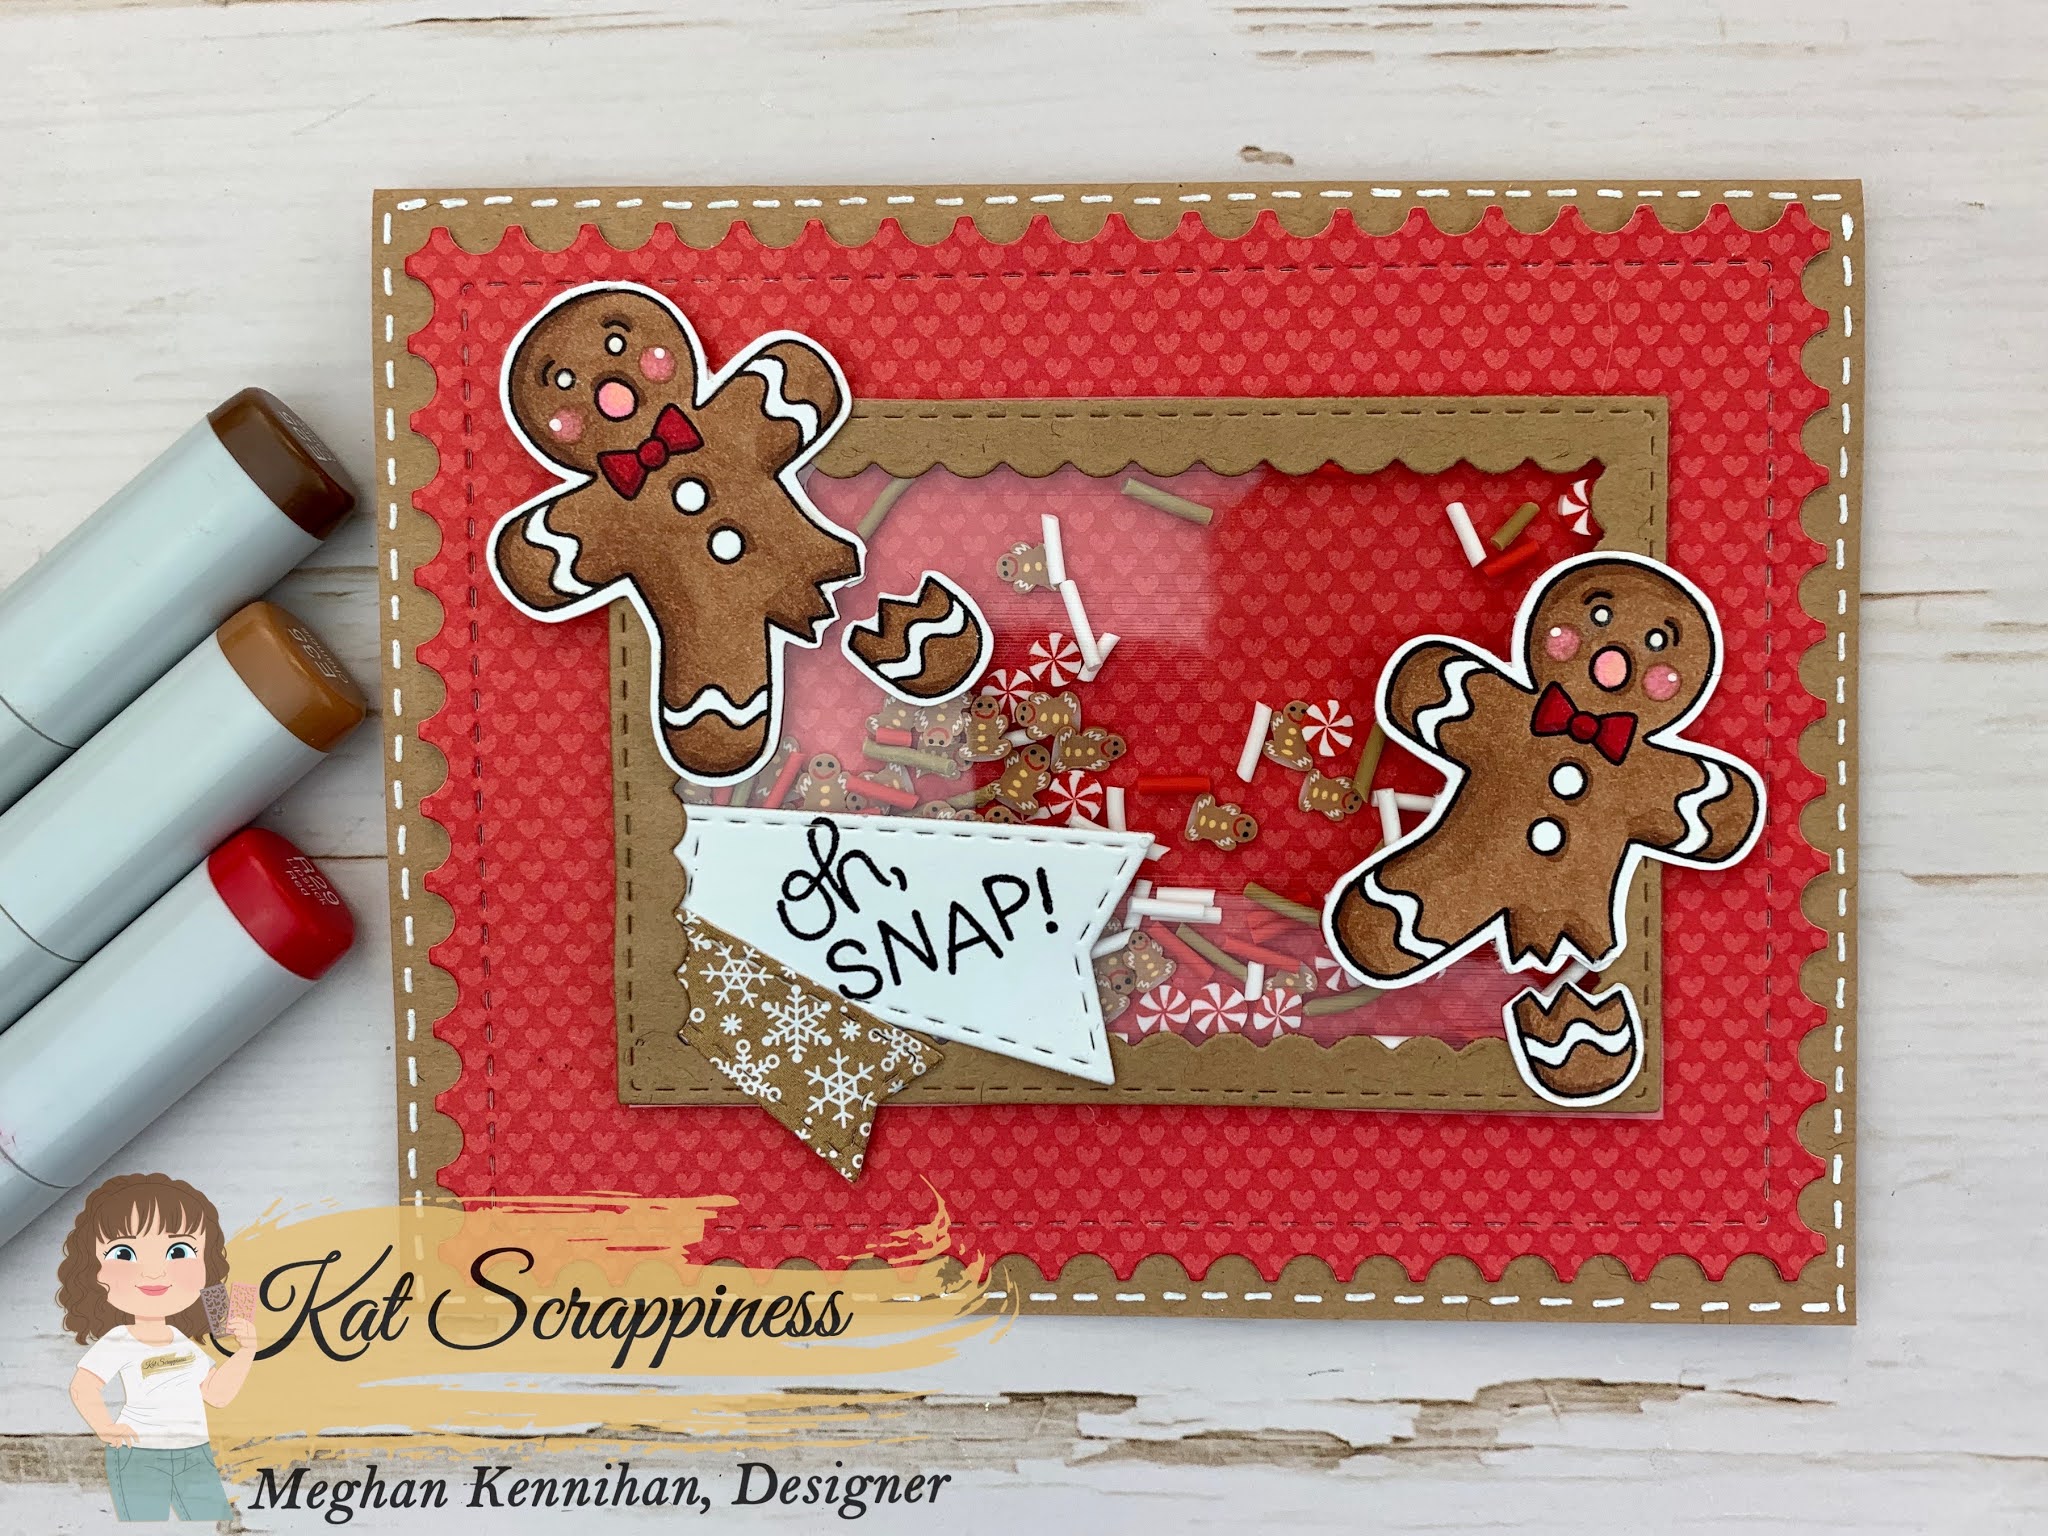
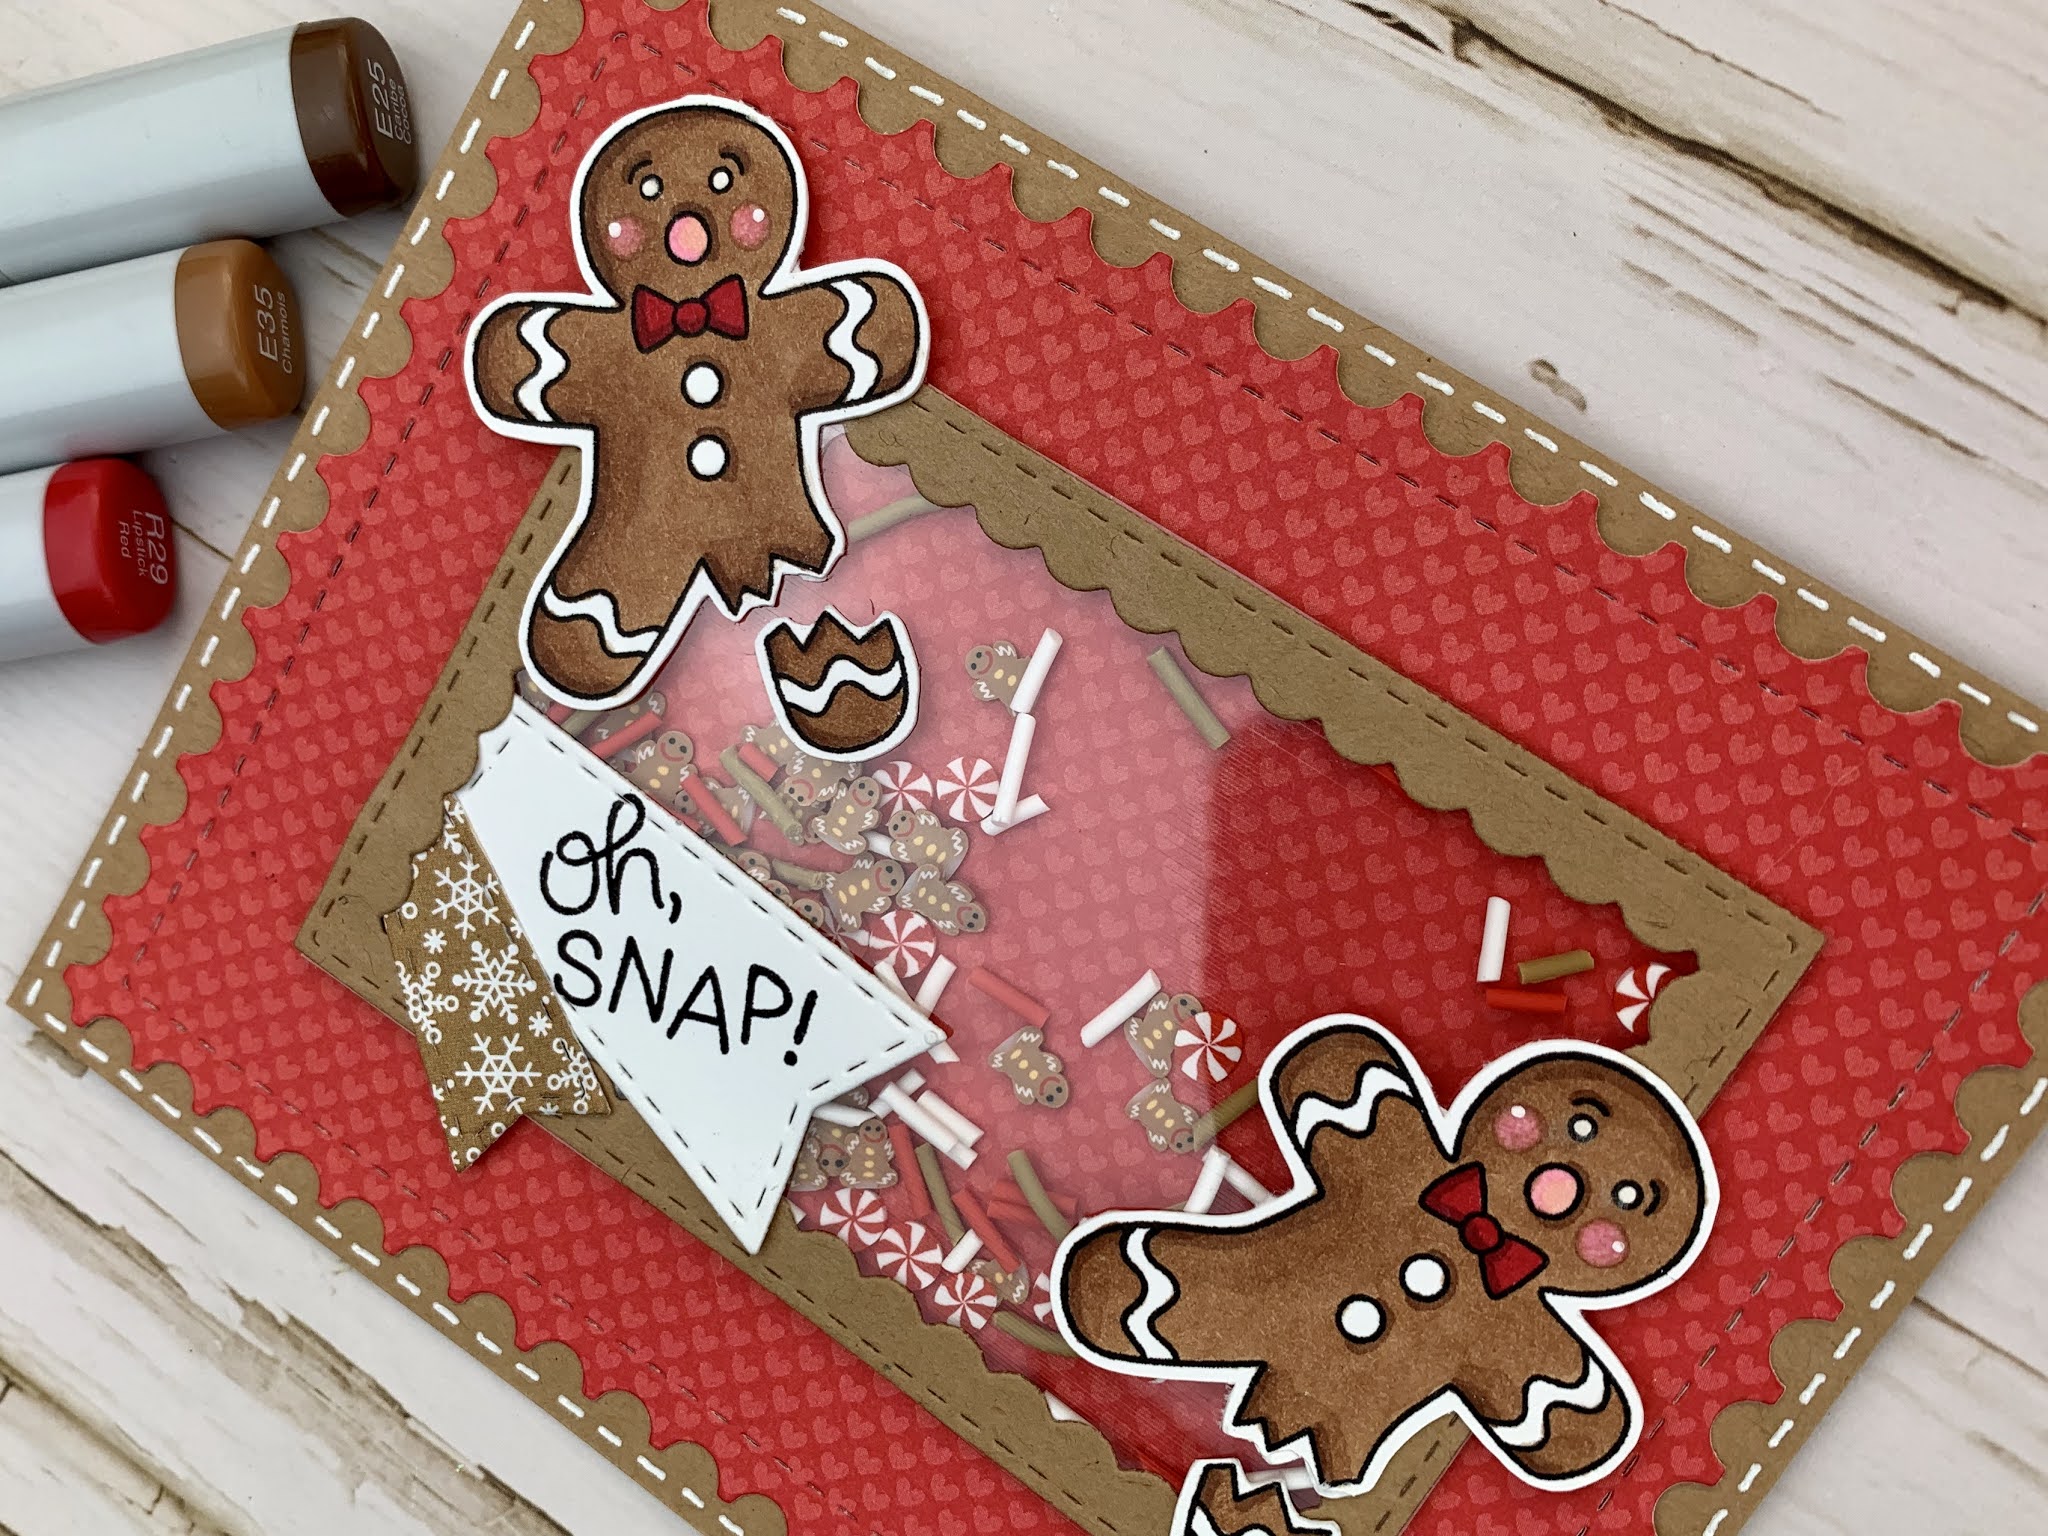
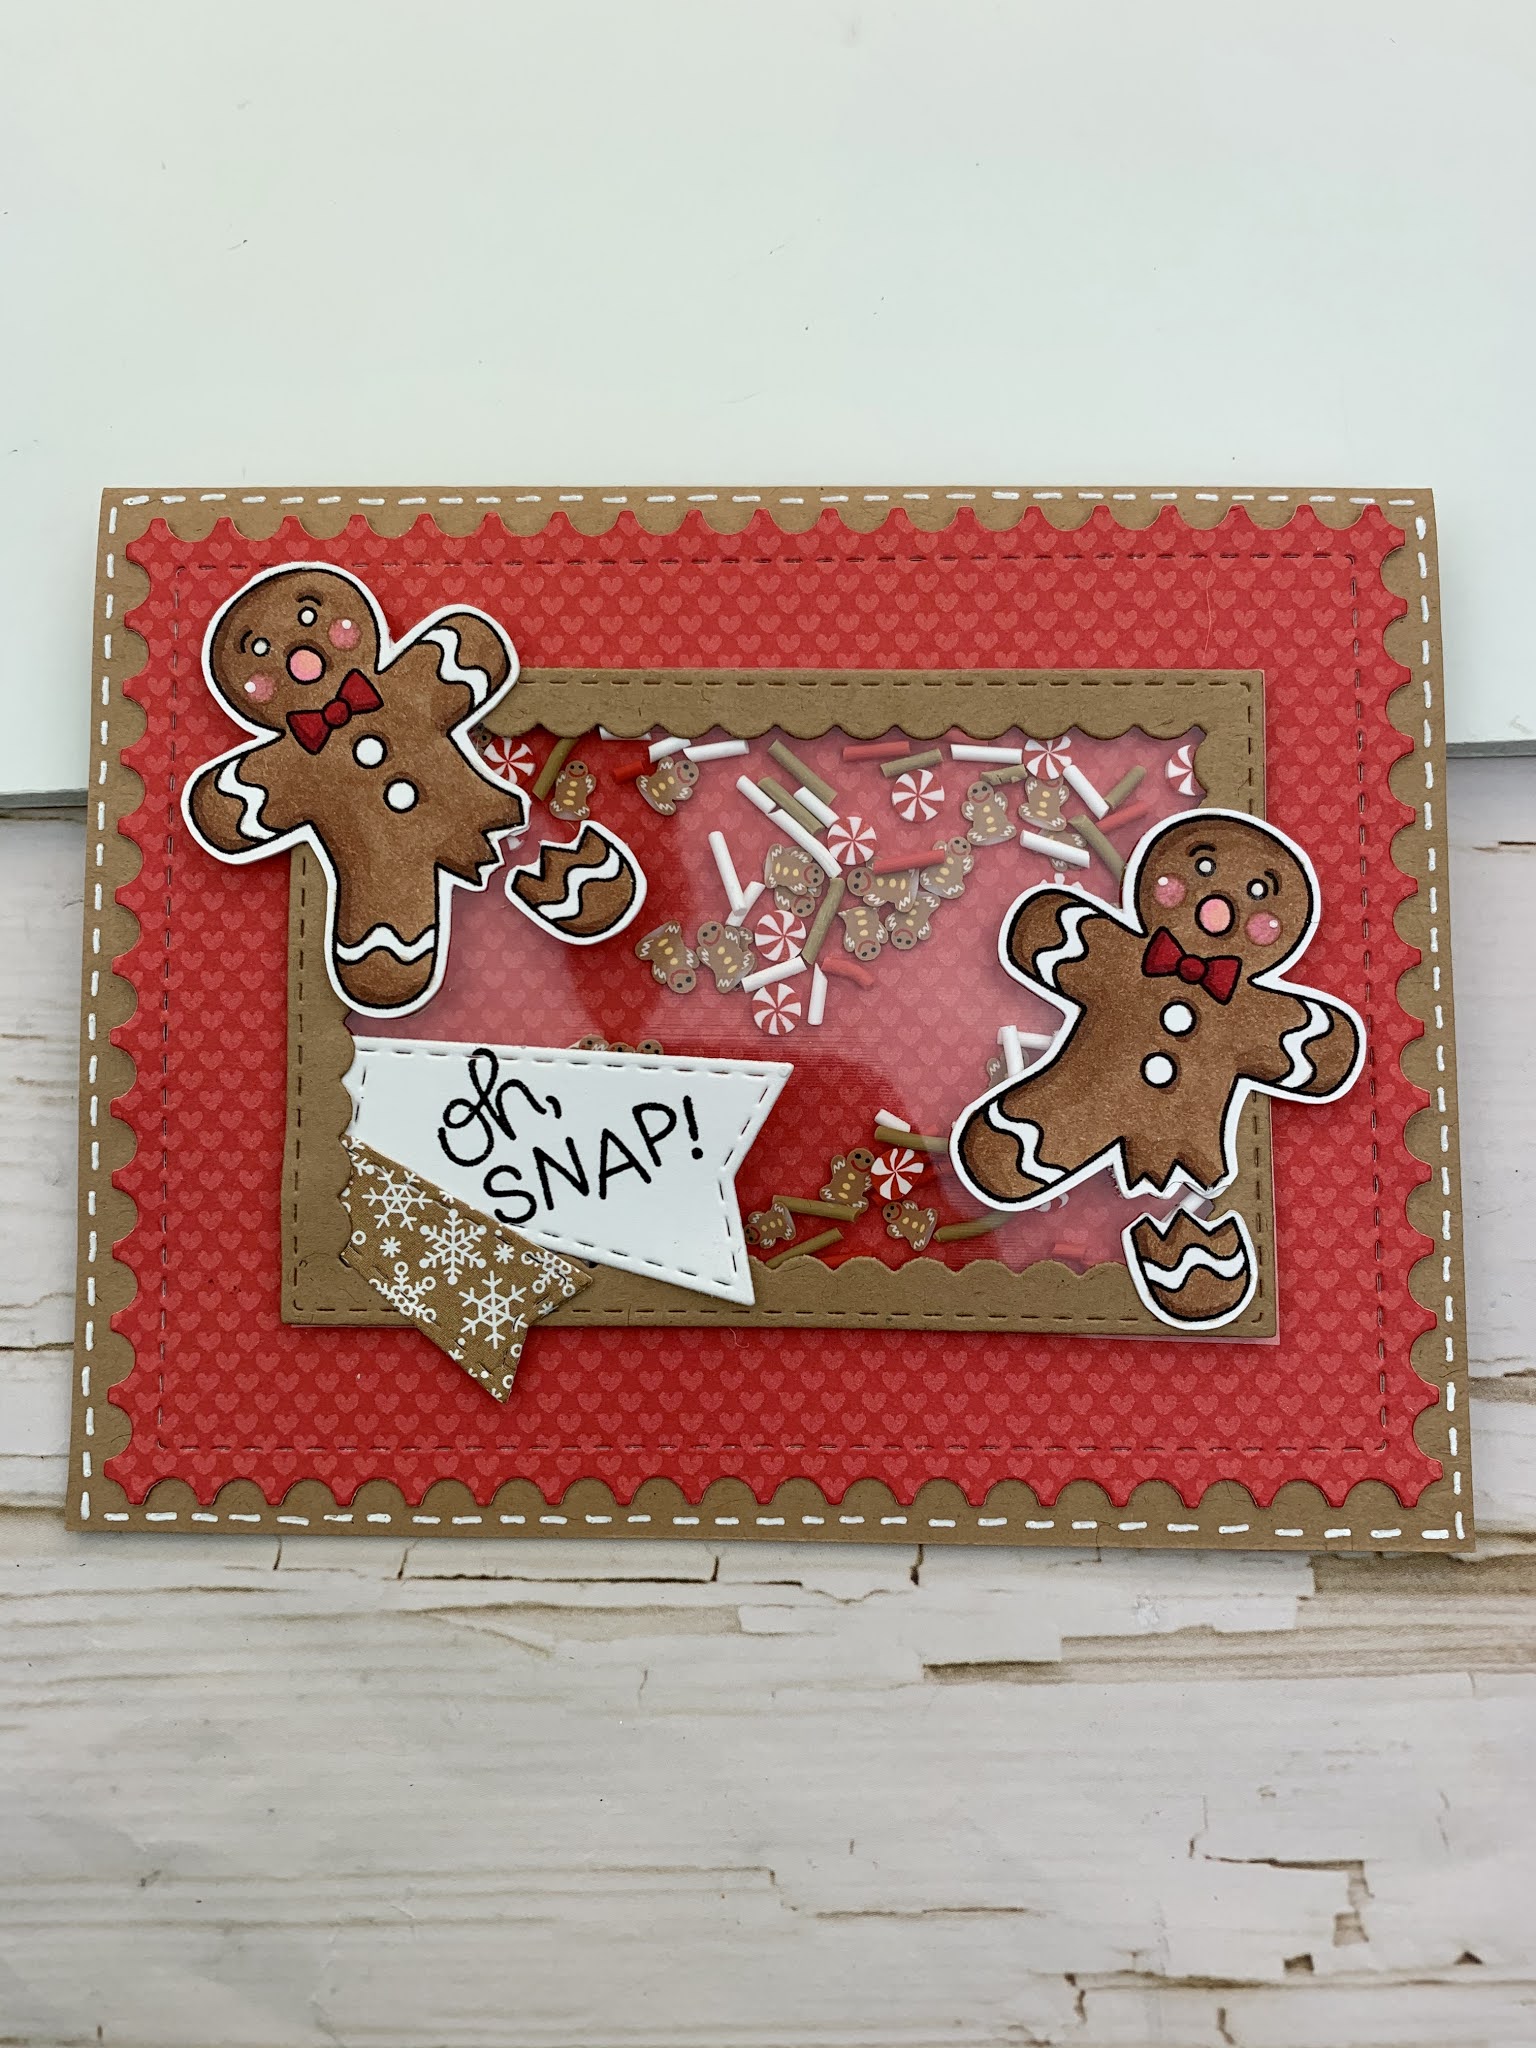
    I have a yummy slimline gingerbread shaker card for you today! I am featuring a ton of  Kat Scrappiness dies, their NEW A Cozy Christmas Slimline Paper Pad, and cute matching Gingerbread Cookie Sprinkle Mix for this card. I used the Fancy Scallop Slimline Nesting Dies to make my frame, Gingerbread Man Die and Uppercase Condensed Alphabet Dies to make my sentiment. Then, I added Kat Scrappiness slimline acetate to the back of my fancy scallop frame and added the Gingerbread Sprinkles to create my shaker piece.

    Make Crafty Friends Q & A:
    Q: Do you like Gingerbread cookies?
    A: Me? Yes, they are my favorite Christmas cookie.

    Supplies:
    Kat Scrappiness Gingerbread Cookie Sprinkle Mix
    Kat Scrappiness Peppermint Sticks Sprinkle Mix
    Kat Scrappiness Fancy Scallop Slimline Nesting Dies
    Kat Scrappiness Design A Gingerbreadman Die
    Kat Scrappiness A Cozy Christmas Slimline Paper Pad
    Kat Scrappiness Uppercase Condensed Alphabet Dies
    Kat Scrappiness Slimline Acetate

    BONUS CARD:

    Supplies:
    Kat Scrappiness Postage Stamp Rectangle Dies
    Kat Scrappiness Stitched Flag Banner Dies
    Kat Scrappiness Gingerbread Cookie Sprinkle Mix
    Kat Scrappiness Peppermint Sticks Sprinkle Mix

    Don’t forget to subscribe, follow, and comment on my blog for your chance to win my November Prize and for more giveaways and inspiration follow me on Instagram @MadeByMeghanK

  • Kat Scrappiness September Card Challenge: Sequins & Sprinkles + August Winners & LABOR DAY SALE

    Kat Scrappiness September Card Challenge: Sequins & Sprinkles + August Winners & LABOR DAY SALE

    Hi Crafty Friends,

    It’s time for a NEW Challenge at Kat Scrappiness. We have released soooo many AMAZING sequin blends and sprinkles in the past few months that I want to see what you are doing with them! We also have our very own 4 1/4″ x 5 1/2″ acetate sheets now too!

    This month’s challenge is going to be SEQUINS & SPRINKLES! You can make a shaker card, you can glue them to your creation as accents, whatever you would like! Just make the sequins and sprinkles the focus of your project/card! And there is a LABOR DAY SALE GOING ON NOW! 15% off SITEWIDE! Use this link and type in LD2019!

    Thank you so much for entering last month’s challenge Back to School! We loved seeing your darling school cards!

    And NOW the WINNERS!

    The Winners of the Back to School Challenge for August are

    Becca Yahrling- Random.org Pick and winner of $15.00 gift certificate to Kat Scrappiness

    and

    Esther -The Design Team’s Top Pick (grab your badge below) and winner of 6 pack of sequins, jewels, and/or sprinkles

    Congratulations! Thank you for sharing your projects with us!

    ** PLEASE email winners@katscrappiness.com to claim your prize**

    I wanted to get you inspired for the SEPTEMBER CHALLENGE:  SEQUINS & SPRINKLES with this fun candy card using Sweet Candy Sprinkles and 3mm Clear Confetti Dots!


    I started my card by creating the candy pieces using a Kat Scrappiness Stitched Circle Die and cutting out three circles.


    Next, I added my Kat Scrappiness Acetate sheet to the back of the panel and added foam tape around each circles so that they would each be their own shaker.


     I die cut the little wrappers using the Kat Scrappiness Stitched Flag Dies in two sizes using pink and white vellum.


     I added my sprinkles and sequins to the centers and put my panel on my base. Then I glued the little flag dies on the edges of the candy pieces to look just like wrappers.


     I finished my card by stamping the sentiments on my panel and drawing the smiley faces on my candy!


    Supplies Used: 

    I can’t wait to see what you create! Let’s make this month the most entries EVER!

    Prizes: $15 Gift Certificate to Kat Scrappiness and TOP PICK wins a Sequin, Jewel, and/or Sprinkles Prize Pack

    While you do not “HAVE” to use our products, we would LOVE to see how you use our stamps and/or dies in your projects!

    Rules:

    1) Follow the theme

    2) You must link back to our Challenge in your Entry

    3) No Backlinking, projects must be NEW

    We will randomly pick the winner of the G.C at the end of the month and CHOOSE the DT TOP PICK OF THE MONTH who will get this badge to proudly display on their blog and a prize pack!

    Enter Below:

    You are invited to the Inlinkz link party!

    Click here to enter

    https://fresh.inlinkz.com/js/widget/load.js?id=d1626941e732cbb79b50


  • You Make Me Jump For Joy and I Love ‘Roo cards by Maria

    You Make Me Jump For Joy and I Love ‘Roo cards by Maria

    Hello Kat Scrappiness fans! Maria Russell here on the blog with you today sharing two cards, showcasing A LOT of products available at the shop.


    Before I start with the post, I just want you guys to know that there is a 20% site-wide sale going on and you can use the coupon code mentioned below.  Take advantage of this sale and get your favorite products while you can:


    For my project today, I am showcasing the Hoppy For you stamp set, along with the Yellow Star Sprinkles, Pink Flower Sprinkles, Wood Grain Frame Die, Stitched Cloud Backdrop die and the Mandala Frame die.


    I started out by stamping the images on Spectrum Noir Ulta Smooth Premium White card stock using Spectrum Noir Finesse Alcohol-Proof Black ink.  I colored the images in with my Spectrum Noir TriBlend alcohol markers.  I die-cut the images using my Scan N Cut machine.


    I adhered some Pink Flower Sprinkles on the mommy Kangaroo and layered the baby kangaroo inside the mommy’s pouch with liquid and foam adhesive.


    The A2 size panel was die-cut using the Stitched Cloud Backdrop die and ink blended with Bubblegum, Soft Lilac and Butter Ink using some blending brushes and my Clouds stencil die.  I know you can hardly see the clouds because of the shaker elements but It’s important to me to have all those details in creating my card.  I also die-cut the frame using the Wood Grain Frame Die.


    I adhered some acetate sheet and foam adhesive on the Wood Gran Frame Die and added the Yellow Star Sprinkles with Fairy Dust confetti mix for my shaker element.


    I die-cut some black card stock using the Stitched Flag die and stamped the sentiment with Versamark ink.  I sprinkled white embossing powder and heat-set this with my heating tool.  I finished my design by adhering the kangaroo on the front panel.  Here’s my card:


    I always LOVE making shaker cards and with the new sprinkles and sequin mixes available at the shop, it’s hard not to make them all the time.  They are super fun to make!  Here’s a closer look:


    For my next card, I also used the Mandala Frame die and created a very simple, white-on white card.  The “wreath” was die-cut using a die from Hero Arts that I bought from Kat Scrappiness years ago.  I layered the flowers I colored earlier with liquid and foam adhesive.


    To finish my design, I used my white gel pen to add some interest and texture on the flowers.  Here’s a closer look:


    I hope you got inspired today.  The supplies I used are listed and linked below.  Have an amazing day and happy crafting!


    ———-SUPPLIES———-


  • Happy Birthday Card by Maria

    Happy Birthday Card by Maria

    Do you ever run out of birthday cards?  I do!  I make them a lot but I always seem to run out of these cards, right when I need it the most.  This gave me the motivation to make some birthday cards today.

    I am showcasing a lot of products from Kat Scrappiness.   I used the new Stitched Scalloped Rectangle Dies, the Woodgrain Frame Diamond Wire Background Die, the Photo Booth 4 x 8 Clear Stamps by Your Next Stamp, the Photo Booth Polaroid die, the Stitched Flag Diesand the Everyday Brush Stroke stamp set by Kat Scrappiness.

    I started out by die-cutting the polaroid with some white card stock.  I stamped the images on the inside of the polaroid, and colored them in with my Copic markers.  I die-cut another piece of white card stock using the Stitched Scallop Rectangle Dies.

    IMG_8458

    To create my own patterned paper, I used the Everyday Brush Stroke stamp set to stamp the images on my card panel.

    IMG_8459

    I picked up the die-cuts and I temporarily placed them on top of my stamping tool so I can figure out the placement for the stamp images, as well as the polaroids.

    IMG_8460

    I die-cut the smallest of the Tag Banner Dies with the Lawn Fawn Gotta Have Gingham 6×6 patterned paper in different colors.  I assembled the card my adhering the polaroids on top of the stamped background.  I added the tag banner dies behind one of the photos.    I stamped the sentiment “Happy Birthday” from the Everyday Brush Stroke stamp set.

    IMG_8461

    To finish my design, I added some black dots to the background to fill in some empty spaces.

    KatScrapPhotoselfie1B

    Aren’t those images so adorable?  I also love the colorful tag banner dies behind the photo.  It made it look really festive!

    KatScrapPhotoselfie1B

    I really love how these cards turned out.  It took me about half an hour to make one card so it wasn’t too bad.  I will be mass-producing these cards so I can have them on hand.

    KatScrapPhotoselfie1


    Plus here’s another “just-because” card featuring  the new Woodgrain Frame Diamond Wire Background Die.  I did an inlaid background technique with the new die


    I inserted a heart-shaped paper clip and also included a push-pin sticker to make it look like a bulletin board.


    I hope you like my projects today and got inspired.  Please visit www.katscrappiness.com to order the supplies I used.  Don’t forget to use my coupon code “MARIA10” for 10% off your order.  The supplies I used are listed and linked below.  Have a wonderful day!

    —————–SUPPLIES—————-


    https://linkdeli.com/widget.js?1528877046279

  • Happy Father’s Day Shaker Card

    Hello crafty friends!! It is Design Team Member Jana stopping by today to share a tutorial on how I have created this fun shaker card for Father’s Day using lots of amazing products from Kat Scrappiness.

    How super fun does this card look ?!?! I am very happy with how it has turned out and can’t wait to send it off for Father’s Day! So without any further delay, let’s get to it…..

    To begin, I die cut a piece of card stock (which will be used as my shaker base) as well as a piece of acetate using the largest sized scalloped circle die from the newly released Stitched Scalloped Circle Dies by Kat Scrappiness. This die set is awesome and comes with a total of 7 different sized dies.

    I knew that I wanted to create a shaker and I wanted to created a frame for my shaker. In order to do this, I used a simple Sizzix Circle die which fit perfectly inside the largest scalloped circle die which was used in the previous step. I used Removable Purple Tape to help hold my dies in place as I die cut several pieces (8 to be exact) of card stock which will later help me to form the frame of my shaker element.

    Continuing with my die cutting, I used the Happy Father’s Day Die by Kat Scrappiness to cut out my cards sentiment. I used the negative left over card stock from my previous die cutting as to not waste any paper.

    In order to create my shaker element, I began to glue my previously cut frames together, perfectly on top of each other, making sure that all of the scalloped edges lined up. I used Nuvo Deluxe Adhesive and glued seven of the eight frames together. I use this method of creating a shaker quite a bit. As you can see from the picture above, the combined layers of card stock help to create a deep enough space between the base of the shaker and the top layer of acetate to allow the sequins or shaker filler to move around freely. This method also allows you to save your foam adhesive dots and will also help to allow your sequins to move freely, rather than allowing the possibility of the sequins becoming stuck to the adhesive foam on the sides.

    The next step was to take the layered frame which I had glued together in the previous step and adhere the acetate on top. Again, I used a thin strip of Nuvo  Deluxe Adhesive on the top of my frame and placed the acetate on top, making sure that my scalloped edges were matched up. Once the acetate was in place, I then took my last piece of frame (remember, I had cut out 8 originally, glued 7 of them together and saved the last one to go over the top of the acetate as a finishing piece).

    While my acetate frame was set off to the side to dry, I adhered my “Happy Father’s Day” die cut sentiment on to the first scalloped circle card stock that was die cut (my shaker base). I decided that I wanted to use the Madison Avenue Sequin Mix as my filler for my shaker. I adhered a few of these sequins randomly on my shaker base (as seen above).

    While I was allowing my shaker base and frame to continue drying, I die cut several tags using the Stitched Flag Dies by Kat Scrappiness.

    Once my shaker elements were completely dried, I added more of the Madison Avenue Sequins to the center of the shaker element. I added a small strip of Nuvo Deluxe Adhesive around the outer edge and then carefully lined up the scalloped edges of the acetate frame with the shaker base and applied them together to complete my shaker.

    While I let my completed shaker portion dry, I began to play around with the stitched flags that I had die cut and adhered them together, making sure to overlap them so that all of the card stock used could be seen. I arranged them in a pattern I was happy with then adhered my shaker element over the top of the flags, which as you can see has created a nice Father’s Day award ribbon.

    Because the entire finished piece measures approximately 5″ x 8″, I created an A9 card base which measures about 5-1/2″ x 8-1/2″, using 110lb. Ivory Card Stock. I cut a piece of gray card stock about 1/8″ smaller than my card base and applied it as my mat. I adhered my completed shaker award ribbon to the center on my card and for a simple finishing touch, I added some matte enamel dots I had in my stash on the top left and bottom right corners.

    I hope that I have helped to inspire you to create your own shaker card and if so, I can’t wait for you to share it with us all. You may find a complete list with all of the products and supplies I have used for this project below.  Remember to use Code: Jana10 at the Kat Scrappiness Store to receive 10% off your order at checkout.  Thank you for stopping by and have a Fabulously Crafty Day!!!

    Product/Supply List:

    Stitched Scalloped Circle Dies by Kat Scrappiness

    Happy Father’s Day Die by Kat Scrappiness

    Stitched Flag Dies by Kat Scrappiness

    Removable Purple Tape 1.5″ x 15yd Roll by iCraft

    Madison Avenue Sequin Mix – Shaker Card Fillers

    Nuvo Deluxe Adhesive 200N

    110lb. Ivory Card Stock

    Bazzill Card Stock (Navy)

    Acetate

    Recollections Gray Card Stock

    Patterned Paper – Doodlebug Designs Inc. “Kraft in Color” Card Stock

    Matte Blue Enamel Dots – Various Sizes

  • Mini Treat Bags

    Hello again crafty friends!  It’s Lisa back today on the Kat Scrappiness blog to bring you another cute project!  I made 3 adorable mini treat bags using the Stitched Heart Tag die and I decorated them with the Stitched Flag dies and the Double Stitched Circle dies.  I have a video for you today to show how I assembled the bags and it’s super easy to follow.  I have to thank my fellow Kat Scrappiness design team member Maria Russell for the fabulous idea to make the bag.  She did a video a while back showing the process and I remade the bags using some current stamps and dies.

    This is the bag I assembled in my video and I used a sentiment from the Punny Snacks stamp set.

    The pretty patterned paper is from the Lawn Fawn paper pack, Gotta Have Gingham .  I started with 2 die cut panels from the larger die in the Stitch Heart Tag dies. I then cut a coordinating piece of paper to 11 7/8″ x 2″ to attach the 2 die cut panels together.  Next you will score your paper on the 11 7/8″ side at 4″ and 7 7/8″ and then you will score the paper 1/4″ in from both sides on the 2″ side.


    After you score your strip fold on all the score lines and make 4 snips up to the point where the score lines meet each other.

    The next step is to place some strong double sided adhesive along the middle sections to adhere the 2 heart tags.


    Next you want to apply some additional double sided tape to the remaining scored flaps and assemble the box accordingly.


    The video will show the assembly process step by step.  The only thing left to do is decorate the front of the box and fill it with pretty tissue paper and treats!

    I die cut several Stitched Flag dies from some more gingham paper and arranged them around one of the Double Stitched Circle dies.  I stamped a sentiment from the Punny Snacks stamp set on to a scalloped circle and adhered it to the circle on some foam tape.

    I made the same box with some different patterned paper but essentially followed the same steps.

    I also created the same bag a third time for the Coffee Lovers Bloghop that Kat Scrappiness is a super sponsor for.  I used the Layered Coffee Cup die and the “Got Coffee” sentiment die for the front of the bag and I finished it off with a sentiment from the Technique Tuesday stamp set “Sassy Coffee”

    I stamped the sentiment on to a Stitched Tag die and finished off the front panel with some paint splatters of Ground Espresso distress ink.

    These treat bags are super fun to make and they are very quick and easy to assemble.  They would make great party favors for a kids party or even elegant favors for a wedding or anniversary party.

    Here is a link to the YouTube video showing how to assemble these cute bags.

    Thanks for joining me today,  I hope you’ll give this technique a try!

    All supplies linked below.

    Don’t forget to use code Lisa10 at KatScrappiness.com to receive 10% off your order at checkout.

    Have a great day, I already am!

    ?Lisa?

  • Watercoloring with Distress Inks

    Watercoloring with Distress Inks


    Hi there! Hannah here! 😀 Today I have a technique video to share!

    I created this card and I thought I’d show you how! Watercoloring with Distress Inks is one of my favorite techniques the colors stay true to the ink, and the ink moves so wonderfully. You can dilute it as much as you want, or keep it as strong and rich as you wish.

    This card was the perfect reason to showcase Kat’s new Stitched Flag Dies! The sentiment I used is from the new Dad’s Tools stamp set, which just shows you how versatile the set is!

    Have a quick look at my video!

    [youtube https://www.youtube.com/watch?v=Xux1h4HreEA]

    I hope you enjoyed my card(s) and my video. I also hope that you took my mistakes to heart, it is just paper and it is a great learning experience!

    This has been Hannah Rubenstahl, of Fanciful Spaces, hoping you have a crafty day, and if you need any of the products I used, feel free to use my discount code: Hannah10!

    Products used:

    Stitched Flag Dies by Kat Scrappiness
    Dad’s Tools Stamp Set by Kat Scrappiness
    Wonky Wavy Stitched Rectangle Dies by Kat Scrappiness
    Distress Inks
    Memento Tuxedo Black Ink
    Watercolor Paper
    Blue Cardstock
    Neenah Solar White 110lb
    Scor Tape
    EK Tools 3d Strips
    Glue Tube by Lawn Fawn
    Fun Foam

  • Mermaid “scales”

    Hi Friends! kel here today to share a fun card for a special mermaid!! And I totally took inspiration from a fellow KS teamie Caren… She made a beautiful rainbow flag card the other day and it made me think mermaid!!

    I’m using the new Stitched Flag Dies to make this card. There are SEVEN different flags in this set… I used the 2nd smallest one to make my card. I knew I didn’t want to cover the whole card with my mermaid “scales” but didn’t want to go so big that there wouldn’t be a lot of layers on it.


    This card was SO MUCH FUN. I wasn’t really looking forward to having to individually die cut all the flags but it ended up being pretty quick! I’ve had this shiny paper in my stash for at least a decade (sooooo not even kidding about that lol!) and thought it was the perfect pair for mermaid colors! I stamped out the sentiment using the Merman color from the Gazebo pack of the Lawn Fawn ink cube sets, and then added a splattering of sequins from the Mint Sparkles Sequin Mix to the top left corner. I wasn’t sure how the pink in the sequin mix would work with the purple in the card but I think it goes perfectly together. And I wanted it to look like a random sprinkle of sequins so I just kinda dumped it out on the card and then tried my best to just glue it down individually so I could keep the placement. Not easy to do using my fingers lol!! I think any of the pick-up tools from the Kat Scrappiness store would have made things a little bit easier for me!! Maybe next time lol!

    I’m SOOOOOOO happy with how this card came out… it totally has that mermaid vibe going! Thanks for stopping by, see you again soon! Don’t forget to take part in our awesome monthly challenge for your chance to win a $25 Gift Card!!

    lovies, =o) kel

    Supplies Used (use code kel10 for 10% off your order!):

  • Fun Card using Stitched Flag Dies

    • Hi everyone, it’s Caren.  Today, I have a fun card using the Kat Scrappiness Stitched Flag dies.  I immediately had this idea when I first saw the dies.  I love the way these cards turned out.

    It was a lot of die cutting, but putting them together was quick.  Here is a video showing how I created these cards.


    Use code caren10 for a 10% discount in the Kat Scrappiness shop.

    Thanks for stopping by and happy stamping!

    – – – SUPPLIES – – –

  • Have a Sweet Day!

    Have a Sweet Day!

    Hannah here! Today I’m bringing you a card that I simply adored making. I enjoy making nearly all the cards I make, but some of them I love more than others. I love adding depth to my cards, I also love moving elements, which is one reason why I love shaker cards. But I REALLY love moving elements when they aren’t expected.

    Sequins provide that perfect opportunity for movement out of the unexpected. Why? Because you can string them via the holes in the center! I’ve done this for Kat Scrappiness before for a Halloween card and a Fall card. Using a needle and thread I attached both sequins and some Stitched Flag Dies.

    When these guys move on a card, it is positively delightful!

    To create the depth in the card, I backed the various layers with fun foam. Fun Foam is a very inexpensive way to create volume on a card, much less expensive than other alternatives on the market.

    You can see here, the fun foam layered on the backside of a panel. Additionally, you can see the Scor-Tape and the Ranger Multi Medium Matte. The first is used to attach the fun foam to the next layer of paper, the later to ensure my string stays put.

    I was very much inspired by the fun bright colors found in the Perfectly Plaid Spring Lawn Fawn paper. The Distress Oxides: Wilted Violet, Worn Lipstick, Squeezed Lemonade, and Salty Ocean accented the paper quite nicely. So I made some card panels and cut them out using the Stitched Rectangle Postage Dies and the NEW Stitched Fishtail Banner Dies!

    Oh, those YUMMY rock candy sticks? Oh, those delicious things are from the Rock Candy Layered stamp set by Kat Scrappiness! I chose to use my Altenew inks for the layering, they work so perfectly with layered sets like this.


    When everything is all together this, BRIGHT and SHINY card is what you create!


    All but the center flag move, and look at the layers! It is such a fun card!


    I think this is the perfect card to send to someone “just because.” If you are interested in any of the products I have used, especially the NEW ones, you can find them below. Feel free to use my discount code Hannah10 for 10% off. 🙂

    Stitched Flag Dies by Kat Scrappiness
    Stitched Postage Stamp Edge Rectangle Dies by Kat Scrappiness
    Stitched Fishtale Banner Dies by Kat Scrappiness
    Rock Candy Layered Stamp Set by Kat Scrappiness
    Spring Leaves Sequin Mix by Kat Scrappiness
    Perfectly Plaid Spring paper by Lawn Fawn
    Distress Oxide
    Altenew Inks
    Memento Tuxedo Black Ink
    Scor-Tape
    Ranger Multi Medium Matte
    Fun Foam
    Embroidery Thread

    This has been Hannah Rubenstahl, of Fanciful Spaces, sincerely hoping you have a crafty day!