Tag: father’s day

  • Happy Father’s Day!

    Happy Father’s Day!

    Hello everyone!

    It’s Donna here showcasing some of the newly released products which are the Happy Father’s Day with Shadow Die. This die is a nice size die that would be great for the focal point on your card, I’m also using the newly released Lumber Yard slimline paper and the Baseball and Football Sprinkles which I used in the shaker card. I am also using the Kat Scrappiness Mini Slimline Tri-Frame dies and the Quokka image is from the Kat Scrappiness Summer Quokka stamp set. Would you like to win the entire May release?  Kat Scrappiness will pick one lucky winner! (*U.S. residents only but if international winner is chosen, winner will have to pay for shipping).  Here’s how to win:  ENTER THE GIVEAWAY BY CLICKING ON THE RAFFLECOPTER.  WINNER WILL BE ANNOUNCED ON THE KS INSPIRATION FACEBOOK PAGE ON JUNE 4th.

    There is a sale until tomorrow, May 31st, 15% off your total order, excluding the new release!  Be sure to use code MEMDAY2021 at checkout.
    Here is my shaker card I created using the Kat Scrappiness, Inc. newly released products.

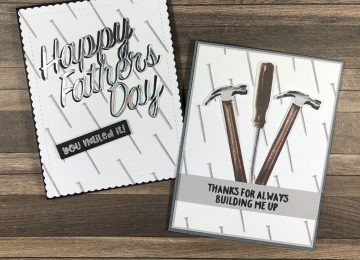
    Here is how I created my shaker card:

    1. I cut the base card at 6 x 3 1/2.   I then cut the lumber yard slimline paper to size and to the base of the card.
    2. I then die cut the Kat Scrappiness Mini Slimline Tri-Frame die from the Kat Scrappiness

    Starlights jewels slimline paper.

    3. I adhered Kat Scrappiness Mini Slimline Acetate Sheet to the Mini Slimline Tri-Frame die with liquid glue. I added some foam tape to the back of the Tri-Frame die and attached the acetate.
    4. I added the shaker parts of the card to the base.
    5. I stamped and colored the image with copics from the Kat Scrappiness Summer Quokka and added him to the front of the card.
    6. I die cut the Happy Father’s Day with Shadow Die with the lumber yard slimline paper and die cut the shadow with vellum, I adhered them together and added it to the card.
    Here is my shaker card I created using the Kat Scrappiness, Inc. newly released products.
    Here is a list of supplies I used on my card, Affiliate Links used at no additional cost. Thank you for your support.

  • June Card Challenge – Meals With Dad

    June Card Challenge – Meals With Dad

    Hello Kat Scrappiness fans!

    It’s Lisa back on the blog today to bring you another monthly challenge!

    We just wanted to say thank you so much for entering our card challenge in May!

    We had over 50 amazing entries and we loved seeing your

    Coffee themed / Mother’s Day cards!

    Thank you to all who entered for playing along!

    And now on to our WINNERS!

    The 2 random winners of the Coffee With Mom challenge from May are

    Indy – $15.00 gift certificate to Kat Scrappiness

    and

    karenladd – 6 pack of sequins, jewels and/or sprinkles

    Congratulations Indy and karenladd and thanks so much for sharing

    your beautiful projects with us!

    ***Please e-mail us at winners@katscrappiness.com to claim your prizes!***

    Make sure you stay tuned to the Kat Scrappiness blog,

    Facebook group and Instagram pages

    to be the first to know about special discounts and giveaways!

    ***********************************************************************************

    That brings us to the June challenge.

    Meals With Dad

    In June we like to celebrate the special Dads and Grandads in our life

    on Father’s Day but we all know there are many father

    figures in our lives so in June let’s tell them how much we

    love and appreciate them!

    Let’s face it, food is a big part of our celebrations and Father’s Day

    is no different!  Whether you celebrate Dad with a big

    pancake breakfast or a smokin’ BBQ dinner,

    the important part is sharing a meal with family!

    For the June challenge we will focus on Father’s Day and food!

    Kat Scrappiness has a wide selection of food related products.

    Here are 2 Kat Scrappiness products to get you started:

    So come on now, let’s see your Father’s Day and food inspired cards!

    You just might get lucky and win a $15 gift certificate to KatScrappiness.com

    or a sequin prize package

    While you do not “have” to use our products, we would love to see how you

    incorporate your Kat Scrappiness stamps and/or dies in your projects!

    This month as always, we only have 2 easy requirements to play along.

    1) Share your Father’s Day or Food themed cards!

    2) Remember to link back to our challenge in your entry.

    That’s it! Easy Peasy right!

    To enter, submit a photo of your project below

    (Click on the “Add Your Link” button) and we will randomly pick the winner at the end of the month.  Good Luck from the Kat Scrappiness team and we look forward to seeing your beautiful projects!

    You are invited to the Inlinkz link party!

    Click here to enter


  • Happy Father’s Day Shaker Card

    Hello crafty friends!! It is Design Team Member Jana stopping by today to share a tutorial on how I have created this fun shaker card for Father’s Day using lots of amazing products from Kat Scrappiness.

    How super fun does this card look ?!?! I am very happy with how it has turned out and can’t wait to send it off for Father’s Day! So without any further delay, let’s get to it…..

    To begin, I die cut a piece of card stock (which will be used as my shaker base) as well as a piece of acetate using the largest sized scalloped circle die from the newly released Stitched Scalloped Circle Dies by Kat Scrappiness. This die set is awesome and comes with a total of 7 different sized dies.

    I knew that I wanted to create a shaker and I wanted to created a frame for my shaker. In order to do this, I used a simple Sizzix Circle die which fit perfectly inside the largest scalloped circle die which was used in the previous step. I used Removable Purple Tape to help hold my dies in place as I die cut several pieces (8 to be exact) of card stock which will later help me to form the frame of my shaker element.

    Continuing with my die cutting, I used the Happy Father’s Day Die by Kat Scrappiness to cut out my cards sentiment. I used the negative left over card stock from my previous die cutting as to not waste any paper.

    In order to create my shaker element, I began to glue my previously cut frames together, perfectly on top of each other, making sure that all of the scalloped edges lined up. I used Nuvo Deluxe Adhesive and glued seven of the eight frames together. I use this method of creating a shaker quite a bit. As you can see from the picture above, the combined layers of card stock help to create a deep enough space between the base of the shaker and the top layer of acetate to allow the sequins or shaker filler to move around freely. This method also allows you to save your foam adhesive dots and will also help to allow your sequins to move freely, rather than allowing the possibility of the sequins becoming stuck to the adhesive foam on the sides.

    The next step was to take the layered frame which I had glued together in the previous step and adhere the acetate on top. Again, I used a thin strip of Nuvo  Deluxe Adhesive on the top of my frame and placed the acetate on top, making sure that my scalloped edges were matched up. Once the acetate was in place, I then took my last piece of frame (remember, I had cut out 8 originally, glued 7 of them together and saved the last one to go over the top of the acetate as a finishing piece).

    While my acetate frame was set off to the side to dry, I adhered my “Happy Father’s Day” die cut sentiment on to the first scalloped circle card stock that was die cut (my shaker base). I decided that I wanted to use the Madison Avenue Sequin Mix as my filler for my shaker. I adhered a few of these sequins randomly on my shaker base (as seen above).

    While I was allowing my shaker base and frame to continue drying, I die cut several tags using the Stitched Flag Dies by Kat Scrappiness.

    Once my shaker elements were completely dried, I added more of the Madison Avenue Sequins to the center of the shaker element. I added a small strip of Nuvo Deluxe Adhesive around the outer edge and then carefully lined up the scalloped edges of the acetate frame with the shaker base and applied them together to complete my shaker.

    While I let my completed shaker portion dry, I began to play around with the stitched flags that I had die cut and adhered them together, making sure to overlap them so that all of the card stock used could be seen. I arranged them in a pattern I was happy with then adhered my shaker element over the top of the flags, which as you can see has created a nice Father’s Day award ribbon.

    Because the entire finished piece measures approximately 5″ x 8″, I created an A9 card base which measures about 5-1/2″ x 8-1/2″, using 110lb. Ivory Card Stock. I cut a piece of gray card stock about 1/8″ smaller than my card base and applied it as my mat. I adhered my completed shaker award ribbon to the center on my card and for a simple finishing touch, I added some matte enamel dots I had in my stash on the top left and bottom right corners.

    I hope that I have helped to inspire you to create your own shaker card and if so, I can’t wait for you to share it with us all. You may find a complete list with all of the products and supplies I have used for this project below.  Remember to use Code: Jana10 at the Kat Scrappiness Store to receive 10% off your order at checkout.  Thank you for stopping by and have a Fabulously Crafty Day!!!

    Product/Supply List:

    Stitched Scalloped Circle Dies by Kat Scrappiness

    Happy Father’s Day Die by Kat Scrappiness

    Stitched Flag Dies by Kat Scrappiness

    Removable Purple Tape 1.5″ x 15yd Roll by iCraft

    Madison Avenue Sequin Mix – Shaker Card Fillers

    Nuvo Deluxe Adhesive 200N

    110lb. Ivory Card Stock

    Bazzill Card Stock (Navy)

    Acetate

    Recollections Gray Card Stock

    Patterned Paper – Doodlebug Designs Inc. “Kraft in Color” Card Stock

    Matte Blue Enamel Dots – Various Sizes

  • Happy Father’s Day Eclipse Card

    Happy Father’s Day Eclipse Card


    Hello Kat Scrappiness fans!  It’s Lisa back with you today to share an eclipse card that I made for Father’s Day.  I used one of the new dies in the shop this month called Stitched Scalloped Rectangle Dies.  I also used the Large Alpha dies to form the focal point of the card after I made a background with the Dad’s Tools stamp set.

    I started by die cutting a white panel from one of the stitched rectangle dies and stamping the hammer and nails randomly all over in every direction.  I made sure to stamp some of the hammers and nails off of the card for a more random look.  Once the background was done I die cut the letter D A D out of the panel.  The next step was to die cut the same letters out of black paper two more times.  I adhered the black letters to each other and made the top layer the letter that was cut from the stamped background.  The last step was to cut the letters out one more time from double sided foam tape to pop the letters up on the card.  I adhered the stamped panel to a black card base and fit the thick letters back in like a jigsaw puzzle.  Because they had black layers under them they appear to have a shadow under them making them stand out.  I finished the card with a sentiment from Dad’s Tools heat embossed with white on to a stitched flag and popped it up on foam tape.

    I love to decorate the inside of my cards with a coordinating stamp and sentiment so I stamped Mr. Fix It on the inside with a hammer and a few nails to finish the card off.

    The eclipse card is such a fun technique and you can check out YouTube for a great video showing this technique by my other Kat Scrappiness team member Tina Dornbaum.

    All products used will be linked below.

    Don’t forget to use code Lisa10 at checkout for 10% off your order!

    Thank you for joining me today and I hope you have a great day!

    I already am!

    ?Lisa ?


  • Masculine Cards- Dad’s Tools

    Masculine Cards- Dad’s Tools

    Hi everyone, it’s Caren.  Anyone else struggle to make masculine cards?  My style leans towards cutesy and flowers,  so it’s a struggle for me.  Kat Scrappiness has a new stamp  set out this month that will help with those masculine cards – Dad’s Tools.  This is laying stamp set which features several tools with some great sentiments.

    I’ve have two cards today featuring this set.  On both cards, I used two layers of the nail stamps to create the background.  These two stamps were easy to line up and took little time to create these backgrounds.


    For the first card, I stamped the layered nail for the background.  I then cut the Kat Scrappiness Happy Fathers Day die out three times – twice in black and once in a silver mirror card stock.  I adhered the two black die cuts together.  I then offset the silver mirror die cut onto the black to make the sentiment stand out more.  The “you nailed it” sentiment is from the Dad’s Tool stamp set.  I stamped it in Versamark ink onto black card stock,  covered it in silver embossing powder, and then heat set it.  There is also a little sneak peak on this card of something being released in June!


    On the second card, I again stamped the layered nail for the background.  I stamped the hammers and screwdriver onto white cardstock and cut them out by hand.  The hammer head, hammer handle, screwdriver, and screwdriver handle each have four layers.  I used various brown and gray ink for the layers.   The sentiment is from the Dad’s Tool stamp set.  I stamped it in Versamark ink onto gray card stock,  covered it in black embossing powder, and then heat set it.

    Use code caren10 for a 10% discount in the Kat Scrappiness shop.

    Thanks for stopping by and happy stamping!

    – – – SUPPLIES – – –


  • Happy Father’s Day

    Hello everybody! I am excited to stop by and share with you all, a card that I have created for Father’s Day using some amazing products from Kat Scrappiness.

    I started off by creating my A2 sized card base using 110lb. White Neenah Card Stock. I then cut down a piece of blue Bazzill Cardstock to measure 4-3/8″W x 5-3/8″H and adhered that onto my card base as my card mat.

    One of my favorite dies from Kat Scrappiness is the Condensed Uppercase Alphabet Dies. I used these to die cut the word “DAD” using some gold foiled card stock that I had left over in my stash from a previous project.

    I also die cut three different sized ovals using the Cross Stitched Oval Dies by Kat Scrappiness.

    Have you seen the newly released Dad’s Tools – 6″x 8″ Layered Stamp Set by Kat Scrappiness? This stamp set is amazing! There are a total of 34 stamps in this set. The tools, which include a hammer, screw driver, nails and screws are all layering stamps and there are 12 sentiment/word stamps, making it that much easier to be able to create that perfect masculine card for any occasion. I decided that I was going to use the hammer for my card creation. I started by stamping the hammers handle using Tim Holtz Distress Oxide Inks in Antique Linen, Frayed Burlap and Vintage Photo. For the hammer head, I used Hickory Smoke, Iced Spruce and Black Soot.

    I also decided that I wanted to use one of the sentiments from the Dad’s Tools – 6″ x 8″ Layered Stamp Set as well. I went with the “Happy Father’s Day” stamp, which I stamped with Versamark Ink and heat embossed using Hero Arts Gold Embossing Powder onto the smallest blue oval that I had die cut previously.

    To complete my Father’s Day card, I layered my die cut ovals and centered them at the lower portion of my card. I added foam tape to the “DAD” letters to make them pop up a bit and to make it fun, I wanted to put the hammer through the first “D”. Once all of my card elements were in place and adhered down, I added some small adhesive gems at the top left and bottom right corners to add a bit of interest and complete my card.

    I am happy with how my card has turned out and I hope that you enjoyed my quick tutorial as well.  All of the supplies I have used for this card are listed below and can be found at the Kat Scrappiness Shop. Remember to use Code: Jana10 at checkout to receive 10% off of your order. Thank you again for stopping by and have an amazing day!!!

    Supplies List:

    110lb. Neenah White Card Stock

    65lb. Blue Bazzill Card Stock

    Patterned Paper & Gold Foiled Card Stock

    Condensed Uppercase Alphabet Dies by Kat Scrappiness

    Cross Stitched Oval Dies by Kat Scrappiness

    Dad’s Tools – 6″ x 8″ Layered Stamp Set by Kat Scrappiness

    Antique Linen Distress Oxide Ink Pad by Tim Holtz

    Frayed Burlap Distress Oxide Ink Pad by Tim Holtz

    Vintage Photo Distress Oxide Ink Pad by Tim Holtz

    Hickory Smoke Distress Oxide Ink Pad by Tim Holtz

    Iced Spruce Distress Oxide Ink Pad by Tim Holtz

    Black Soot Distress Oxide Ink Pad by Tim Holtz

    Tsukineko Full-Size Versamark Clear Embossing Ink Pad

    Hero Arts Gold Embossing Powder

    Adhesive Gems

  • Mother’s and Father’s Day Cards

    1. Hello Kat Scrappiness fans!

    It’s Lisa here on the blog today to share two cards with you that I made with the same supplies but with 2 very different looks.  It’s always nice to make 2 cards at the same time especially at this time of the year when Mother’s Day and Father’s Day are so close together.

    The new Stitched Flags dies in the shop this month when paired with the Upper and Lower Condensed Alpha Dies allow for some very versatile combinations of cards.

    The first card is a masculine card that could be used for Father’s Day or Birthday.  I decorated the Stitched Flags with the Everyday Brush Strokes stamp set from last month’s release.  I cut out the letters D-A-D with the Condensed Uppercase Alphas and gave them a confetti like appearance with some polka dots at the bottom of the letters in blue and brown.  I die cut the kraft panel with a Wonky Wavy Stitched Rectangle die and then embossed it with a woodgrain embossing folder.  Lots of foam tape to pop up the flags and the letters.  I just love the added dimension!

    My second card is just a feminine version of the first card.  It’s amazing when you change the color palette and the stamp set what a different look you can achieve.  The Fab Flowers stamp set from Lawn Fawn and the pink palette make this the perfect Mother’s Day card

    or a sweet Birthday card for Mom.

    Thank you so much for stopping by today, I hope I’ve inspired you to look at your dies and stamp sets in a new light to see what combinations you could come up with!

    Don’t forget to use code Lisa10 at checkout in the Kat Scrappiness shop to get a discount

    on all your crafty goodies!

    Have a great day!

    I already am!

    ??Lisa ??

  • Dad’s Tools – Happy Father’s Day

    Dad’s Tools – Happy Father’s Day

    Hi there! It is Hannah, bringing you a Father’s Day card! We’ve got just about a month to get those cards to the father figures in our lives, there is no time like the present to start working on them!

    Fortunately, Kat has a new layered stamp set called Dad’s Tools! This set is PERFECT for Father’s Day, men’s birthdays, or just because. There is such a wide range of sentiments in this set you’ll always find a use for it!

    I started by smooshing Distress Inks: Blueprint Sketch, Salty Ocean, and Tumbled Glass onto some Watercolor Paper. Then I use the largest of the Distressed Edge Rectangle Dies, by Kat Scrappiness, to cut a panel of that out. The finishing touch, on that panel, was to create a vignette look by adding the same Distress Ink along the edges.

    Next, I stamped out my hammer. I chose to use Altenew Inks, as this is what I had on hand, however you should look at your grays and browns. You can mix brands! You might have a variety of different companies that work well for you! You’ll want 4 grays and 4 browns. If you are interested you can message Kat and see if she is able to special order something for you too. 😀

    The hammers I cut out using my Scan-n-Cut, however, it would be really easy to fussy cut. I laid them out to figure out where they would go on my card and then stamped out my sentiment accordingly. This sentiment was stamped using Memento Tuxedo Black and then clear embossed. Finally, I popped my hammers up using foam squares. The watercolor panel was then adhered to some coordinating cardstock I had on hand and voila! The perfect Father’s Day card! Super easy and super fun!


    This has been Hannah Rubenstahl, of Fanciful Spaces. It is my sincerest hope that I have inspired you to create! If you need the Dad’s Tools stamp set or any other products at Kat Scrappiness, please feel free to use my discount code Hannah10!

    Products Used:

    Dad’s Tools Stamp Set by Kat Scrappiness
    Distressed Edge Rectangle Dies by Kat Scrappiness
    Distress Inks
    Altenew Inks
    Memento Tuxedo Black
    WOW! Clear Embossing Powder
    Foam Squares
    Scor-Tape
    Coordinating Cardstock, Navy Blue
    Neenah Solar White Cardstock in 80 & 110lb

  • Father’s Day Card with Dad’s Tools

    Father’s Day Card with Dad’s Tools

    Hello my crafty friends, Maria here with you today on the blog!  I hope you are all having a great week so far.  Father’s Day is fast approaching and it is time to honor all the AMAZING dads out there.  The new Dad’s tools – 6×8 Layered stamp setis perfect for this type of occasion, or you can even make just-because cards.  It doesn’t always just have to be for one day out of the year.  I know if my Dad were here, I probably would make him a card at least once a month.

    I started out by stamping my images on Neenah solar white card stock, using my Tim Holtz Tonic Stamp Platform.  I think it is a must-have tool for stamping layered images.  Since this stamp set did not have matching dies, I used my Brother Scan N Cut2 to die-cut the images.

    I used the biggest of my Cross Stitched Rectangle dieto die-cut the blue patterned paper taken from the Gotta Have Gingham Petite Paper Pack 6×6 by Lawn Fawn.  I then used the third piece of the Cross Stitched Rectangle dieto die-cut a piece of silver card stock. I placed this card stock onto my We R Memory Keepers embossing folder and run it through my die-cutting machine to emboss this piece.

    I adhered my blue patterned paper onto my card base and then layered the embossed silver cardstock on top for my foreground.  On another piece of white card stock, I die-cut the word Dad with the Uppercase Condensed Alphabet Dies.  To give it some dimension, I used my foam adhesive to adhere the word Dad onto my card.

    I stamped the sentiment on a black card stock with my Versa-mark ink and used my white embossing powder then set it using my heating tool.  I also adhered the hammer and screwdriver images from the stamp set.  I finished the design by adhering my blue enamel dots on the four corners of my silver card stock embossed piece.  Here’s the card.


    KatScrapDadsToools1


    I honestly struggle with masculine cards so designing this was a bit of a challenge for me.  However, I love how this turned out.  Here’s a close-up look:


    KatScrapDadstools1A


    I hope you got inspired today.  Don’t forget to use my coupon code “MARIA10” for 10% off your order at the shop.  The supplies I used are listed and linked below.  Have a wonderful day!

     ———–SUPPLIES———-


    https://linkdeli.com/widget.js?1525091912704

  • Thanks for Building Me Up


    May’s new stamp set from Kat Scrappiness called Dad’s Tools is another great all around stamp set with perfect “punny” sentiments for anyone important in your life.  I love the idea of sending a thank you note to those who have made a difference in our lives.  Many times, those people may be pleasantly surprised that they’ve had such an impact.  Today’s card is super clean and simple and revolves around a favorite sentiment of mine from the set.

    Many times, when I receive my design team package, I like to take out the stamps and arrange them on a card base while I’m brainstorming ideas for projects.  I liked the idea of using boxes to show “building up” so I stacked a few kraft-colored squares using my Never Ending Square dies on a panel of white card stock cut about 3 3/4″ by 5″.

    I arranged my stamps around the boxes to get the perfect fit keeping everything spaced close together in a cluster.  When I was happy with my design, I stamped the hammer and nails using various shades of grays for the hammer head and nails and browns for the hammer handle.  I used my Tim Holtz Tonic Stamp Platform which made it very easy.

    I added some Doodlebug paper to the front of a 4 1/4″x 5 1/2″ note card to serve as a background for my main panel.

    I stacked the boxes onto the panel using various levels of foam tape to give a 3D look of stacking.

    I added the sentiment on a strip of white card stock as well as a little heart cut out to finish the card.

    Thanks so much for joining me today.  Be sure to check out the new Kat Scrappiness stamps and dies for the month of may over at the shop.  Feel free to use my coupon code:  Heidi10 to receive 10% off your order.

    Don’t forget, this Saturday, May 5 is National Scrapbooking Day.  The Kat Scrappiness blog will be having a big sale and some great giveaways so stay tuned……..

    Heidi

    –SUPPLIES–

    Dad’s Tools stamp set–Kat Scrappiness

    Never Ending Square die set-– Kat Scrappiness

    Double Stitched Heart Dies–Kat Scrappiness

    Tim Holtz Tonic Stamp Platform

    Doodlebug Swiss Dots Petite Prints 6×6 paper pad

    Lawn Fawn Tea Party Ink Cube Pack (Doe)

    Lawn Fawn Candy Store Ink Cube Pack (Walnut)