Tag: Crafters Essentials Halloween dies

  • Mini Slimline Halloween Scene Card

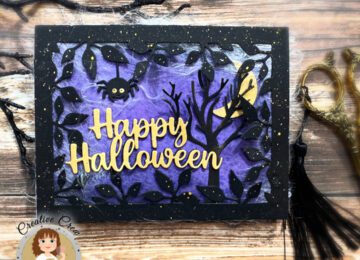
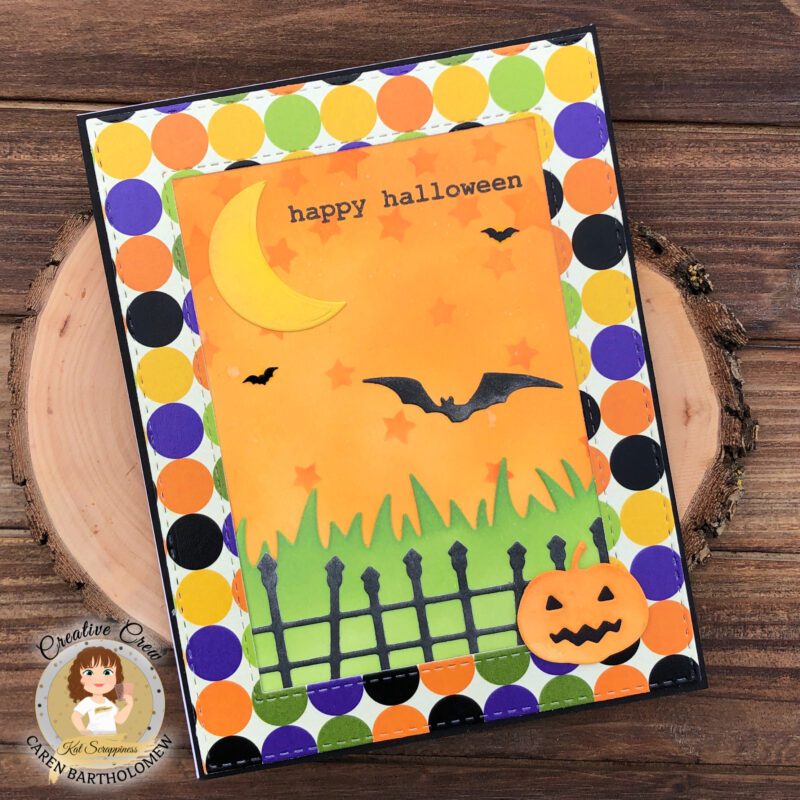
    Hi everyone, it’s Tina here. I have a Mini Slimline Halloween Scene card to share using the Creepy & Kooky 6×6 Paper Pad and the Crafter Essentials Halloween Dies. Below you will find the steps to create your own card.

    Step 1 – Trim White Cardstock to 7″ x 6″, score at 3 1/2″ and fold in half for a horizontal top fold card. (Mini Slimline).

    Step 2 – Trim Creepy & Kooky 6×6 Paper Pad to 2 15/16″ x 6″. Adhere to card front using Bearly Art Precision Glue.

    Step 3 – Diecut Crafters Essentials Halloween using various colors of cardstock. Adhere the fence, tree, moon, pumpkins and tombstone using Bearly Art Precision Glue. I forgot to add green cardstock behind the fence but I don’t mind the white space behind. But if you prefer the green then adhere it before adding the fence right after Step 2.

    Step 4 – Diecut Happy Halloween with Shadow using White cardstock for the shadow and Black cardstock for the word. Assemble and adhere to card using Bearly Art Precision Glue.

    Below is a link to all the products used. Thank you for stopping by and Happy Crafting!

    Products Used:


    https://linkdeli.com/widget.js?id=f5e8378456858c916708

  • Creating a Spooky Framed Halloween Scene

    Creating a Spooky Framed Halloween Scene

    Happy Sunday Crafty Friends! Priscilla here from theΒ Kat ScrappinessΒ Design Team.Β Halloween cards are definitely my favorite to make! I love all the vivd colors this holiday has to offer, including purple, orange, bright green, and of course black. I created a spooky scene for today’s card using rich purple and black inside a leafy frame, and then added touches of the unexpected – gold splatter and cobwebs!

    I used several Kat Scrappiness products to make today’s card, including the A2 Foliage Frame Die, elements from both the Creepy Crawly Dies andΒ Crafters Essentials Halloween Dies, plus theΒ Β Happy Halloween Word Dies with Shadow.

    Card Details:

    Thank you so much for stopping by! Don’t forget to check out what’s NEW in Kat’s Shop, and follow my blog, Instagram, and Facebook for more “Kat Scrappiness Amazingness”!

    Stay Safe . . .

    Priscilla πŸ‘Ώ

    The supplies I used are listed and linked below.Β I would be so grateful if you use these affiliate linksΒ  to grab your Kat Scrappiness Goodies! No extra cost to you!

  • Trick or Treat Ghost Halloween Card

    Trick or Treat Ghost Halloween Card

    Happy Friday Friends! Sheri here today from the Creative Crew with a FUN Halloween Card featuring the NEW Creepy & Kooky 6×6 pad from Kat Scrappiness Shake It Up Release and a few dies from the shop! This card design is perfect for using up your paper scraps!

    Steps to Create Card:

    • Cut and Score Black A2 Top Fold Card Base: 4 1/4″ x 5 1/2″ (4 1/4 x 11″, scored at 5 1/2″).
    • Cut Black Mat: 3 7/8″ x 5 1/8″
    • Cut 4 strips of pattern paper from the Creepy & Kooky 6×6 Paper Pad: 7/8″ x 5 1/8″
    • Cut the word “BOO” out 3 times using the Condensed Uppercase Alpha die set. (Cut 2 in black card stock and 1 in black glitter card stock). You will stack & glue to add dimension to your card.
    • Cut 2 Ghosts and 3 Bats using the Crafters Essentials Halloween die set. (white and black card stock needed)
    • Stamp & emboss “Trick or Treat” sentiment from the Toil & Trouble Layered stamp set in white on a piece of black card stock. Use Boxed Sentiment Strip die to trim into a sentiment strip.
    • Assemble Card. For embellishment I added a strip of grosgrain ribbon.

    Here’s a list of supplies from the store.

    Affiliate links used at no additional cost to you. Thank you for your support!
    Happy Stamping!!

  • Not-So-Spooky Halloween Card!

    Not-So-Spooky Halloween Card!

    Good morning Kat Scrappiness Friends! Tasha here sharing a Not-So-Spooky Halloween card featuring the new Boo-Gy Ghosts Dies and Creepy & Kooky Paper Pad!

    The background was created with a cloud stencil and gray Distress Oxide Ink for the sky. For the ground, I used a piece of scrap paper to mask off the Bottom section and added green ink to look like grass, I love this green and gray color combination! I also added a fence from the Crafters Essentials Halloween Die Set to go with the Halloween look.

    See the full card making tutorial on the Kat Scrappiness YouTube Channel!

    [youtube https://www.youtube.com/watch?v=0uGN_1fkdrA]

    The sentiment “It’s time to get Spooky!” was embossed in white and I added orange paper to bring in more color. This greeting pops with the bright white words!

    The ghosts are from the new Kat Scrappiness Boo-Gy Ghosts Dies. These little ghosts are so cute and I love the extra accessories! I also like that there are so many different styles, so you can mix and match to customize your project!

    Lastly, I added a piece of spider web pattern paper from the new Creepy & Kooky Paper Pad and attached another layer of orange paper before adhering the card to a white card base.

    The completed card measures 5″ x 6-1/4″

    Thank you for checking out today’s card and I hope you are inspired to create a not-so-spooky Halloween card!

    -Tasha


  • Happy Halloween

    Happy Halloween

    Happy Wednesday everyone.Β  It’s Caren here on the blog today.Β  I’m not sure why but I love making Halloween cards (I think it’s the colors.)Β  I have a fun Halloween card for you today using lots of Kat Scrappiness products!

    Here is how I created the card:

    Thanks for stopping by!

    – – –– – –– – –– – –– – –– – –– – –– – –– – –– – –– – –– – –– – –– – –– – –– – –– – –– – –– – –– – –– – –– –

    Here is a link to theΒ Kat Scrappiness shop and direct links for products I used on today’s card.

    – – – SUPPLIES for today’s project– – – – – – – – – – – – – – – – – – – – – – – – – – – – – – – – – – – – – – –

  • Happy Halloween Mini Slimline Card

    Happy Halloween Mini Slimline Card

    Hi everyone, it’s Tina here. I have a clean and simple Halloween Mine Slimline Card to share using the Crafters Essentials Halloween dies and the new Creepy & Kooky 6×6 Paper Pad from Kat Scrappiness. Below is the steps to create your own card.

    Step 1 – Trim White Cardstock to 7” x 6”, score at 3 1/2” and fold in half for a vertical side fold card.

    Step 2 – Trim Creepy & Kooky 6×6 Paper pad 3 1/2” x 6” and adhere to card front using Bearly Art Precision Glue.

    Step 3 – Trim White Cardstock to 3” x 5 3/4”. Diecut Never Ending Circles using masking paper. Attach the diecut circle to the trimmed White Cardstock. Apply medium Grey Ink to the edges and remove the masking paper.

    Step 4 – Diecut Crafters Essentials (bats) using Black Cardstock and adhere to card front using Bearly Art Precision Glue.

    Step 5 – Stamp Happy Day greeting using Versafine Onyx Black Ink.


    All products used are linked down below. Thank you for stopping by and Happy Crafting!

    Products Used:


    https://linkdeli.com/widget.js?id=f5e8378456858c916708

  • R.I.P. – Spooky Cemetery Halloween Card

    R.I.P. – Spooky Cemetery Halloween Card

    Hey Crafty Peeps! Priscilla here from NubbleΒ Light Designs.Today I am sharing a spooky slimline Halloween card using the Crafters Essential Halloween Dies from Kat Scrappiness.


    This collection, which will work with A2, Slimline, Mini Slimline cards, and more, includes 8 individually designed dies that you can mix and match to create a multitude of scenes.

    Β 

    Card Details:

    1. Created a black cardstock slimline card base (8.5″ x 7″, scored at 3.5″) and adhered a honey colored cardstock layer over it.
    2. Using Distress Oxide inks, created an eerie sky background, added gold spatter, and then die cut it out using one of the Kat Scrappiness Distressed Edge Nesting Slimline Dies before adhering it to the honey cardstock layer.
    3. Die cut the spooky tree, pumpkin, headstones, fence, bat, and moon (ALL included in the collection!) and adhered them to the front of the card to create a cemetery scene.

    4. Die cut the sentiment “Happy Halloween” 3 times out of gold cardstock for greater dimension and adhered them to the front of the card.

    5. For an even eerier effect, I added “cobwebs” to the tree and headstones.


    Thank you so much for stopping by! Don’t forget to check out what’s NEW in Kat’s Shop, and follow my blog and Instagram for more “Kat Scrappiness Amazingness”!

    Stay Safe . . .

    Priscilla πŸŽƒ

    The supplies I used are listed and linked below.Β I would be so grateful if you use these affiliate linksΒ  to grab your Kat Scrappiness Goodies! No extra cost to you!

  • Happy Halloween

    Happy Halloween

    Happy Monday everyone!Β  I’ve got a fun and spooky mini slimline Halloween card to start off your week.

    I started the card by ink blending the front panel of my slimline card (3.5 x 6 inches) with distress oxide inks – Carved Pumpkin, Picked Raspberry, Seedless Preserves, and Black Soot.Β  I used a spray bottle on the panel to make the panel splotchy.Β  I then die cut all the pieces (except the pumpkin) from the Crafters Essentials Halloween die set.Β  I inked up the edges of the tomb stones with Black Soot and did a little ink blending on the moon with Wild Honey.Β  I adhered the tree, fence, and moon directly to the panel with liquid adhesive.Β  I added dimensional adhesive to the tombstones and bats.Β  I stamped my sentiment – Happy Halloween – from the Toil & Trouble Layered stamp set to finish the card.

    Thanks for stopping by!

    – – –– – –– – –– – –– – –– – –– – –– – –– – –– – –– – –– – –– – –– – –– – –– – –– – –– – –– – –– – –– – –– –

    Here is a link to theΒ Kat Scrappiness shop and direct links for products I used on today’s card.

    – – – SUPPLIES for today’s project– – – – – – – – – – – – – – – – – – – – – – – – – – – – – – – – – – – – – – –