Hello friends and welcome to the Kat Scrappiness Day Release 2022. This release includes so many awesome products from Stamps, Dies, Stencils and a Paper Pad (all linked down below)!!!
VIDEO INTRODUCTIONS:
VIDEO TEAM MEMBER TASHA
VIDEO TEAM MEMBER LIHN
VIDEO TEAM MEMBER REVATI
VIDEO TEAM MEMBER SUZANNE
VIDEO TEAM MEMBER YVETTE
Grab a cup of coffee, glass of Sweet Tea (or any beverage you have in mind) while browsing through all of the beautiful projects prepared by the design team!
Are you ready to get inspired?
Thank you to our Blog and Video Creative Crew for your awesome projects!!!
BLOG TEAM MEMBER- CAREN B
Pawsome Cats stamp & dies
Pawsome Cats sentiments stamps
Fish Bone stencil
The Kat’s Meow paper
Fish Bone sprinkles
Stitched Rectangle dies
Stitched Hexagon dies
Pawsome Cats stamps & dies
Pawsome Cats sentiment stamps
Wonky Wavy Stitched Rectangle dies
Spectrum of Love 6×8 paper
Diamond rhinestones
Build a Dog dies
Pawsome Boy paper
Stitched Alphabet dies
Spectrum of Love paper
Stitched Postage Stamp Edge square dies
Give the Dog a Bone sprinkles
Pawsome Love background die
Pawsome Dogs stamp & dies
Pawsome Dog Sentiments stamp & dies
In the Dog House dies
SL Grass border die
Blue Opal sequins
BLOG TEAM MEMBER- CRYSTAL
Kats Meow Paper Paper
Pawsome Cat Sentiments/Die
Pawsome Cat Stamps
Fish bone Stencil
Fish Bone Sprinkles
Scallop A2 Frames
Kats Meow Paper Pad
Ball of Yarn Stencil
Rainbow Bridge Sentiments
Paw print Sprinkles
Pawsome Cat Stamp Set
Heart from Heart Donut Builder
Embossed Wavy Frame Die
Rainbow Bridge Stamp/Die Set
Pawsome Love Backdrop Die
Simple Sentiments
Multi-colored Paw Print Sprinkles
Confetti Party Rainbow Dies
Build a Pawsome Dog
Pawsome Boy Paper
In the Dog House Die
Mini Slimline Reverse Scallop Frame
BLOG TEAM MEMBER – DONNA I
KS Pawsome Love Backdrop Die
KS Lumber Yard Paper Pad
KS Pawsome Dog Sentiments & Die
KS In the dog House Die
KS Pawsome Dogs Stamp & Die
Pawsome Dogs Sentiments Stamp & Die
KS Pawsome Cat Stamp & Die
KS Pawsome Cats Sentiment
KS Kats Meow Paper Pad
KS Double Stitched Rectangle Dies
KS Pawsome Dog Sentiments & Die
KS Pawsome Girl Paper Pad
KS Build A Pawsome Dog Die
KS In the Dog House Die
KS Never Ending Rectangle Die
KS Double Stitched Heart Die
KS Dog Bone Sprinkles
KS Stitched Scalloped Rectangle Dies
KS Double Stitched Rectangle Dies
KS Pawsome Cats Stamp & Dies
KS Pawsome Cats Sentiments KS Stamps & Dies
KS Fish Bone Stencil (dry embossed)
KS Kat’s Meow paper
KS Fish Bone sprinkles
KS Never Ending Rectangle Dies
Pawsome Cat Stamps
Pawsome Car Dies
Pawsome Cat Sentiments
Pawprint Backdrop Die
Stitched Nesting Hexagon Dies
Mother of Pearl Confetti
Pawsome Cat Sentiments
Pawsome Cat Sentiment Dies
Fishbone Stencil
Mint Green AB Solid Round Confetti
Pawsome Dog Sentiments
Pawsome Dogs Stamps
Pawsome Dogs Dies
Nesting Stitched Dome Dies
Dog Bone Sprinkles
Lumber Yard Paper Pad
Pawprint Cover Plate Backgeound Die
Build a a dog a house Dies
Build A Dog dies
Pawsome Sentiment Stamps
Stitched Nesting Hexagon Frames
Lumber Yard Paper
Pawprint Confetti
Dog Bone Stencil
BLOG TEAM MEMBER- KIM
Pawsome Dogs Sentiments
Build a Pawsome Dog
Build A Doghouse Dies
Pawsome Girl 6 x 8 Paper Pad
Clear AB Glass Bubbles
Build a Doghouse Dogs
Pawsome Dogs Stamps
Simple Sentiments Stamps & Dies
Stitched Nesting Dome Dies
Pawsome Boy 6 x 8 Paper Pad
Almandine Garnet Rhinestone Mix
Kat’s Meow Paper Pad
Pawsome Cat Stamps/Dies
Pawsome Cat Sentiments/Dies
Kat’s Meow Paper Pad
Pawsome Cat Stamps/Dies
Pawsome Cat Sentiments/Dies
Wonky Wavy Stitched Rectangle Dies
VIDEO TEAM MEMBER LINH
Pawsome Dogs die
Pawsome Dogs Sentiments stamp
In the dog house die (paw print)
Pawsome Love Backdrop die
Nested Postage Square dies
Pawsome Dogs papers
In the dog house die
Pawsome Dogs stamp & die
Pawsome Dogs Sentiments stamp & die
Kat’s Meow Paper (B side)
Pawsome Dog Girl Paper (B-side)
Pawsome Cat Sentiments Stamp & Die
Pawsome Cat Stamp & Die
Ball of Yarn Stencil
Stitched Hexagon
Kat’s Meow Paper
Pawsome Dog Girl Paper
Pawsome Cat Sentiments Stamp & Die
Pawsome Cat Stamp & Die
Ball of Yarn Stencil
Square Postage
BLOG TEAM MEMBER- MARIA
– Pawsome Dogs Stamps & Dies
– In the Dog House Dies
– Pawsome Dogs Sentiment and Dies
– SL Hills Border Die
– Crafter’s Essentials 2 Die Set (Sun)
– Starlights Jewel SL PP
– Pink Daisy Sprinkles
– Build a Pawsome Dog Dies
– Stitched Nesting Hexagon Dies
– Pawsome Girl PP
– Pawsome Dog Sentiments & Dies
– A2 Acetate Sheets
– Dog Bone Sprinkles
– Coffee Sequin Mix
– Cat’s Meow Stamp Set & Dies
– Cat’s Meow Sentiment and Dies
– Film Strip Border Die
– Starlights Bright SL PP
– Fish Bone Sprinkles
– Cat’s Meow Stamp Set & Dies
– Fishbone Stencil
– Cat’s Meow Sentiment Stamp & Dies
– Kat’s Meow PP
– Stitched Nesting Dome Dies
– Fish Bone Sprinkles
– Blue Opal Solid round Confetti
– Marshmallow Pearl Mix
Dog bone
Dog bone stencil
Pawsome dogs
Pawsome dog sentiments
Dog house
Pawsome dog paper pack
Pawsome dog sentiments
Pawsome cats stamps
Pawsome cats sentiments
Pawsome love coverplate
3D box dies
Pawsome Cats
Fish bone confetti
Pawsome cats sentiments
Kat’s meow paper pad
BLOG TEAM MEMBER – NORA
KS Pawsome Love Backdrop Die
KS Rainbow Bridge Sentiments
KS Rainbow Bridge Sentiments Coordinating Die Set
KS In the Doghouse Dies
KS Never Ending Square Dies
KS Pawsome Girl 6×8 Paper Pack
KS Build a Pawsome Dog
KS In the Dog House Dies
KS Valentine Quokka (sentiment)
KS Rainbow Bridge Sentiments
KS Rainbow Bridge Coordinating Dies
The Kat’s Meow
Mermaid Tail Pearl Mix
A2 Frames Dies
Boxed Sentiment Strips
Ball of Yarn Stencil
Pawsome Cat Sentiments and Dies
Stitched Scallop Nesting Tags
KS Pawsome Cats Stamps and Dies
KS Fishbone Sprinkles
KS Sentiment Strips and Matching Dies
KS The Kat’s Meow 6×6 Paper Pad
KS Stitched Nesting Hexagon Dies
KS Pawsome Love Backdrop Die
BLOG TEAM MEMBER-PRISCILLA
– Rainbow Bridge Stamps/Dies
– Lumber Yard Paper Pad (6×6)
– Slimline Rainbow Die Set (cloud)
– Slimline Stitched Cloud Border Die
Pawsome Stamps/Dies
– Pawsome Sentiments
– Pawsome Boy Paper Pad
– Lumber Yard Paper Pad
– Stitched Nesting Dome Dies
Pawsome Cat Stamps/Dies
– Spooky Boo Word Die
– Fish Bone Stencil
– Crafters Essentials Halloween Dies
– Cross Bone Sprinkles
– Pawsome Cat Sentiment Stamps/Dies
– Happy Birthday Brush Script Word & Sentiment Die
– Pet Sentiments Brush Script Word & Sentiment Die Set
– The Kat’s Meow Paper Pad
– Ball of Yarn Stencil
VIDEO TEAM MEMBER- REVATI
Pawsome Cat Stamp
– Pawsome Cat Dies
– Pawsome Cat Sentiment Stamp
– Pawsome Cat Sentiment Dies
– Fish Bone Stencil
– Fish Bone Sprinkles
– Rainbow Confetti Sprinkles
– Mother of Pearls Solid Round Confetti Sequins
-Pawsome Love Backdrop Die
– Rainbow Bridges Sentiment Stamps
– Rainbow Bridges Sentiment Dies
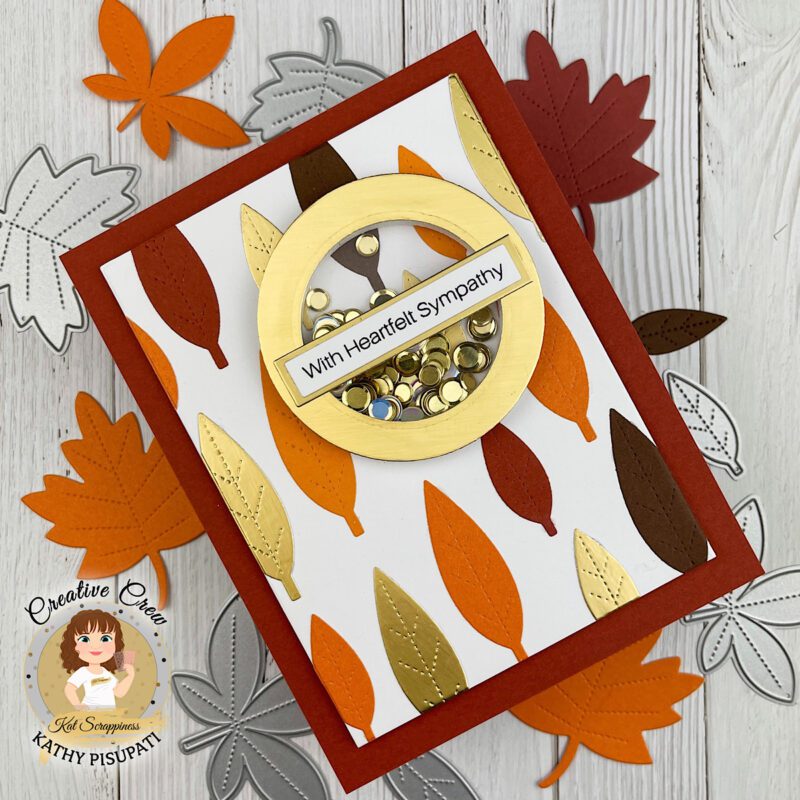
BLOG TEAM MEMBER – SHERI
KS Pawsome Cats Stamp Set
KS Simple Sentiments Stamp & Die Set
KS The Kat’s Meow 6×6 Paper Pad
KS Pawsome Cats Die Set
KS Fish Bone Stencil (dry embossed)
KS Never Ending Rectangle Die
KS Stitched Circle Die
KS Fish Bone Stencil
KS Pawsome Cats Stamp Set
KS Pawsome Cats Sentiment Stamp Set
KS Pawsome Cats Die Set
KS Pawsome Cats Sentiments Die Set
KS Ball of Yarn Stencil (dry embossed)
KS Never Ending Rectangle Die
KS Stitched Slimline Strips Die
KS White Enamel Dots
KS Pawsome Dogs Sentiments Stamp Set
KS Pawsome Dogs Sentiment Die
KS In the Dog House Die
KS Build A Pawsome Dog Die
KS Double Stitched Square Die
KS Stitched Puffy Cloud Die
KS Slimline Grass Border Die
KS Rainbow Bridge Sentiments Stamp Set
KS Pawsome Boy Paper Pad
KS Pawsome Girl Paper Pad
KS Build A Pawsome Dog Die
KS In the Dog House Die (paw prints)
KS Never Ending Rectangle Die
KS A2 Quilted Backdrop Die
KS Double Stitched Heart Die
KS Boxed Sentiment Strips Die
Pawsome Love Backdrop Die
In the Dog House Dies
Pawsome Dogs Sentiments Stamps & Dies
Pawsome Cats Stamps & Dies
Slimline Stitched Cloud Border Dies
Build A Pawsome Dog Dies
Stitched Hexagon Dies
Merry Christmas Word Dies
A Cozy Christmas Slimline Paper
Teal Enamel Dots
Holiday Bliss Sequins
Build A Pawsome Dog Dies
Stitched Hexagon Dies
Merry Christmas Word Dies
A Cozy Christmas Slimline Paper
Teal Enamel Dots
Holiday Bliss Sequins
KS In the Dog House Dies
Pawsome
KS Dogs Sentiments Stamps & Dies
KS Pawsome Girl 6×8 Paper Pad
KS Pawsome Dog Stamp and Die Sets
KS Lemon Yellow Pearl Mix
KS Stitched Dome Dies
KS Pawsome Cats Stamp & Dies
KS Pawsome Cats Sentiments Stamp
KS Spectrum of Love Paper
KS Scalloped Heart Dies
KS Crystal AB Rhinestone Mix
KS Pawsome love coverplate
KS Build A Pawsome Dog Dies
KS Mini Slimline Quilted Backdrop Die
KS Pawsome Boy Paper Pad
KS Dogs Sentiments Stamps & Dies
BLOG TEAM MEMBER -TINA
3D Box Dies
3D Add On Hills Dies
3D Add On Grass Dies
In The Dog House Dies
build A Pawsome Dog Dies
Pawsome Dogs Sentiment Stamps
Stitched Puffy Cloud Dies
Summer Fun Essential Dies
Paw print 6×6 Stencil
Mini Slimline Double Stitched Dies
Rainbow Bridge Sentiments Stamps and Dies
The Kat’s Meow 6×6
Ball Of Yarn 6×6 Stencil
Pawsome Cats stamps and dies
Pawsome Cats Sentiment stamps
Boxed Sentiment Strip Die
Ball of Yarn 6×6 Stencil
Pawsome Cats Stamps and Dies
Pawsome Cats Sentiment Stamps
Clear Solid Round Confetti Mix
Apricot Pearl Mix
VIDEO TEAM MEMBER- YVETTE
Build A Pawsome Dog Dies
Pawprint Stencil
Pawsome Dogs Sentiments
In the Doghouse Dies
Wood Grain Frame Die
Build A Pawsome Dog Dies
Pawprint Stencil
Pawsome Dogs Sentiments
In the Doghouse Dies
Pawsome Love Backdrop Die
Peachy Keen Enamel Dots
The Kat’s Meow Paper Pad
Pawsome Cats Stamps
Pawsome Cats Dies
Pawsome Cats Sentiments
Pawsome Cats Sentiments Dies
The Kat’s Meow Paper Pad
Pawsome Cats Sentiments
Nested Stitched Hexagon Dies

*Would you like to win the prize from Kat Scrappiness *U.S. residents only but if international winner is chosen, winner will have to pay for shipping).
Here’s how to win:
Comment below, and then head over to Instagram and follow #KSTHEKATSMEOW to follow all the hop participants, see their projects made for that hop and comment on their posts as well. Make sure you are following @KatScrappiness. Winner will be announced on @Katscrappiness on October 29, 2022.
Giveaway is Open to all. Please don’t follow and then unfollow afterward, that’s not nice. Giveaway accounts do not qualify. Per Instagram rules, we must mention this is in no way sponsored, administered, or associated with Instagram or Facebook. By entering, entrants confirm they are 13+ years of age, release Instagram or Facebook of responsibility and agree to their terms of use. Thank You and Happy Hopping!