Follow:
    Design Team Projects

    Such a Tool!

    Hi Friends! kel here today to share a fun card for a special friend!

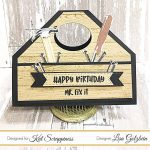
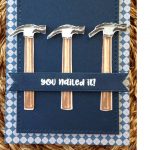
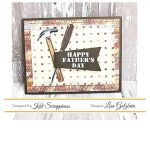
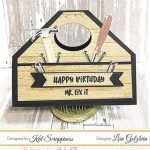
    I’m using the new Dad’s Tools stamp set to make this card. This set is HUMONGOUS and I absolutely love that it’s a multi-step stamp… the tools layer over each other for depth in the image which you can totally see below with the hammer heads.

    And the sentiment!! SO MUCH FUN!! I actually had a really hard time deciding which sentiment I wanted to use because there are soooo many to choose from! So my only complaint is that I don’t have enough inks/ink colors. hahaha!! What a thing to complain about, right?!? I scrounged around my stash for browns, and used the greys from the Gazebo pack (light grey, Manatee) and the Tropical pack (darker grey, Hippo) of the Lawn Fawn ink cube sets. I think the browns from the Coffee Break Mini Ink Pad Cube set would have worked if I had them! (P.S. – I TOTALLY have an excuse to need to go out and buy more inks haha!!)

    The last thing I did was stamp out the sentiment with my Memento Tuxedo Black Ink Pad and then mat it on some dark grey cardstock.

    But a hint for anyone that doesn’t have a lot of variety in shades – Stamp with the same color!! I used the first two layers of the hammer head with Manatee and then did the last two layers in Hippo and it still had a lot of depth in it, so it’s not always necessary to have every shade (but it definitely is nice to have every shade!!)

    Thanks for stopping by, see you again soon! Don’t forget to take part in our awesome monthly challenge for your chance to win a $25 Gift Card!!

    lovies, =o) kel

    Supplies Used (use code kel10 for 10% off your order!):

    New Releases, News

    Our May 1st Release at Kat Scrappiness!

    Hi everyone!  I’m so excited to share with you our three new products released today.  First up is Dad’s Tools which is a layered stamp set and so much fun!  Perfect for Father’s Day, birthdays, or other masculine cards!

    Dad's Tools

    Here are a few sample cards our design team members made with this stamp set.

    Now for our newest dies!  The first set of dies is called Stitched Flags and it includes SEVEN dies!

    Stitched Flag banner dies

    Here are some samples by our design team:

    Last but not least, our Stitched Fishtail Banners!  There are four banners in this set.

    Here are some samples created by our design team.

    That’s it for today! I hope you love our new stamp set, Dad’s Tools and our new dies, Stitched Fishtail Banners and Stitched Flags!  We have another new release coming later this month so stay tuned!  We also released several new sequins and sequin mixes this month as well!  You can see them HERE.

    Thanks for visiting our blog, be sure to stop by the store and pick up your new favorites! Have a crafty week!

    Design Team Projects

    Star Shaker Card with DT Member Cynthia

    Hi, crafters!  Cynthia here with a new video on how I made this Star Shaker Card.  I was very inspired by Kat’s Breezy Summer sequins mix to make something colorful and fun, so I reached for the Kat Scrappiness Swatches stamp set and pulled out the solid star stamp.  I am a BIG fan of making my own background panels, and this stamp set makes it super quick and easy.  I selected two yellow inks and a soft blue (to match the sequins colors), then decided to add some shiny silver embossing.  I found a small, solid circle stamp to include in my panel, which really helped fill in any small gaps between the stars.  I encourage you to take a look through your own stamp set collection and see how many of these small accessory stamps you might have.  They are the perfect way to add little details to your projects!


    I don’t know about you, but I used to be very intimidated by making shaker cards.  Yes, there are multiple steps to the process, but it really isn’t anything to be worried over.  My favorite way to make them is to create them as a separate element that I can attach to the front of my card.  You can make any shape that you would like to use – even a star!  I actually used my Silhouette Cameo 3 machine to create a star that was exactly the right size for my card front, but you could easily use dies to do it as well.  The “sandwich” of layers I used (from bottom to top) is as follows:

    • Yellow card stock star
    • Foam tape layer
    • Sequins mix
    • Acetate piece
    • White card stock star frame


    The final touch was to add a sentiment.  I used the “congratulations” from the Everyday Brush Strokes stamp set, heat embossed in the same shiny silver as the polka dots.  The adorable stitched banner is a little sneak-peek of more Kat fabulousness to come!  (Shhhh, don’t tell the boss!)  I really hope that you like this card as much as I do, and that you give shaker cards a try if you haven’t already.  Please watch my video (linked below) to see my entire process from start to finish.  Thank you so much, and I’ll see you all again soon!

    Design Team Projects

    Crafty Friends are the Best Friends!

    Good morning Kat Scrappiness fans!

    It’s Lisa here on the blog today and it’s time to get CRAFTY!??

    Chances are if you’re reading this post you are a crafty person and chances are you have one or more crafty friends!  Today I have 2 cards to share with you that are perfect to send to the crafty friends in your life!  Both cards use the new Kat Scrappiness word die “Scripty Hello My Crafty Friend“.  This is such a fun die because it can be used as a large focal point on it’s own or you can use any of the 4 words in the set on their own like I did on the second card.

    For my first card I used a technique that I love called inlaid die cutting.  I took some smooth white card stock and I blended 6 different Distress inks in a rainbow of color large enough to die cut the Crafty Friends die out of.  The Distress inks I used were a combination of the original colors and the newer Distress oxide pads.  In rainbow order the were:

    Picked Raspberry

    Carved Pumpkin

    Squeezed Lemonade

    Cracked Pistachio

    Salty Ocean

    Wilted Violet

    After I got the colors just the way I wanted I splattered the paper with water to give it a distressed look and then I die cut the entire saying out of the rainbow background and then again out of a black panel measuring 5 1/4″ x 4″.  I then took a standard white A2 card base and put adhesive all over the front before laying down the black panel.  Next I laid the rainbow colored sentiment back into the open spots on the black panel and fit them in like a jigsaw puzzle.  They fit perfectly in the openings and it didn’t add any bulk to the card.  I saved the little black bits to place back in the openings in the letters with holes in them.  Putting the black bits back in gives it a very uniform look.

    To finish the card off I added some paintbrushes that I also cut out of the rainbow background that I made and I added some glittery hearts at the bottom.  I splattered the whole front with some white paint to give it an artsy fun appearance.  The Crystal Katana tool was very helpful in helping me replace the words in their holes and also to place the tiny hearts down at the bottom.


    For my second card I used the word “Hello” from the Scripty Hello My Crafty Friend Die and cut it out 5 different times in a rainbow of glittered paper.  I layered a white banner on to a kraft card base to really make the repeated “Hellos” stand out.  To finish the card I stamped a sentiment from the Everyday Brush Strokes stamp set onto some kraft card stock and heat embossed it with white powder.  I popped the sentiment up with foam tape and the card was done.  This was a super quick card to put together but I think it looks fabulous because of all the glittery goodness in a rainbow of colors.  This is just one example of how you can use any of the words on their own from the Scripty Hello My Crafty Friend Die

     Thanks for joining me today, I hope you’ll share some creativity with one of your crafty friends!  This versatile die makes it super easy to do! 

    Don’t forget to play along each month with the Kat Scrappiness challenge for your chance to win a $25 gift card to the KS online store.  This month’s challenge is Envelope Art!  The KS Giraffe Envelope Art stamp set and The Owl Envelope Art stamp make dressing up your envelopes so much fun!

    If you enter code Lisa10 at checkout you can receive 10% off of your order!

    Have a great day everyone!

    I already am!

    ?Lisa ?

    Design Team Projects

    Envelope Art featuring Giraffe Envelope Stamp Set by Kat Scrappiness

    Hello everybody! Today I am stopping by to share some envelope art that I created using the newly released Giraffe Envelope Art Stamp Set by Kat Scrappiness.  This stamp set is perfect for creating super cute and fun cards as well as envelopes for all your happy mail!! The stamp set comes with a total of 9 stamps, allowing you to create the sweetest envelopes and cards your recipient has ever received.

    I started out by placing a plain white 4.3″ x 5.75″ envelope in my Tim Holtz Tonic Stamp Platform and stamped this adorable Giraffe using Memento Tuxedo Black Ink.

    I then colored my stamped image using Prismacolor Premier Colored Pencils.

    While I was quite happy with how my giraffe turned out, I wanted to add just a bit more color to my envelope.  With my pencils being a wax based pencil, I knew that I would be able to add some Distress Oxide Ink to my card without covering up and destroying the image I had already colored. I went with the Broken China and Antique Linen Distress Oxide Inks by Tim Holtz and applied both to my envelope using both a blending and blotting motion.

    I realized that I forgot to stamp the “please deliver to:” on the board before I started coloring, so I stamped it afterwards. And that completes my envelope art. I am happy with how it turned out and I can’t wait to be able to send someone some Happy Mail!!!

    I hope that you enjoyed my Envelope Art project for today! Below is a list of supplies that I have used to create this envelope and most can be found in the Kat Scrappiness Store. To receive 10% off of your order, use Code: JANA10 at checkout.

    As a reminder, Kat Scrappiness has a Challenge every month. One winner will be randomly picked at the end of each month and will receive a $25 gift card to the shop. Make sure you enter your projects for a chance to win!!!


    Supplies & Materials Used:

    Giraffe Envelope Art Stamp Set by Kat Scrappiness

    Tim Holtz Tonic Stamp Platform

    Memento Tuxedo Black Dye Ink Pad

    ReCollections White 4.3″ x 5.75″ Envelope

    Prismacolor Premier Colored Pencils

    Broken China Distress Oxide Ink Pad by Tim Holtz

    Antique Linen Distress Oxide Ink Pad by Tim Holtz


    Coupons & Sales, Design Team Projects

    Prayers to You and Your Family

    Happy Saturday, everyone! Thank yo for stopping by Kat Scrappiness Blog today. I created a what I considered CAS card for today’s blog.

    I love love love ink-blending background especially with a geometric twist. It’s very easy to do that does not require any particular stencil and such. So I die cut a big circle(I chose the biggest circle die in my stash) from a piece of cardstock, and use the negative piece as a stencil. For my ink-blending, I chose some pretty pinks and reds colors from Distress Ink Pads, you can definitely go with any color scheme you want, and I think a rainbow color ink-blending with be good here too. Started from the left, I move my big circle stencil to the right every time, and created a pattern as shown in the picture.

    I then use the same circle die did some partial die-cutting on the right side, also trim down the bottom so my piece will go nicely to the bottom left corner. As much as I love a colorful background, sometimes I like to leave som white space to make the colors pop even more. I used some foam tape to adhere the panel on my card base for some dimension.

    For my sentiment, I die cut the word “Prayers” from Hero Arts Prayers Stamp & Cut (Stamps & Dies) three times and adhere them together to go onto my card. I also white heat embossed the sub-sentiment “to you and your family” on a thin strip of black cardstock.

    Finish it off with some clear sparkling sequins, and this card is finished.

    I hope you like today’s card and give it a try! Also remember to use the code: HERO30 at Kat Scrappiness online store when check out to get 30% off your Hero Arts stamps and dies. Have a good day!

    Supply List:

    Hero Arts Prayers Stamp & Cut (Stamps & Dies)

    Gina K Designs Cardstock 8.5″X11″ 12/Pkg – White

    Gina K Designs Cardstock 8.5″X11″ 12/Pkg – Black Onyx

    Tsukineko Full-Size VersaMark Clear Embossing Ink Pad

    EK Success Embossing Powder Tool Applicator

    White Embossing Powder by Lawn Fawn

    Ranger Multi Medium Matte .5 oz