Tag: Everyday Brush Strokes stamp set

  • Oopsie Daisy – Happy Birthday Card

    Oopsie Daisy – Happy Birthday Card

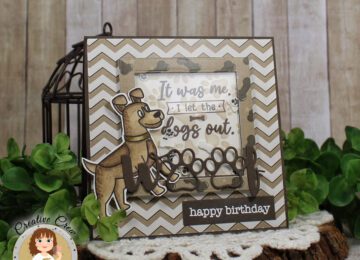
    Happy Friday Friends! Sheri from the Creative Crew here today with a Birthday card featuring the Oopsie Daisy Layering Stencil along with a few other supplies.


    Steps to Create Card:

    • Cut White A2 Top Fold Card Base: 4 1/4″ x 5 1/2″ (4 1/4″ x 11″, scored at 5 1/2″)
    • Cut White panel using the A2 Quilted Background die.
    • Cut White frame using the largest die from the A2 Frame die set.
    • Cut 2 White fishtail banners from the Nesting Fishtail Banner die set. I used the second & third largest banners in the set: 3″ x 4 1/2″ & 2 5/8″ x 4″.
    • Ink blend the largest fishtail banner from the 2 you cut out. (used Gina K. Dark Orchid)
    • Stamp birthday sentiment from the Happy Day and Every Day Brush Strokes stamp sets on the smaller fishtail banner towards the bottom. Use black ink for the “Happy” and stamp the “Birthday” using embossing ink on a scrap piece of black card stock that you will trim into a strip using the Boxed Sentiment Strip dies.
    • Cut foliage from the Stitched Foliage die set. I cut three pieces from white card stock.
    • Ink blend foliage pieces using green ink. (used Gina K. Designs Jelly Bean Green)
    • Take white card stock large enough to stencil your flowers and leaves. With the Oopsie Daisy Layering Stencil and three shades of ink to create your daises. (used Gina K. Light Orchid, Medium Orchid and Dark Orchid). You will also need 4 leaves. (I used Gina K. Jelly Bean Green and was just heavy handed with the second layer). Once your daisies and leaves are complete, cut them out with the Oopsie Daisy Coordinating Die Set.
    • Assemble Card. (foam tape optional)
    • For embellishment I added a few Ice Ice Baby Clear Enamel Dots.


    Here’s a list of supplies I used that can be found in the store.

    Affiliate Links used at no additional cost to you. Thank you for your support!


    Happy Stamping!!

  • Pawesome Dog Shaker Card

    Pawesome Dog Shaker Card

    Happy Tuesday Friends! Sheri here today from the Creative Crew with a fun Doggy Shaker card featuring products from the NEW Pawsome Dog Release! What a FUN release for all the DOG LOVERS out there!!

    Steps to Create Card:

    • Cut and Scor 4 1/4″ Top Fold Square Card Base: (4 1/4″ x 8 1/2″, scored at 4 1/4″) – used Gina K Charcoal Brown card stock.
    • Cut pattern paper panel from Pawsome Boy 6×8 Paper Pad using Never Ending Square die set: 4 1/8″.
    • Create Shaker Window: using the Never Ending Square die set you will need to cut a total of four 2 7/8″ x 2 7/8″ squares -1 with white card stock for stenciled background panel, 1 with Acetate, 1 with brown card stock and 1 with pattern paper. You will then take the Pattern Paper and Brown squares and cut out the center to create window using the 2 1/4″ square die.
    • Take white 2 7/8″ x 2 7/8″ square and Pawprint stencil – used Gina K Kraft ink. Next stamp sentiment from Pawsome Dogs Sentiment stamp set – used Gina K. Charcoal Brown.
    • Stamp and color dog from the Pawsome Dog stamp set. I colored with copic markers and then fussy cut the image out.
    • Cut 2 Woof sentiment from Pet Sentiment die set with brown card stock – used Gina K Charcoal card stock. Stack to add dimension to card.
    • Stamp and emboss in white the Happy Birthday sentiment from the Everyday Brushstroke stamp set. Then cut into a sentiment strip using the Boxed Sentiment dies.
    • Assemble card/shaker window. For shaker bits I used the Dog Bones and Paw Print Sprinkle Mixes.


    Here’s a list of the supplies I used from the store.

    Affiliate links are used at no cost to you. Thank you so much for your support!

    Kat Scrappiness
    Pawsome Dog Release

    Affiliate links are used at no cost to you. Thank you so much for your support!


    Happy Stamping!!

  • Happy Birthday Shaker Card

    Happy Birthday Shaker Card

    Happy Saturday everyone!  It’s Caren on the blog today, and I’m sharing a shaker card using a ton of Kat Scrappiness products.  I made this fun card for my niece’s birthday.

    Here is how I created the card:

    I love the way this card turned out!  Check out the Mother’s Day sale going on in the Kat Scrappiness shop.  Save 15% off sitewide with coupon code “LOVEMOMS” now thru May 9th.

    Thanks for stopping by!

    – – – SUPPLIES for today’s project– – – – – – – – – – – – – – – – – – – – – – – – – – – – – – – – – – – – – – –

  • Mini Slimline Quokka Birthday Card

    Mini Slimline Quokka Birthday Card

    Sheri here today with a masculine birthday card featuring the adorable Everyday Quokka stamp & die set!

    Do you struggle with masculine cards? I know I do at times. I thought that starting with a ink blended background would be fun and this argyle background was perfect for a masculine themed card!


    Steps to Create Card:

    • Create a Mini Slimline card base:  3 1/2″ x 6″ (Cut card stock to 6″ x 7″,  score at 3 1/2″ on the 7″ side).
    • Cut Blue Mat: 2 15/16″ x 5 7/16″.
    • Cut White Panel for stenciled back ground. Start with a piece of card stock measuring 3 1/2″ x 6″.  Using the Newton’s Nook Argyle Stencil and two shades of blue (GKD Blue Denim & GKD In The Navy) to stencil the background. I found using the Mini Detail Blending Brushes helpful for the stitching. You want to pounce up and down to create the clean lines.
    • Trim White/Stenciled Panel down to 2 13/16″ x 5 5/16″.
    • Cut out a white 2 1/2″ circle from the Never Ending Circle die set. Depending on the look you want I trimmed off to match the blue mat once the card was assembled.
    • Stamp and Color the Quokka and present from the Everyday Quokka stamp set. I stamped with alcohol friendly ink and used copic markers. Then I cut out with the coordinating die set. You can also fussy cut the images out.
    • Stamp sentiment from the Everyday Brush Strokes stamp set with Versamark and emboss with white embossing powder. Now trim into a sentiment strip (approx 2 1/4″ x 3/8″).
    • Assemble card. For dimension I added foam tape to pop up the card panel to the card base, the circle element, Quokka and present. This is optional.
    • For embellishment I added a few enamel dots from the America the Great collection.

    Here’s a list of the supplies I used from the store.
    Affiliate Links used at no additional cost to you. Thank You so much for your support! 

    To Shop Sale, Click Here!

    Happy Stamping!!

  • Birthday Essential Dies – I Love You

    Birthday Essential Dies – I Love You

    Happy Monday.  Did everyone take a look at the new Birthday Essentials release from this weekend?  There are so many great new products in the shop.

    My card today features several dies from the Birthday Essentials die set – the cake, dripping icing, and bow. I die cut my shapes from various colors of card stock and adhered them together.  I die cut a panel of white card stock and a piece of the turquoise Spectrum of Love pattern paper with one of the Stitched Fancy Scalloped rectangle dies.  I adhered the turquoise pattern paper to the lower half of the panel and added a strip of pink patterned paper.  I very lightly ink blended on the center of the panel with light pink ink to get a glowing effect behind the cake.  I heat embossed my sentiment from the Everyday Brushstrokes stamp set to the top of the panel.  I added the cake with dimensional adhesive to the panel and adhered the panel to a light gray card base with dimensional adhesive.  I added fuchsia berry rhinestones on the cake to finish off the card.

    I love that this die set can be used for much more than birthdays.  Thanks for stopping by.

    – – – SUPPLIES for today’s project– – – – – – – – – – – – – – – – – – – – – – – – – – – – – – – – – – – – – – –

  • Hello My Crafty Friend

    Hello My Crafty Friend

    Hello Everyone!

    Sheri here with a fun card to say “Hello” to a crafty friend!

    We will be using some dies (Hello Crafty Friend with Shadow, After the Rain, & Stitched Scalloped Rectangle) and doing a little ink blending and using a sentiment from the Everyday Brush Strokes stamp set today.


    Steps to Create Card:

    • Cut an A2 Top Fold Card Base: 4 1/4″ x 5 1/2″ (4 1/4″ x 11″, scored at 5 1/2″).
    • Cut a White Stitched Scallop Rectangle panel using the largest die from set.
    • Cut Black Mat: 3 5/8″ x 4 7/8″
    • Cut White Panel: 3 1/2″ x 4 3/4″
    • Cut out Rainbow and Clouds using the After The Rain die (Rainbow: Dark Pink, Light Pink, Orange, Yellow, Green, Light Blue & Purple and three white clouds).
    • Cut out a Hello Crafty Friend with Shadow in black card stock. You will snip off the and only use the “Hello”.
    • Take White panel and softly ink blend a little light blue to add a sky. You will also stamp “My Crafty Friend with black in from the Everyday Brush Strokes stamp set.
    • Assemble Card.
    • For embellishment I added Glossy Accents to the “Hello” to make it look like an epoxy sticker and a few Diamond Rhinestone Mix. Shhh…coming in tomorrow’s release 😉

    Here’s a list of the supplies I used from the store.

    Affiliate Links used at no additional cost to you. Thank You so much for your support!


    Make sure to check out this Weekends Holiday Sitewide SALE!!

    (Click on banner to start shopping!!)

    Happy Stamping!!

  • KS August DT Inspiration and Giveaway Day 2

    KS August DT Inspiration and Giveaway Day 2

    Hello Kat Scrappiness fans!  Welcome to Day 2 of the August DT Inspiration and today, we are showcasing the two pre-released Slimline dies –> the Cross-Stitched Nesting Slimline and the Zig-Zag Nesting Slimline. The design team is back to show you more project inspiration using the new dies and we also have a GIVEAWAYPLEASE SCROLL THROUGH AT THE END OF THE POST TO FIND OUT HOW TO WIN.


    CROSS-STITCHED NESTING SLIMLINE DIES


    ZIG-ZAG NESTING SLIMLINE DIES


    We have a special treat for you today with process videos from our YT DT Members.  You are going to LOVE what they have in store for you!


    Are you ready to see the samples?


    ADAM KARLE


    I love the simplicity of this card by Adam.  He used the Zigzag Nesting Slimline die and die-cut the card stock in different colors to create his design.  He added the Brush Script “hello” and black enamel dots to finish his design. Simple and elegant!


    CAREN BARTHOLOMEW

    Two amazing cards by Caren.  First card is with the Zig-Zag Nesting Slimline die and the Wok-On stamp set.   Second card below uses the Cross-Stitched Slimline Nesting dies and the Merry Christmas with Shadow dies.


    YT DT MEMBER – JO THOMPSON


    This fall scene by Jo is just AMAZING!  She also has a process video for us today on how she created this card.


    KATHY SCHWEINFURTH


    I love this shaker card by Kathy.  She used the Cross-Stitched Nesting Slimline dies to create the frame on her shaker card using a mix of the new sprinkles, and added the Santa from the Christmas Gnomes stamp set and Merry Christmas with Shadow.


    The second card below was shared on the blog earlier this week, showcasing the Thanksgiving Gnomes stamp set and Zig-zag Nesting Slimline dies.


    LISA GOLZBEIN


    A crafty card by Lisa, showcasing the Zig-Zag Nesting Slimline die, Distressed Edge Nesting Slimline dies and the Crafter’s Gonna Craft stamp set.  Perfect card for a crafty friend!


    MARIA RUSSELL


    My first card was created by die-cutting the Cross-Stitched Slimline panel on white card stock.   I used the Everyday Brush Strokes stamp set and stamped the image a few times in rainbow order.  Finishing the design by adding the “you” from the Thank You with Shadow die and Sparkling Clear Droplets sampler pack for added texture.


    I used the Zig-Zag Nesting Slimline die as well as the Zig-zag rectangle dies to adorn the background for my Thanksgiving Gnomes.   The berries came from the Happy Fall Y’all stamp set.  I wanted to use a funny sentiment (available at the shop) from Riley & Co. called Vegetarian Cling Stamp that I thought went perfectly with this scene.  It makes me laugh!


    MARTHA GOMEZ


    Martha shared her blog post yesterday on how she created this card, using the Zig-zag Nesting Slimline die and the Owl Envelope Art stamp set.


    MEGHAN KENNIHAN


    Meghan is spoiling us today with 3 AMAZING CARDS, showcasing the Cross-Stitched Nesting Slimline dies, sprinkles, Cityscape Slimline die, and Thanksgiving Gnomes stamp set.  She will be sharing a blog post on how she created these cards.  I can’t even pick a favorite!


    PRISCILLA JOSEPH


    Love both cards by Priscilla.  The first one uses the Zig-zag nesting slimline dies and the Crafter’s Gonna Craft stamp set.

    The second card was created using the Thanksgiving Gnomes stamp set, Cross-Stitched Nesting Slimline dies along with the Crafter’s Essential Fall die-set.


    TINA DORNBAUM


    A “sweet” and simple card by Tina showcasing the Zig-zag Nesting Slimline die and the Sweet Word sentiment die.  I love the simplicity of this card but creates a huge impact.


    YT DT MEMBER – SANDRA BEUS


    Sandra is joining us today with a process video (below) on how she created this card.  It’s so gorgeous!


    WALESKA GALINDO


    A cute summer-themed card by Waleska featuring the Zig-Zag Nesting Slimline die set with the new sprinkles available at the shop.


    The entire design team worked so hard to create these samples for you today.  Which one is your favorite? I can’t even pick one to be honest!
    You will find all of the supplies listed and linked below.  We have more amazing products coming your way next month so please stay tuned.  Thank you for joining us this week and happy crafting!

    Would you like to win the Cross-Stitched Nesting Slimline or the Zig-Zag Nesting Slimline dies?    We will choose one lucky winner for each prize!
    Here’s how to win:
    Leave a comment on this blog post and tell us what project/s inspired you to the most today.  You have until August 27 to leave a comment.  Winner will be announced on Friday, August 28thWinner should send an email to: winners@katscrappiness.com to claim the prize within 48 hours.
    ————SUPPLIES———–


  • Lola Happy Birthday Slimline Card

    Lola Happy Birthday Slimline Card

    Hi everyone, it’s Tina here. Slimline cards are the rage right now and Kat Scrappiness has you covered with an awesome selection of dies. Below you will find the steps to create your own Lola Happy Birthday Slimline Card.

    Step 1 – Trim White Cardstock to 7” x 8 1/2”, score at 3 1/2” and fold in half for a vertical side fold card. (Slimline)

    Step 2 – Diecut Wonky Stitched Nesting Slimline using White Cardstock. Adhere to card front using Nuvo Deluxe Adhesive.

    Step 3 – Trim White Cardstock to 2 1/2” x 7 1/2”. Apply Distress Oxide Ink Speckled Egg and Stormy Sky onto a kraft mat, spray with water and dip the panel into the ink. Heat set in between dips and repeat until desired effect is achieved. Set aside to dry.

    Step 4 – Diecut Never Ending Circles to create Balloons using various colours of Cardstock. (If you have a Balloon die then use that instead). Cut out a small triangle to place in back of the circles. Add string to the back using a piece of tape. Adhere to panel created in Step 3. Bottom Balloon is adhered using Foam Tape and Nuvo Deluxe Adhesive to the balance. Trim off the Balloons that is hanging off the edges. Adhere the entire panel to the card front.

    Step 5 – Stamp Lola The Giraffe using Gina K Amalgam Ink on White Cardstock. Colour in with any Alcohol Markers of your choice. I used Spectrum Noir Classique Markers. Fussy cut the image and using a Black marker add Black ink to the edges. While I was doing that my marker slipped and I marked the ear and the foot. To fix this I created a bow to cover the ear and recoloured the feet and that fixed my errors. Wrap the strings around the horn on the left side and adhere the image using Foam Tape

    Step 6 – Stamp Everyday Brush Strokes sentiment using Versafine Onyx Black Ink to the bottom of the card front.

    Step 7 – For added interest and sparkle randomly adhere Sparkling Clear Jewels using a Crystal Katana and Collage Medium.

    This card can be used for many occasions by changing the colours and sentiment. For an example it can be for an anniversary or baby shower, etc. Below is a link to the products used. Thank you for stopping by and Happy Crafting!

    Products Used:

    https://linkdeli.com/widget.js?id=f5e8378456858c916708

  • You Color My World Rainbow Card

    You Color My World Rainbow Card

    Hi everyone, it’s Tina here. I have been playing around with the Never Ending Circle dies to create rainbows. It is super easy and by stacking the Circle dies you end up getting 2 with one pass. Below you will find the steps to create your own You Color My World Rainbow Card.

    Step 1 – Trim White Cardstock to 8 1/2” x 5 1/2”, score at 4 1/4” and fold in half for a vertical side fold card. (A2)

    Step 2 – Diecut Stitched Cloud Backdrop using Black Cardstock. Adhere to card using Nuvo Deluxe Adhesive.

    Step 3 – Diecut 7 of the largest Never Ending Circles using White Cardstock. Colour in each layer in rainbow order using any colour medium of your choice. I used alcohol markers. Once coloured cut in half. Adhere the rainbow using Nuvo Deluxe Adhesive. See below photos.

    Step 4 – Diecut He Is Risen (x2 small cloud and 1x large cloud) using White Cardstock. Adhere small cloud and large cloud using Nuvo Deluxe Adhesive. For the last small cloud stamp Everyday Brush Strokes sentiment Color My World. I used Washi Tape to cover the word You and the other words except one word in one colour. I removed the Washi Tape and stamped. I repeated this process to have each word in a different colour. Adhere the stamped cloud using Foam Tape.

    Step 5 – Diecut I Love You With Shadow using Red Cardstock for the shadow and Orange Cardstock for the word. Assemble and adhere to card using Foam Tape.

    Step 6 – For added interest I adhered Confetti Sprinkles using all the 6 colours used in the rainbow using Collage Medium and a Crystal Katana. The colours of the Confetti Sprinkles are Red, Orange, Bright Yellow, Lime Green, Light Blue and Purple.

    This card can be used for any occasion by changing the colours and sentiment. Right now cards using Rainbows with words of encouragement are the rage. Below you will find the link to all the products used. Thank you for stopping by and Happy Crafting!

    Products Used:


    https://linkdeli.com/widget.js?id=f5e8378456858c916708


  • Rainbow Clouds Shaker Card With Process Video

    Rainbow Clouds Shaker Card With Process Video

    Hi Everyone, it’s Tina here. There are some new sprinkles in the shop and today’s video is featuring the Kawaii Cloud Sprinkles along with some of my favorite Kat Scrappiness product.

    This card is so much fun and can be used for several occasions by changing the colors and sentiment. Below is a link to all the products used. Right now Kat Scrappiness have a Christmas in July sale. Use code: JULYXMAS at checkout to receive 20% all Christmas/Hannukah and holiday themed products. Thank you for stopping by and have a wonderful day.

    Products Used:

    https://linkdeli.com/widget.js?1559654439292