Follow:
    Design Team Projects

    Snowflake Joy Mini Slimline Card

    Hi everyone, it’s Tina here. I have a holiday card to share with you which can be used as a New Year’s Card using the Snowflake Trio Dies. Below are the steps to create your own card.

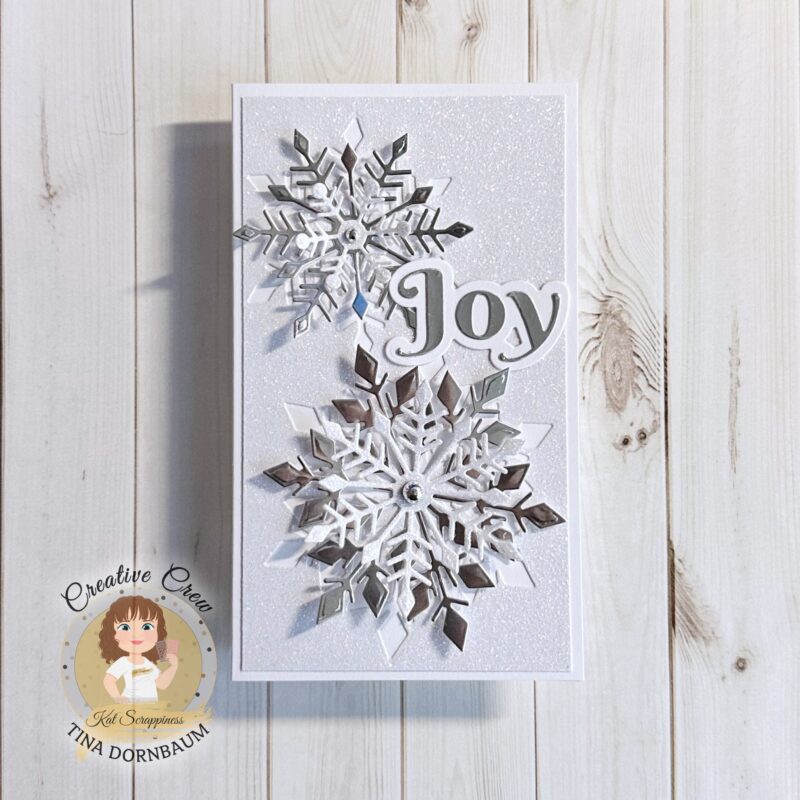
    Step 1 – Trim White Cardstock to 7″ x 6″, score at 3 1/2″ and fold in half for a vertical side fold card. (Mini Slimline)

    Step 2 – Trim White Glitter Cardstock to 3 1/4″ x 5 3/4″. Diecut Snowflake Trio using the 2 largest dies on the trimmed White Glitter Cardstock. Keep the diecuts and adhere the panel to the card front using Bearly Art Precision Glue. Diecut the Snowflakes Trio using White Glitter Cardstock and Silver Matte Cardstock in various sizes. Using Bearly Art Precision Glue adhere the Silver Matte diecuts, then top it with the White Glitter diecuts.

    Step 3 – Adhere Silver Pearl Mix to the center of the Snowflakes using Bearly Art Precision Glue.

    Step 4 – Diecut Joy with Shadow (Joy using Silver Matte Cardstock and Shadow using White Cardtock). Assemble and adhere to card using Bearly Art Precision Glue.

    This card can be used for several occasions by simply changing the sentiment. For example, use Happy Birthday sentiment for someone who celebrates their birthday in the Winter Season. Below is a link to all the products used. Thank you for stopping by and Happy Crafting!

    Products Used:


    https://linkdeli.com/widget.js?id=f5e8378456858c916708

    Design Team Projects

    Santa Flying Over The Mountains Card

    Hey crafty friends! Today I am sharing a Christmas card showcasing the Slimline Mountainscape dies from Kat Sprappiness paired with the flying Santa from the new The Night Before Christmas Window Scene dies. I just LOVE this wintery scene! I am imagining Santa flying over the mountains on his way back to the North Pole after a long night of delivery presents! Here is how I made this card

    1. I decided to cut down the slimline mountains to a mini-slimline size, so I first cut out all the mountain dies from Neenah cardstock and then ink blended the mountains and trees with Distress inks. I wanted some dimension on the snow peaks of the mountains, so I decided to try out the new Deco Topping Marble-First Snow media from Kat Scrappiness. I loved how this turned out – it looks like packs of snow on the snow peaks!
    2. I then ink blended the background card panel with blue distress inks and glued the mountains onto the card panel using Bearly Art Glue. I popped the trees with foam tape. I then cut off the excess scene to match up to the mini-slimline card base. I then added some white splatter for a snowy scene using white acrylic paint.
    3. I then cut out the flying Santa from The Night Before Christmas Window Scene dies with black glitter cardstock. I then popped Santa above the mountains using foam tape so he flying in the sky.
    4. I then used the Happy Holidays sentiment from the Reindeer Games Sentiment stamp set and white embossed the sentiment on a piece of red cardstock I had in my stash. I cut the sentiment down to a strip and popped the sentiment onto the card base with foam tape.
    5. I then added some Sparkling Snow Pearl Mix embellishments to add the extra sparkle to my card before gluing the card panel onto a mini slimline card base.

    I love how this scene turned out! It is such a cute scene! I hope you got inspired by my card and I hope you have a great day! Don’t forget the Kat Scrappiness sale this month! Use the code CHRISTMAS10 to get 10% off Christmas items! Sale runs until December 24th! Thank you for stopping by!

    Here is what you need to make this card:

    Slimline Mountainscape Dies – Kat Scrappiness, Inc

    Reindeer Games Sentiments Stamp Set – New Release – Kat Scrappiness, Inc

    The Night Before Christmas Window Scene Dies – New Release – Kat Scrappiness, Inc

    Deco Topping Marble – First Snow – Kat Scrappiness, Inc

    Sparkling Snow Pearl Mix – Kat Scrappiness, Inc

    Bearly Art Precision Craft Glue – THE ORIGINAL – Kat Scrappiness, Inc

    Opaque Bright White – WOW! Super Fine Embossing Powder 15ml – Kat Scrappiness, Inc

    Telescopic Embossing Powder Tool with Retractable Brush – Kat Scrappiness, Inc

    Design Team Projects

    Gift Card Pocket Die

    Happy Wednesday everyone.  It’s Caren here on the blog today.  Do you give gift cards during the holidays?  I always ending up giving a couple of gift cards.  Today I’m sharing several gift card holders I created with the Gift Card Pocket die.  What I love about this die is that you can use as it or attach it to a card, package, and gifts.

    These were so fun and quick to make!


    Thanks for stopping by!

    – – –– – –– – –– – –– – –– – –– – –– – –– – –– – –– – –– – –– – –– – –– – –– – –– – –– – –– – –– – –– – –– –

    Here is a link to the Kat Scrappiness shop and direct links for products I used on today’s card.

    – – – SUPPLIES for today’s project– – – – – – – – – – – – – – – – – – – – – – – – – – – – – – – – – – – – – – –

    Design Team Projects

    More than just cards?

    Hi friends!  Kim here with you today, and I am sharing a project that is not a card!  I wanted to show how versatile the amazing dies are!  First, I would love to know if you create handmade gifts or not.

    Rather than creating a card, I used the Mason Jar Shaker Card Dies to create an ornament.   I had seen an advertisement for a wood shaker ornament somewhere, and I immediately thought that I could recreate it using these dies.

    Here are the instructions for creating the ornament:

    1.  Die-cut the mason jar outline from heavy cardstock several times.  I used heavy kraft cardstock and I cut 6 outlines.
    2.  Die-cut the solid portion of the mason jar twice from acetate.
    3.  Adhere acetate to the top of one outline die-cut, the bottom of one outline die-cut and set them aside to dry completely if using a liquid adhesive.
    4.  Using the remaining die-cut pieces, adhere them together and adhere to the bottom die-cut that has acetate adhered to the top.   This will create your shaker base.  Allow to dry completely if using liquid adhesive.
    5.  Once the layers are dry, add your shaker bits.  I used the Holiday Bliss Mix for my ornament.
    6.  Adhere the top of the shaker (acetate is adhered to the bottom of the die-cut layer) to the base and allow to dry.
    7.  Die-cut the “fabric” piece from your favorite patterned paper and the jar band from your favorite metallic paper.  I used the Gobble Gobble 6 x 6 Paper Pad.
    8.  Prior to adhering the “fabric” and band, wrap a piece of jute around the top of the mason jar and tie it to create a hanger.
    9.  I added two banners and hand wrote the year on one of them, adhered them down and then added the “fabric” piece and jar band.
    10.   Add a simple bow and any other desired embellishments.

    Shopping List:

    Mason Jar Shaker Card Dies

    Holiday Bliss Mix

    Gobble Gobble 6 x 6 Paper Pad

    I hope that you are inspired to find new ways of using your products!  I had so much fun creating this ornament, and I am amazed at how simple it really was!

    Thanks so much for hanging out with me!


    **Affiliate links have been provided at no additional cost to you.  Thanks so much for supporting my hobby!**


    Design Team Projects

    Reindeer Games Christmas Card

    Hello my crafty friends! It’s Maria Russell here with you today I am on full “Christmas Card” production mode! This card today is probably one of my favorites so far!

    For today’s project, I am showcasing the Reindeer Games Stamp Set and coordinating dies, along with the Santa’s Helper Stamp Set (sentiment) and Birch Tree With Cardinal Backdrop Die.

    Here’s how I made this card:

    I hope you like this card today and got inspired. Below, you will find links to the supplies used to create this project. Where available, I use compensated affiliate links at no extra cost to you. Your support helps me to keep bringing you new projects and inspiration. Thank you for stopping by, and have an amazing day!

    ———-SUPPLIES———-

    Design Team Projects

    Santa’s Helper Christmas Card-Are you Naughty or Nice?

    Hello friends!! It is Nora here on the blog with a simple Christmas card created with some of the NEW Kat Scrappiness Winter Release. I combined the little boy elf from the Santa’s Helper Stamp Set with the new Reindeer Games 6×6 Paper Pad for this holiday card.

    Here is how I created this card:

    • Die cut the checked paper from the Kat Scrappiness Reindeer Games 6×6 Paper Pad using the Deco Frame Nesting Die. I trimmed a smidge off of each side so that the card base would show on the edges. Adhere it to the front of an A2, top folding, white card.
    • Using the Kat Scrappiness Nesting Fish Tail Banner Dies, die cut a banner out of white cardstock. Adhere the banner to the front of the card as shown.
    • Stamp the elf and the sentiment from the NEW Kat Scrappiness Santa’s Helper Stamp Set onto white paper with black ink. Color the elf with markers. I used Copic markers for mine but you could color it in with any type of medium you might have. I also embellished the image with some white gel pen for the polka dots on the presents and silver glitter glue for the bells on his shoes.
    • With the Santa’s Helper Coordinating Dies, die cut the elf and the sentiment. Using foam adhesive, adhere the elf onto the banner. Adhere the sentiment underneath with liquid glue.

    • Using a clear sparkle pen, color over the hat and the red shirt for some sparkle and shine. Add glossy accents to the socks and green bow.
    • To complete the card, add some red and green sequins using the Kat Scrappiness Glitter Sequin Mix-Christmas and the card is complete.

    That is all from me today. Please be sure to check in to the Kat Scrappiness Blog for more amazing projects by the Design Team.


    All Products used from the Kat Scrappiness Shop are linked below. Affiliate Links used at no extra cost to you.


    Design Team Projects

    Creative Crew’s 2022 Holiday Gift Guide

    Hello Crafty Friends!

    It’s Donna Idlet here, I hope you have enjoyed all month the Kat Scrappiness Creative Crew showing you their personal TOP FIVE FAVORITE Kat Scrappiness products, that we think you need in your craft room.  If you missed them, please check out the blog for more inspiration.

    I’m choosing these top five items, because I either love using them or use on most cards I create ….so without further ado, here it goes.

    Number 1Embossed Rectangle Die.  I love how this die, it leaves a beveled edge on the layer.


    Number 2:  Is the Rainbow bridge Sentiments and Rainbow Bridge Coordinating Die Set.  This set is perfect to send someone that has lost a furry family member.

    Here is a sample card I used all of these sets above.  You can find all the details of this card here.


    Number 3:  The Stitched Nesting Dome Dies is a favorite!  These dies are great for layering or using the largest die for a card base.

    Here is a sample of a card I used the Stitched Nesting Dome Dies as a card base.  You can find the details of this card here.

    Number 4Large Merry Christmas with Shadow.  I love all of Kat Scrappiness words with shadows, the large ones are so nice because you can create a card just with the word dies.

    Here is a sample of a card I created using the Large Merry Christmas Die with Shadow.  You can find the details of this card here.

    Number 5:  My last item that is a must to have in your crafty room is the Christmas Gnome Stamp Set with Coordinating Dies.  Those of you who may follow me, know I love to create cards with gnomes and coffee.  Well, this set has it all!  You can find all the details of this card here.


    BONUS!  Another favorite of mine is Kat Scrappiness Teflon Bone Folder & Rainbow Ombre Reverse Connecting Lock Craft Tweezer.  I use these items in almost every card I create.


    Did you know Kat Scrappiness has gift cards you can ask your loved ones to purchase for you?  They are available in varying amounts, starting at $10.  Here is the link to the gift cards and the store to start shopping!!!

    Thank you so much for stopping by, what are some of your favorites from Kat Scrappiness?

    Here is a list of supplies I used on my cards. Affiliate Links used at no additional cost. Thank you for your support.


    https://linkdeli.com/widget.js?id=f5e8378456858c916708