
Happy Monday Crafty Friends! Priscilla here from the Kat Scrappiness Design Team. Today I am sharing a holiday card that showcases an adorable Gingerbread Man die from Kat Scrappiness with a festive holiday back drop.
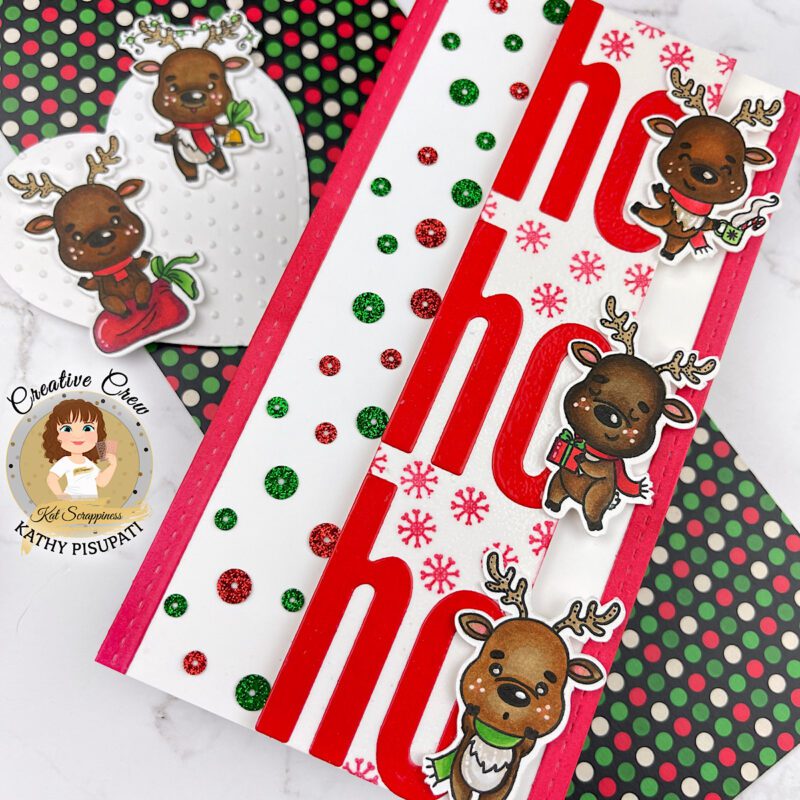
- First cut a slimline card base. The measurement for mine is 3.5” x 8.5”.
- On a separate piece of card stock, stamp your reindeer. Color with your choice of medium. I used alcohol markers.
- Die-cut your reindeer.
- Select a red card stock that you want to use for the lettters and the stitched strips on the edges of the card. Die-cut two strips, 3 each of the letter H and O.
- I added embossing ink and clear powder to the letters and heat embossed them.
- Now cut a strip of white card stock just wide enough to place your letter on. The length is 8.5”.
- Using the small snowflake stamp in the stamp set, randomly stamp snowflakes all over the piece you just cut.. I used a coordinating red ink.
- Align your first H to the left edge and glue down.
- Align your first O to the left and adhere.
- Now do the BOTTOM H & O.
- Find the center point between these two words and do the same with the third word. Glue it down.
- Decide where you want your reindeer on the above strip. Adhere the left edge with glue.
- Add foam tape to the reindeer strip and glue to the main card panel (a bit to the right side)
- Glue down your two Stitched Strips.
- Add the Christmas Glitter Sequin Mix to the left of the deer and you’re done.
- I die-cut a panel for my card front using the Birch Tree w/Cardinal Backdrop Die.
- I added a shimmery white embossing paste to the die-cut panel, and I love the effect that it gave. I then set it aside to dry completely.
- When the panel was dry, I adhered it to a white card base.
- I die-cut the cardinals from a deep red cardstock and adhered them to the branches.
- I die-cut one of the deer from the Reindeer Duo Dies from dark brown card stock and adhered it to the front of the card.
- I used a sentiment from the Simple Sentiments Stamp & Die Bundle and backed it on holographic cardstock.
- I tied a loopy bow from iridescent embroidery floss and added it behind the sentiment panel and then popped the panel up on foam dots.
- Lastly, I pulled out some of the snowflake sequins from the Glistening Christmas Tree Sequin Mix and added them to the card front.
(Affiliate links for most products provided below at no additional cost to you.)
Who wants to play with reindeer today? The new Reindeer Games stamps and coordinating die sets are adorable. Kathy here with a cute slimline for you!

Card Details
These deer are so cute, aren’t they? I hope you enjoyed this card and would love you to head over to the Kat Scrappiness Store and see all of the fabulous new products! Thanks for stopping by!
Hi everyone, it’s Tina here. I can’t believe the year is almost over and the holidays is nearly upon us. For my last post in 2022 I am sharing a card using the beautiful Layered Poinsettia Dies. Below are the steps to create your card.

Step 1 – Trim White Cardstock to 8 1/2″ x 5 1/2″, score at 4 1/4″ and fold in half for a vertical side fold card. (A2)
Step 2 – Trim White Glitter Cardstock to 4 1/4″ x 5 1/2″ and adhere to card front using Bearly Art Precision Glue.
Step 3 – Diecut Buffalo Plaid using White Cardstock and adhere to card front using Bearly Art Precision Glue.
Step 4 – Diecut Layered Poinsettia using Pink and Green Cardstock. Assemble each layer using Bearly Art Precision Glue. Optional: For added interest and sparkle spray Hero Arts White Iridescent Spray or any Spray you have in your stash. Once dry adhere to card using Bearly Art Precision Glue.
Step 5 – Diecut Joy w/Shadow using Pink Cardstock for word and White Cardstock for shadow. Assemble and adhere to card using Bearly art Precision Glue.


Wishing you all a Happy Holidays and see you 2023! Below is a link to all the products used. Thanks for stopping by and Happy Crafting!
Products Used:
Happy Friday Crafters!!! Did you know Kat Scrappiness is having a SALE all month long on ALL Christmas Items?

Today I am sharing a slimline card using some of the products that are on sale NOW at the store.


I used the following products to create this card
Ugly Sweater Slimline Paper Pack


Forest for the Trees Slimline Dies

To finish the card off I used the sentiment from the Reindeer Games Sentiments Stamp Set.

Thanks so much for stopping by, Happy Holidays!!!
Hi friends! Creative Crew Kim, here with you today, and I am so excited to share a card I made using some of the amazing products from the latest release! I am a huge fan of the beauty in nature, and I feel that this card represents that so well!

Here is how I made this card!
I hope that you love this card as much as I do! It was so incredibly much fun to create, and was really quite easy, as the dies did all of the hard work! Make sure to head over to the shop to check out the full release! You will not be disappointed! Don’t forget that all Christmas products are 10% off through December 24th with code CHRISTMAS10!
Thanks so much for spending a few minutes of your day with me!
Xoxo, Kim
**Affiliate links provided at no additional cost to you. Thank you for supporting my hobby!**
Hello everyone!
It’s Donna Idlet here today sharing a card featuring the NEW A2 Buffalo Plaid Backdrop Dies, Layered Poinsettia dies, and the Joy w/Shadow die.
Here is my card for your inspiration:

I’m in love with the NEW Layered Poinsettia die. I die cut the poinsettia using pink paper and the leaves using green paper and then inked the blended the pedals, I then added some splatters for some texture.
For the background I used the NEW Buffalo Plaid Backdrop Dies, die cutting the top layer with white cardstock and the bottom with silver glitter paper.
I added the Joy from the Joy w/Shadow die, I die cut the shadow in black and the letters with the silver glitter paper. For finishing touches I added some KS Lemon Yellow Pearl Mix in the center of the flower.

Here is a closer look at the poinsettia, I love all the dimension.
Thank you so much for stopping by, please come back again soon!
Here is a list of supplies I used on my cards. Affiliate Links used at no additional cost. Thank you for your support.
Happy Sunday Crafty Friends! Priscilla here from the Kat Scrappiness Design Team. Today I am sharing a holiday card that showcases two of the new dies in the Kat Scrappiness Winter Release and also features my favorite pattern of all – buffalo check plaid. This time of year . . . it’s everywhere!