Follow:
    Design Team Projects, New Releases, News

    KAT SCRAPPINESS BE MY VALENTINE 2023 RELEASE


    Hello friends and welcome to the Kat Scrappiness BE MY VALENTINE Release 2023. This release includes so many awesome Dies that you will love to use for your projects. Be sure to join the Instagram Hop beginning at Noon EST January 7th.  #KSBeMyValentine2023


    VIDEO INTRODUCTION: Suzanne

    Timestamps:

    00:00 Intro to Be My Valentine Release 01:11 Pop The Bubbly Die Set 01:59 Say Yes! Dies 05:16 Sweetheart Doily Dies 07:01 A2 Intertwined Stitched Hearts Dies 08:40 Layered Heart Doily Dies 10:00 Happily Avo-After Dies 11:30 Stuck On you Dies 13:16 Sunray Backdrop Die

    Grab a cup of coffee, glass of Sweet Tea (or any beverage you have in mind) while browsing through all of the beautiful projects prepared by the design team! 

    Are you ready to get inspired?


    Thank you to our Blog and Video Creative Crew for your awesome projects!!!

    VIDEO TEAM MEMBER- APRIL

    Sweetheart Doily Die Set
    Uppercase Condensed Alphabet Die Set

    Pop the Bubbly
    Uppercase Condensed Alphabet


    BLOG TEAM MEMBER- CAREN B

    Happily Avo-After dies
    You Guac My World stamp set
    Stitched Fishtail Banner dies
    Never Ending Rectangle dies
    A2 Quilted Backdrop die
    Spectrum of Love 6×8 paper
    Layered Heart Doily dies
    Say Yes dies
    Congrats with Border dies
    Blush rhinestones
    Diamond rhinestones

    BLOG TEAM MEMBER- CRYSTAL
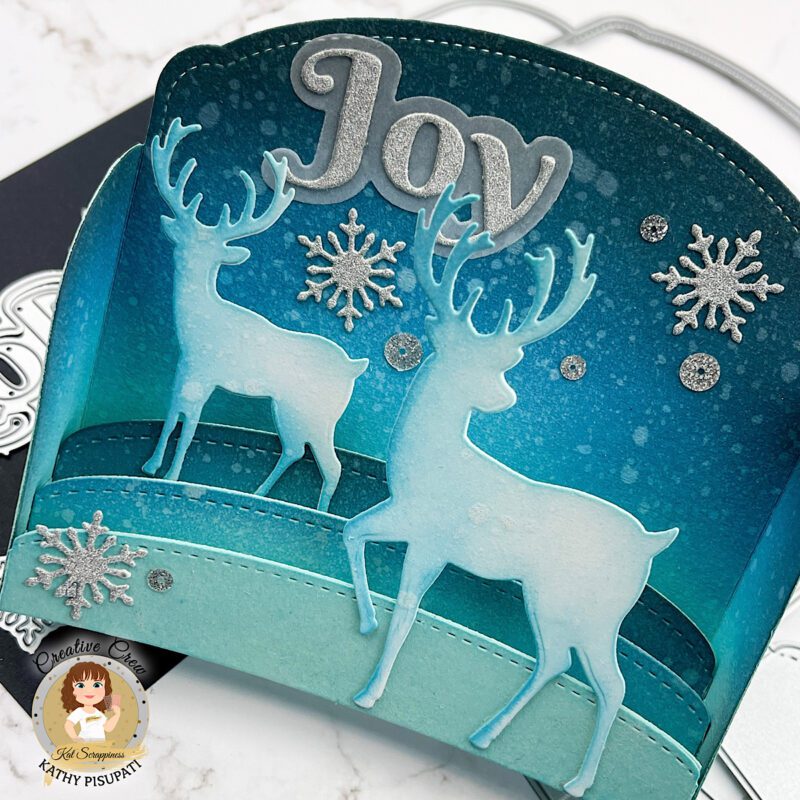
    Sunray Backdrop Die
    Layering Nesting Heart Dies
    Valentine Quokka Sentiment
    White Jewels
    Red Glitter Sequin Mix

    Stuck on you dies
    Friendship Sentiments
    Stitched Heart Coverplate
    Lumber Yard Paper


    BLOG TEAM MEMBER – DONNA I

    Sunray Backdrop Die
    Say Yes! Die Set
    Congrats Word Dies with Shadow
    Layered Heart Doily Dies
    Stitched Nesting Dome Dies
    Spectrum of Love Slimline Paper Pad
    Heartfelt Wishes Slimline Paper Pad
    Love You Word w/Shadow Dies
    Smooches Coverplate Die (lips)


    BLOG TEAM MEMBER- KIM 

    Stuck on You Dies
    A2 Quilted Cover Plate Die
    Everyday Brush Strokes Stamps
     A2 Intertwined Stitched Hearts
    A2 Stitched Hearts Coverplate Die
    6mm Metallic Red Solid Heart Sequins


    VIDEO TEAM MEMBER LINH

    Sunray Backdrop
    A2 Intertwined Stitched Hearts
    Simple Sentiments Stamp & Die
    A2 Intertwined Stitched Hearts
    Ugly Sweater Slimline Paper Pack
    Love You w/ Shadow
    Bride Sequin Mix


    GUEST DESIGNER- KENDRA

    Layered Heart Doily Dies
    Stewart the Sloth Stamp Set
    Stitched Hearts Coverplate Die
    Mini Slimline Wonky Stitched Dies

    Stuck on You Dies
    Happy Day Stamp Set
    Happy Valentine’s Day Word Die with Shadow
    Cross Stitched Rectangle Dies


    BLOG TEAM MEMBER-MARIA
     Layered Heart Doily Dies
    Wreath Die
    Christmas Foliage Dies
    Build A Bow Die
    Embossed Edge Rectangle Die
    Stuck on You Dies
    Love You Word with Shadow Dies
    Heartfelt Wishes Slimline Paper Pad


    BLOG TEAM MEMBER-PRISCILLA

    Sweetheart Doily Dies
    Mail Storm Cover Plate Die
    Valentine Quokka Stamp Set/Dies
    Red Heart Sprinkles
    This Kiss Sprinkles

    Happy Avo-After Dies
    You Guac My World Stamp Set
    Perk Up 6×8 Paper Pad (balloon)
    Avocado Slices Sprinkles


    VIDEO TEAM MEMBER- REVATI

    Say Yes! Die Set
    Diamond Wire and Wood Grain Frame Cover Plate Die
    Simple Sentiment Stamp and Die
    Love You Word w/ Shadow Die


    Sweetheart Doily Die
    Diamond Wire and Wood Grain Frame Cover Plate Die
    Love You Word w/ Shadow Die


    BLOG TEAM MEMBER- SAMMI

    Pop the Bubbly Dies
    Peacock Backdrop Die
    Simple Sentiments stamp and dies

    A2 Intertwined Hearts
    Heartfelt Wishes Slimline Paper Pad
    Love You To The Moon and Back Word Die
    Hot Cocoa Mix
    Mocha Pearl Mix


    BLOG TEAM MEMBER – SHERI

    KS Happy Avo-After Die
    KS Stuck on You Die (Hearts)
    KS You Guac My World Stamp Set
    KS Falling Hearts Stencil
    KS Stitched Postage Stamp Edge Die
    KS Layering Nested Heart Die
    KS Boxed Sentiment Strips Die

    KS Stuck on You Die
    KS Valentine Quokka Stamp Set (sentiment)
    KS Falling Hearts Stencil
    KS Never Ending Rectangles Die
    KS Boxed Sentiment Strips Die


    VIDEO TEAM MEMBER- SUZANNE

    Layered Heart Doily Dies
    Happily Avo-After Dies
    Love You Word w/ Shadow Die
    Hop Into Easter Paper Pack
    Pink Lemonade Solid Round Confetti
    Sweetheart Doily Dies
    Stuck on you Dies
    Love You Word w/ Shadow Die
    A2 Intertwined Stitched Hearts Dies
    Love You Word w/ Shadow Die
    Stitched Scallop Nesting Tags Dies
    Pearlescent Peach Solid Round Confetti

    VIDEO TEAM MEMBER -TASHA

    Stuck on You Dies
    Love You Word W/Shadow Die
    Spectrum Of Love 6×8 Paper Pad
    Lumber Yard 6×6 Paper Pad
    Stitched Slimline Hills Dies
    “Friendship Greetings” Stamp Set
    Happy Avo-After Dies
    You Complete Me Word W/Shadow Die
    Stitched Sun Ray Backdrop Die

    BLOG TEAM MEMBER -TINA 

    Layered Heart Doily Die
    Love You w/Shadow dies

    Happily Avi-After Dies
    Stitched Sun Ray Backdrop Die
    You Guac My World Stamps (for sentiment)
    Boxed Sentiment Strip Dies
    Embossed Edge Heart Dies
    Falling Hearts 6×6 Stencil


    VIDEO TEAM MEMBER- YVETTE

    KS Pop The Bubbly Craft Dies – New Release
    KS A2 Reverse Scallop Dies
    KS Say Yes Craft Dies – New Release
    KS Chocolate Jewel Mix

    So there you have it for a SMALL sampling our Release, Saturday will be our Instagram hop with more samples using these awesome dies!!! As far as this post, the team created some AMAZING SAMPLES, don’t you think?!   We are so very lucky to have this talented design team!

    Giveaway!

    *Would you like to win the prize from Kat Scrappiness *U.S. residents only but if international winner is chosen, winner will have to pay for shipping).

    Here’s how to win:

    Comment below, and then head over to Instagram and follow to follow all the hop participants using #KSBeMyValentine2023, see their projects made for that hop and comment on their posts as well. Make sure you are following @KatScrappiness. Winner will be announced on @Katscrappiness on December 14, 2023

    Giveaway is Open to all. Please don’t follow and then unfollow afterward, that’s not nice. Giveaway accounts do not qualify. Per Instagram rules, we must mention this is in no way sponsored, administered, or associated with Instagram or Facebook. By entering, entrants confirm they are 13+ years of age, release Instagram or Facebook of responsibility and agree to their terms of use. Thank You and Happy Hopping!
    Design Team Projects

    Rainbow Hugs

    Hello everyone!

    It’s Donna Idlet here sharing a card featuring the Confetti Party Rainbow Dies, Rainbow Hugs Word w/Shadow die and the Spectrum Of Love Slimline Paper Pack.  This would be the perfect card to send your Valentine.

    Here is my card for your inspiration:
    My card is an A2 card and I used the Confetti Party Rainbow Dies to cut out the frame of the card.  I then used the Spectrum Of Love Slimline Paper Pack to cut out the arches in rainbow order.  I also cut out the arches in white to layer the arches so they would give the rainbow some depth.  I then die cut the Rainbow Hugs Word w/Shadow die with black card stock and cut the shadow with vellum.  I added some hearts from the Bright Rainbow Hearts Sprinkles and added them to the card.  I also added some hearts to the clouds from the Brilliant Pink Hearts.

    Thank you so much for stopping by, please come back again soon!

    Here is a list of supplies I used on my cards. Affiliate Links used at no additional cost. Thank you for your support.


    https://linkdeli.com/widget.js?id=f5e8378456858c916708

    Design Team Projects

    Love you!

    Happy Wednesday Crafters! Are you starting on your Valentine’s Day cards? Today I am sharing a sweet Valentine I made using several Kat Scrappiness Products.


    For this card I used the following products. These products are just perfect for your Valentine Creations.

    Stitched Hearts Coverplate Die

    The Stitched Hearts Coverplate die measures approximately 4 1/4″ x 5 1/2″. It features stitching around the edges, and stitched hearts of different sizes. to create a fun background die!

    Layering Nested Heart Dies

    Kat Scrappiness custom dies are high-quality steel and are compatible with all industry standard die cutting machines!

    Love You Word w/Shadow Die

    This sentiment die has a 1/4″ shadow. You can use the sentiment with or without the shadow. This die measures approximately 3.2in x 1.4in.

    Lastly I added a cute Quokka from the Valentine Quokka Stamp Set. I just love these Quokkas!

    Thanks for stopping by I hope you have a great Wednesday!

    Design Team Projects

    Wintry 3D Pop-Up Card with Kat Scrappiness New Release

    Good morning! Kathy here today with a 3D pop-up card for you. Christmas may be over but it is still snowing and the perfect time for a winter scene! Today’s card features the new Reindeer Duo Dies, the 3D Pop-Up Box Die with the Stitched Hills Add On and a few snowflakes from the Night Before Christmas Window Scenedie set. This 3D Box is easy to make. I suggest you head over to our YouTube channel and see the tutorial for this box HERE. Today I will explain how I created this scene.

    First you will cut the 3D-Box pieces. I started by cutting them from a pale blue card stock. Then I ink-blended the front side of the box die-cut and the hill pieces using Distress Oxides. The colors I used were Uncharted Marina, Prize Ribbon and Broken China. I also used some Black Soot at the top of the box panel. Use the same combo for the hill add-ons in the same order. I then splattered the panels with water and let them dry.

    Next, die-cut your reindeer twice. I used white card stock and then lightly brushed on some Uncharted Marina mostly on the left side of one set of deer. Glue the other die-cut to the back. This provides a bit more stability to the deer.

    Now using the snowflakes from the Night Before Christmas die-cut from some silver glitter card stock. I have 3 on this card. For the sentiment I used the Joy Word/Shadow Die. the shadow was cut in vellum and the word in the same glitter card stock as the snowflakes.

    Assemble your box. It is easy, score all of the pieces and the main thing to remember is to start with the largest hill. Add strong adhesive to the left tab, align the edge of the tab to the left fold of the main panel. Make sue it is straight. Fold the left side on to the hill die piece. Repeat this for the right side. The smaller hills will be done the same just align the bottom of each piece with the bottom edge of the last hill. OR watch the tutorial HERE.

    Add your bits and pieces. I started with the front piece and worked backwards. Just make sure you continually open the box to make sure pieces are where you want them. (TIP: Use temporary tape on pieces for placement). Everything was then added with liquid glue. I also added some of the new Silver Glitter Sequins.

    These pop-up cards are really easy and so much fun. The best part is they fit into an A2 envelope! Thanks for stopping by the blog today. I truly appreciate it. Make sure you check out all of the new collection in the Kat Scrappiness Store. Have a fabulous day!


    https://linkdeli.com/widget.js?id=f5e8378456858c916708

    Design Team Projects

    Happy Holiday Card

    Hello crafty friends!! Nora here with my last post on the blog. I have had a fabulous time on the Kat Scrappiness Design Team and will miss it immensely. The Kat Scrappiness Products are amazing and so fun to work with.

    Today my card is a holiday card that I created using some of the Winter Release and some previously released Kat Scrappiness products. I designed an ornament by creating my own stencils with the Kat Scrappiness Never Ending Circles Dies. I paired this stenciled ornament with a snowflake from the Kat Scrappiness Snowflake Trio Dies and an ornament top from the older Kat Scrappiness Christmas Shaker Ornament Dies. I like to look at my dies and use them in other ways to stretch them.

    Here is how I created this card:

    Cut a piece of the striped paper from the Kat Scrappiness Reindeer Games 6×6 Paper Pad into a 4 1/4″ by 5 1/2″ piece. Adhere it over an A2, top folding card base.

    Using three different size circles from the KS Never Ending Circle Dies, cut a stencil out of scrap cardstock. Starting with the largest circle, stencil with red ink onto a piece of white cardstock. Repeat the stenciling with the next two circle stencils using a slightly different red ink on each circle.

    Stamp and heat emboss with gold embossing powder the “Happy Holidays” sentiment from the Kat Scrappiness Reindeer Games Sentiment Stamp Set.

    Die cut the white panel with a Kat Scrappiness Nesting Deco Frames Die and adhere it to the middle of the card base.

    Add the snowflake that was die cut using the Kat Scrappiness Snowflake Trio Dies out of gold glitter paper. Adhere this to the center of the stenciled ornament.

    Die cut an ornament topper out of gold paper using the Kat Scrappiness Christmas Shaker Ornament Dies. Adhere it to the top of the ornament.

    Adhere some twine to the ornament hanger and add a gold pearl from the Kat Scrappiness Gold Pearl Mix. This completes the card!!

    I want to thank everyone for taking the time to stop by today. Please be sure to pop back in to the Kat Scrappiness Blog to see some inspiration from other member of the Kat Scrappiness Creative Crew.

    ****All links in this post are affiliate links used at no extra cost to you.


    Design Team Projects

    Merry Christmas

    Happy Wednesday everyone.  It’s Caren here on the blog today.  Is everyone ready for the holidays?  I’m really close!  I just need to get a couple more things and wrap presents.  Today, I have a fun slimline card using the adorable Santa’s Helper stamps.


    Thanks for stopping by!  Check out the couple of sales going on right now on the Kat Scrappiness site. 10% off Christmas items with code CHRISTMAS10 or 20% off Slimline dies and paper with code SLIMLINE20.


    – – –– – –– – –– – –– – –– – –– – –– – –– – –– – –– – –– – –– – –– – –– – –– – –– – –– – –– – –– – –– – –– –

    Here is a link to the Kat Scrappiness shop and direct links for products I used on today’s card.

    – – – SUPPLIES for today’s project– – – – – – – – – – – – – – – – – – – – – – – – – – – – – – – – – – – – – – –

    Design Team Projects

    Reindeer Games 3D Style

    Hello crafty friends and Happy Holidays!! We are so close to Christmas and I wanted to share one more Christmas card with y’all!! I just adore the Reindeer Games stamps and dies and what better way to showcase them using the 3D Pop Up Box die! I LOVE this 3D Box die! So many ways you can use it! And don’t forget that all Christmas items are 10% off at Kat Scrappiness until December 24th! Here is how I made this card:

    1. I first cut out the 3D Pop Up Box out of Neenah Cardstock and then cut out the Stitched Hills Add-On Dies in white glitter cardstock. I then cut out the back of the pop up box from the red snow paper from the Reindeer Games 6×6 paper pad and cut out the sides of the pop up box from the green gingham paper from the same paper pad. I then glued the 3D box together using Bearly Art glue and then glued the patterned paper and glitter cardstock onto the pop up box.
    2. I then stamped the reindeer images from the Reindeer Games stamp set onto Neenah cardstock with Memento black ink and cut them out with the coordinating dies. I then colored the reindeer with Copic Markers.
    3. I wanted some extra snow so I cut some snowflakes using the Snowflake Trio Dies using the same white glitter cardstock. I also wanted some trees, so I cut the trees from the Crafters Essentials Winter dies and ink blended the trees with Oxide inks. I added some white splatter on the trees with white acrylic paint.
    4. I then glued the trees and snowflakes in between the 3D layers and added the reindeer as I was gluing everything down. I then stamped the sentiment from the Reindeer Games Sentiment stamp set and glued it onto the back of the card. I added some Basil Pearl Mix around the sentiment to add some more dimension.

    I am in LOVE with how this turned out! The 3D Box Dies are so perfect to make a great scene card!! I hope I have inspired you to give it a try and Happy Holidays everyone!!

    Here is what you need to make this card:

    3d Pop Up Box Die from Kat Scrappiness – Kat Scrappiness, Inc

    Stitched Hills Add-On Dies from Kat Scrappiness – Kat Scrappiness, Inc

    Reindeer Games Sentiments Stamp Set – New Release – Kat Scrappiness, Inc

    Reindeer Games 6×6 Paper Pad – New Release – Kat Scrappiness, Inc

    Reindeer Games Stamp Set – New Release – Kat Scrappiness, Inc

    Reindeer Games Coordinating Dies – New Release – Kat Scrappiness, Inc

    Snowflake Trio Dies – New Release – Kat Scrappiness, Inc

    Crafters Essentials WINTER Dies – Kat Scrappiness, Inc

    Bearly Art Precision Craft Glue – THE ORIGINAL – Kat Scrappiness, Inc