Follow:
    Design Team Projects

    He Is Risen Eclipse Card and Video

    Welcome back to the blog Kat Scrappiness fans, it’s Lisa here with you today!

     I have a fun Eclipse card to share with you and a video

    to go along with it to show you exactly how I made it!

    I have 2 guests in my video today…..

    My cat Poppers who refused to get off of my desk for the video

    so I let her stay, excuse the cat hair….

    My second guest is my daughter Taylor who took over for my

    voiceover about half way through the video.

    I was frustrated and tired and she knows so much about

    card making she agreed to help me out!

    She has a great sense of humor, I love her take on card making!

    Now on to the card.

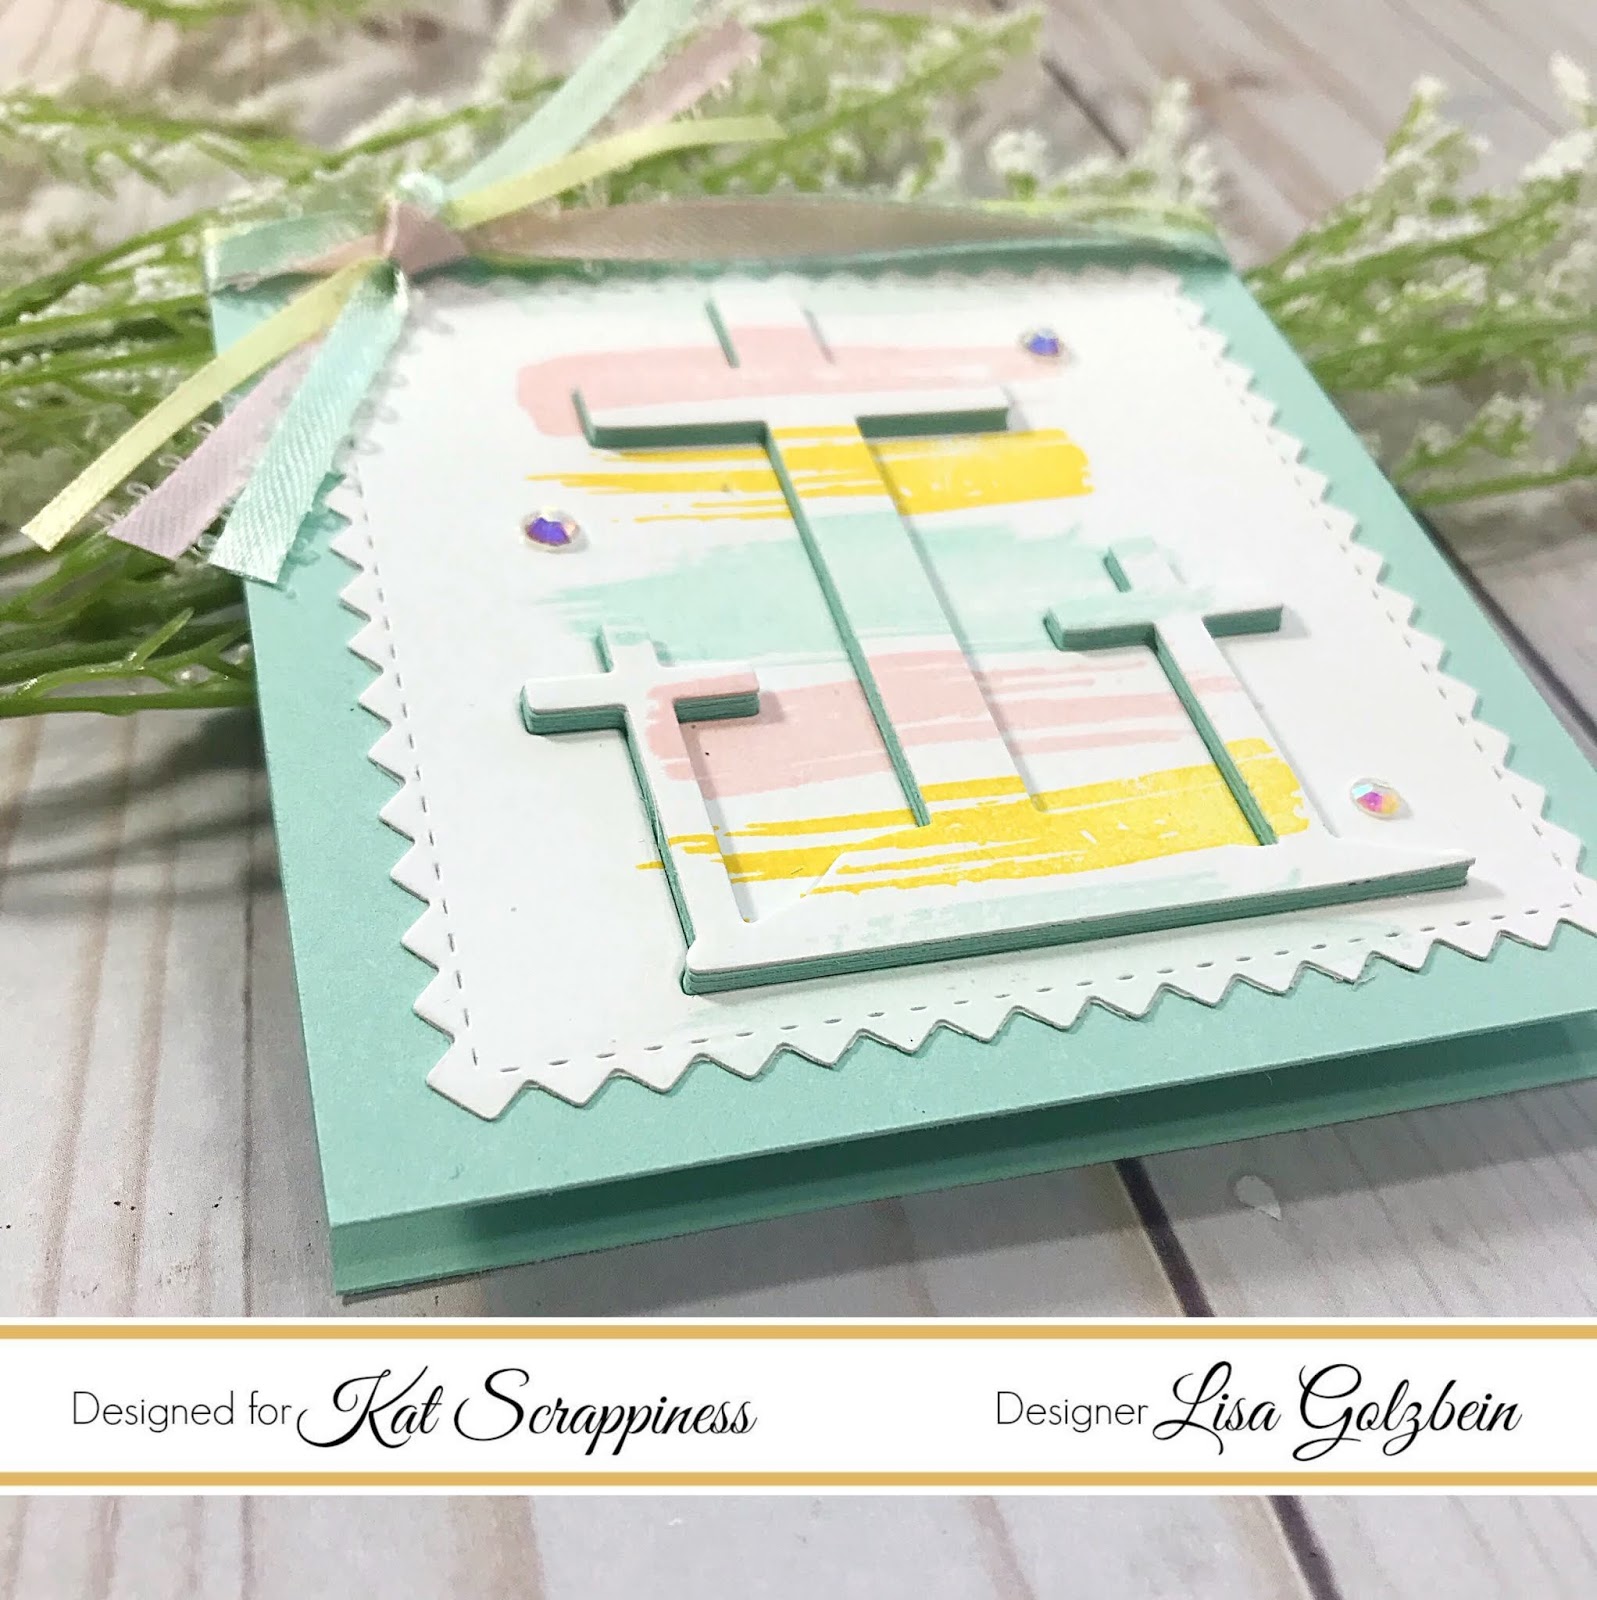
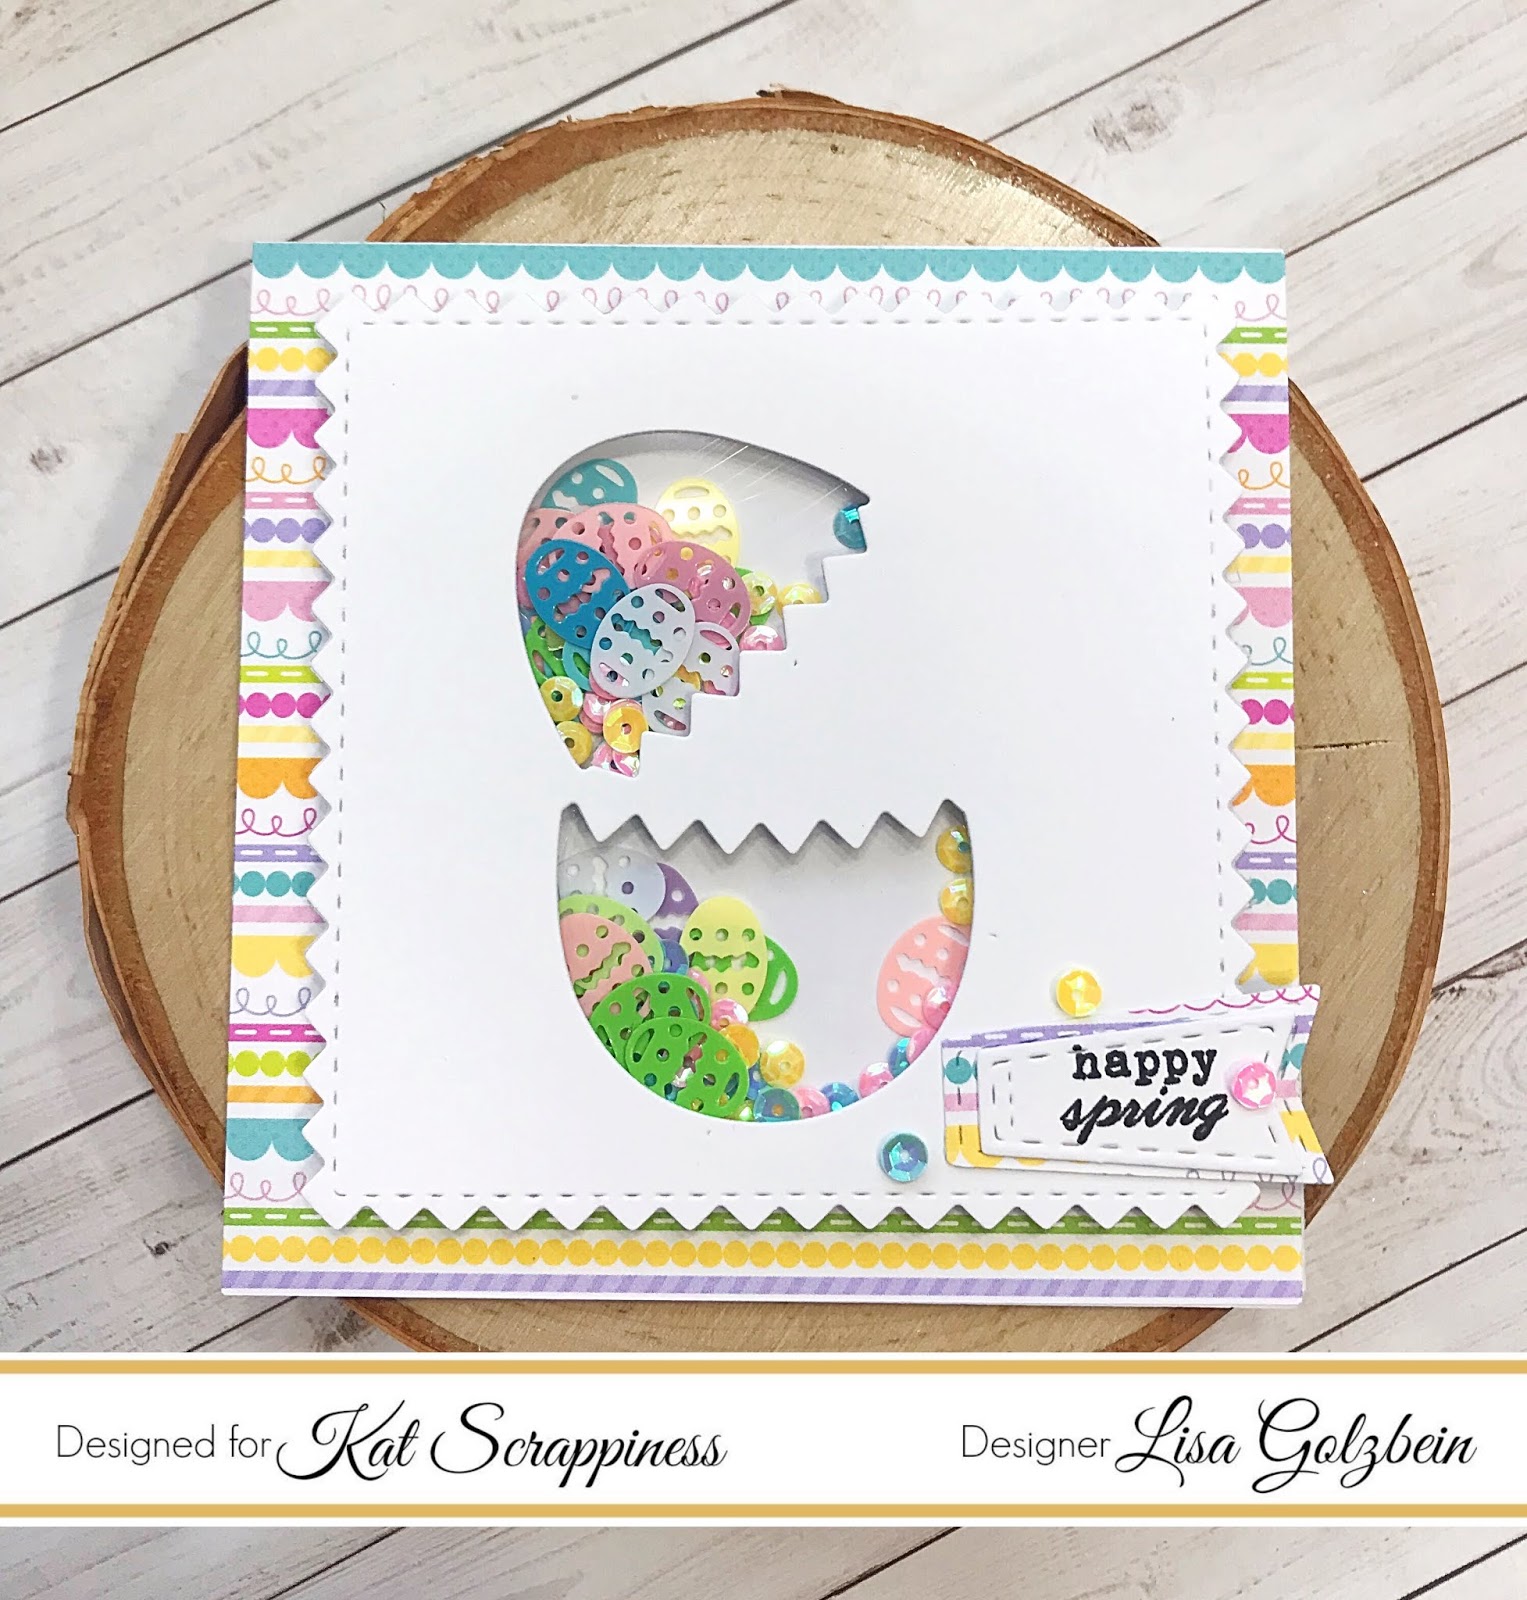
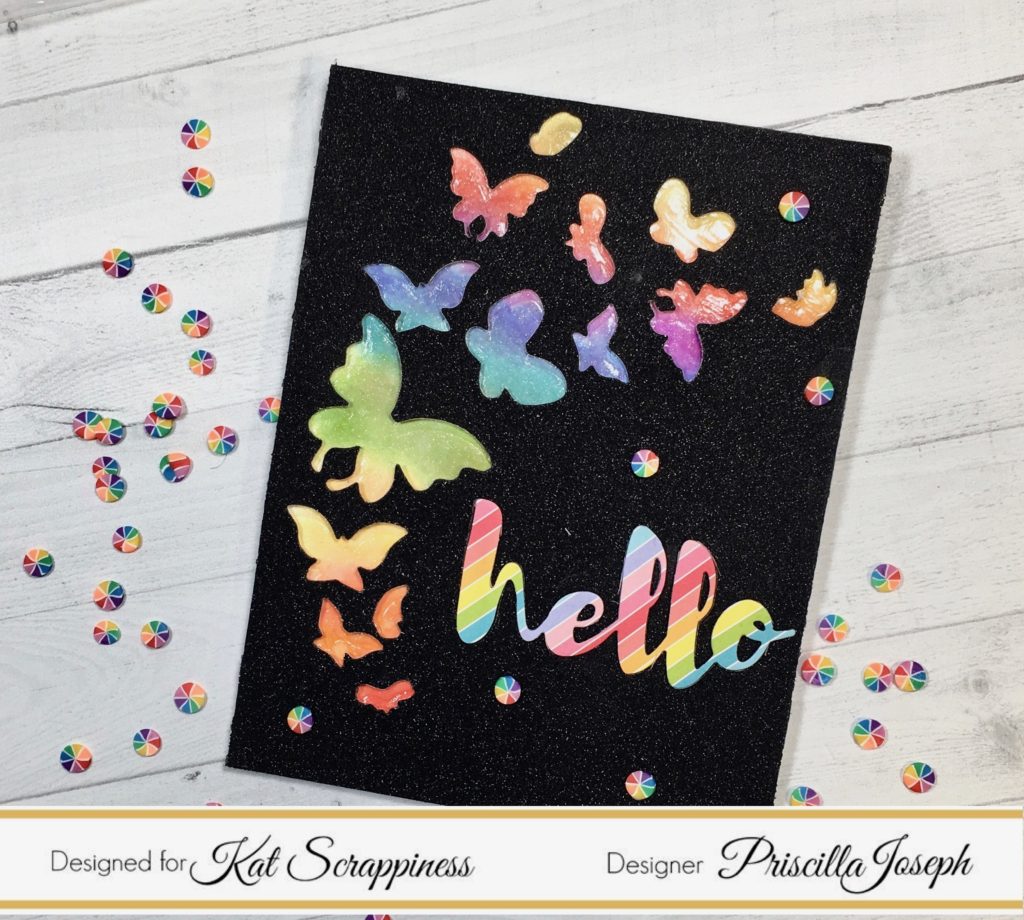
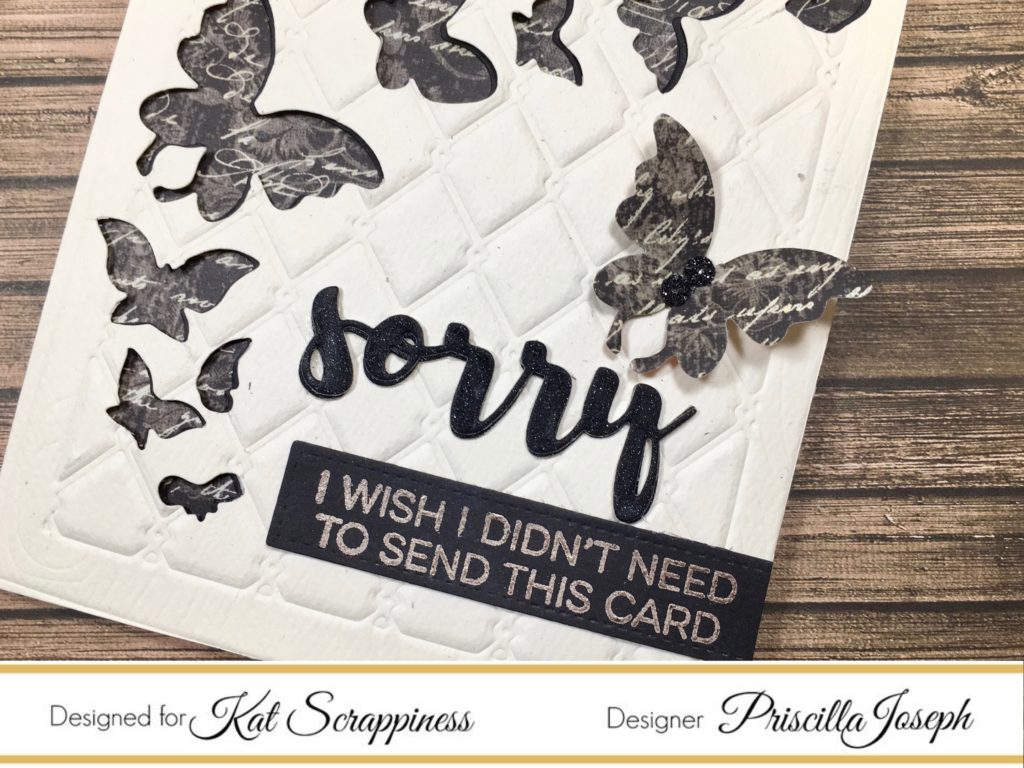
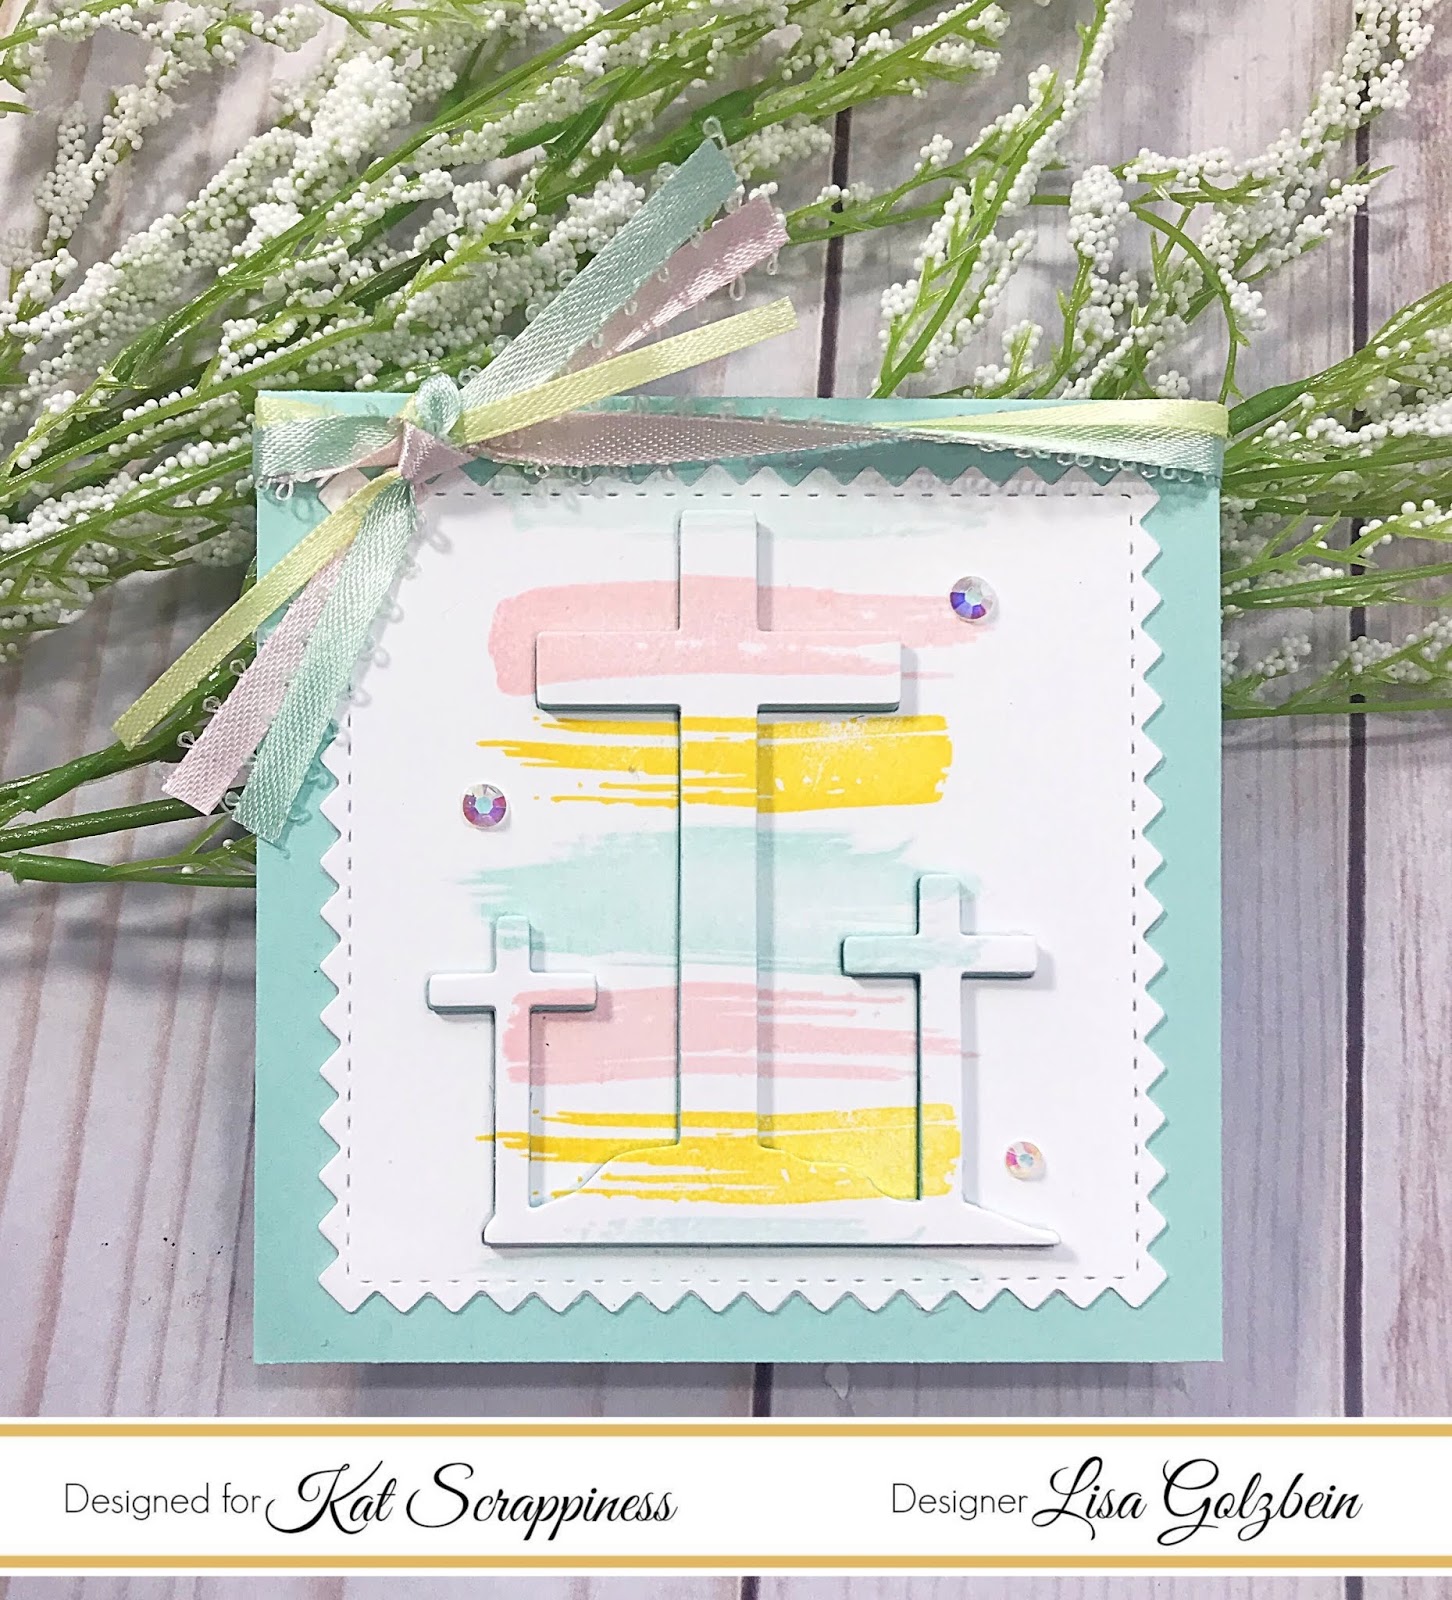
    This card measures 4″ x 4″ and features the eclipse technique.

    I started out with a panel cut from the Square Zig Zag dies to stamp on.

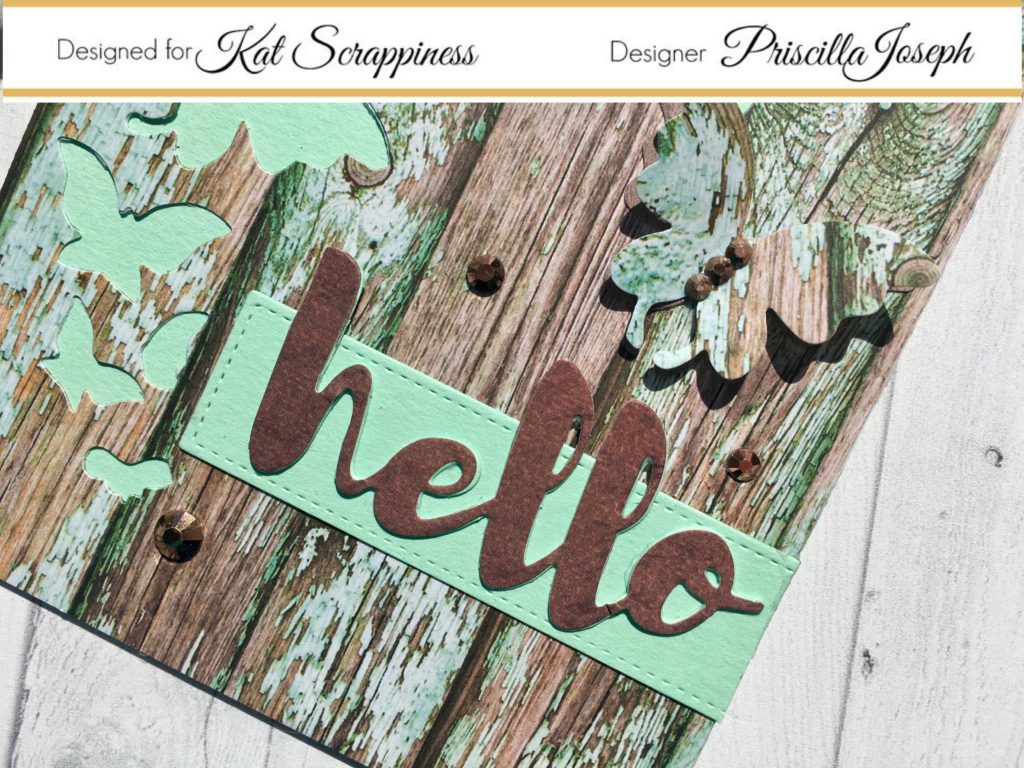
    I stamped those lovely pastel brush strokes from the

    Everyday Brush Strokes stamp set and then I used the He Is Risen

    trio of crosses die to cut out a focal point.

    I also cut that beautiful trio of crosses out 4 more times in

    aqua card stock to layer under the stamped die cut.

    Once I layered the “built up” trio of crosses back on to the panel,

    they really stood in a very subtle way giving that classic

    eclipse look to the card.

    Sparkling Clear Jewels gave a nice finishing touch to this card!

    It’s much easier to understand in a video so you can check out

    my video here or on YouTube.

    [youtube https://www.youtube.com/watch?v=HfS-LdV0zgs]

    I hope you have enjoyed today’s card and I hope it inspires you

    to make your own eclipse card!  Also please consider joining us over at our

    monthly challenge, this month the theme is “Pastel”.

    Check out this post for more details.

    April Card Challenge

    As always feel free to use my code LISA10 to save

    10% on your order anytime!

    Thanks for stopping by and enjoy your day,

    I already am!

    ?Lisa?

    Design Team Projects

    Easter Die Cuts Inspiration

    Hello Crafty friends, Martha Lucia here to share with you some inspiration using the recently released Crafters Essentials – Easter Edition Dies. Today I have a set of projects created with the Easter Die Cuts and more from Kat Scrappiness Store.  This is the perfect season to create sweet projects and I found many things in this store to share with you. Let me start with these baskets for candies.

    Easter Die Cuts Inspiration

    To create these baskets I used the basked die included on the new Crafters Essentials- Easter Edition Dies. It is a complete set of die cuts full of easter dies that you can also use for another occasions.

    I cut twice the basket and connected on the center with a strip of card stock. The card stock size is 1-1/4″x4-1/4 and I made score in 1-1/4 from each border. Over the base of this I added the chocolate that I want to share. I used round chocolates but you can use any other form and size.

    Easter Die Cuts Inspiration

    I decorated the baskets with different elements included on the Crafters Essentials Easter Edition. For one I used the big butterfly and for the other the rabbit. I decorated the rabbit with the white pom poms – Bunny Tails also available at the store.  For both baskets, I use the tiny bow included on the Crafters Essentials Easter Edition.

    Easter Die Cuts Inspiration

    My next project is a card that I made using the Butterfly Backdrop Die from Kat Scrappiness. It is a fantastic cover plate die that I used on the simple way. I just created the base of my card using Whisper White card stock and cut the second layer using the same color and a little small from the base.

    Easter Die Cuts Inspiration

    I inked the central area of the second layer using distress ink and after that, I cut the Butterfly Backdrop Die. I keep all the negative butterflies to use them in another project. Then I stamped a sentiment..(please keep me the secret but the sentiment is a sneak peak of a new stamp set) … using VersaFine Clair Nocturne and pasted the decorated layer with double sided foam tape.

    Easter Die Cuts Inspiration

    As final touch I pasted some new AB Butterfly Confetti that have the particularity of change the color as you can noticed on the above photos.

    Easter Die Cuts Inspiration

    My last project is an Easter card that I made using the new He is Risen Dies by Kat Scrappiness too.  This is a complete set of dies that you can use for many religious celebrations or any other occasions. The base of my card is Blue Balmy and I cut a second layer using Very Vanilla card stock. I created a distressed background with this layer, just making some score lines and sponging with Soft Suede  Classic Ink.

    Easter Die Cuts Inspiration

    I cut from the inked layer one of the Zig Zag Oval Dies and using the inlaid technique I replaced the oval with a new clean oval that I paste with double sided foam tape.  I decorated the oval, using the three crosses and the grass border included on the He is Risen Dies.

    To finalize the decoration I cut the two clouds included on the He is Risen Die set and sponged them with a Balmy Blue ink. I stamped the Jesus spine crown from the My Redeemer stamp set and the sentiment from the Light Bulb Moment stamp set, both from Joy Clair Stamps.  As final touch I added some splatters of Glimmer Mist Dragonfly and some drops of Nuvo Morning Dew.

    PROMOTION:

    Be part of the cleaning store making CLICK HERE or over the promotion image.


    SUPPLIES:

    Affiliate links are used where they are available. If you make a purchase I receive a small commission at not extra cost to you. thank you so much for your support!

    Crafter Essentials - Easter Die Cuts by Kat Scrappiness
    Crafter Essentials – Easter Die Cuts by Kat Scrappiness
    Shop at:
    KS
    Butterfly Backdrop Die by Kat Scrappines
    Butterfly Backdrop Die by Kat Scrappines
    Shop at:
    KS
    He is Risen Dies by Kat Scrappiness
    He is Risen Dies by Kat Scrappiness
    Shop at:
    KS
    Zig Zag Oval Dies by Kat Scrappiness
    Zig Zag Oval Dies by Kat Scrappiness
    Shop at:
    KS
    Bunny Tails by Kat Scrappiness
    Bunny Tails by Kat Scrappiness
    Shop at:
    KS
    Novu Crystal Drops Morning Dew
    Novu Crystal Drops Morning Dew
    Shop at:
    C&SS | KS | HS
    Distress Ink Broken China
    Distress Ink Broken China
    Shop at:
    C&SS | KS | HS
    Distress Ink Blueprint Sketch
    Distress Ink Blueprint Sketch
    Shop at:
    C&SS | KS | HS
    VersaFine Clair ALL colors
    VersaFine Clair ALL colors
    Shop at:
    KS | OTS | SB
    Double sided foam Tape or Dimensionals
    Double sided foam Tape or Dimensionals
    Shop at:
    KS | OTS
    Challenges & Hops, News

    April Card Challenge – Pastels

    Hello Kat Scrappiness fans!

    It’s Lisa back on the blog today to bring you another monthly challenge!

    We just wanted to say thank you so much for entering our card challenge in March!

    We had over 30 amazing entries and we really enjoyed your

    colorful rainbow projects!

    Thank you to all who entered for playing along!

    The random winner of the Rainbow challenge from March is

    ***Kristina Pavlovic***

    Congratulations Kristina and thanks so much for sharing your beautiful projects with us!

    Make sure you stay tuned to the Kat Scrappiness blog,

    Facebook group and Instagram pages

    to be the first to know about special discounts and giveaways!

    ***********************************************************************************

    That brings us to the April Challenge.

    What better way to welcome Spring than with some

    beautiful pastel colors?

     This month let’s pull out all of our pretty pastel ink pads and markers and have some fun!

    Why not try some light and beautiful water coloring on your card?

    I decided to make a card this month to start you off and give you some

    inspiration for your pastel projects.

    I created an eclipse card in some pretty pastel

    colors and I used the brand new

    He Is Risen dies for the focal point.

    My card features several products available at Kat Scrappiness,

    some old and some new.

    If you’d like to recreate this card here is a supply list

    of all products used:

    He Is Risen Dies

    Square Zig Zag Dies

    Everyday Brush Strokes Stamp Set

    Sparkling Clear Jewels

    So come on now, let’s see your pretty pastel cards!

    This month we are changing things up a bit and we will pick not 1 but 2 winners!

    You just might get lucky and win one of two prizes, a 6 pack of sequins, jewels

    and/or sprinkles of your choice or

    a $15.00 gift certificate to KatScrappiness.com!

    While you do not “have” to use our products, we would love to see how you

    incorporate your Kat Scrappiness stamps and/or dies in your projects!

    This month as always, we only have 2 easy requirements to play along.

    1) Use pastel colors on your project

    2) Remember to link back to our challenge in your entry

    That’s it! Easy Peasy right!

    To enter, submit a photo of your project below

    (Click on the “Add Your Link” button) and we will randomly pick the winner at the end of the month.  Inlinkz is requiring you to verify your email address now but don’t worry, that will just make it easier for us to contact you should you win one of the great prizes!

    Good Luck from the Kat Scrappiness team and we look forward

    to seeing your beautiful pastel projects!

    News

    Easter Shaker Notecards

    Hello Kat Scrappiness fans and welcome back to the blog!

    It’s Lisa here with you today and I have a fun trio of shaker notecards

    to share with you using the newly released Easter edition of the

    Crafter’s Essentials dies. This is a fun set that features several different dies

    perfect for Easter and Spring themed cards!

    Here is a picture of all the dies that come with this set:

    I used the bunny, chick and cracked egg to make 3 adorable shaker notecards.

    The Kat Scrappiness Easter themed sequin mixes and Doodlebug patterned paper

    were the perfect accessories for these cards!

    The first card was made using the bunny die from the set.

    I cut a card base out of card stock measuring 4″ x 8 ” and scored it at 4″.

    I used a piece of patterned paper from the Hoppy Easter paper pack

    cut to 4″ x 4″ to cover the card base.

    I then took a piece of white card stock and cut out a panel

    with the second largest Square Zig Zag die.

    I placed the bunny die in the center of that Zig Zag square

    and ran it through my Vagabond.

    That left the negative shape of the bunny in the panel which I then

    backed with acetate to form my shaker window.

    To make the foam tape curve around the back of the bunny

    I snipped small lines half way into the tape so that it would bend

    easily and not warp the paper.

    For the bunny shaker I used 3 different sequin mixes:

    Pink 3 mm Solid Star confetti mix

    Yellow 3 mm Solid Star confetti mix

    3 mm Mirrored Clear Hollow Stars

    It’s so much fun to see the mix of sequins and confetti shaking around.

    For the sentiment I stamped on a Stitched Flag Die and used the same

    patterned paper to back it with a larger Flag die.

    I also decorated the flag with a few stars from the shaker mix.

    Next up is the chick card.  The basic assembly of the card is just

    like the bunny card except I used different patterned paper and sequins.

    The patterned paper is also from the Doodlebug Hoppy Easter paper pack

    and the sequin mix is called Chicken or the Egg?

    I just love the little yellow chick that’s included in this mix!

    I tucked one of them behind the sentiment flag.

    The last card I have to share with you is the cracked egg card.

    Again the basic assembly is as explained in the bunny card above.

    The patterned paper for this card is from the Doodlebug Simply Spring paper pack

    and the sequin mix is called Easter Egg Parade!

    The tiny die cut Easter eggs in this mix are just too cute!

    These cards were so much fun to make! You can really get creative with the

    patterned papers and different sequin mixes, there’s so many fun combinations!

    All of the linked products can be found at Kat Scrappiness.

    If you’d like to do some fun crafty shopping for any of the above linked

    products or any other supplies, make sure to use my code Lisa10 anytime at

    checkout for 10% off of your order!

    Thanks for stopping by today and have a great day,

    I already am!

    Lisa ?

    Design Team Projects

    With Sympathy And Love

    Hi Everyone, it’s Tina here. Today I have a card to share using the new Butterfly Backdrop. It creates a beautiful stream of butterlies and I instantly knew it would translate into a sympathy card. Below you will find the steps to create your own card.

    Step 1 – Trim White Cardstock to 8 1/2″ x 5 1/2″, score at 4 1/4″ and fold in half for a vertical side fold card. (A2)

    Step 2 – Trim White Cardstock to 5 1/2″ x 4 1/4″. Apply Distress Oxide Inks with the Life Changing Brushes to the White Cardstock. Working with the darkest to the lightest color leaving a white border at the bottom. Spritz some water and wait 30 seconds then place a scott towel to pick up the excess.

    Step 3 – Diecut Wonky Wavy Stitched Rectangles Die using the Background from Step 2. Adhere to card using Nuvo Deluxe Adhesive.

    Step 4 – Trim White Cardstock to 5 1/2″ x 4 1/4″. Apply Distress Oxide Inks to the center using the lightest shade used from Step 2. Apply Sparkle Sheer Shimmer Spritz. Let dry.

    Step 5 – Diecut Butterfly Backdrop using the background created from Step 4. To place the diecut butterflies in the same order onto your card front use the negative part as a template. Apply Nuvo Deluxe adhesive in the space where the butterflies will go. Now take each diecut butterfly and adhere to card. Once finished remove the negative diecut. You can save the negative diecut for another card.

    Step 6 – Stamp sentiment in ink of your preference.

    Step 7 – Using a crystal katana adhere Tinkerbell sequins with collage medium.

    This card can be used for any occasion by changing the sentiment and colors. You can also dry emboss to create an embossed impression. Below is a link to all the products used. To receive 10% off your order use code: TINA10 at checkout. Thank you for stopping by and have a wonderful day.

    Products Used:

    https://linkdeli.com/widget.js?1552642647875

    Design Team Projects

    Butterflies Everywhere!

    Hey Crafters! Priscilla here! Welcome back to my third blog post this month for Kat Scrappiness.  Today I have four cards for you, all spotlighting Kat‘s new “Butterfly Backdrop” Coverplate die.


    This die covers the entire front of an A2 size card!

    There are so many ways to use this versatile die — with the butterfly openings as pictured above, with the cut out butterflies inserted back into their openings, dry embossed so the butterflies appear raised, or simply using the die cut butterflies alone on a card.


    For my first card, I dry embossed the butterfly die on white card stock, and then sponged a rainbow of Distress Oxide inks over them.


    I applied a thin layer of “Glossy Accents” over the butterflies and let them dry. Meanwhile, I used the die with black glimmer card stock and adhered it over the dry embossed layer. I love how the raised butterflies glow through the openings!

    I finished the card with Kat‘s “Hello Brush Script Word & Sentiment Die” cut out of rainbow patterned paper, and then sprinkled her new “Rainbow Wheel Sprinkles Embellishment Mix” around the front of the card.


    For my second card, I created a springtime theme card with the “Butterfly Backdrop Die” cut out of blue gingham paper from the Echo Park“Spring Fling” 6×6 paper pad. The pink layer underneath it is also from the same paper pad.


    I used the largest die cut butterfly, cut from a polka dot patterned paper from  Echo Park‘s “Easter Wishes” 6×6 paper pad, as an embellishment over the “Happy Spring” sentiment. Kat’s “Mixed Flower Sprinkles Embellishment Mix” and “Sparkling Clear Droplets” provided the finishing touches.


    My third card is a a sympathy card. I used the same die cutting method as the spring card above, except this time I first die cut the top cream layer with the “Butterfly Backdrop Die” and then dry embossed it with Kat‘s “Wood Grain Framed Diamond Wire Die.”


    I used some black script patterned paper from my stash for the underlay and for the  3D butterfly embellishments. Kat‘s “Sorry Brush Script Word & Sentiment Die” was cut from black glimmer paper and some of her “Shimmering Onyx Sequin Mix” accented the two butterflies.


    For my fourth and final card,  I created a masculine card using a wood-patterned paper from the ModaScrap Wood Effect Paper Pack.”


    I used the same die-cutting methods that I did for the spring and sympathy cards. A solid mint green card stock served as the under layer to make the butterflies “pop off the page.”

    I die cut the “Hello Brush Script Word & Sentiment Die” out of a wood textured paper and mounted it on a “Stitched Sentiment Strip Die” cut from the same mint green card stock. Kat’s “Brown Jewels” were the final touch to the butterfly’s body, with a few more scattered on the front of the card.

    Well, that’s all for today. See you again soon!

    The supplies I used are listed and linked below.  Please don’t forget to use my coupon code “Priscilla10” for 10% off your order at the shop.

    PRISCILLA?


    SUPPLIES

    Design Team Projects

    Happy Easter Card

    Hi Everyone, it’s Tina here. I have a super fun card to share with you using the new Crafters Essentials Easter dies. This die set is packed with dies to create Easter projects as well as Spring. Below are the steps to create your own Easter Card.

    Step 1 – Trim White Cardstock to 8 1/2″ x 5 1/2″, score ar 4 1/4″ and fold in half for a vertical side fold card. (A2)

    Step 2 – Trim Watercolor Cardstock to 5 1/2″ x 4 1/4″ and temporarily adhere to a flat surface using Painter’s Tape. Using a paint brush completely cover the watercolor paper with water. Using any paint of your choice dab in light pastel colors to the enter surface. Let dry before moving onto the next step.

    Step 3 – Diecut Double Stitched Rectangles die to the background created from Step 2. Adhere to the front of card using Nuvo Deluxe Adhesive.

    Step 4 – Diecut Crafters Essentials Easter dies using White Cardstock. Apply Distress Oxide Inks to the Chick. I used Mustard Seed and Spiced Marmalade. Adhere to card using Nuvo Deluxe Adhesive for the bottom egg shell and chick and Foam Tape for the top egg shell.

    Step 5 – Stamp sentiment using Ink.

    Step 6 – Adhere White Jewels using a Crystal Katana and collage medium.

    This card can be used as a Spring card by changing the sentiment. To receive 10% off your order at Kat Scrappiness used code: TINA10 at checkout. Below is a link to all the products used. Thank you for stopping by and have a wonderful day.

    Products Used:

    https://linkdeli.com/widget.js?1552642647875