Follow:
    Design Team Projects

    A Bunch of Bunnies

    Friends,

    I am so excited to be sharing this simple Easter card using the Kat Scrappiness Stitched Outline Bunny Die. This is a card that can be assembly line made. This would be great if you had a bunch of Easter cards to send out.

    The cards can be the same yet different simply by using different patterned paper. I chose to use various spring colors and black to die cut the bunnies and define them.  Layering a black die cut behind the colored one allows the eye to see depth.  Each Bunny got a colorful bunny tail.

    The final step is to layer up coordinating paper to create the finished card. I used a simple sentiment on a fishtail banner and added a few acrylic bubbles and the card was finished.   I believe this fun card will bring a smile to everyone’s face.

    Supplies:

    Kat Scrappiness Stitched Outline Bunny die

    Kat Scrappiness acrylic bubbles

    Kat Scrappiness Bunny tail Pom pom

    New Releases

    KS March Release – Day 3 – Faberge Egg with Cross & He Is Risen With Shadow Die

    Welcome to Day 3 of the March release!  Have you managed to check out the first two days of the reveal?   We also have a giveaway everyday during the reveals so PLEASE SCROLL THROUGH AT THE END OF THE POST TO FIND OUT HOW TO WIN.

    For today’s reveal, we are showcasing the Faberge Egg with Cross and He Is Risen Sentiment with Shadow die.


    I am honestly blown away by the samples made by the team.  Each DT member will have a detailed blog post throughout the month on how they made their cards so please stay tuned.


    ADAM KARLE


    CAREN BARTHOLOMEW


    KATHY SCHWEINFURTH


    LISA GOLZBEIN


    MARIA RUSSELL


    MEGHAN KENNIHAN


    PRISCILLA JOSEPH


    GUEST DT – LEEANN MCKINNEY


    GUEST DT – WALESKA GALINDO


    Would you like to win the Faberge Egg with Cross or the He Is Risen Sentiment With Shadow Die?   We will pick two winners today –> one to win the Faberge Egg with Cross and one to win the He is Risen Sentiment with Shadow.
    Here’s how to win:
    Leave a comment on this blog post and tell us what project/s inspired you to the most today .  You have until Thursday, March 12 to leave a comment.  Winners will be announced on Friday, March 13All winners should send an email to: winners@katscrappiness.com to claim their prize within 48 hours.

    ———–SUPPLIES———–


    News

    KS March Release – Day 2 – Large Filigree Egg with Happy Easter Sentiment with Shadow

    Happy Friday!  Welcome to Day 2 of the March release!  Have you managed to check out yesterday’s reveal?   We also have a giveaway everyday during the reveals so PLEASE SCROLL THROUGH AT THE END OF THE POST TO FIND OUT HOW TO WIN.

    For today’s reveal, we are showcasing the Large Filigree Egg and Happy Easter Sentiment with Shadow Die.

    Get ready to be wowed by these samples below:


    ADAM KARLE

    Adam used the Filigree Die with the Happy Easter Sentiment with shadow and the Embossed Edge Rectangle die.


    CAREN BARTHOLOMEW

    We have two cute cards from Caren.  She used the “happy easter” sentiment with shadow on her first card with the embossed edge rectangle die.

    For Caren’s second card, she strung up the PomPoms as a banner and added the cute bunny using the Bunny outline die and build a bunny stamp set.


    JO THOMPSON

    Our very talented YouTube DT member, Jo created this adorable card using the Bunny Outline die with the Easter Egg Parade sprinkles and Pastel Pink Bunny tails.  Find out more details about Jo’s project on her blog here or watch the process video below:
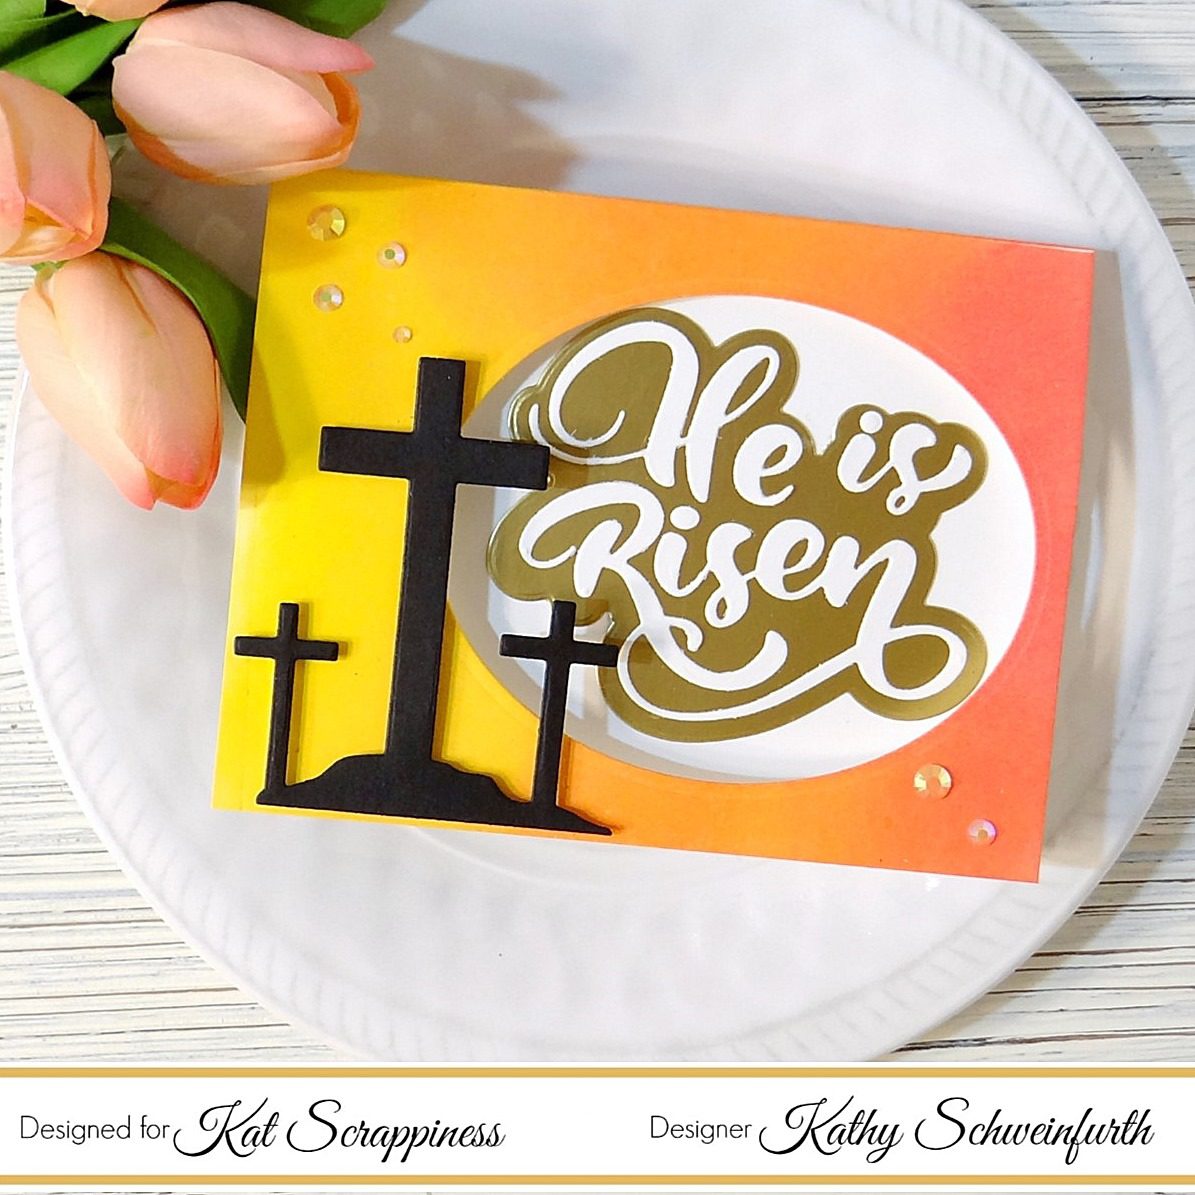

    KATHY SCHWEINFURTH

    Love this beautiful card by Kathy.  She used the Large Filigree egg die with the Happy Easter sentiment with shadow die and added the bow from the Crafter’s Essentials, Spring set.  She also used the 3mm Pink Solid Heart Confetti and Easter egg Parade sprinkles.  I love the baby pink color against the blue plaid background.  Beautiful design!


    LISA GOLZBEIN

    Lisa created a beautiful rainbow background and die-cut the Large Filigree Egg with glitter paper to create this shaker card.


    MARIA RUSSELL

    I decided to go for a tone-on-tone card using the Large Filigree egg and used the Chicken or Egg? sprinkles as my shaker element.  I love the cute little yellow chicks with the colorful sequins and they really popped against the white background.


    I used the Bunny outline die to die-cut three bunnies in white and adhered the Pink Bunny Tails on each bunny.  I also used the Happy Easter die as my sentiment.


    MEGHAN KENNIHAN

    Loving these cards that Meghan created.  The first one is using the Large Filigree egg die with the double-stitched rectangle dies to create her frame.  She added the Happy Easter sentiment die in white and used Rose Medley sequin mix as her shaker element.


    For Meghan’s second card, she used the Bunny Outline die and added the Teal Bunny Tails and the Happy Easter sentiment die. Super adorable!


    PRISCILLA JOSEPH

    Love this card by Priscilla.  She die-cut the Large Filigree Egg first and used it as her stencil and sponge the yellow ink color to make her die-cut pop!  She also added the Happy Easter sentiment die and finished her design by adorning her card with the Carrots sprinkles.


    GUEST DT – LEEANN MCKINNEY

    I love the gold card stock that LeeAnn used to die-cut the Large Filigree egg.  She also used a colorful background and banner with gold accents to make her design look more cohesive.

    LeeAnn used the Happy Easter sentiment as a topper to show off the yummy Easter chocolates she is giving to her loved ones this Easter.


    GUEST DT – WALESKA GALINDO

    Love both cards created by Waleska using the Large Filigree Egg die.  Can’t even pick a favorite!


    Would you like to win the Large Filigree Egg and Happy Easter Sentiment with shadow dies we showcased today?   We will pick one lucky winner!
    Here’s how to win:
    Leave a comment on this blog post and tell us what project/s inspired you to the most today .  You have until Thursday, March 12 to leave a comment.  Winners will be announced on Friday, March 13All winners should send an email to: winners@katscrappiness.com to claim their prize within 48 hours.

    ———–SUPPLIES———–


    New Releases

    KS March Release – Day 1 – Build A Bunny Stamp Set, Sprinkles & PomPoms

    Hello Kat Scrappiness fans!  Welcome to Day 1 of the March release!  This month’s products focuses on spring and Easter!  We also have a giveaway everyday during the reveals so PLEASE SCROLL THROUGH AT THE END OF THE POST TO FIND OUT HOW TO WIN.

    For the first day, we are showcasing the 4×6 Build A Bunny Stamp set that coordinates with the Bunny Outline die plus we have an array of new sprinkles and pompoms.

    YouTube Design Team member Jo Thompson is joining with a process video to show you how she made her card.  Are you ready to see the samples?


    ADAM KARLE

    Adam created this cute Easter card using the new Build a Bunny stamp set and layered it onto a a cute plaid panel with the Jelly Beans.


    CAREN BARTHOLOMEW

    Caren created three super cute cards using the Build A Bunny stamp set, Carrot sprinkles, and the pompoms.  She also used the new “happy easter” sentiment that is going to be released tomorrow.  Aren’t her projects so amazing?


    JO THOMPSON

    Our very talented YouTube DT member, Jo created this adorable shaker card using the Build A Bunny stamp set, along with the carrot sprinkles and KS acetate sheets.  The frame was die-cut using the Crafter’s Essentials die-set.  For the sentiment, she used the Easter Blessings sentiment die.    Such a great card design.   Find out more details about Jo’s project on her blog here or watch the process video below:


    KATHY SCHWEINFURTH

    A clever design by DT Member, Kathy!  She used the Bunny outline die to die-cut the pink bunny and used the Build a Bunny stamp set to add the details.  She added the new Jelly Beans, Easter Egg Parade and Large Easter Egg sprinkles on her card and finished her design by adding the pink pompom on the bunny’s tails and used the Happy Easter die for her sentiment!  Wow!


    LISA GOLZBEIN

    Lisa created this amazing slimline card with the three bunnies using the Build A Bunny stamp set and Bunny outline die, and some new sprinkles.  The bunnies really popped against the soft pastel-colored background.  What a great design!


    MARIA RUSSELL

    I used the Bunny outline die to die-cut three bunnies in blue, pink and yellow.  I used the Build a Bunny stamp set to stamp the details and adhered the Large Easter Egg sprinkle on each bunny with liquid adhesive.  The background was made by using a stencil from my stash with some small sponge daubers and quick dry inks.  I diffused the busy pattern by adhering vellum on top.


    MEGHAN KENNIHAN

    What can I say about Meghan’s cards? ABSOLUTELY GORGEOUS!  For her first card, she used the bunny outline die with the build a bunny stamp set, and included the Large Filigree Egg (releasing tomorrow).  For her second card, she used the Easter Egg Parade sprinkles  as her shaker element.  Love both cards.


    PRISCILLA JOSEPH

    I love this slimline shaker card by Priscilla!  She used the Build a Bunny stamp set and used the new sprinkles as her shaker element.  She also used the new pompoms for her bunny tails.


    GUEST DT – LEEANN MCKINNEY

    LeeAnn used the build a bunny stamp set and the new Easter Egg Hunt and Bunny Tails PomPoms to adorn her card.


    GUEST DT – WALESKA GALINDO

    Love this simple and cute card from Waleska!  She used the build a bunny stamp set and fussy cut the bunnies and adorned with some of the new sprinkles that we have in the shop.


    Would you like to win the new Build A Bunny stamp set and the Bunny Outline die (and some sprinkles) we showcased today?   We will pick one lucky winner!
    Here’s how to win:
    Leave a comment on this blog post and tell us what project/s inspired you to the most today .  You have until Thursday, March 12 to leave a comment.  Winners will be announced on Friday, March 13All winners should send an email to: winners@katscrappiness.com to claim their prize within 48 hours.

    ———–SUPPLIES———–


    Design Team Projects

    Easter Greetings

    Hello crafty friends, Martha Lucia here with you to share one of the stamp sets that is available in Kat Scrappiness Store and also is perfect for the Spring Time, the Easter Greetings.

    This is very easy design that you can create and enjoy at the same time. Let me share with you the quick steps:

    1. Create your card base using a dark color. I love to use the line of purples and burgundy during this season.
    2. Take a whisper white layer and a stencil. I am using the Strokes design from Gina Marie Designs with Oassis Harmony Ink.
    3. Resize the layer using a die cut from your preference. The Embossed Edge Rectangle Dies works wonderful with this design but I used the Big & Little Chain also from Gina Marie Designs.
    4. In a separate piece of whisper white stamp the flowers included on the Easter Greetings stamp set. I used Memento Tuxedo Black Ink and colored them with Illustrator Markers from Spectrum Noir.
    5. Fussy cut the flowers with scissors or with the svg file that is included with the stamp set.
    6. Stamp one of the rabbits included on the Easter Greetings stamp set using Memento Desert Sand Ink. Cut with scissors or die cut machine very close to the border.
    7. Paste the rabbit directly over the stenciled white layer.
    8. Paste and arrange the flowers over the stenciled area with Crafty Foam Tape.
    9. Stamp a personalized message. The Easter Greetings stamp set include many messages and single words that you can use and combine.
    10. Paste the decorated layer with crafty foam tape over the card base with a little movement.

    Thank you for stopping by and please, don’t forget to visit the Kat Scrappiness Store. We have the most beautiful stamp sets and die cuts that work  great with the season and the best along of the year by the versatile use.

    Challenges & Hops

    Kat Scrappiness March Card Challenge: Mostly Green (And February Winners!)

    Welcome to the Kat Scrappiness March Card Challenge and the announcement of the February Card Challenge Winners!

    First we would all like to thank  everyone who entered last month’s HEARTS!.   The team really enjoyed seeing all of your creations.


    And NOW the WINNERS for February!

    1. The Winner of the Hearts Challenge for February is:  Becca Yahrling – (Random.org Pick) and her prize is a $10.00 gift certificate to the Kat Scrappiness StoreBecca, please email us at winners@KatScrappiness.com with your address so we can send out your prize!
    2. The Design Team’s Top Pick (shown below and winner $5.00 Gift Certificate is Kavya.  Kavya, please save the badge below to your computer and upload it to your blog or website to show off your accomplishments!  You can link back to our blog here:  http://www.KatScrappinessBlog.com!


    March Card Challenge

    Hi Crafty Friends,

    It’s time for a NEW Challenge at Kat Scrappiness.!

    This month’s theme is “Mostly Green!”

    To enter our March Card Challenge all you need to do is share your creations that are MOSTLY GREEN. You can join at the bottom of this page and view the RULES, for your chance to win $$ to the  Kat Scrappiness Store! Try to use your Kat Scrappiness Supplies we love to see our products in action.

    You can also enter our social media challenge which is ALWAYS Anything Goes. Just use Kat Scrappiness products and enter your card on our Facebook Group page and Instagram using the hashtag #katscrappinessfan for your chance at a $5 Prize.

    We also have some great Stamps, Dies, Sprinkles, and Sequins to get your GREEN MOJO going:


    What’s Happening Next?

    Stay up to date on everything Kat Scrappiness!

    We want you to be the first to know about giveaways, sales, challenges and so on, and the best way to do that is to subscribe to us!  Here are a few ways you can keep in touch:

    • Subscribe to the Kat Scrappiness Newsletter HERE
    • Join the Kat Scrappiness Facebook Fan Group HERE
    • Subscribe to the Kat Scrappiness Instagram HERE

    Trust us, you don’t want to miss our releases and inspirations!


    March Card Challenge Inspiration

    The Kat Scrappiness Design Team has some GORGEOUS GREEN creations to help inspire you for the challenge.

    Rules:

    1) Kat Scrappiness Products are not required but are HIGHLY Encouraged.

    2) Winner of the Gift Card is picked at Random. If the winner uses KS products the G.C will be $15, if the winner does not use KS products the G.C will be $10

    3) Design Team Top Pick is chosen by the Design Team and will receive a $5 G.C and the DT Top Pick Badge.

    4) MUST link back to the Kat Scrappiness Challenge Blog in your post or mention @katscrappiness on your Instagram Post

    5) Entry Limit: 3


    You are invited to the Inlinkz link party!

    Click here to enter


    Design Team Projects

    Love Shaker Card

    Hi Everyone, it’s Tina here. Did you know Kat Scrappiness has Shaker Cards Kits which takes the guess work out of making Shaker Cards. Each one comes with everything you need which are precut to the exact dimensions. All you need is a Shaker Card Kit, glue and sequins. Below you will find the easy steps to creating your own shaker card.

    Step 1 – Trim White Cardstock to 8 1/2″ x 5 1/2″, score at 4 1/4″ and fold in half for a vertical side fold card. (A2)

    Step 2 – Trim White Cardstock to 5 1/2″ x 4 1/4″. Emboss a pattern and adhere to the front of the card using Nuvo Deluxe Adhesive.

    Step 3 – Color in or Spray some Glimmer Mist to the Decorative Frame Overlay. Set aside to dry. Adhere the Element Shape Base (3mm) to the front of the card using Collage Medium. Wait a few minutes for it to dry. Add to the inside of the base with 3mm Mirrored Clear Hollow Hearts, 3mm Mirrored Clear Solid Heart Confetti and Candy Kisses Valentine Sequin Mix. Adhere the precut Acetate Sheet using collage medium. Adhere the Decorative Frame Overlay using Collage Medium.

    Step 4 – For added interest randomly adhere the same sequin mix from Step 3 on the front of the card using a Crystal Katana and Collage Medium.

    Easy peasy…right! This card can be used for an Anniversary or just to say you love someone without it having to be a Valentine’s Card. Below is a link to all the products used. Thank you for stopping by and Happy Crafting!

    Products Used:
    https://linkdeli.com/widget.js?1559654439292