Tag: zig zag nesting slimline dies

  • Hello My Crafty Friend

    Hello My Crafty Friend

    Hello everyone!

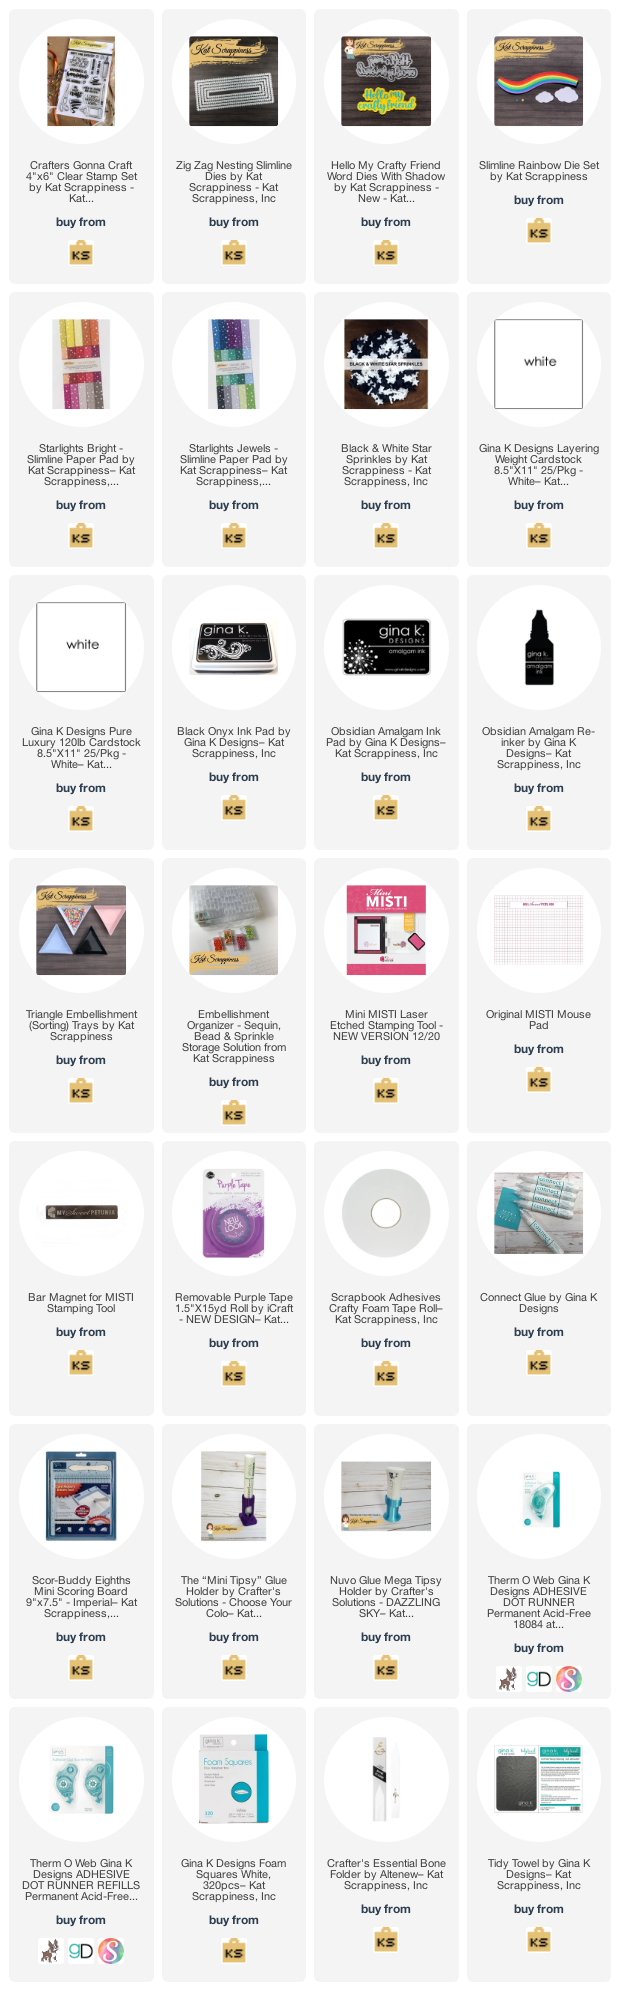
    It’s Donna here sharing a slimline card using the newly released “Hello My Crafty Friend” word die with shadow.  This word die is perfect to send to one of your crafty friends.  The words can also be used separately if you wanted to.  This is a great die to have in your stash.

    Here are the steps to create this card:

    • Cut the White Slimline Card Base: 6″ x 3 1/2″ (6″ x 7″, scored at 3 1/2″).
    • Top layer is cut using the Zig Zag Nesting Slimline Dies.
    • Die cut the rainbow using the Slimline Rainbow die with Starlights Jewel and Bright slimline paper.
    • Die cut the Hello My Crafty Friend word die with shadow.
    • Stamped and cut the crafty elements from the Crafters Gonna Craft Stamp set.  Colored them with copics.
    • Assembled the card and finished off with adding white stars from the Black & White Star Sprinkles.


    Thank you so much for stopping by, please come back again soon.

    Here is a list of supplies I used on my card, Affiliate Links used at no additional cost. Thank you for your support.


    https://linkdeli.com/widget.js?id=f5e8378456858c916708

  • Hello My Crafty Friend | Slimline Card for a Fellow Crafter

    Hello My Crafty Friend | Slimline Card for a Fellow Crafter

    Hi Everyone! Priscilla here from Nubble Light Designs, taking a pause between Christmas and Valentine cards to share with you a slimline card for a crafty friend using several Kat Scrappiness products.


    After creating a slimline card base (8.5″ x 7″, scored at 3.5″), I created a white frame using the largest of the Kat Scrappiness “Zig Zag Nesting Slimline dies” and adhered it to a layer of black card stock.


    I created a background with several colors of blue and purple Distress Oxide inks, and then black heat embossed several of the images from the “Crafters Gonna Craft” stamp set on it.


    I finished off the card by adhering a sentiment using the “Hello My Crafty Friend” die and some “Red Flower Sprinkles.”


    Thank you so much for stopping by! Don’t forget to check out what’s NEW in Kat’s Shop, and follow my blog and Instagram for more “Kat Scrappiness Amazingness”!


    Stay Safe . . .

    Priscilla 🖌✂

    The supplies I used are listed and linked below.

    SUPPLIES

  • Sweet Birthday Wishes Slimline Card

    Sweet Birthday Wishes Slimline Card

    Hi everyone, it’s Tina here. Kat Scrappiness has quite a selection of the Slimline Nesting Dies. I used the Zig Zag Nesting Slimline die for today’s card. Below you will find the steps to create your own Sweet Birthday Wishes Slimline Card.

    Step 1 – Trim White Cardstock to 7” x 8 1/2”, score at 3 1/2” and fold in half for a vertical side fold card (Slimline)

    Step 2 – Trim Black Cardstock to 3 1/4” x 8 1/4” and adhere to card front using Nuvo Deluxe Adhesive.

    Step 3 – Trim White Cardstock to 3 1/2” x 8 1/2” (this can be used from the excess of Cardstock from Step 1). Place a background stencil on top and secure it with painter’s tape or washy tape. Apply ink with a blending brush. I used Distress Oxide Inks in colours Spiced Marmalade, Fired Brick, Mustard Seed, Aged Mahogany for the Flowers and Twisted Citron for the Leaves. I used Post it notes to mask off the areas I did not want colours to blend.

    Step 4 – Diecut Zig Zag Nesting Slimline with the panel created in Step 3 and adhere to card using Nuvo Deluxe Adhesive.

    Step 5 – Diecut Sweet (word die) using Orange Cardstock and adhere to card using Nuvo Deluxe Adhesive.

    Step 6 – Stamp sentiment using Versamark Ink on Black Cardstock, sprinkle White Embossing Powder and remove the excess. Heat set it with a heat tool. Trim out the sentiment and adhere to card using Foam Tape.

    Step 7 – For added interest and sparkle randomly adhere Sparkling Clear Jewels using a Crystal Katana and Nuvo Deluxe Adhesive.

    This card can be used for several occasions by changing the Word Die and sentiment strip. Below is a link to all the products used. Thank you for stopping by and Happy Crafting!

    Products Used:

    https://linkdeli.com/widget.js?id=f5e8378456858c916708

  • Crafty Rainbow Slimline

    Crafty Rainbow Slimline

    Hey, Crafty Friends!   Rainbows just make me happy – whether when I see the real thing after a storm or when I create one in my craft room!  My card today was so much fun to put together using lots of Kat Scrappiness goodies!

    For my slimline card, I first layered a black stripe pattern paper to the card base.  I cut silver glitter cardstock using one of the Zig Zag Nesting Slimline dies for a touch of shimmer.  

    To create the shaker panel, I cut black cardstock with one of the Cross Stitch Nesting dies then cut out the center with one of the Embossed Edge Nesting dies.  I adhered a Slimline Acetate sheet to the back then adhered small strips of black cardstock to form ‘sections’.  On the black strips and all around the Cross Stitch frame, I placed thin foam adhesive strips and then filled in the sections with lots of different sprinkle embellishments (see thumbnails below for all the sprinkles I used).  I then adhered color cardstock to enclose the sprinkles.  

    These adorable ‘crafty’ images are from Gina K Designs Crafty Notes stamp set which I copic colored and popped up with 3D Foam Squares.


    https://linkdeli.com/widget.js?id=f5e8378456858c916708

  • Thankful For My Gnomies

    Thankful For My Gnomies

    There is much to be thankful for, even during these difficult times.  I’m very grateful for my ‘gnomies’…my family, friends, neighbors and even our dog!  

    While it’s hard to believe Thanksgiving is only 3-1/2 months away, it’s never too early to start on Fall Holiday cards and Kat Scrappiness released this ADORABLE Thanksgiving Gnomes set just in time!

    For my card, I first cut orange cardstock with one of the new Zig Zag Nesting Slimline dies, then cut brown cardstock using one of the Embossed Edge Nesting Slimline dies. As mini backdrops for the images, I cut kraft cardstock using one of the Stitched Square dies.

    After copic coloring and cutting out the Thanksgiving Gnomes images, I placed them along the card and added the sentiment from the set.  To finish, I added a few Golden Green Pinwheel Sequins.


    https://linkdeli.com/widget.js?id=f5e8378456858c916708