Tag: Versafine Ink

  • Hello My Dear Friend Card

    Hello My Dear Friend Card

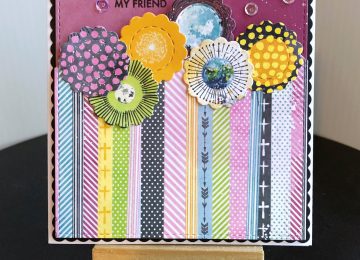
    Hi Everyone, it’s Tina. Today I have a simple and fun card to share with you using the Woodgrain Frame Die and the Friendship Greetings Stamp Set. Below are the steps used to create this card.

    Step 1 – Trim White Cardstock to 8 1/2″ x 5 1/2″, score at 4 1/4″‘ and fold in half for a vertical side fold card. (A2)

    Step 2 – Trim ModaScrap Wood Effect 6×6 Patterned Paper to 3 3/4″ x 5″. Adhere to front of card using Nuvo Deluxe Adhesive.

    Step 3 – Diecut Woodgrain Frame using Kraft Cardstock. Adhere to card using foam tape.

    Step 4 – Diecut Stitched Fishtail Banners using Kraft Cardstock. Stamp Friendship Greetings sentiment to the diecut using Versafine Onyx Ink. Trim off right side and adhere to card using Nuvo Deluxe Adhesive.

    Step 5 – Stamp Friendship Greetings sentiment to the inner section of the frame using Versafine Onyx Ink.

    Step 6 – Stamp image of your choice, color and adhere to card using foam tape.

    Step 7 – For added interest apply Crystal Nuvo Drops Dark Walnut randomly.

    Sometimes Clean and Simple adds more to the card. In this case it doesn’t take away from the gorgeous detail of the Woodgrain Frame Die. Below is a link to all the products used. To receive 10% off your next order at Kat Scrappiness use code: TINA10 at checkout. Thank you for stopping by and have a wonderful day.

    Products Used:

    https://linkdeli.com/widget.js?1552642647875

  • You Mean So Much To Me Using Friendship Greetings

    You Mean So Much To Me Using Friendship Greetings

    Hi Everyone, it’s Tina here. I have a simple yet elegant card to share with you today using the Friendship Greetings Stamp Set. Below are the steps to create your own card.

    Step 1 – Trim White Cardstock to 8 1/2″ x 5 1/2″, score at 4 1/4″ and fold in half for a vertical side fold card. (A2)

    Step 2 – Stamp Friendship Greetings image on White Cardstock using Gina K Amalgam Ink. This is an alcohol friendly ink. Color in with any alcohol markers of your choice. I used the TriBlends from Spectrum Noir. Fussy cut the image or use the Scan ‘N’ Cut. Adhere to card using Foam Tape.

    Step 3 – Stamp Friendship Greetings sentiment using Versafine Onyx Black Ink for Hello and Versafine Morning Mist for You Mean So Much To Me.

    Step 4 – For added interest and sparkle use a Crystal Katana to randomly adhere White Jewels with collage medium.

    This card can be used for any occasion by changing the sentiment. Below is a link to all the products used. To receive 10% off your next order at Kat Scrappiness use code: TINA10 at checkout. Thank you for stopping by and have a wonderful day.

    Products Used:


    https://linkdeli.com/widget.js?1552642647875

  • Bunny In A Basket Card

    Hi Everyone, it’s Tina here. Today is release day for the Crafters Essentials Easter dies. The Crafters Essentials come packed with many dies at an awesome price. When I opened this dieset I already had several ideas brewing. The first idea was a basket with flowers and a bunny. Below are the steps to create your own Bunny In A Basket Card.

    Step 1 – Trim Kraft Cardstock to 8 1/2″ x 5 1/2″, score at 4 1/4″ and fold in half for a vertical side fold card. (A2)

    Step 2 – Trim Black Cardstock to 4 1/8″ x 5 3/8″. Adhere to card front using Nuvo Deluxe Adhesive.

    Step 3 – Using a background stencil apply Distress Oxide Ink Brushed Corduroy with an ink applicator on White Cardstock. Stamp sentiment to bottom using Versafine Onyx Black Ink. Diecut Double Stitched Rectangles to the background. Adhere to card using Nuvo Deluxe Adhesive.

    Step 4 – Diecut Crafters Essentials Easter (bunny in grey and black cardstock, basket in kraft cardstock, bow in orange). Distress the edges of the basket with Distress Oxide Vintage Photo. Adhere to card using Nuvo Deluxe Adhesive only applying the glue to the edges. You want to leave the opening free of glue. Adhere the bunny (grey on top and black on the bottom) using Nuvo Deluxe Adhesive Glue only at the bottom of the bunny. Assemble the bow and adhere to card.

    Step 5 – Optional – Diecut any flowers die you have or use flowers from your stash. Adhere to the card in the basket opening and if you can intertwine it with the bunny.

    This card can be used for any occasion by changing the sentiment and colors. Below is a link to the products used. To receive 10% off your order use code: TINA10 at checkout. Thanks for stopping by and have a wonderful day.

    Products Used:

    https://linkdeli.com/widget.js?1552642647875

  • Merry Christmas My Deer Friend Card

    Merry Christmas My Deer Friend Card

    Hi Everyone, it’s Tina here. This month Kat Scrappiness has a fabulous Merry Critters Stamp Set to help you make your Holiday Cards. It has critters as well as some fun sentiments. Below you will find the steps to replicate this card.

    Step 1 – Trim White Cardstock to 8 1/2″ x 5 1/2″, score at 4 1/4″ and fold in half for a vertical side fold card.

    Step 2 – Trim White Cardstock to 5 1/2″ x 4 1/4″. Apply Distress Oxide Ink using an ink applicator. Start with Stormy Sky at the top and blend in Tumbled Glass leaving an inch at the bottom uncolored. Spritz some water to create droplets. Dab at excess. Apply White Acrylic Paint onto an Acrylic Block. Spray some water and mix it. Using a paintbrush tap the brush to create a snowy scene. Set aside to dry.

    Step 3 – Stamp Merry Critters onto White Cardstock using Versafine Onyx Black Ink. Color using any color medium of your choice. I used Winsor and Newton Promarkers. For added detail use a White Gel Pen to create stripes and circles on the presents and on the tree to create snow. Fussy cut out all the images or use a scan n cut.

    Step 4 – Adhere the background created from Step 2 onto the card front using Nuvo Deluxe Adhesive Glue. Adhere the images to the card using collage medium.

    Step 5 – For added interest and sparkle use Wink of Stella on some of the images.

    I hope you enjoyed today’s card. Below you will find a link to all the products used. To receive 10% off your next order at Kat Scrappiness use code: TINA10 at checkout. Thank you for stopping by and have a wonderful day.

    Products Used:

    https://linkdeli.com/widget.js?1539684774787

  • Stitched Multi Window Frame Card

    Stitched Multi Window Frame Card

    Hi Everyone, it’s Tina here today. Kat Scrappiness has a fabulous Die Set this month called the Crafters Essentials 1. This is packed with 13 dies that are a must have to your collection which can be mixed and matched to create unique cards. For my card I used the Stitched Multi Frame Window and Stitched Fishtail Banner die from this set along with my favorite Double Stitched Rectangles Die. It is topped off with a sentiment from the Everyday Brush Strokes Stamp set. Below are the steps to replicate this card.

    • Step 1 – Trim White Cardstock to 8 1/2” x 5 1/2”, score at 4 1/4”, fold in half for a horizontal side fold card (A2)
    • Step 2 – Diecut Double Stitched Rectangles Die using Patterned Paper. Adhere to front of card using Clear Double Sided Adhesive Tape.
    • Step 3 – Diecut Multi Stitched Frame using White Cardstock. Diecut or Trim Patterned Paper to fit underneath the Multi Stitched  Frame. Place the Multi Stitched Frame in the position you want and adhere the rectangle cutouts using Clear Double Sided Adhesive Tape. Add thin strips of foam tape to the backside of the Multi Stitched Frame and adhere to card.
    • Step 4 – Diecut Stitched Fishtail Banner using Patterned Paper. Add a sentiment using Versafine Onyx Black Ink. Adhere to card using Clear Double Sided Adhesive Tape.
    • Step 5 – Add drops of collage medium adhere Sequins.

    I hope you enjoyed today’s card. This card can be used for any occasion by changing the patterned paper, color and/or sentiment.

    To receive 10% off your order at Kat Scrappiness use code: TINA10 at checkout. Below is a link to all products used. Thank you for stopping by and have a wonderful day!

    Kat Scrappiness Products Used:


  • Stitched Flower Card

    Stitched Flower Card

    Hi Everyone, it’s Tina here today. I have a super fun and fast card to share with you using the new Stitched Scallop Circles Die, Stitched Scallop Rectangles Die along with the Double Stitched Rectangles Die. Below you will find the link to the products used along with the steps to replicate this card.

    • Step 1 – Trim White Cardstock to 8 1/2″ x 5 1/2″, score at 4 1/4″ fold in half for a vertical side fold card.
    • Step 2 – Diecut Stitched Scallop Rectangles using Black Cardstock. Adhere to card using double sided adhesive tape.
    • Step 3 – Diecut Double Stitched Rectangles using Patterned Paper (you want this to be mostly a solid color) Set it aside for now.
    • Step 4 – Diecut Double Stitched Rectangles using a Striped Patterned Paper.
    • Step 5 – Diecut Stitched Scallop Circles 6 times using different Patterned Paper. About half way through the Striped Patterned Paper adhere the Diecut Stitched Scallop Circles using Collage Medium in the center. Once you have all your Stitched Scallop Circles adhered cut out the top half of the Stripe Patterned Paper.
    • Step 6 – Place the Striped Patterned Paper on top of the Solid Patterned Paper and mark the area for the sentiment placement. Stamp Sentiment. For my Hello sentiment I used Versamark Ink and sprinkled Sparkling Embossing Powder then heat set with a heat tool. For my friend I used Versafine Onyx Black Ink.
    • Step 7 – Adhere Solid Background to the front of the card using Double Sided Adhesive Tape. Adhere Stripe Patterned Paper to the front of the card using Foam Tape.
    • Step 8 – Optional – Add Trim Mix II Sequins Mix to the upper part of the card.

    I hope you enjoyed today’s card. This card can be used for any occasion by changing the Color and/or sentiment. Below are links to all the products used. Thanks for stopping by and have a wonderful day!

    Kat Scrappiness Products Used:

    https://linkdeli.com/widget.js?1528877046279

  • Envelope Art Made Simple

    Envelope Art Made Simple

    Hi Everyone, it’s Tina here today. I have a super fun Envelope Art to share with you. Kat Scrappiness has made it so simple to decorate our envelopes with the Owl Envelope Art and Giraffe Envelope Art Stamps Set. Below you will find the easy steps to replicate this Envelope Art.

    • Step 1 – Use a heavy weight envelope or create one yourself using the We R Memory Keepers 1-2-3 Punch Board.
    • Step 2 – Stamp Owl Envelope Art on the front of envelope using Versafine Ink.
    • Step 3 – Mask the image either with Masking Liquid (you will need to let this dry before proceeding to the next step) or stamp image on large Post-It, trim it and place over the image on the envelope. I used Masking Liquid.

    • Step 4 – Carefully create your Distress Oxide background. To create background apply the colors on a kraft mat, spray with water, dip the top part of envelope into the oxidized inks, dry using a heat tool. Repeat the process until you reach your desired effect.
    • Step 5 – Carefully remove the masking.
    • Step 6 – Color the image using any color medium of your choice. I used Winsor & Newton Promarkers for easy blending.
    • Step 7 – Stamp sentiment using Versafine Ink.

    A reminder that Kat Scrappiness has a Challenge every month so be sure to check it out here. Every month there is a chance to win a $25.00 gift card. To enter, submit a photo of your project by clicking on the “Add Your Link” button. A winner is randomly picked at the end of each month.

    To receive 10% off any order at Kat Scrappiness use code TINA10.

    Below is a link for all products used for this project.

    Thanks for stopping by and have a wonderful day.

    Kat Scrappiness Products Used:
    https://linkdeli.com/widget.js?1524143299350

  • “You’re Too Sweet” Card

    “You’re Too Sweet” Card

    Hello, crafters!  Today I will be sharing a card with you that I made using the new “Punny Snacks” stamp set.  This stamp set is full of adorable food images and funny sentiments to go with them.  I chose to use the ice cream cone and put the You’re Too Sweet sentiment with it.  I am a big fan of creating my own custom backgrounds, and the ice cream stamp is the perfect size to use for this.  I cut a panel of white card stock to 4×5.25″ and stamped the images repeatedly in a random pattern, using VersaFine Onyx Black ink.  This is my favorite black ink to use, and it lends itself beautifully to heat embossing (I used Ranger Clear powder for this project.)

    There are many different ways to color your card projects, but I decided to do a little watercoloring with my aqua brush and some Zig markers.  With only 2 shades of brown and 1 pink, I was able to get some pretty shading because of the water added with my brush.

    Once my background panel was done, I used the Kat Scrappiness Double Stitched Circle Dies to create a focal piece.  The great part about these dies is that you get a stitched detail on the piece you cut out (in this case my polka dot paper), and stitched detailing around the edge of the cut-out (my custom background.)  To give the background just a bit more pizzazz I decided to dry emboss it with one of my embossing folders (I used polka dots, but any uniform pattern would do.)

    For my focal piece, I stamped the ice cream cone and put the sentiment beneath it, again using VersaFine ink and Clear embossing powder.  I added a watercolored ice cream cone with some foam tape so that it would really stand out against the polka dot paper.  These images are really easy to cut out by hand!

    Finally, I popped up the focal piece with some foam tape and placed it over the circle opening of my background panel.  And there it is, my finished card!  I hope that you enjoyed this project and will give it a try for yourself.  If you’d like to watch a video of the full creation of this card, I’ve included a link below.  See you all soon!


    “You’re Too Sweet” process video


  • Coffee & Donuts

    Coffee & Donuts

    Hi everyone, Cheryl here, with another project to share. Ever hit a brick wall in crafting? That was my week! Every thing I tried to  make didn’t work, fought me every step of the way! Lol, finally just had to push through.

     I ran out of time and had to go with what I had, and this is it. Who doesn’t love coffee and donuts? I chose this stamp set from Gerda Steiner Designs and colored it using my Zig markers. I added a bit of highlights to the “hair” with a sparkle pen. I fussy cut them out.

    I chose the paper pad from Doodlebug called Cream & Sugar. Sooo cute! One of the papers is all strips so I picked a few and made an element of a few of them. I cut the coffee bean paper down to 5.25 x 4. and the pink layer is 5.o x 3.75. I layered them together and ran the strip element up from the bottom edge a bit. I popped up the two hedgehogs on foam squares and the coffee cup.

    I then used a small circle die and cut out several of the little donuts from another paper from the pad. A few I popped up and a few I left flat on. I brushed them with a bit of  Spectrum Noir sparkle brush. For the coffee cup, I stamped it on different papers and cut apart to paper piece it.

    I selected sentiments from two different Gerda Steiner stamp sets. Stamped it out in a dark brown ink. And added some cute stamped hearts, too. Like…Sending you Coffee Love…lol!

    So, that’s about it. Pretty easy, actually. And anyone can send me some coffee and donuts anytime! Hope you got a bit of inspiration, even though there are three cards laying on my desk that butted heads with me…and this one was a fight too. Oh well, we all have those days, I guess! Get out your fun things and craft something!

    Cheryl

    https://static.inlinkz.com/ppr.js

    Save

    Save

  • You Are My Most Favorite! – Featuring 2-step stencils and Clarity Brushes

    You Are My Most Favorite! – Featuring 2-step stencils and Clarity Brushes


    Hello everyone! I have a bright and fun project to share with you today. If you haven’t tried the Die Cuts and More 2 step stencils, you should! They are fun, versatile, and beautiful! The stencils paired with the Clarity Stencil Brushes are a match made in heaven. AND…to top it off this design and card were done in under 30 minutes;)

    The 2 step stencils are very easy to use and have the most awesome designs. The one used on this card is called Cubicles. Please check out the video below for the detailed description and process on using both the Layering Stencils and the Clarity Stencil Brushes. I can show you so much easier than I can write out the process 😉

    Have a great day!

    Kelley;)

    Video:


    Supplies: