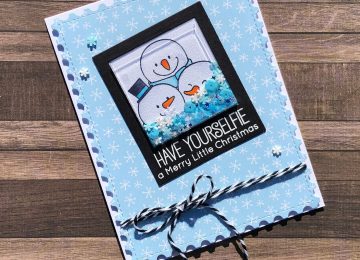
Tag: kat scrappiness sequins

  • Poolside | Last Hurrah to Summer

    Poolside | Last Hurrah to Summer

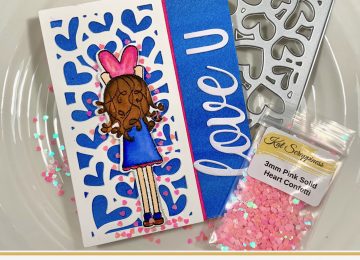
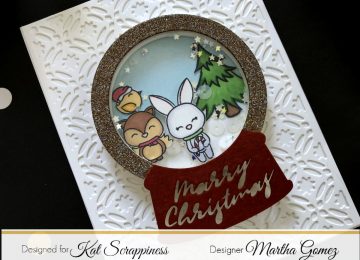
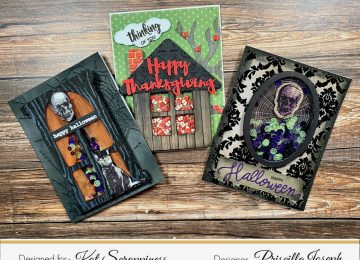
    Hi Everyone, it’s Priscilla here. Today I have a shaker card that pays “homage” to summer. I know . . .  you can argue that summer isn’t over until after Labor Day or technically September 21st, but when you are a teacher like I am, summer is officially over when that first school bell rings in August. So in honor of my favorite season, I wanted to make a “poolside” card in memory of all the pools I frequented this summer (which right now are already a distant, but lovely memory). Let’s get started!

    Today’s card features this grand swimming pool I created with a die from my stash to make a shaker card filled with Kat Scrappiness “Ocean Sequin Mix” along with her “Sparkling Clear Droplets” for a hint of bubbles. To complete my scene, I used a palm tree die and a “tanning diva” stamped image (also from my stash) and colored them with Spectrum Noir “Tri-Blend Markers.”

    For the “bottom” of the pool I used some pattern paper from Honey Bee Stamps called “The Bee’s Knees.” To create the pool deck, I used the Kat Scrappiness “Star Fusion Coverplate Die” and embossed an A2 size layer of gray card stock to give the deck a textured look before sponging on Distress Oxide inks in “Pumice Stone” and “Hickory Smoke.” I stamped the  “Hello” sentiment from the Kat Scrappiness “Friendship Greetings” stamp set with blue ink to make it look like it was “painted” on the pool deck.

    Thank you so much for stopping by! Don’t forget to check out what’s NEW in Kat’s Shop, and follow my blog and Instagram for more “Kat Scrappiness Amazingness”!

    Priscilla???

    The supplies I used are listed and linked below.

    SUPPLIES

    https://linkdeli.com/widget.js?1559654439292

  • Christmas In July – Merry Christmas Shaker Card

    Christmas In July – Merry Christmas Shaker Card

    Hi Crafters!

    We are still celebrating Christmas in July here at Kat Scrappiness.  It has really put me in the mood to make Christmas cards, they are my favorite!

    I tend to use fun/bright colors on my cards, so it was good to get out of my comfort zone and use brown/gold tones for this card.  I absolutely love the way it turned out.

    I found a piece of light brown patterned paper with gold snowflakes on it from my stash.  I used the double stitched rectangle dies to cut out a panel from the patterned paper.  I then used the double stitched circle dies to cut a circle from this piece.  As you can see, the double stitched circle die left stitches on the outside of the circle.

    I used the VersaMark watermark pen with a ruler to draw a line from the top of the circle to the edge of the paper.  I covered the line with gold embossing powder and heat set it.  I also heat embossed the sentiment Merry Christmas from the Merry Critters stamp set onto a Stitched Fishtail banner die cut from kraft card stock.

    I backed the circle opening with clear acetate and attached gold glitter paper to my kraft card base.  I added Golden Anniversary sequins to create the shaker part of the card and attached it to the card base using dimensional adhesive.  I die cut the bow from Lawn Fawn’s Mini Picture Frame dies in gold glitter paper and attached it to the top of the circle to create the ornament.

    To finish the card, I added the sentiment banner with dimensional adhesive.

    – – –– – –– – –– – –– – –– – –– – –– – –– – –– – –– – –– – –– – –– – –– – –– – –– – –– – –– – –– – –– – –– –

    Check out this great sale – use code JULYXMAS to get 20% off all Christmas products.  Also, you will receive tickets for a giveaway in August.

    Christmas in July Sale & Giveaway

    Thanks for stopping by and happy stamping!

    – – – SUPPLIES for today’s project– – – – – – – – – – – – – – – – – – – – – – – – – – – – – – – – – – – – – – –

  • Dolphin Shaker Card with Bonus D.I.Y. Calendar Video!

    Dolphin Shaker Card with Bonus D.I.Y. Calendar Video!

    Hey Crafters! Priscilla here!  Today I’ll be showing you the shaker card I made using the  “Stitched Dolphins” die set available in Kat‘s shop. And stay tuned for a special bonus video of a related D.I.Y. calendar project I’ve been featuring every month on my blog, nubblelightdesigns.com.

    Here are the two Kat Scrappiness products I used to make this card.

    Click on the product photos above  to see them in Kat’s Shop.

    Let’s look at the card I created . . . .

    I sponged several shades of blue Distress inks to create the background before adding the ocean plants and sunlight rays using the Honey Bee “Ocean Scene Builder” stencils and Distress white pigment ink.


    I used the largest dolphin die to create the shaker opening and filled it with Kat‘s “Ocean Mix”– a beautiful mix of blue and green sequins. I die cut one of the smaller dolphins, sponged it with the same Distress inks as the background, and then stamped and white heat embossed a “Make a Splash” sentiment I had in my stash on it.

    The finishing touches were the ocean “bubbles,” created with Kat‘s 6mm and 4mm “Sparking Clear Droplets.”


    BONUS VIDEO!

    This card was the “inspiration” for my July calendar project. If you follow my blog, nubblelightdesigns.com, you know I create a monthly calendar using a Paper Source “D.I.Y. Calendar Kit.” Watch the video below to see how it all came together!


    Thank you so much for stopping by! Don’t forget to check out what’s NEW in Kat’s Shop, and follow my blog and Instagram for more “Kat Scrappiness Amazingness”!

    Priscilla?

    The supplies I used are listed and linked below.

    SUPPLIES

  • Monkey Shaker Tag

    Monkey Shaker Tag

    Good morning Kat Scrappiness fans and welcome back to the blog!

    It’s Lisa here with you today and I have an adorable Monkey Shaker Tag to

    share with you! I am having so much fun using all of the new sprinkles and sequins

    in the shop, there are so many to choose from!

    I just love making shaker cards and tags and for my project today

    I used the Sunny Studios Love Monkey stamp set and Stitched Scalloped Nesting Tags

    to create an adorable tag.


    I started by cutting out

    a tag from the Stitched Scalloped Nesting Tags in black and white

    striped paper and a second one in white for the base of the tag.

    Next I took one of the smaller heart dies from the Layered Nesting Heart Dies

    and die cut a heart shape from the bottom right side of the tag so I could fill

    it with my shaker bits. Before I continued with the shaker element I stamped the

    word “monkey” in Versafine Clair Glamorous Ink at the bottom of the tag

    next to the heart cut out. The next step was to cover the back of the heart shape

    up with some Lawn Fawn Acetate and then build up the area around the heart with

    some Brutus Monroe foam tape. After I created the well for my shaker bits I filled it

    with the red hearts from the Heart Sprinkles mix and some sparkly

    3 mm Mirrored Solid Heart Confetti.  I just love adding some sparkle to any shaker

    card or tag! I added the second tag I cut out in white to the back of my shaker to enclose

    all of the shaker bits.  The adorable monkey image was stamped in Gina K Amalgam ink

    and colored with my Copic markers. After I colored him I die cut him out with the

    coordinating Sunny Studios Love Monkey dies.

    I popped him up on some more Brutus Monroe foam tape for some dimension.

    For the sentiment I used Brutus Monroe Alabaster embossing powder to

    heat emboss the sentiment from the Sunny Studios Love Monkey stamp set

    on to some black card stock and pop it up on an angle at the top of the tag.

    The finished touch was to thread some red and white bakers twine through

    the hole in the top of the tag.

    I just love how this cute tag came out and I love shaking it even more!

    Here is a another pic with a few of the Kat Scrappiness supplies used on my tag.

    I hope you’ll give shaker tags a try! They are so much fun to make and even more

    fun to shake! You will feel like a chef in the kitchen picking out the perfect mix

    of shaker bits to fill your card or tag!

    If you wish to purchase any of the products I used on my tag, just click on the

    product links to go to the store. Make sure you use my code “LISA10” at

    checkout to save 10% on your entire order.

    (Affiliate links are used at no additional cost to you)

    As always thank you so much for stopping by and have

    a great day, I already am!

    ?Lisa ?

  • “Special Delivery!” | Creating a Birthday Card with the New Balloon Shaker Card Kit

    “Special Delivery!” | Creating a Birthday Card with the New Balloon Shaker Card Kit

    Hey Crafters! Priscilla here!  Today I’ll be showing you the shaker card I made using one of the new “Shaker Card Kits” in Kat’s shop.


    Here’s the products I used from Kat’s shop to make my shaker element:


    (Click on each photo above to go right to the link in Kat’s shop.)


    This kit includes everything (except the adhesive) to create a balloon shaker card quickly and easily! Here’s the info on these kits as described in the shop:

    Included:

    • Shaker Element Shape Base (3mm thick)
    • Transparent film cut to fit the shape perfectly
    • Decorative Frame Overlay.  

    You can use the decorative frame overlay the way it is which is a milky white color or you can change the color  with any medium you choose such as ink, markers, watercolors, paints, etc.  Anything you can use on paper/cardstock, you can use to color your frame the color(s) you’d like.

    When the shaker is completed the approximate height of the shaker portion is 5mm. 


    You can assemble the shaker kit in several different ways. I placed a yellow background (a little less than the size of the balloon frame) on my card front and then adhered the balloon-shaped foam frame on top of it. Then I pour the  “Party Confetti” sprinkles into the opening. Next I painted the top balloon frame with white acrylic paint and let that dry before adhering the acetate film to the back of it. Finally I adhered the completed frame/acetate frame over the foam frame housing the sprinkles. Done!


    I finished the card with some yellow ribbon and a sentiment from my stash. Note how I scattered several different colors of  Kat’s Jewels around the sentiment for a finishing touch.

    Thank you so much for stopping by! Don’t forget to check out what’s NEW in Kat’s Shop and use my coupon code Priscilla10″ for 10% off your order at the shop. Follow my blog and Instagram for more “Kat Scrappiness Amazingness”!

    Priscilla?

    The supplies I used are listed and linked below.

    SUPPLIES

  • July Card Challenge – Patriotic Pets

    July Card Challenge – Patriotic Pets

    Hello Kat Scrappiness fans!

    It’s Lisa back on the blog today to bring you another monthly challenge!

    We just wanted to say thank you so much for entering our card challenge in June!

    We loved seeing your

    Food themed / Father’s Day cards!

    Thank you to all who entered for playing along!

    And now on to our WINNERS!

    The 2 random winners of the Meals With Dad challenge from June are

    shartl – $15.00 gift certificate to Kat Scrappiness

    and

    Janis in ID – 6 pack of sequins, jewels and/or sprinkles

    Congratulations shartl and Janis in ID, thanks so much for sharing

    your beautiful projects with us!

    ***Please e-mail us at winners@katscrappiness.com to claim your prizes!***

    Make sure you stay tuned to the Kat Scrappiness blog,

    Facebook group and Instagram pages

    to be the first to know about special discounts and giveaways!

    ***********************************************************************************

    That brings us to the July challenge.

    Patriotic Pets

    In America the 4th of July is a huge celebration full of

    fireworks and fun! A lot of us like to include our pets in that celebration as well!

    Let’s face it, our pets are a big part of our celebrations and July 4th

    is no different!  We love our pets and they are part of the family!

    For the July challenge we will focus on July 4th and pets!

    Any and all types of animals are fair game for this challenge!

    In my house we have 1 dog, 2 cats, 1 bearded dragon and 5 leopard geckos!

    It’s a small zoo!??????

    Let’s celebrate our pets that are with us and those that have sadly

    crossed over the rainbow bridge, we LOVE them all!

    Here are 3 products in the Kat Scrappiness shop to get you started!

    Let Freedom Ring Sequin MixPaw Print Sprinkles 

    and

    Pet Sentiments Brush Script Word Dies

    So come on now, let’s see your July 4th and pet inspired cards!

    You just might get lucky and win a $15 gift certificate to KatScrappiness.com

    or a sequin prize package

    While you do not “have” to use our products, we would love to see how you

    incorporate your Kat Scrappiness stamps and/or dies in your projects!

    This month as always, we only have 2 easy requirements to play along.

    1) Share your July 4th or Pet themed cards!

    2) Remember to link back to our challenge in your entry.

    That’s it! Easy Peasy right!

    To enter, submit a photo of your project below

    (Click on the “Add Your Link” button) and we will randomly pick the winner at the end of the month.  Good Luck from the Kat Scrappiness team and we look forward

    to seeing your beautiful projects!

    You are invited to the Inlinkz link party!

    Click here to enter

    https://fresh.inlinkz.com/js/widget/load.js?id=ef8b06cc10bc6002458d

  • “Sour” You?  | A Shaker Card with Kat Scrappiness Sprinkles

    “Sour” You? | A Shaker Card with Kat Scrappiness Sprinkles

    Hey Crafters! Priscilla here!  Today I’ll be showing you a mouth-watering ice-cold glass of sparkling lemonade . . . perfect for the hot summer days ahead here in Chicago where I live. Except you can’t drink this one . . . cuz it’s on the front of a card. LOL! This shaker card showcases several of the new sprinkles in the Kat Scrappiness shop. Can you tell that yellow is my favorite color?

    To create this shaker card, I used Kat‘s new “Lemon Slice Sprinkles,” “Yellow Star Sprinkles,” and even a few “Sparkling Clear Droplets” for the ice cubes!

    (Click on each photo above to go right to the link in Kat’s shop.)

    I “shopped my stash” for this card and found a glass tumbler and lemon stamped images to color and cut out using my Brother “Scan N Cut” machine. I “filled” the glass tumbler with all these sprinkles before adhering the die cut shaker frame (with acetate) over it.

    Also from my stash, I found the perfect “tropical” patterned paper for the background, some matching fern die cuts, and the “‘Sour’ You” sentiment to adhere to the front of my card. Notice a few more “Lemon Slice Sprinkles” rising up from the lemonade!

    And yeah, that’s a real drinking straw added for the finishing touch!


    Thank you so much for stopping by! Don’t forget to check out what’s NEW in Kat’s Shop and use my coupon code Priscilla10″ for 10% off your order at the shop. Follow my blog and Instagram for more “Kat Scrappiness Amazingness”!

    Priscilla?

    The supplies I used are listed and linked below.

    SUPPLIES

  • Crafters Gonna Craft

    Crafters Gonna Craft

    Happy Monday everyone, hope everyone is enjoying the start of summer!

    Today I have a fun shaker card that uses a couple of Kat Scrappiness dies, Crafters Gonna Craft stamp set, and five different sets of sequins and jewels.  This was such a fun card to make, and I can’t wait to send it to a crafty friend!

    I started off the card by die cutting a piece of patterned paper from the Really Rainbow Scallops paper from Lawn Fawn using the largest Zig Zag rectangle die.  I then used one of the Double Stitched heart dies to cut out a heart from the same piece of paper.  I heat embossed one of the sentiments from the Crafters Gonna Craft stamp set directly on this panel.  I then backed the panel with some clear acetate.

    I stamped a few of the images (marker, pencil, sequins) from the Crafters Gonna Craft set, colored them with Copic markers, and fussy cut them out.

    I cut a piece of pink paper from the Watercolor Wishes paper from Lawn Fawn and glued it directly to my white card base.  This piece will show thru where the heart was cut out.  For the shaker part of the card, I added the images I colored along with the following sequins – 4mm Purple Majesty, 3mm Blue Stars, and Pastel Scissors.

    I added dimensional adhesive to the back of the yellow panel and adhered it directly to the card base.  To finish off the card, I added a couple of the colored images onto the card and added pretty pink and lilac jewels.

    – – –– – –– – –– – –– – –– – –– – –– – –– – –– – –– – –– – –– – –– – –– – –– – –– – –– – –– – –– – –– – –– –

    Use code caren10 for a 10% discount in the Kat Scrappiness shop.

    Thanks for stopping by and happy stamping!

    – – – SUPPLIES for today’s project– – – – – – – – – – – – – – – – – – – – – – – – – – – – – – – – – – – – – – –

  • You Make Me Jump For Joy

    You Make Me Jump For Joy

    Hi everyone!  I’ve got another card using the Hoppy for You stamp set and one of the new sprinkle mixes from Kat Scrappiness.  Kat released 38 new sequin/sprinkle mixes this month.  That isn’t a typo – there are 38 fun new mixes!

    I stamped and colored the large kangaroo and the flowers from the So Hoppy For You stamp set with Copic markers.  I then cut them out using my Silhouette Cameo.  I die cut the Stitched Scalloped Collage Frame die from plaid patterned paper and white card stock.  I adhered the plaid frame the white card base.  I blended a little bit of Spun Sugar Distress ink directly onto the card base where the cut outs were.  I also added Spun Sugar Distress ink onto one of the inner pieces of the frame from the white card stock.  On this piece, I stamped my sentiment in black ink.

    I used dimensional adhesive to add the kangaroo and the piece with the sentiments.  I then adhered the flowers directly to the card base.  To finish the card, I added the purple flower sprinkles to the kangaroo and the flowers.

    – – –– – –– – –– – –– – –– – –– – –– – –– – –– – –– – –– – –– – –– – –– – –– – –– – –– – –– – –– – –– – –– –

    Use code caren10 for a 10% discount in the Kat Scrappiness shop.

    Thanks for stopping by and happy stamping!

    – – – SUPPLIES for today’s project– – – – – – – – – – – – – – – – – – – – – – – – – – – – – – – – – – – – – – –

  • “Hoppy For You” | Creating Four Kangaroo Cards

    “Hoppy For You” | Creating Four Kangaroo Cards

    Hey Crafters! Priscilla here! By now you’ve probably seen the new Kat Scrappiness “Hoppy for You” kangaroo stamp set. I don’t think there’s a lot of kangaroo stamps on market, so it makes this set even more special!

    I’ve had such fun using this stamp set and created four cards for you today. Let’s get started!


    My first card features “Kanga” deep in the jungle. (Note my “creative license” because I don’t think kangaroos live in that environment! LOL!)

    For this card, I used the Kat Scrappiness “Foliage Frame” die and some patterned paper from my stash to create a “jungle” frame around the kangaroo. I used various shades of blue distress oxide inks on a fern patterned embossing folder for the background. “Kanga” was colored with the new-to-me Spectrum Noir “Tri-Blend Markers” and die cut using my Brother “Scan n Cut” machine.

    I finished off the card with the “I Love ‘Roo” sentiment from the stamp set and some of Kat’s “Sparkling Clear Jewels.”


    My second card features “Kanga” in the spotlight ready to present his “significant other” with a flower.

    I used a MFT stencil and Distress White ink to create a spotlight on navy blue card stock. A star stencil and silver pigment ink finished the background. Once again I used the  Spectrum Noir  “Tri-Blend Markers” to color “Kanga” and the flowers, before die cutting them using my Brother  “Scan n Cut” machine.

    I used Kat‘s “Sparkling Clear Droplets” to connect “Kanga” to his speech bubble.


    For my third card, “Kanga” is posing for a “Selfie” with his buddies.

    To make this card, I stamped “Kanga” and them masked him off and stamped the “Photo Bomb” stamp (from Mama Elephant) over the mask. I colored both the kangaroo and his friends with alcohol markers. I also used a M.E. die to cut out the image to look like an Instagram frame and found a template on Pinterest that had the appropriate symbols for the bottom margin.

    I used patterned paper from the Simple Stories “Say Cheese” collection and some black card stock die cut with Kat‘s “Cross Stitched Rectangle” die for the base layer. Some of Kat‘s hearts were the final touch to this card.


    My final card would be perfect for a “New Mom.”

    I created a soft background with Distress Oxide inks and MFT cloud and grass stencils. Note the pouch stamped on Mama Kangaroo’s belly. This is an additional stamp in the set just for that purpose. I cut a slit in it before inserting Baby, with some flowers from the stamp set added behind. The sentiment was stamped on one of Kat’s “Stitched Fishtail Banner” dies, a butterfly from the “Crafters Essentials-Easter Edition” die set was added, with a balloon die from my stash for the finishing touch.

    Sale Ends Tomorrow!

    Thank you so much for stopping by! Don’t forget to check out what’s NEW in Kat’s Shop and use my coupon code Priscilla10″  for 10% off your order at the shop. Follow my blog and Instagram for more “Kat Scrappiness Amazingness!”

    Priscilla


    The supplies I used are listed and linked below.

    SUPPLIES