Tag: kat scrappiness jewels

  • Let’s Make A Summer Card with New Dies from Kat Scrappiness!

    Let’s Make A Summer Card with New Dies from Kat Scrappiness!

    (affiliate links to most products are provided below at no additional cost to you)

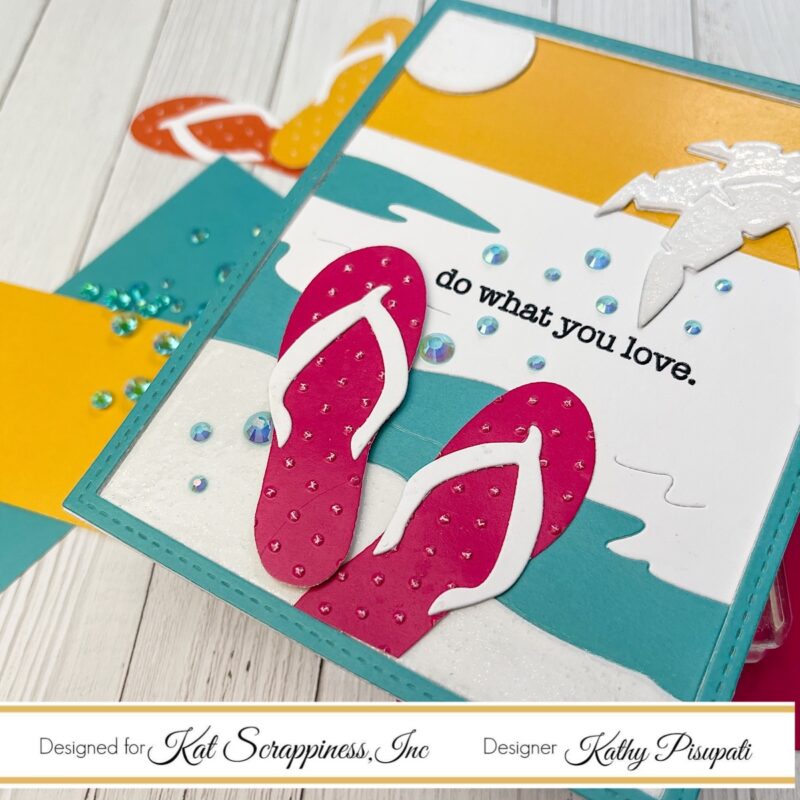
    Good Morning, I am up on the Kat Scrappiness blog today with some more inspiration for you. Today we are going to do some paper piecing with the A2 Waterside Die and the Summer Essentials die set. The only ink you will need is black pigment ink for the sentiment! These dies make it easy to create fun cards for the summer! So let’s make a card!

    Card Supplies

    Card Details

    • Cut, score, and fold an A2 top-folding card base.
    • Cut a white panel to 4.25″ x 5.5″ (you can use a lighter weight card stock for this.)
    • Select some solid colors from the Summer Vibes paper pack.
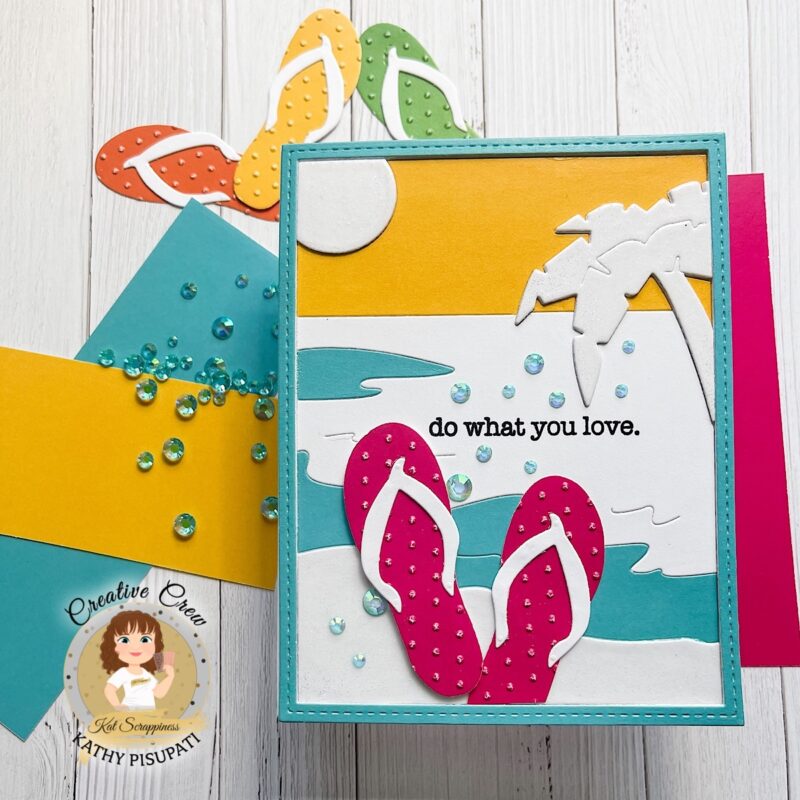
    • Die-cut 1 completely white panel with the A2 Waterside Die.
    • Die-cut one completely turquoise panel for the frame and the water pieces.
    • Cut the sky area from the yellow color paper.
    • I cut the palm tree and the sun a few more times, from some white scraps as I will be layering them.
    • Using the Summer Fun Essentials dies cut out your flip-flops from colored card stock. I also ran my flip-flops through my die-cutting machine with an embossing folder for a bit of texture.
    • Glue your palm trees together and your suns together with Bearly Arts Precision glue or another liquid adhesive.
    • Then I inked the sun and palm tree with Versamark embossing ink and covered it with clear embossing powder and heat embossed.
    • Next, glue the flip-flop pieces together.
    • Now adhere all your puzzle pieces on top of the white 4.25″ x 5.5″ panel we cut earlier.
    • Put the panel in your MISTI stamping platform and stamp your sentiment. I also heat embossed the sentiment with clear powder.
    • Adhere to your frame and your stacked palm tree and sun. Add foam tape to the back of the flip-flops and adhere.
    • Toss on a couple of the Aqua AB Jewels and the card is done.

    You can create so many color combinations with these dies. You can even throw in some of the fabulous patterned paper. This is an easy card to create. Please stop by the Kat Scrappiness shop to purchase any of these products. I hope this card inspired you to pull out your colored card stock and do some paper piecing. As always, thanks so much for stopping by. Check out all of the inspiration from our amazing Creative Crew HERE!


    https://linkdeli.com/widget.js?id=f5e8378456858c916708

  • Design Team Holiday Shopping Guide & Holiday Sales!

    Design Team Holiday Shopping Guide & Holiday Sales!

    crafter's shopping guie

    Are your friends and family asking you what you want for Christmas? Struggling to figure out what to get your crafty friends and loved ones? Let us help!

    The Kat Scrappiness Design Team Members all got together and each came up with their personal TOP TWO FAVORITE Kat Scrappiness products that they believe everyone needs in their craft room. So whether you are making a list for Santa or giving to a crafty friend we have what you need in our Design Team Recommended Shopping Guide!

    And the BEST PART of this list?

     It’s ALL ON SALE!

    Beginning November 27th through December 3rd is our biggest sale of the year!  BLACK FRIDAY, SMALL BUSINESS SATURDAY AND CYBER MONDAY HOLIDAY EXTRAVAGANZA!

    It’s the perfect time to get amazing deals on ALL your FAVORITE products!

    Black Friday Sale at Kat Scrappiness.com


    Design Team Recommended Shopping Guide!

    Let’s start with design team member, Meghan Kennihan’s top two Kat Scrappiness products!

    Her first choice is the Kat Scrappiness Wavy Wonky Rectangle Die.

    Kat Scrappiness Wonky Wavy Rectangle Die

    And here is a sample of this die in action:

    http://bit.ly/2NvQFi3


    Meghan’s second choice is the Kat Scrappiness  You Guac My World Stamp Set

    You Guac My World Stamp Set by Kat Scrappiness

    Here is a sample of a project made with this stamp set.

    http://bit.ly/36md9uJ


    Caren Bartholomew’s Favorites include the Kat Scrappiness  Stitched Scalloped Rectangle Die.

    Stitched Scalloped Rectangle Die.

    Here is a project created using this die.

    Stitched Scalloped Rectangle Die.


    Caren’s second choice was the Kat Scrappiness White Jewels.

    Kat Scrappiness White Jewels

    Here is a project using the White Jewels.

    White Jewels


    Adam Karle’s Favorites include the Kat Scrappiness Bamboo Backdrop Die

    Bamboo Backdrop Die

    Here is a project using the Bamboo Backdrop Die.

    Bamboo Backdrop Die


    Adam’s second choice is the Kat Scrappiness  Crafter’s Gonna Craft Stamp Set.

    Crafter's Gonna Craft Stamp Set.

    Here is a sample project that was made using this stamp set.

    Crafter's Gonna Craft Stamp Set.


    Priscilla Joseph’s Top Recommended Products include the Kat Scrappiness Wok On Stamp Set.

    Wok On Stamp Set.

    Here is a project using this stamp set.

    Wok On Stamp Set.


    Priscilla’s second choice was the Kat Scrappiness Building A Stocking Christmas Dies.

    Building A Stocking Christmas Dies.

    Here are a few cards she made using this die set.

    Building A Stocking Christmas Dies.


    Jo Thompson’s Favorite Two Kat Scrappiness Products include the newly released Give Thanks Sentiment Die with Shadow.

    Give Thanks Sentiment Die with Shadow.

    Here is a beautiful shaker card she made using these dies.

    Give Thanks Sentiment Die with Shadow.


    Jo’s Second Favorite product is the Kat Scrappiness Layered Coffee Cup Dies.

    Layered Coffee Cup Dies.

    Here is a warm and cozy card she made using that die set.

    Layered Coffee Cup Dies.


    Martha Gomez’s Favorite Two Products include the Kat Scrappiness Medallion Coverplate Die.

    Kat Scrappiness Medallion Coverplate Die

    Below is a clever and creative way she used this die to make the following card.

    Medallion Coverplate Die.


    Martha’s second choice is the Kat Scrappiness Zig Zag Stitched Rectangle Dies.

    Zig Zag Stitched Rectangle Dies.

    Again, a very creative and unique way to use these dies!

    Kat Scrappiness Zig Zag Rectangle Dies


    Maria Russell’s favorite two Kat Scrappiness products include the Fancy Scalloped Stitched Border Dies.

    Fancy Scalloped Stitched Border Dies.

    These cards are a great way to show off those border dies.

    Fancy Scalloped Stitched Border Dies.

    Maria’s second favorite Kat Scrappiness product is the Layered Chocolate Bar 6″x8″ Stamp Set.

    Kat Scrappiness Layered Chocolate Bar Stamp Set

    Here is a sweet card made using this stamp set:

    Kat Scrappiness Layered Chocolate Bar Stamp Set

    https://www.katscrappiness.com/collections/ks-stamp-sets/products/layered-chocolate-bar-6x8-stamp-set-by-kat-scrappiness

    https://www.katscrappiness.com/collections/ks-stamp-sets/products/layered-chocolate-bar-6x8-stamp-set-by-kat-scrappiness


    Dawn Soto’s Favorites begin with the Kat Scrappiness Give Thanks Wreath Die.

    Give Thanks Wreath Die.

    Look at all the different ways she used these dies to create these beautiful cards!

    Give Thanks Wreath Die.


    Dawn’s Second Favorite Product from Kat Scrappiness is the Woodgrain Framed Diamond Wire Die (which is one of Kat’s faves as well)

    Kat Scrappiness Woodgrain Framed Diamond Wire Die

    This is a fun and creative card that Dawn made using this die.

    Kat Scrappiness Woodgrain Framed Diamond Wire Die Card Project


    Tina Dornbaum’s Favorite Product for this year’s gift guide is the Kat Scrappiness Hoppy For You Stamp Set.

    Hoppy For You Stamp Set.

    This is an adorable card that Tina made using this stamp set.

    Hoppy For You Stamp Set.


    Tina’s second favorite is the Kat Scrappiness Merry Critters Stamp Set.

    Merry Critters Stamp Set.

    And here is a fun and festive Christmas Card Tina made using this stamp set.

    Merry Critters Stamp Set.


    AND LAST but NOT LEAST… OUR AMAZING LEADER AND CEO of Kat Scrappiness!

    Kat Driggers’ favorite Kat Scrappiness Product is the Embossed Edge Dies.  They also come in circles, ovals, squares and hearts!

     Embossed Edge Rectangle Dies.

    And here is an example project using this die.

     Embossed Edge Rectangle Dies.

    Kat’s Second Favorite Kat Scrappiness product is the Crafter’s Essentials Winter Dies.

    Kat Scrappiness crafters essentials winter die set

    And here is just one example of how you can use the many dies in this die set.

    Kat Scrappiness crafters essentials winter die set


    That’s it for our Design Team Recommended Shopping Guide for this year.  Kat Scrappiness has over 660+ exclusive products including stamps, dies, embellishments, shaker card kits, a2 acetate sheets, gift cards and more!  Plus we carry many of the other top crafting brands in our store as well.  And…

    Don’t forget our Holiday Extravaganza begins on the 29th!

    • 20% off All items Eligible November 29th- December 3rd (*sale excludes Gina Marie Product*)
    • Free Gift for all orders over $50
    • Free Shipping for all orders over $75
    • All orders over $100 will receive a raffle ticket for a drawing on January 8 ,2020 with multiple prizes/winners!

    START YOUR WISHLIST HERE!

  • Crafting with the New Kat Scrappiness “Bamboo Backdrop Die” | Giveaway!

    Crafting with the New Kat Scrappiness “Bamboo Backdrop Die” | Giveaway!

    Hi Everyone, it’s Priscilla here. Today I have three cards that feature Kat‘s new “Bamboo Backdrop Die” from her September release. And stay tuned for a giveaway of three Kat Scrappiness products at the end of this blog post. Let’s get started!

    My first card uses the new Bamboo die, but with a twist. I created a stencil with it by die cutting it out from a mylar stencil sheet. You can pick these sheets up anywhere, including Amazon.

    Here’s the stencil I made with the die, which can be used over and over again ?. I placed the mylar stencil over navy blue card stock and carefully spread white embossing paste using the Deco Foil “Stencil Pal” tool to ensure a smooth finish. After the paste dried,  I added two Gerda Steiner “Lovely Panda” images, cut and colored using my Spectrum Noir “Tri-Blend Markers.” A “Happy Birthday” sentiment, white heat embossed on a navy strip die cut with one of Kat‘s “Stitched Fishtail Banner Dies,” was the finishing touch.


    For my second card, our panda is peeking out from the bamboo to tell this card’s recipient how he feels. The “I like you ‘beary’ much” sentiment is also from the Gerda Steiner “Lovely Panda” stamp set. I love how the “tone-on-tone” effect of the shimmering black card stock overlaid on plain black card stock looks! Three Kat Scrappiness “Sparkling Clear Droplets” connect the speech bubble die to the panda.


    For my third card,  I created a shaker card with the “Bamboo Backdrop Die.” After die cutting the bamboo background from Yupo paper, I painted several Tim Holtz “Alcohol Inks on to it to create a “mystical” jungle effect, before adhering a sheet of the new Kat Scrappiness “A2 Acetate Sheets” to the back.

    For shaker elements, I used a mixture of the Kat Scrappiness “Clear Sparkling Jewels” and “Gold Jewels” with a gold foil card stock as a background. A third cute panda from the Gerda Steiner‘s “Lovely Pandas” set sits atop a “Happy Birthday” sentiment, gold heat embossed on one of Kat‘s “Stitched Fishtail Banner Dies.”

    Giveaway!

    I received duplicates of these three Kat Scrappinessproducts, so Kat suggested I do a “giveaway” on my blog, and . . .  why not? Pictured are the just released “Bamboo Backdrop Die,” a 10-pack of Kat‘s new “A2 Acetate Sheets,” and Kat‘s “Happy Thanksgiving Brush Script Word & Sentiment Die”— perfect for the upcoming holiday. To enter the giveaway, simply:

    One lucky person will receive all 3 products!

    Thank you so much for stopping by! Don’t forget to check out what’s NEW in Kat’s Shop, and follow my blogand Instagramfor more “Kat Scrappiness Amazingness”!

    Priscilla??

    The supplies I used are listed and linked below.

    SUPPLIES


  • 5 Cards 1 Stamp Set with Wok On

    Hello crafty friends! Do you ever get a new stamp set and know you could make oodles of great cards with it, but realize, a few months later, you’ve only used it maybe once? Today’s post was inspired by the idea of getting several uses out of a single stamp set in a single crafting session. When I want to make a batch of cards I tend to decide on some unifying things to make the process a little faster and then add unique touches to each one. To hear more about my thought process making these cards check out the video below:

    [youtube https://www.youtube.com/watch?v=jU1NDOUuHJA]

    For my card set today I used one of the newest releases from Kat Scrappiness Wok On. This has so many images that are easy to color and also very easy to cut. I fussy cut all the images today. I decided to start with some common things I could do on each card to make the process a bit faster. I decided I would cut the main decorated panel using the Cross Stitched Rectangle die from Kat Scrappiness. Then I added a layer of colored cardstock and a layer of black to each card. The extra layer of mats helps the cards pop a bit and makes them clean and simple designs carry a bit more visual weight.

    I colored all the images with Copic markers and once I picked a few markers I tried to use the same ones repeatedly to save time. I also used the markers to color the mats so that I wouldn’t waste time trying to find something that coordinated from my stash.

    Each of the colored images was popped up to help it stand out a bit more. I have taken to layering scraps of cardstock to create my own pop ups instead of using foam. I like that I can control the thickness, save money, and use up what would otherwise be waste.

    Finally each card was finished off with some Kat Scrappiness jewels or sequins. While picking out the perfect embellishment for each card was a bit time consuming it is definitely one of the fun parts of crafting for me but you could save time by using the Kat Scrappiness Black Jewels for each one since they would all match those.

    Feel free to let me know which of the cards was your favorite or share a tip for how to make multiples cards more quickly. I love that I got so much use out of one new stamp set. Now to go craft with all the other new sets I have yet to ink up. If you’re reading this the day it’s posted check out the Memorial Day sale and use the code MEMDAY19 to save or on a different day you can always save with the code JESS10.


  • 3 Ideas & Techniques with the Butterfly Backdrop Die

    3 Ideas & Techniques with the Butterfly Backdrop Die

    Hi everyone! It’s Lindsay Adreon, from Crafting While Caffeinated Blog & YouTube Channel, here with you today. I am super excited to be guest designing today with Kat Scrappiness! This past release, the new Butterfly Backdrop die was release and when I seen it, I had so many different ideas for it I couldn’t choose just one, so I picked three to share with you today! Be sure to watch the video tutorial below to see three different ideas and techniques you can use with the new Butterfly Backdrop Die from Kat Scrappiness!

    My first card is definitely the most shiny of the three! I love using glitter and making a full glittered background with this die is easier than you might think! Be sure to watch the video above for all the details. But I did want to tone it down just a touch so I added a border to the top and bottom of the card using the new Zig Zag Border dies. I also added a few Brown Jewels from Kat Scrappiness to give this card a few finishing touches!

    My second card is super easy and can be completely customized to fit your card recipient or card making style. I started by die cutting a piece of heavy weight white card stock and kept both pieces. Behind the large piece I added an ink blended panel and then popped up the little butterflies back over the panel. I did add a little fold to the butterflies wings so they would have a lot of dimension!

    For my final card, I used the die cut as a stencil! This is one of my favorite ways to use large background dies like this. And because this card was so simple, I wanted to add a little more interest by making a shaped card base. I used the new Zig Zag Rectangle Die Set from Kat Scrappiness to create the card base. Be sure to watch the video above to see how easy it is to use the dies to create fun shaped card bases!

    I hope you all enjoyed the three different ideas and techniques I shared today to use with the Kat Scrappiness Butterfly Backdrop Die! I’ve listed and linked all of the Kat Scrappiness products I used on each of my projects down below. Thank you for letting me spend a bit of time with you today! Happy Crafting!!


    ——Supplies Used———————————————————————————————————————————

  • Caren’s Favorite Kat Scrappiness Products

    Caren’s Favorite Kat Scrappiness Products

    Hi everyone!  Today I have a video that features my favorite Kat Scrappiness that have been released this year.  I’ve been with the Kat Scrappiness design team for a year, so I wanted to make a video showing my favorite and most used products.  I’m also happy to be staying on for another term!  Can’t wait for you guys to see some of the new things Kat has in store for us!


    * This is actually the Peacock backdrop Coverplate – not Petal Burst


    – – –– – –– – –– – –– – –– – –– – –– – –– – –– – –– – –– – –– – –– – –– – –– – –– – –– – –– – –– – –– – –– –

    Use code caren10 for a 10% discount in the Kat Scrappiness shop.

    Thanks for stopping by and happy stamping!

    – – – Caren’s Favorite Kat Scrappiness products – – – – – – – – – – – – – – – – – – – – – – – – – – – – – – – – – – – – – – –

  • Easy Easter Cards with Kat Scrappiness Mandala Frame and Lawn Fawn

    Hello crafty friends! I’m excited to share one of the new products from Kat Scrappiness. One of my favorites from the new release is the Mandala Frame. I love using it to create card sets like the one I’m featuring today. I was inspired by the colors from the Lawn Fawn Perfectly Plaid Spring and Rainbow paper pads. For more details on how I made these cards check out the video below.

    [youtube https://www.youtube.com/watch?v=eturBqzUQoM]

    After cutting the backgrounds from the patterned paper I picked out some coordinating inks and jewels. I picked out the Kat Scrappiness jewels in Lime Green, Lilac and Teal. As mentioned in the video I originally intended to mix up all the colors but I also liked the monochromatic look. Let me know which one was your favorite.

    In addition to keeping it simple with the gorgeous Kat Scrappiness die, I also decided to keep it simple by stamping the duck image from the Lawn Fawn Easter Party set onto patterned paper. Having the subtle background under simple coloring I can add interest without having to add detailed shading.

    Above you can see a mixed card and below you can see the monochromatic version. I personally don’t know which I like better but I do know those Kat Scrappiness Jewels are a perfect finishing touch every time!


  • Merry Christmas Critters

    Merry Christmas Critters

    Hi Eveyone, it’s Tina here today. I have a Holiday card to share with you using the new Merry Critters Stamp Set and the Double Stitched Rectangles Die. Below you will find the steps to replicate this card.

    Step 1 – Trim White Cardstock to 8 1/2″ x 5 1/2″, score at 4 1/2″ and fold in half for a vertical side fold card. (A2)

    Step 2 – Trim White Cardstock to 4 1/2″ x 5 1/2″. Apply Distress Oxide Ink using an ink applicator to create a sky. I used Tumbled Glass starting from 1 1/2″ from the bottom and working up to Stormy Sky. I sprayed it with water to create some droplets. I sprayed som Shimmer Spritz for some added sparkle. Once dry I placed the Snowed In Stencil and applied Nuvo Glimmer Paste Moonstone. Let dry.

    Step 3 – Stamp Merry Critters images using Memento Tuxedo Black Ink. Color in the images with medium of your choice. I used Winsor and Newton Promarkers. Fussy cut the images or use a scan n cut.

    Step 4 – Dry Emboss the scene from Step 2 using the 2 largest dies. Spray a little water to help prevent cracking of the paper. Adhere to the card front using Nuvo Deluxe Adhesive Glue.

    Step 5 – Optional – Create hills – Stamp sentiment in bottom right corner using Versafine Onyx Black Ink. Adhere to card front using Nuvo Deluxe Adhesive Glue and foam tape for the last layer.

    Step 6 – Adhere the images from Step 3 using collage medium and foam squares for the tree. Using a white gel pen add some snow to the tree.

    Step 7 – For added interest and sparkle adhere Dark Blue Jewels using a Crystal Katana Tool and collage medium.

    I hope you enjoyed today’s card. The Merry Critters Stamp set is a fun way to create your holiday cards. Below is a link to all the products used. Thank you for stopping by and have a wonderful day.

    Products Used:

    https://linkdeli.com/widget.js?1540275216575

  • Happy Fall Y’all

    Happy Fall Y’all

    Did everyone get a chance to celebrate World Card-making Day yesterday?  I plan on celebrating today!  You can still celebrate today at Kat Scrappiness with a 15% discount site-wide by thru October 7, 2018 by using code CARDDAY18.

    I have a card today featuring the new Happy Fall Y’all stamp set.  I used the 4″ Wreath Builder template from Gina K to create a fall wreath with three of the leave stamps in the Happy Fall Y’all stamp set.  I then stamped the sentiment from the same stamp set in the middle of the wreath.  I added some red jewels on the inside of the wreath.  I cannot stop using the jewels from Kat Scrappiness on every card I make!  I matted the wreath panel onto some matching green card stock and tied a piece of brown and white twine around that panel.  I then adhered the panel to a brown card base.


    – – –– – –– – –– – –– – –– – –– – –– – –– – –– – –– – –– – –– – –– – –– – –– – –– – –– – –– – –– – –– – –– –

    Use code caren10 for a 10% discount in the Kat Scrappiness shop.

    Thanks for stopping by and happy stamping!

    – – – SUPPLIES for today’s project– – – – – – – – – – – – – – – – – – – – – – – – – – – – – – – – – – – – – – –

  • Wine Not

    Wine Not

    Hello everyone!  Have you seen the latest items released from Kat Scrappiness?  On today’s card, I’m featuring several of these new products.  My favorite – the Peacock Backdrop die – it is so beautiful and elegant.  I’m going to have to resist using it on every card!

    For the back panel of this card, I used the double stitched circles from Kat Scrappiness to cut out a circle on a 4 1/4 x 5 1/2 piece of kraft cardstock.  Behind this I layered a piece of deep purple card stock die cut using the Peacock Backdrop die.  Behind this I added a piece of dark gray card to match the Wine Not sentiment I heat embossed on to the panel.  I used the Wine Not dies to create the wine bottle.  I found a piece of patterned paper that had script writing on it – I thought this was perfect for the body of the wine bottle.  I popped that up on the card using adhesive foam tape.

    I added silver jewels on the wine bottle and sparkling clear jewels on the peacock backdrop to give a little sparkle to the card.  I thought the card was missing something in the upper right corner so I add three drops of the clear glass drops by Fabrika.


    – – –– – –– – –– – –– – –– – –– – –– – –– – –– – –– – –– – –– – –– – –– – –– – –– – –– – –– – –– – –– – –– –

    Use code caren10 for a 10% discount in the Kat Scrappiness shop.

    Thanks for stopping by and happy stamping!

    – – – SUPPLIES for today’s project– – – – – – – – – – – – – – – – – – – – – – – – – – – – – – – – – – – – – – –