Tag: Kat Scrappiness Embellishments

  • February Kat Scrappiness Embellishment Release

    February Kat Scrappiness Embellishment Release

    Hi there Kat Scrappiness Fans, today we have a fun Embellishment release for you. The team has come together to create some fun projects for you. Not all of the new release has projects, but be sure there will be more projects coming in future posts from the team. All items used by the team are linked at the end of the post.


    Sheri used the Luck of the Irish mix along with Everyday Quokka and Uppercase Condensed Letters for her Mini Slimline Shaker Card.

    Caren has used the Luck of the Irish mix with the Lowercase Condensed letters in her mini slimline shaker project.

    Sammi hit it on the head with the Luck of the Irish Mix, along with the Bumble Bee Pearl mix formerly released. The Clouds from the Slimline Rainbow Die Set and the After the Rain die set, along with the Happy from the Happy Easter with Shadow set.


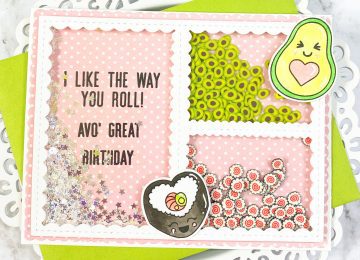
    Nora did an awesome job using the cute Stitched Bunny Outline Dies and the Spring Has Spring Mix.

     She also used the Rainbow Confetti Slimline Paper Pack for her card panel.


    Donna used the Stitched Slimline Rainbow Die, Rainbow Hugs with Shadow Die,  Reverse Scalloped Mini Slimline Die and the Love Is Love mix for this awesome card!!!

    Tasha used the Slimline Jewels Paper Pad, Party Banner Cover Plate Die, Everyday Quokka Stamp/die,

    Everyday Sentiments and Rainbow Mouse Sprinkles to make this amazing shaker card.

    Kathy used the Happy Easter w/shadow, Rainbow Egg Die set and Pastel Hearts Mix.

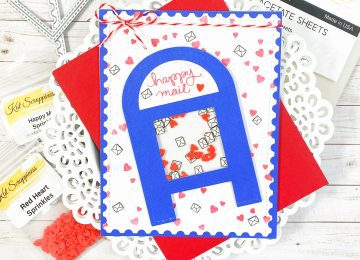
    Nicki made this great shaker card using the Happy Birthday w/shadow die, Layered Party Banner Die, And Star Studded Rainbow Sprinkles


    Crafty All used the Lowercase Condensed Alphabet, Stitched Bunny Outline and Pastel Love Mix.


    Kimberly used the Fancy Scallop A2 Dies, Layered Tulip Bouquet Dies, along with the Teal and Purple Seashell mixes on this wonderful card.


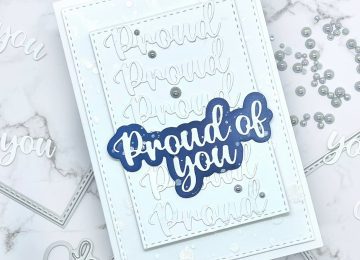
           And last but not least we have Donna’s Shamrock project where she used the Stitched Fancy Scalloped Hearts to make the Shamrock Shaker, filled with the              Over The Rainbow Mix and used the Happy Mail sentiment from the Happy Mail Mini Slimline Envelope Die Set.


    LEAVE A COMMENT BELOW FOR YOUR CHANCE TO WIN A $10 GIFT CARD FOR KAT SCRAPPINESS EMBELLISHMENTS,

    COMMENTING WITH CLOSE ON 3/6 12AM EST WINNER WILL BE ANNOUNCED TUESDAY 3/8 BY 12NOON EST.


  • Absolute Birthday Card Essentials!

    Absolute Birthday Card Essentials!

    Good Morning, Kathy here with some new inspiration for you.  The new Birthday Essentials die set from Kat Scrappiness provides many elements to create beautiful birthday cards. Today’s card is a bit interactive as I added a wobble. I think it is so fun and hope you do too! This was easy to create and a load of fun. Drop a comment below and let me know what you think of this card. The Birthday Essentials die set can be found here and I encourage you to check it out as I don’t think it will be available for long! Now it’s time to make a card!

    CARD SUPPLIES

    [youtube https://www.youtube.com/watch?v=zSsBl0gtNjQ]

    CARD DETAILS

    • Cut, score, and fold a 5″ x 5″ card base.
    • Cut a panel from white card stock measuring 4.5″ x 4.5″.
    • Add some interest to this panel by using an embossing folder or just score lines every 1/4″ like I did.
    • With a 3″ circle die, center, and die-cut from the smaller panel.
    • With a slightly larger die, cut a circle from the Birthday Essentials Paper Pack.
    • Die-cut your birthday hats from the Birthday Essentials die set. I cut 4 hats. Two from silver and two from blue card stock. But if you just want to use patterned paper behind your hats you only need two.
    • Trace the hat onto a piece of white card stock and cut it out two times. This will be glued to the back of the hat if you are inlaying your small die-cut elements. If you are using patterned paper trace the hats and glue the patterned paper to the back of the die-cut hats.
    • I took the inside die pieces from one hat and inlaid them into the other hat. So on this card I took the blue dots and inlaid them into the silver hat with dots, then the silver stripes were inlaid into the blue hat.
    • Tape your larger patterned circle to the back of the main card panel with low-tack tape. Add glue ONLY to the circle. Then, center the main panel onto the card base and press down on the circle. This will get you perfect placement for the larger circle. (Remember to remove the low tack tape)
    • Layout your hats. To one of the hats, I added foam tape to pop it up. I added a little wobble piece to the second hat and adhered to that.
    • I stamped the sentiment in Versafine Nocturne Clair black ink from the Everyday Brushstrokes stamp set. I then embossed with clear embossing powder and heated. I cut the sentiment with my paper cutter then cut a slightly larger rectangle from blue card stock. Glue these together and add to your card. Where the sentiment was touching the card I used liquid glue. Then I put a small piece of foam behind the area touching the patterned circle.
    • Add a few silver confetti and the card is done.

    As always, I thank you for visiting my blog today and would love for you to subscribe to it. Make sure you stop over and check out the new release at the Kat Scrappiness Shop. It is an amazing release!


  • So Proud of You!

    So Proud of You!

    Good Morning All of My Card Making Friends!

    This is Kathy from Expressive Paper.  I have been busy making cards for fall and Halloween.  Then I remembered December is not too far in the future and I need a graduation card!  This card is pretty simple and perfect for your graduate.

    Card Details

    •  I cut 6 of the “Proud of You” pieces and one of the shadows with a layering card stock
    • I used the 5 X 7 Stitched Rectangle Dies.  This is a 6 piece rectangular die set that is perfect for larger cards. Select the largest frame and the frame two sizes smaller. (your die cut word should fit into the rectangle)
    • Use whatever ink you use for ink blending and blend the shadow die piece. I used the colors of the school the student is graduating from. I also used the Mini Ink Blending Brushes
    • I next took a pearlescent spray and used it on the shadow and the card pieces.
    • Cut, fold and score your 5 x 7 card base
    • Adhere 5 of your “Proud of You” to the smaller stitched rectangle. I centered the dies but you could stagger them, add more whatever you want!
    • Adhere the 6th die cut on top of the shadow and place it in the bottom third of your card.
    • I added foam tape to the back of the main panel for dimension.
    • Adhere some Grey Opal Pearls to your card panel and you are done.

    Thank you so much for visiting the blog.  I would appreciate it if you would follow my blog I would love for you to join me on Instagram too! Currently, Kat Scrappiness is having a sale on all things in the Halloween and  Thanksgiving categories.  The sale goes on until October 25th so please take advantage of it! Click on the photo below for more details. The savings code is SPOOKYSAVINGS.  Have a great day!

  • Avocado Sushi Birthday Shaker

    Avocado Sushi Birthday Shaker

    Hi there, it’s Lisa here with you from Oh So Cute By Lisa sharing another Kat Scrappiness inspired card!
    I’m excited to share a shaker card with you today that I made! I used quite a few products from the Kat Scrappiness store to make this fun card.
    Here are all the details:
    To start my card I colored the cute images from the You Guac My World Stamp Set and the
    Wok On Stamp Set.  I decided to use one image from each set for my card. The next step was to cut the front panel of the card using the Stitched Scalloped Collage Frame Die which served as the perfect shaker window.  It’s great because it makes 3 windows that you can put different shaker bits in. I backed that frame with a piece of acetate from the A2 Acetate Sheets and then built the back of it up with foam tape.
    Now it was time to prepare the base of the card. I used the Stitched Scalloped Rectangle Dies and I cut out a piece of pink polka dot paper for my background.  Before I adhered that panel to the base of my A2 sized card I stamped 2 sentiments in black ink from the You Guac My World and
    Wok On Stamp Sets in the space that will be the largest window opening.  I embossed it with clear embossing powder to give it a shiny appearance.
    Now the fun part! Adding the sprinkles to the card! The technique that I use is to put my sprinkles on the base of the card and place the frame with the foam tape over those sprinkles. This way I can see the sprinkles and the base of the card and I can place the window down in the exact center of that base panel.
    I chose 3 different embellishments for my shaker windows. I used the Avocado Sprinkles and the Sushi Sprinkles for the two smaller windows and I used the 3mm Mirrored Clear Solid Stars for the largest window with the sentiment. The last thing to do was adhere the two little avocado and sushi images to the front of the card. Here’s a closeup of those fun sprinkles:
    This was a fun card to make and it always amazes me how many products you can use on one card.  Kat Scrappiness has so many awesome stamps dies and embellishments in the store, you can find EVERYTHING you need and so much more!
    Here is one more look at my card with all the supplies shown:
    Thank you so much for joining me today, I’m so glad you stopped by to check out my latest card and I hope you’ll check out all the fun shaker bits in the store and make your own card.
    Don’t forget to follow
    Kat Scrappiness on all
    social media platforms to be alerted to new releases, sales and giveaways!
    Have a great day, I already am!
  • Happy Mail

    Happy Mail

    WHO DOESN’T LOVE HAPPY MAIL?!

    I KNOW I DO!

    ?

    Hi! It’s Lisa here with you today from Oh So Cute By Lisa, let’s make some Happy Mail!

    It’s my turn on the Kat Scrappiness blog today and I’ve created a fun shaker card that was inspired by

    a new embellishment in the Kat Scrappiness online craft store!

    Take a look at these adorable little Happy Mail Sprinkles!

    From the minute I got my hands on these little cuties I knew I wanted to make a card that had a mailbox on it with a shaker window for these little envelopes and here it is!

    I just love how this card came out and it was super easy to create!

    Since I don’t own a specific mailbox die I figured out a way to make my own mailbox and I’m going to show you how I did it today!

    For my mailbox I started with a top rounded Tag Die. The top part of it is shaped like the top of a mailbox so I took the smallest die in the Kat Scrappiness Double Stitched Square Dies and cut out a notch in the bottom of the tag die.

    The remaining shape looked just like a mailbox.

    I then took the smallest die from the Double Stitched Square Dies again and cut a window out of the lower part of the tag so I could create a shaker window.

    Once I had the window cut out I took a sheet of Kat Scrappiness A2 Acetate Sheets  and cut out a small enough piece to cover the back side of that small square window.

    To make the half circle on top of the mailbox I used the smallest die from the Double Stitched Circle Dies and cut it in half creating a half circle where I could stamp my sentiment from the Simon Says Stamp Envelops Sentiments Stamp Set. I added one envelope and one heart from the Happy Mail Sprinkles and the Red Heart Sprinkles on either side of the sentiment.

    Here is a picture collage tutorial step by step of how I created the mailbox with the shaker window and half circle for my sentiment.

    I used foam tape to build up the area around the window so it would hold my shaker bits.

    The next step was to prepare the base of my card to adhere the shaker mailbox to.  The Stitched Postage Stamp Edge Rectangle Nesting Dies are the perfect dies to create fun background panels for your cards.  I used the largest die from that set, cut out some white card stock and did some fun stenciling using a heart stencil! I just love how the cute little red hearts looked all over the background.

    Once the background was ready I tied some red and white twine around the top and adhered it to a blue card base to match my mailbox.

    Next I sprinkled some of the Happy Mail Sprinkles and the Red Heart Sprinkles into the middle of the stenciled panel. I then removed the backing from all the foam tape behind the mailbox and centered the window over the cute sprinkles. I actually angled the mailbox just because I thought it gave it a fun random look.

    I loved the little envelopes SO much I added a bunch more of them around the card in between the stenciled hearts.

    It was a lot of fun to make my own mailbox. Just because you don’t have a specific die sometimes doesn’t mean you can’t shop your die collection and make something unique!

    Thank you so much for joining me on my blog today! I hope you’ll check out all of the great crafty products over at Kat Scrappiness! There are literally hundreds of embellishments to create the most unique and fun shaker cards like mine! There are sequins, sprinkles, jewels, coffee beans and so much more!

    That’s all for today, don’t forget to follow

    Kat Scrappiness on all

    social media platforms to be alerted to new releases, sales and giveaways!

    Have a great day, I already am!

                                                      ?  Lisa  ?