Follow:
    Design Team Projects

    Happy Father’s Day!

    Happy Sunday Crafty Friends! Priscilla here from the Kat Scrappiness Design Team.

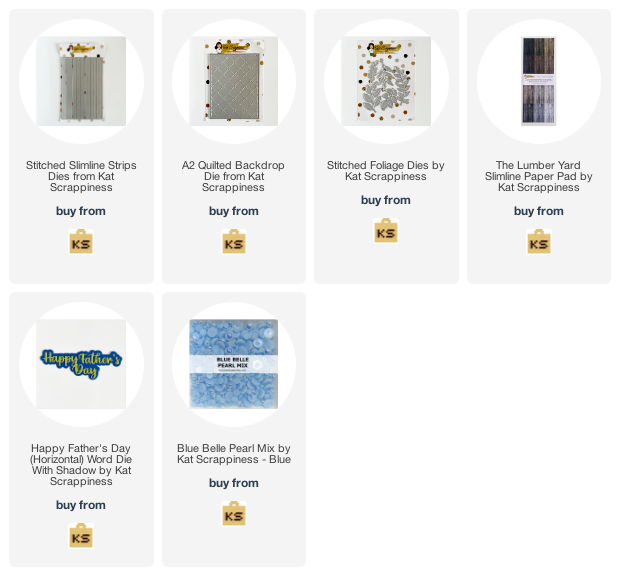
    Since today is Father’s Day, I thought I would share the Father’s Day card I sent to my son in Florida. He is “Dad” to two 10 year old twin boys.

    I used many Kat Scrappiness products, including the Happy Father’s Day Word Die with Shadow, the Stitched Slimline Strips Dies, the A2 Quilted Backdrop Die, the Stitched Foliage Dies, and The Lumber Yard Slimline Paper Pad to make this card.

    A little more info about the Stitched Slimline Strips Dies . . . Included in this set are 4 sets of strip dies (in threes )with stitched detail down the middle. So you get 12 strip dies cuts from one set! These dies are NOT specifically for slimline dies only . . . you can use them on any size card! For this card, I used the steps to create a background for my sentiment.

    Card Details:


    • Snipped off the ends of the strips that overhung the cardstock before adding this piece to the center of the quilted layer.
    • Die cut  a piece of foliage using the Stitched Foliages Dies and blue card stock and adhered it on the left side of the striped center layer.
    • Die cut “Happy Father’s Day” out of black cardstock and the shadow out of vellum cardstock, and then adhered over the foliage on the front of the card.
    • Added three pearls from the Blue Belle Pearl Mix collection for a finishing touch.

    Thank you so much for stopping by! Don’t forget to check out what’s NEW in Kat’s Shop, and follow my blog, Instagram, and Facebook for more “Kat Scrappiness Amazingness”!

    Stay Safe . . .

    Priscilla 🎨

    The supplies I used are listed and linked below. I would be so grateful if you use these affiliate links  to grab your Kat Scrappiness Goodies! No extra cost to you!

    Design Team Projects

    Happy Father’s Day-Summer Vibes Paper Pack

    (affiliate links are provided below at no additional cost to you)

    Good Morning! Kathy here with some Father’s Day Inspiration. If you need a quick card, this is for you. I used the new Summer Vibes Paper Pack and the Father’s Day Shadow DIe to make it easy! I hope you enjoy it! Let’s make a card for dad!

    Card Supplies

    card details

    • Cut score and fold a 5.5″ x 5.5″ card base from Neenah Classic Crest.
    • Choose a patterned paper from the Summer Vibes Paper Pack and cut it to 4.5″ x 4.5″
    • Cut a 4.5″ x 4’5″ panel from Neenah.
    • Cut a 4.75″ x 4.75″ panel from black card stock.
    • Using your Father’s Day Shadow Die, die-cut the sentiment towards the bottom of the white panel.
    • Next, you will cut a few strips from the white panel’s top and one from the bottom.
    • Now, glue down these strips onto the patterned paper.
    • Trim off any excess.
    • Using the Father’s Day sentiment cut another sentiment from black card stock.
    • Add a piece of vellum to the back of the sentiment cut out.
    • Glue the black Father’s Day on top of the vellum.
    • Grab the little stars from the Nesting Fishtail Banner die set. Cut several of the stars from the same black card stock you used for the sentiment.
    • Glue the stars down. (TIP: gluing them at a diagonal from the bottom left to the top right draws the eye up to the sentiment/focal point)
    • Add some Silver Round Confetti.
    • Add the main panel to the black card stock with liquid glue.
    • Add foam tape to the back and adhere to your white card base.

    See, I told you it was easy! Now I can’t wait to see what you create from these fabulous products now available in the Kat Scrappiness Store.


    https://linkdeli.com/widget.js?id=f5e8378456858c916708

    Design Team Projects

    Birthday Kisses Mini Slimline Card

    Hi everyone, it’s Tina here. Today’s card is using products from the new Summer Vibes release. I just love this release. Below are the steps to create your own card.

    Step 1 – Trim White Cardstock to 7” x 6”, score at 3 1/2” and fold in half for a vertical side fold card. (Mini Slimline)

    Step 2 – Diecut Mini Slimline Quilted Backdrop using White Cardstock. Apply Light Blue Ink using a Blender Brush on the top and stopping about 2” from the bottom. Adhere to card front using Bearly Art Precision Glue.

    Step 3 – Diecut Mini Slimline Frame using White Cardstock. Adhere to card front using Bearly Art Precision Glue.

    Step 4 – Stamp Fluttering By using 3 shades of Blue Ink. Diecut with the coordinating die. Adhere to the card using Bearly Art Precision Glue. I applied the glue only to the center to give dimension to the wings.

    Step 5 – Diecut Stitched Foliage using White Cardstock. Adhere 2 Foliage behind the Butterfly and 1 in front of the Butterfly.

    Step 6 – For some added interest and sparkle randomly adhere some Blue Diamond Rhinestones using a Pick Up Tool and Bearly Art Precision Glue.

    Step 7 – Diecut Birthday Kisses sentiment 3 times. 2 using White Cardstock and 1 using the same Ink color used in Step 2. Attach each layer using Bearly Art Precision Glue making sure that the Blue layer is on top. Adhere to the card front.

    This card can be used for many occasions by changing the color and/or sentiment. Below is a link to all the products used. Thank you for stopping by and Happy Crafting!

    Products Used:
    https://linkdeli.com/widget.js?id=f5e8378456858c916708

    Design Team Projects

    We Stand United

    Happy Thursday Crafters! Today I wanted to share a card I made with the NEW Ukraine Strong Stamp, Die & Paper Pad Bundle. Did you know,  All profits from all #UkraineStrong products sold through July 1, 2022 (or while supplies last) will be donated to the Ukraine Crisis Relief Fund 

    Here is the card I created with this wonderful bundle.


    For this card I also used two NEW dies that are NOW Available! I used the Mini Slimline Lattice Frame die along with the new Mini Slimline Quilted Backdrop die.  Kat Scrappiness custom dies are high-quality steel and are compatible with most die cutting machines. If you haven’t checked out this NEW release check it out HERE. You will LOVE all the new products that just released including these new dies.

    Thanks so much for stopping by today, I hope everyone has a GREAT Thursday!!!


    Design Team Projects

    Fluttering By Layered Bubbles Mini Slimline

    I have a mini slimline card to share with you today and I’m using several of the new products from the June release.  I just can’t resist this Fluttering By stamp and die set or the new stencils!


    I started with creating a background using the new Layered Bubbles stencil set.  I used the Honeysuckle, Aqua and Sprout inks from the Concord & 9th collection.   I trimmed the panel down to fit inside the mini slimline lattice frame die that I die cut in a pretty rose pink cardstock.

    I stamped the butterflies from the Fluttering By stamp set in Midnight blue ink and added the second layer in white pigment ink.  I die cut them out and added them to my card with some foam dots.

    I used some leftover Stitched Foliage die cut leaves from a previous project and tucked them behind the butterfly to create a frame for my hello die cut.  This word die is from the Reverse Scallop mini slimline frame die set.

    My card was finished off with 5 Yellow Jewel gems.


    Video tutorial:

     [youtube https://www.youtube.com/watch?v=4CnuyfTHZ74]


    Supply List:


    https://linkdeli.com/widget.js?id=f5e8378456858c916708

    Thank you for stopping by!  You can find more of my ideas and inspiration at Stamping Imperfection!

    Design Team Projects

    Happy Summer

    Hello Crafty Friends and Happy Wednesday!  Donna here sharing a sweet and simple card with a wish for a Happy Summer but before we get to my card, I would like to remind everyone of the #UkraineStrong Bundle and the Summer Vibes June Release.

    During the month of June, all profits from the sale of the #UkraineStrong Bundle will benefit the Ukraine Crisis Relief Fund via GlobalGiving.org.  You can pick up this bundle for $39.99 HERE.

    Be sure to check out all the newest products from the Summer Vibes June 2022 Release.  You will fall in love with the stencils, stamp sets, dies and paper pad plus many more awesome products available at the Kat Scrappiness Shop HERE!

    Now for my card.  This style of card is not a style I create often.  I love color..bright color and loads of design elements, patterned papers, etc so CAS or Sweet and Simple aren’t exactly my style.  I wanted to challenge myself to tone things down a bit and see what I could do with soft pastel colors and a simple sentiment.  This is what I came up with:

    Using the Layered Bubbles 3 piece Stencil Set, I ink blended 3 light and complementary colors on a card panel.  I matted with black card and adhered to a cardbase of 110 lb. Neenah Classic Crest Solar White.  I die cut a sentiment using the Happy Summer Word Die with Shadow Set; however I chose not to use the shadow.

    The sentiment was adhered flat to the card panel and that completes my attempt at a Sweet and Simple Card.  Have a Wonderful Summer, Have Fun in the Sun and Stay Crafty!

    Donna


    Design Team Projects

    Create an Easy Bokeh Background for a Card | Summer Vibes Release | Call Me Crafty Al

    Hello crafty friends!

    It’s Alicia a.k.a. Crafty Al here to share a look at the card that I created using some of the Kat Scrappiness goodies from their Summer Vibes Release, including the NEW Layered Bokeh Stencil Set.

    To get started I blended blue and purple inks onto an A2 sized piece of smooth, white cardstock. Then I used white ink with 2 of the 3 stencils in the Layered Bokeh Stencil Set to create the bokeh effect.

    For the focal point I used 2 sizes of dies from the Nesting Fishtail Banners die set – cutting one from vellum and one from the center of the ink blended piece. These 2 pieces got adhered together and then I added some white cardstock die cuts made with the Stitched Foliage Dies.

    After adhering this piece to the center of the card with foam tape, making sure to cover the opening on the background,
    I added some Aqua AB Jewels and Iris Pearls.

    You can check out my video the full process…

    Thanks for stopping by and I hope you enjoyed today’s card!

    Alicia / Crafty Al

    Related Products:

       Kat Scrappiness

          Layered Bokeh Stencil Set: http://shrsl.com/3k7dw

          Nesting Fishtail Banner Dies: http://shrsl.com/3k7dy

          Stitched Foliage Dies: http://shrsl.com/3kera

          All NEW Products: http://shrsl.com/3hq9p

          Aqua AB Jewels: http://shrsl.com/3f3nz

          Iris Pearl Mix: http://shrsl.com/3ker3

       Art Glitter Glue: http://shrsl.com/37svl

       Jewel Picker: https://shrsl.com/3bedx

    **Some links above are affiliate links. I link them up for your convenience and may receive a small commission, at no extra cost to you. I hope you will consider using the links if you decide to purchase the products I share. 🙂