Follow:
    Design Team Projects

    Summer Vibes!

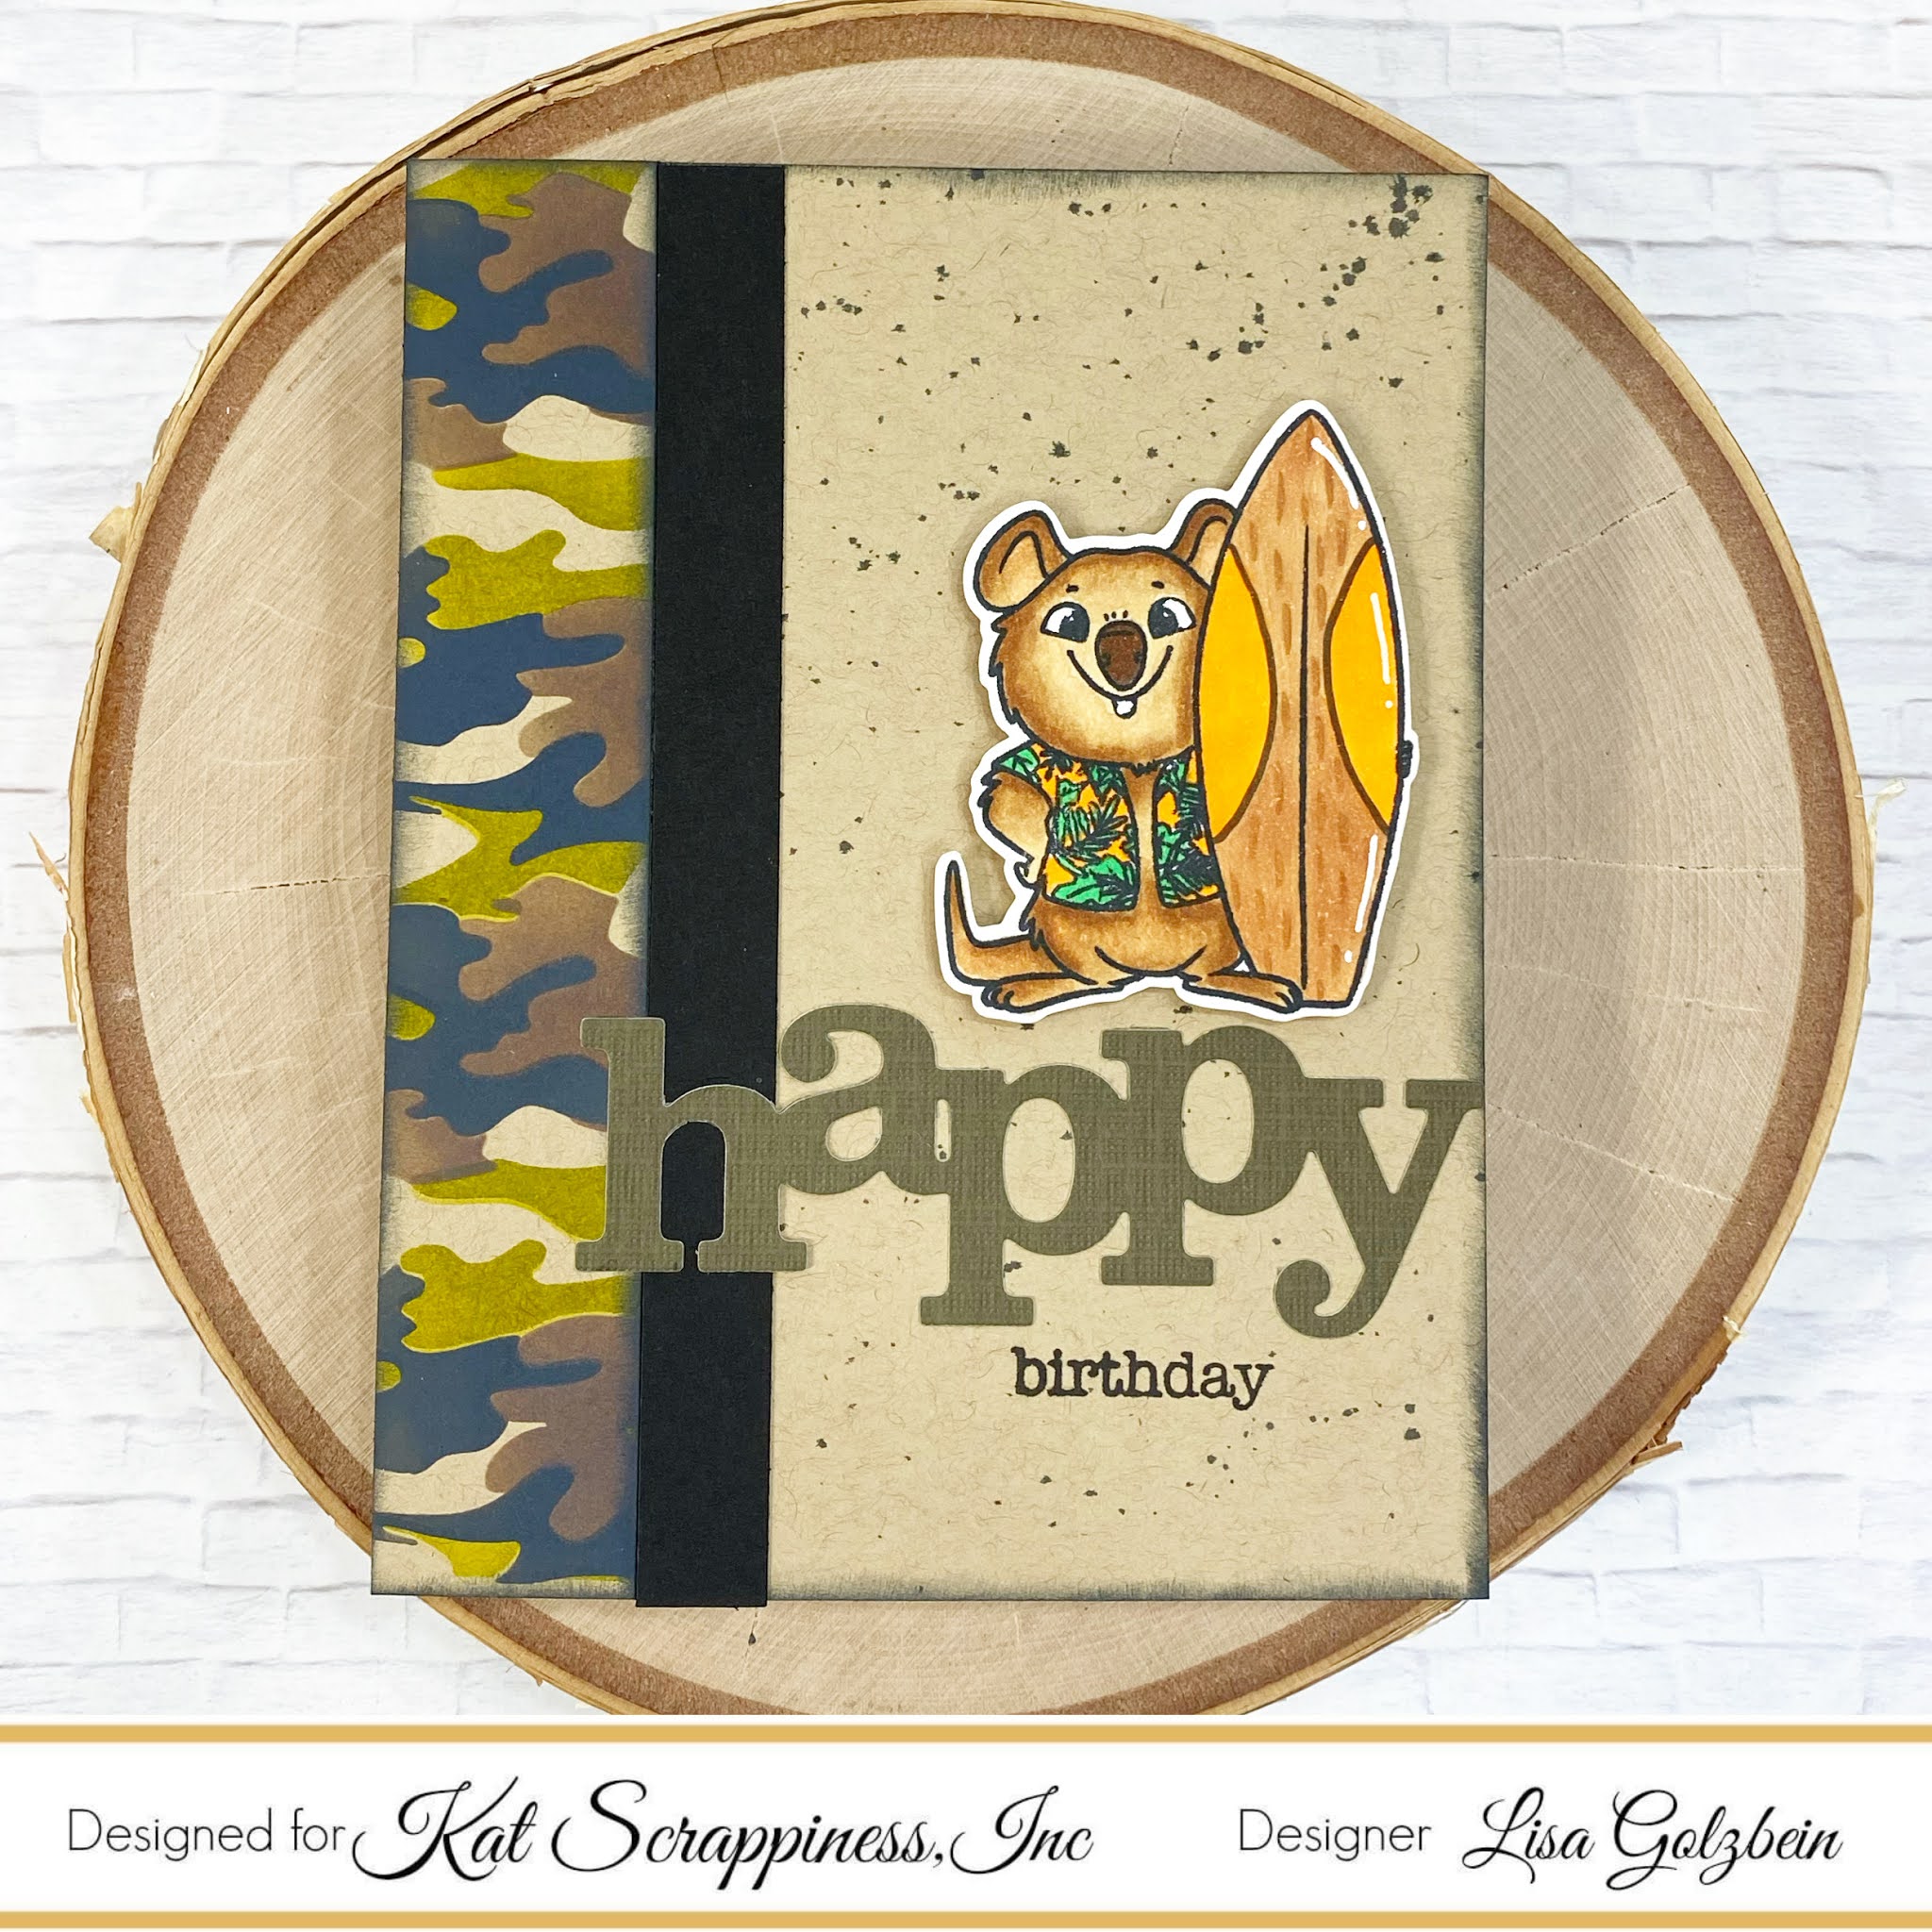
    Hello Friends Waleska here again to share bring to you some Summer Vibes with my card today!  For my card today I used the new and awesome Summer Fun Essentials Die, this Die set comes with lots of different Summer icons you can use all summer long to create beautiful projects.  For my card today I used only the Flip Flops but I will be sharing more projects using more of this dies soon.

    CARD DETAILS:

    For my card today I started with the background, I used Oxide inks in colors: Picked Raspberry, Spiced Mermalade and Mustard Seed.  I love the combination of this 3 colors for summer sunsets.  I splatter some water and also some sparkle watercolor.

    After that I assemble the flip flops with pattern paper, you can make this fun dies any color or pattern you like.  I then cut a piece of cardstock to represent the hanging loop for the flip flops I also added some palm leaves in the corner for a beach look.  I adhere everything with 3D Foam tape and finallly added some sparkle sequins.

    I love all the super cute Summer dies from this set but I think the flip flops are my favorite! Thank you so much for stopping by today, remember to stay safe and stay crafty!


    Waleska Galindo

    Design Team Projects

    Missing You My Crafty Friend

    Hello Everyone!  Sheri here with a FUN Rainbow card featuring the NEW Missing You with Shadow die and the After the Rain die.


    Steps to Create Card:

    • Cut White Mini Slimline Card Base: 6″ x 3 1/2″ (6″ x 7″, scored at 3 1/2″).
    • Cut Red Panel with Postage Stamp Mini Slimline die set (5 11/16″ x 3 1/8″) – used largest die in set.
    • Cut White Panel with Never Ending Mini Slimline die set (5 5/16″ x 2 3/4″) – used 2nd largest die in set. For a little color, add a little ink blending for the sky.
    • Cut Rainbow using After The Rain Die in (Red, Orange, Yellow, Green, Turquoise, Blue & Purple) and the cloud in White card stock.
    • Cut the Missing You die in Black card stock and the shadow layer in vellum.
    • Stamp My Crafty Friend from the Everyday Brush Strokes stamp set in black ink on the cloud.
    • Assemble Card.
    • For embellishment I added a few red hearts from the Bright Rainbow Heart Sprinkles mix.

    Here’s a list of the supplies I used from the store.

    Affiliate Links used at no additional cost to you. Thank You so much for your support!


    Happy Stamping!!

    Design Team Projects

    Happy Father’s Day!

    Hi Crafty Friends,
    Have you made your DAD a Father’s Day Card yet? If not, head to Kat Scrappiness and grab the Father’s Day Sentiment Die and some sports sprinkles and make him a fabulous shaker.

    Make Crafty Friends Q & A:
    Q: What did you get your dad for Father’s Day?
    A: Me? This card. He is too hard to buy for!

    I would be so grateful if you use the affiliate links  to grab your Kat Scrappiness Goodies! No extra cost to you!

    Supplies:
    Kat Scrappiness Mini Slimline Tri Frame Die
    Kat Scrappiness Everyday Quokka Stamp Set
    Kat Scrappiness Happy Father’s Day with Shadow Die
    Kat Scrappiness Football Sprinkles
    Kat Scrappiness Baseball Sprinkles
    Kat Scrappiness Slimline Acetate

    Don’t forget to subscribe, follow, and comment on my blog and on Instagram @MadeByMeghanK for more inspiration!

    Design Team Projects

    Congrats – Graduation Card

    Hello crafters!  It’s Caren here back on the blog.  Today I have a mini slimline graduation card for you.  I live in a college town (Go Cowboys!), and our colors are black and orange.


    I used the newly released Congrats with Shadow die with the Zig Zag mini slimline die.  I die cut my zig zag panel from white card stock and used the Balloon stencil with distress ink to ink blend onto the panel.  I splattered with black ink onto this panel.  I adhered the Congrats sentiment and the graduation cap to the panel.  Adhered that panel onto a piece of black card stock and then onto my mini slimline card base.  I finished off the card by adding a few silver pearls.

    Thanks for stopping by!

    – – –– – –– – –– – –– – –– – –– – –– – –– – –– – –– – –– – –– – –– – –– – –– – –– – –– – –– – –– – –– – –– –

    Here is a link to the Kat Scrappiness shop and direct links for products I used on today’s cards.

    – – – SUPPLIES for today’s project– – – – – – – – – – – – – – – – – – – – – – – – – – – – – – – – – – – – – – –

    Design Team Projects

    Happy Father’s Day Mini Slimline Shaker Card

    Hi everyone, it’s Tina here. With Father’s Day around the corner I wanted to use the new Happy Father’s Day sentiment die along with the Lumber Yard Paper to create a fun shaker card. Below you will find the steps to create your own Happy Father’s Day Mini Slimline Shaker card.

    Step 1 – Trim White Cardstock to 7” x 6”, trim at 3 1/2” and fold in half for a horizontal top fold card. (Mini Slimline)

    Step 2 – Trim Lumber Yard to 3 1/2” x 6”, diecut Mini Slimline Double Stitched using the Lumber Yard Paper to create a frame. Adhere to center diecut to the card front using Bearly Art Precision Glue. Trim KS Acetate Slimline 3” x 5 1/2” and adhere to the backside of the frame. Add Sprinkles of your choice to the top of the card front making sure it is in the center. I used Mixed Fruit Sprinkles since my Dad isn’t a fan of Sports but he loves fruit. Add Foam Tape to the backside of the frame and adhere to the card front.

    Tip 1: align the card into your scoring tool and when placing the top frame with acetate you can align it from the corner.

    Tip 2: before adding the sprinkles apply anti static powder to the card front where you placed your background and to the edges of the Foam Tape. This will prevent static from the acetate.

    Step 3 – Diecut Happy Father’s Day (word) using White Cardstock. Adhere to the card using Bearly Art Precision Glue.

    I love that the shaker can be customized to whatever my Dad enjoys in life and that Kat Scrappiness has so many sprinkles that I am guaranteed to find something to fill my shaker card. Below is a link to all the products used. Thank you for stopping by and Happy Crafting!

    Products Used:
    https://linkdeli.com/widget.js?id=f5e8378456858c916708

    Design Team Projects

    Happy Father’s Day


    Hello all! I’m up on the Kat Scrappiness blog today with a mini slimline card featuring lots of new goodies from the new release! Since Father’s Day is coming up soon I decided to make a card using some of the fun beachy elements from the new Summer Fun Essentials Dies.  I’m in love with those cute flip flops and for this card I cut them out of burlap to give them a more rugged masculine look. I also used distressed a couple of starfish to match the theme!
    Summer Essentials Dies
    Summer Essentials Dies


    I also used the brand new Lumber Yard Slimline Paper Pad for the first layer on my card base and then I cut another layer out of cream colored card stock using the largest die from the
    And now for the star of the show, the Happy Father’s Day Word Dies With Shadow! I just love how the addition of the shadow layer behind the words really makes the sentiment stand out! I used the Lumber Yard Slimline Paper Pad for the shadow layer behind the card. To add some extra interest to the card I added some Espresso Pearl Mix because why not?!

    Here’s one more look at today’s card with all of the supplies used.

    Thanks so much for stopping by today! Make sure to check out the entire new release over at Kat Scrappiness!  You will find lots more shadow dies and pearl mixes and a ton of crafty inspiration! I’ve included lots of affiliate links in my post for you to click on.  There is no extra cost to you but I do earn a small commission to support this hobby that I love! I love recommending products to you that I use and love!

    Have a great day, I already am!
    😎 Lisa 😎
    Design Team Projects

    Happy Father’s Day!

    Hello Everyone!  Sheri here with a Father’s Day Mini Slimline card.  Can you believe that it’s June and Father’s Day is this only a few weeks away?!?  Well I have a masculine card that can be easily adapted to any occasion…Birthday, Congratulations, Retirement, etc.

    To get started I pulled out the Newton’s Nook Argyle stencil set, Peacock Distress Oxide & Delicata Golden Glitz inks and Kat Scrappiness Never Ending mini slimline die set.

    Steps to Create Card:

    • Cut White Slimline Card Base: 6″ x 3 1/2″ (6″ x 7″, scored at 3 1/2″)
    • Cut Navy Panel: 6″ x 3 1/2″
    • Cut Gold Mat: 5 3/4″ x 3 1/4″
    • Cut Navy Panel: 5 5/8″ x 3 1/8″ (used largest die in Never Ending Mini Slimline die set)
    • Die cut Happy Father’s Day from the Happy Father’s Day with Shadow die three times in Gold card stock. You will stack & glue them together to create dimensional word.
    • Take Navy panel along and the Newton’s Nook Argyle Stencil with Distress Oxide Peacock Feathers and Delicata Golden Glitz Ink with Mini ink blending tools (recommend over brushes for this application). You will take stencil #1 add place over panel and apply Distress Oxide Peacock Feathers ink in a pouncing motion (NOT your normal circle motion to keep ink from moving outside of stencil). Next take stencil #2 and apply the Delicata Golden Glitz ink again in a pouncing motion and NOT a circular motion. The inks may need dry time between application and heat setting is highly recommended.
    • Assemble Card.
    • For embellishment I added Gold pearls in each corner from the NEW Gold Pearl Mix.


    Here’s a list of the supplies I used from the store.

    Affiliate Links used at no additional cost to you. Thank You so much for your support!

    Happy Stamping!!