Tag: Lola the Giraffe

  • Mini Slimline Valentine

    Mini Slimline Valentine

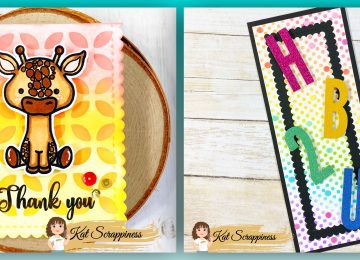
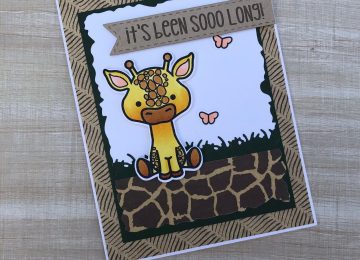
    Happy Tuesday Everyone! Priscilla here from the Kat Scrappiness Design Team. Today I am sharing a a mini slimline Valentine card, perfect to send to a friend you’ve haven’t seen in a while. I love the card’s play on words, “It’s Been Sooo Long.” with an adorable giraffe image. LOL!

    I used the just-released Kat Scrappiness Mini Slimline Foliage Frame Die and an older Kat Scrappiness stamp set and coordinating die called “Lola the Giraffe.”

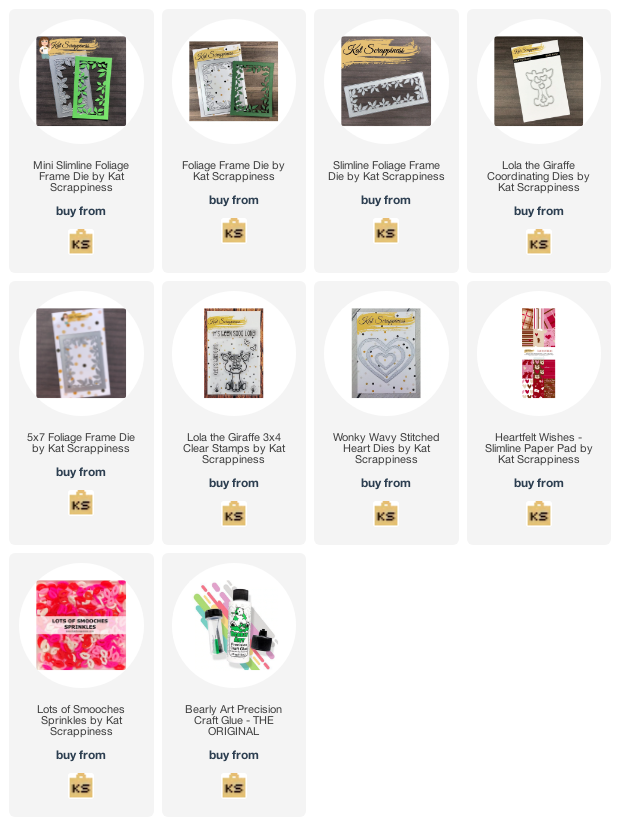
    This new foliage frame die is similar to Kat’s original A2 Foliage Frame Die, but designed especially to fit mini slimline cards. It measures approximately 3.5″ x 6,” which will leave a uniform and perfect border around the die cut. Note: This frame also comes in a regular slimline size and a 5×7 size. All 4 sizes are linked at the end of this blog post.

    Card Details:

    Thank you so much for stopping by! Don’t forget to check out what’s NEW in Kat’s Shop, and follow my blog, Instagram, and Facebook for more “Kat Scrappiness Amazingness”!

    Stay Safe . . .

    Priscilla 🦒

    The supplies I used are listed and linked below. I would be so grateful if you use these affiliate links  to grab your Kat Scrappiness Goodies! No extra cost to you!

  • Let’s Hang Out Mini Slimline Card

    Let’s Hang Out Mini Slimline Card

    Hi everyone, it’s Tina here. We all need some color in our lives and that was my inspiration using the new Summer Quokkas Stamp Set and the Drift & Hills Stencil. Below you will find the steps to create your own card.

    Step 1 – Trim White Cardstock to 7” x 6”, score at 3 1/2” and fold in half for a vertical side fold card. (Mini Slimline)

    Step 2 – Trim White Cardstock to 3 1/4” x 5 3/4”. Place the Drifts & Hills Stencil on top of the cardstock and apply Distress Oxide Ink with a Blender Brush. I used Candied Apple, Spiced Marmalade, Squeezed Lemonade, Cracked Pistachio, Salty Ocean, Wilted Violet. Adhere to card front using Bearly Art Precision Glue.

    Step 3 – Stamp Summer Quokkas using Gina K Amalgam Ink on White Cardstock. Color in using Alcohol Markers. Fussy cut the images and adhere to card using Bearly Art Precision Glue.

    Step 4 – Stamp Lola The Giraffe (sentiment) using Gina K Amalgam Ink.

    This card can be used for several occasions by changing the sentiment. Below you will find a link to all the Products Used. Thank you for stopping by and Happy Crafting!

    Products Used:
    https://linkdeli.com/widget.js?id=f5e8378456858c916708

  • Slimline Dies Two Ways

    Slimline Dies Two Ways


    Hello there, it’s Lisa from Oh So Cute By Lisa and today I have 2 cards for you using some of the newest Slimline Dies from Kat Scrappiness. I used the same Stitched Scalloped Nesting Slimline Dies on both cards yet they have 2 very different looks to them!
    —————————————————————
    Let’s start with the card that uses the Stitched Scalloped Nesting Slimline Dies in the traditional way that you are used to seeing it.
    For this card I cut a piece of Bristol Smooth card stock using the largest die from the
    Embossed Edge Nesting Slimline Dies and did some rainbow ink blending with a polka dot stencil.
    The black scalloped inner frame was made using the second and third largest dies from the Stitched Scalloped Nesting Slimline Dies. I nested them inside each other and sent them through my die cut machine together together at the same time and the result was that cool scalloped black frame that I adhered to the inside of the polka dot panel.
    For the sentiment I used the Condensed Uppercase Alpha Dies and the Condensed Number Dies to cut out HB2U in glitter paper which is short for “Happy Birthday to You”. I popped the letters and number up on foam tape for some dimension. To finish off the card I added some fun and colorful
    Party Confetti Sprinkles to mimic the fun polka dots in the background.
    I took the entire panel and matted it on to black card stock and then adhered all of that to a side opening slimline card base measuring 8 1/2″ x 3 1/2″.
    The brand new Triangle Embellishment Trays and
    Embellishment Pick Up Tool are super helpful when picking up and adhering embellishments to my cards.
    —————————————————————
     
     For my second card today I also used the Stitched Scalloped Nesting Slimline Dies but in a less traditional way.
    I began by using the largest die and cutting out a piece of Bristol Smooth card stock so I could do some ink blending. After I cut out the paper, instead of using it as a traditional slimline panel, I folded it in half to make a notecard.
    These dies are the perfect size when folded to make the cutest little notecards!
    Once it was folded I did some ink blending using Distress Oxide inks and then some stenciling in the same colors.
    I just love the way this panel came out. These 3 colors blended together so well!
    For the main focal point on my card I stamped and Copic colored the adorable little giraffe from the
    Lola the Giraffe Stamp Set. She cut out perfectly on my Scan n Cut but she could be easily hand cut as well. Before I adhered that cute little giraffe down with foam tape I stamped the sentiment in black ink on the bottom of the card. That beautiful “Thank You” is from the Friendship Greetings Stamp Set and looks lovely on any card! After I had Lola down and the sentiment stamped I added a few random sequins from the Aww-tumn Sequins Remixed and Fall Blessings embellishment sequin packs.
    Pictured above are the brand new Triangle Embellishment Trays and
    Embellishment Pick Up Tool and I love using them when I have to place sequins or sprinkles on my cards.
    Here is one more look at both cards photographed with all of the supplies I used on them.
    Thanks for stopping by today! I hope I gave you some new ideas for using your slimline dies in a not so traditional way. The sky is the limit with your imagination and creativity!
    Here is a complete list of Kat Scrappiness products used on both of my cards including links.
    Have a great day, I already am!
    🎉  Lisa  🦒 
  • It’s Been SOOOOO LONG

    It’s Been SOOOOO LONG

    Hi Crafty Friends,

    I am sharing a DARLING little Giraffe from Kat Scrappiness named Lola! She is the perfect stamp set to create cards for all the friends you haven’t seen forever because of COVID-19 and being quarantined away from them.

    Make Crafty Friends Q & A:

    Q: Have you been able to get together with friends again where you live?

    A: Me? Yes. Illinois is in Phase 4 and it has been so nice to see people but I miss BIG HUGS

    Use the links below to get your Kat Scrappiness Goodies! Don’t forget to subscribe, follow, and comment on my blog for your chance to win my August Prize and for more giveaways and inspiration follow me on Instagram @MadeByMeghanK

    Supplies:

    Kat Scrappiness Lola the Giraffe Stamp Set

    Kat Scrappiness Roped Rectangle Die

    Kat Scrappiness Stitched Fishtail Banner Die

    Doodlebug Designs Zoo Paper pad

    Blue Ribbon

  • It’s Been SOOO Long

    It’s Been SOOO Long

    Happy Monday everyone!

    My card for today features Kat Scrappiness’ first stamp set – Lola the Giraffe.

    I colored the giraffe and butterflies from the stamp set with Copic markers and used my Silhouette Cameo to cut them out.  On a piece of white card stock, I adhered a piece of patterned paper that looked like a giraffe pattern and a die cut of the grass from the He is Risen die collection.  I then used one of the Distressed Edged Rectangle dies on this panel.  I layered that panel on a piece of green card stock that was slightly bigger.

    I die cut a banner from kraft card stock using one of the Stitched Fishtail Banner dies and heat embossed my sentiment.  On my white card base, I adhered a slightly smaller piece of coordinating patterned paper.  I then adhered my distressed edge panel.  Finally, I adhered the giraffe and sentiment banner using dimensional adhesive.

    Thanks for stopping by!

    – – –– – –– – –– – –– – –– – –– – –– – –– – –– – –– – –– – –– – –– – –– – –– – –– – –– – –– – –– – –– – –– –

    Here is a link to the Kat Scrappiness shop and direct links for products I used on today’s cards.

    – – – SUPPLIES for today’s project– – – – – – – – – – – – – – – – – – – – – – – – – – – – – – – – – – – – – – –

  • It’s Been So Long . . .| Slimline Friendship Card

    It’s Been So Long . . .| Slimline Friendship Card

    Hi Everyone, it’s Priscilla here. Today I want to share a card I made for the Kat Scrappiness Blog featuring the “Lola the Giraffe” stamp set and the new and VERY popular “Wonky Stitched Nesting Slimline Dies.

    The largest of these “wonky” slimline dies created the perfect frame for this card After die cutting it, I used several Distress Inks in brown tones to “stain” it. I used an animal print stencil to create the backdrop for “Lola. “A paper ruler embellishment from my stash completed the background.

    I stamped and colored “Lola” with Spectrum Noir makers and die cut her on my Brother “Scan N Cut.” I love how the sentiment that came with the stamp set, “Its Been So Long” was so fitting for this tall slimline card!  Finally, I added chocolate brown Nuvo drops on Lola’s spots fort the finishing touch.

    Thank you so much for stopping by! Don’t forget to check out what’s NEW in Kat’s Shop, and follow my blog and Instagram for more “Kat Scrappiness Amazingness”!

    Stay Safe . . .

    Priscilla ??

    The supplies I used are listed and linked below.

    SUPPLIES

  • Let’s Hang Out

    Let’s Hang Out

    Hi,

    I am so excited to share this adorable little guy today. I started by stamping and coloring the baby giraffe and butterflies from the Kat Scrappiness Lola the Giraffe and Die Set. Now what to do with so much cuteness?

    Create a scene of course! I decided to make a card base by cutting it using an octagon die. I then used a light blue card stock and stamped clouds in blue ink. I die cut a grass edge to a piece of green card stock and added some additional stamped grass tuffs. This background was then die cut using a smaller octagon die.  The final step was attaching the cuteness to the card. I felt one of the butterflies had to go on Lola’s nose to complete the look.  The final step was adding the sentiment.

    It is always fun to experiment with shapes and I hope you will too.

    Supplies: KS Lola the Giraffe and Die set

  • Lola Happy Birthday Slimline Card

    Lola Happy Birthday Slimline Card

    Hi everyone, it’s Tina here. Slimline cards are the rage right now and Kat Scrappiness has you covered with an awesome selection of dies. Below you will find the steps to create your own Lola Happy Birthday Slimline Card.

    Step 1 – Trim White Cardstock to 7” x 8 1/2”, score at 3 1/2” and fold in half for a vertical side fold card. (Slimline)

    Step 2 – Diecut Wonky Stitched Nesting Slimline using White Cardstock. Adhere to card front using Nuvo Deluxe Adhesive.

    Step 3 – Trim White Cardstock to 2 1/2” x 7 1/2”. Apply Distress Oxide Ink Speckled Egg and Stormy Sky onto a kraft mat, spray with water and dip the panel into the ink. Heat set in between dips and repeat until desired effect is achieved. Set aside to dry.

    Step 4 – Diecut Never Ending Circles to create Balloons using various colours of Cardstock. (If you have a Balloon die then use that instead). Cut out a small triangle to place in back of the circles. Add string to the back using a piece of tape. Adhere to panel created in Step 3. Bottom Balloon is adhered using Foam Tape and Nuvo Deluxe Adhesive to the balance. Trim off the Balloons that is hanging off the edges. Adhere the entire panel to the card front.

    Step 5 – Stamp Lola The Giraffe using Gina K Amalgam Ink on White Cardstock. Colour in with any Alcohol Markers of your choice. I used Spectrum Noir Classique Markers. Fussy cut the image and using a Black marker add Black ink to the edges. While I was doing that my marker slipped and I marked the ear and the foot. To fix this I created a bow to cover the ear and recoloured the feet and that fixed my errors. Wrap the strings around the horn on the left side and adhere the image using Foam Tape

    Step 6 – Stamp Everyday Brush Strokes sentiment using Versafine Onyx Black Ink to the bottom of the card front.

    Step 7 – For added interest and sparkle randomly adhere Sparkling Clear Jewels using a Crystal Katana and Collage Medium.

    This card can be used for many occasions by changing the colours and sentiment. For an example it can be for an anniversary or baby shower, etc. Below is a link to the products used. Thank you for stopping by and Happy Crafting!

    Products Used:

    https://linkdeli.com/widget.js?id=f5e8378456858c916708

  • KS July Release DT Project Inspiration/Giveaway

    KS July Release DT Project Inspiration/Giveaway

    Hello Kat Scrappiness fans!  Welcome to Kat Scrappiness DT Inspiration and Giveaway.  During the month of July, we changed things a bit for the release and each DT member was assigned  a specific product to feature.  We are back today to show you more project inspiration from the design team and we also have a GIVEAWAYPLEASE SCROLL THROUGH AT THE END OF THE POST TO FIND OUT HOW TO WIN.


    Before I share the projects, I just want you all to know that KS has done a PRE-RELEASE OF 3 NEW SLIMLINE DIES and they are selling fast!  They are the Cross-Stitched, Distress Edge and Zig-Zag.  WE ALSO HAVE SLIMLINE ACETATE SHEETS for your shakers AND SLIMLINE ENVELOPESOrder yours now!  The supplies are listed below:


    For todays inspiration post, we are showcasing all the Slimline dies we released this month –> the Cityscape, Tri-Frames, Double Stitched NestingWonky Stitched, Slimline Hills, Slimline Waves, with the Coffee Background die , the Christmas Gnome stamp set and Lola the Giraffe.


    Are you ready to see more inspiration from the DT?


    WAVES SLIMLINE DIE (WITH EMBOSSED EDGE SLIMLINE DIE AND HILLS) – MARIA RUSSELL


    STITCHED SLIMLINE HILLS – JO THOMPSON


    WONKY STITCHED SLIMLINE DIE (WITH LOLA THE GIRAFFE) – TINA DORNBAUM


    CHRISTMAS GNOME STAMP SET – KATHY SCHWEINFURTH


    CHRISTMAS GNOME – SANDRA BEUS


    COFFEE TIME BACKGROUND DIE –  MARTHA GOMEZ


    COFFEE TIME BACKGROUND DIE (with the CITYSCAPE Die) – ADAM KARLE


    LOLA THE GIRAFFE – LISA GOLZBEIN


    LOLA THE GIRAFFE – CAREN BARTHOLOMEW


    CITYSCAPE SLIMLINE DIE (& EMBOSSED EDGE SLIMLINE) – MEGHAN KENNIHAN


    CITYSCAPE & WONKY SLIMLINE DIES


    DOUBLE-STITCHED SLIMLINE DIE – PRISCILLA BERGMAN


    TRI-FRAMES SLIMLINE DIE – WALESKA GALINDO


    Would you like to win a $20 Gift Card to the KS shop?   We will pick one lucky winner!
    Here’s how to win:
    Leave a comment on this blog post and tell us what project/s inspired you to the most today.  You have until August 5 to leave a comment.  Winner will be announced on Friday, August 7thWinner should send an email to: winners@katscrappiness.com to claim the prize within 48 hours.
    ————SUPPLIES———–


  • I’m Missing You!

    I’m Missing You!

    It’s been soooo long since I’ve seen many of my friends!  I’m sure you’re in a similar boat.  Here’s a card I plan to send to one of my good friends who I haven’t seen since Christmas!

    My slimline card was created with several new Kat Scrappiness goodies!  The layers were made using the Embossed Edge Nesting Slimline Dies to cut yellow cardstock and a wood grain pattern paper.  The stitched frames were created by cutting kraft cardstock with two of the Tri-Frame Slimline Dies.  The leaves were then cut from dark green cardstock using the Foliage Frame Die and placed around the inside frame.

    The darling little giraffe image and sentiment are from the Lola the Giraffe set


    https://linkdeli.com/widget.js?id=f5e8378456858c916708