Tag: KS Never Ending Rectangle Dies

  • Happy Fall Layered Die Card

    Happy Fall Layered Die Card

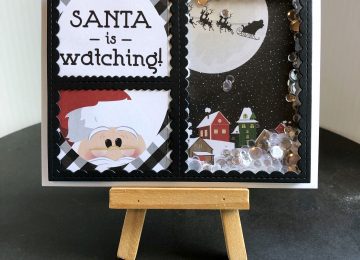
    Hello Friends! Sheri from the Creative Crew here today with a Fall themed card but before we get started…

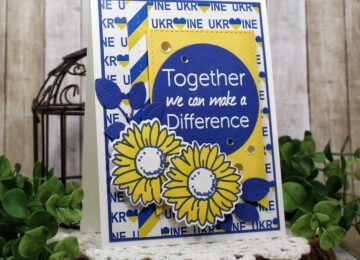
    Did you see the NEW Release?!

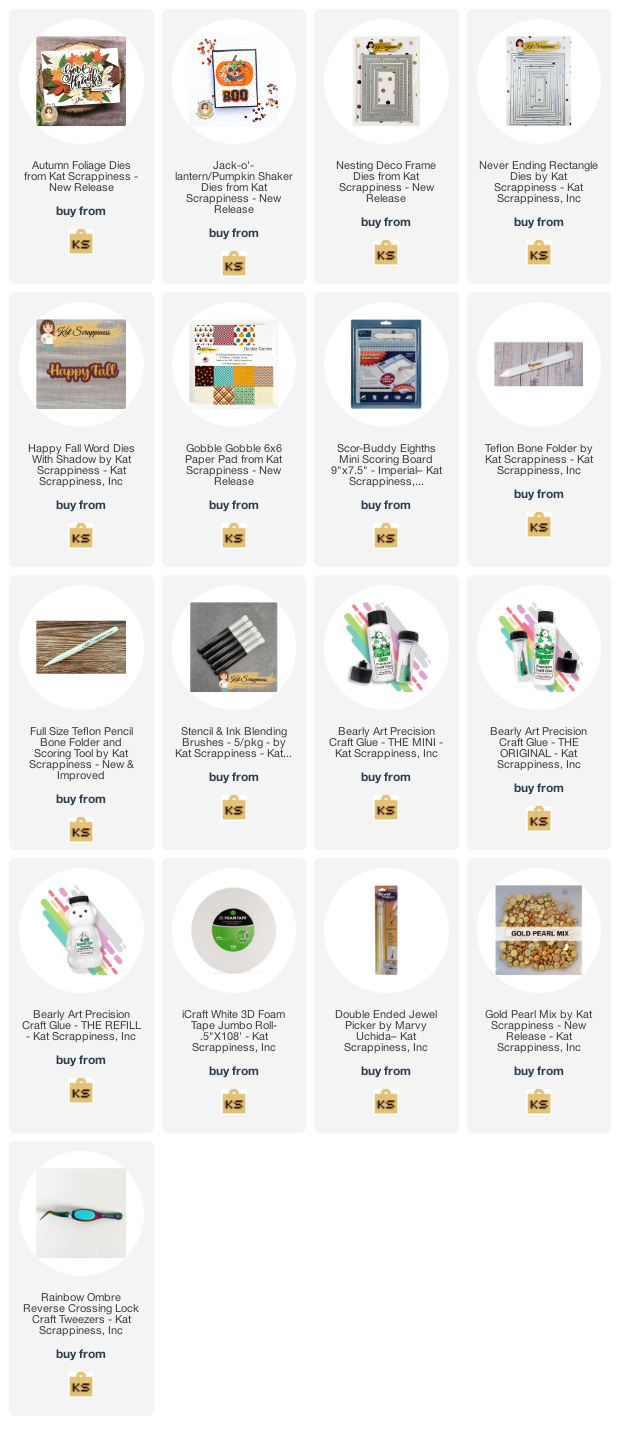
    You can find all the products from the NEW Kat’s Meow & Pawsome Dogs 2 Release, HERE.

    Now back to my project, my card features ALL dies and NO stamping!

    Steps to Create Card:

    • Create Brown A2 Top Fold Card Base: 4 1/4″ x 5 1/2″ (4 1/4″ x 11″, scored at 5 1/2″)
    • Cut Brown Panel: 3 13/16″ x 5 1/16″
    • Cut Rust panel with Nesting Deco Frame: 3 1/2″ x 4 3/4″
    • Cut Gold Mirror Panel: 3″ x 4 1/4″
    • Cut Pattern Paper Panel (Gobble Gobble 6×6): 2 7/8″ x 4 1/8″
    • Die cut 2 Pumpkins using the Jack-O’-Lantern/Pumpkin Shaker die. I used Gina K Honey Mustard and Gobble Gobble pattern paper. You will also need to cut two stems with dark brown card stock. To add texture to the pumpkins lightly add Gina K. Honey Mustard ink with a small detail blending brush.
    • Die cut leaves out using the Autumn Foliage die set (used Gina K Faded Brick, Honey Mustard and Recollections Gold Mirror).
    • Die cut sentiment from the Happy Fall w/Shadow die with Dark Chocolate card stock.
    • Assemble card.
    • Embellish with Gold Pearl Mix and Gold Twine.


    Here’s a list of supplies I used that can be found in the store.

    Affiliate Links used at no additional cost to you. Thank you for your support!


    Happy Stamping!!

  • Together We Can Make A Difference

    Together We Can Make A Difference

    Happy Saturday Friends!

    It’s Sheri here today! Before we get to today’s card I have a SALE to share with you!

    This weekend get 13% OFF STOREWIDE with Coupon Code: SECRETSALE.

    Sale ends 7/24 at Midnight PST. To SHOP, click HERE!!

    ———-

    I’m back this week to showcase another card featuring the #UkraineStrong Fundraiser Products! The #UkraineStrong products (stamps, die set & paper pad) can now be purchased as a bundle or individually. Kat has also extended the fundraiser and will continue donating the profits from #UkraineStrong Products to the Ukraine Crisis Relief Fund via GlobalGiving.org until they are all sold. You can find them HERE.

    (These products are excluded from the sale)

    These products are so well coordinated and make it very easy to create some really beautiful cards to show our support to Ukraine!

    Steps to Create Card:

    • Cut White A2 Top Fold Card Base: 4 1/4″ x 5 1/2″ (4 1/4″ x 11″, scored at 5 1/2″ on 11″ side)
    • Cut Blue Mat: 3 15/16″ x 5 3/16″
    • Cut #UkraineStrong Pattern Paper: 3 13/16″ x 5 1/16″
    • Cut #UkraineStrong Pattern Paper Strip with Stitched Slimline Strips die: 1/2″ x 5 1/16″
    • Cut Yellow banner with the Nesting Fishtail Banner die: 2 5/8″ x 4″
    • Cut 2 leaves from the Stitched Foliage die set using blue card stock.
    • Stamp 2 sunflowers from the #UkraineStrong Stamp Set. I used blue and yellow ink pads.
    • Stamp sentiment from the #UkraineStrong Stamp Set using embossing ink on blue card stock and emboss with white embossing powder. Next cut out with 2 1/2″ Never Ending Circle die.
    • Assemble card. The yellow fishtail banner and sunflowers are popped up with foam tape. (Optional)
    • For embellishment I added a few Clear Solid Round Confetti.

    Here’s a list of the supplies I used from the store.
    Affiliate links are used at no additional cost to you. Thank you so much for your support!


    Happy Stamping!!


  • Christmas Wishes

    Christmas Wishes

    Hello Everyone!

    Sheri here today with a CAS (clean and simple) Christmas card!

    Do you like stretching your supplies and being able to use them for more than one way?  Well the striped “Candy Cane” background paper was created with the NEW Boxed Sentiment Strips die set.

    Steps to Create Card:

        • Create White A2 Top Fold Card Base: 4 1/4″ x 5 1/2″ (4 1/4″ x 11″, scored at 5 1/2″)
        • To create stripped panel:
          • Cut 4 1/4″ x 5 1/2″ rectangle panel out of copy paper
          • Cut 20 (10 red and 10 white) strips using the 3/8″ x 5″ die from the Boxed Sentiment Strips die set to create your stripes.
          • Next apply adhesive to the rectangle panel and start adding your strips on a diagonal to create your background.
          • Clean up your panel by cutting it out with the 2nd largest die from the Never Ending Rectangle die set.
        • Cut Holly & Berries out using green and red card stocking with the Holly Leaves & Berries die set.
        • Cut Christmas Wishes out of gold mirror card stock using the Christmas Wishes w/shadow die.
        • Assemble card.
        • For embellishment I added a few gold pearls and some glossy accents to the berries.

    Here’s a list of the supplies I used from the store.
    Affiliate Links used at no additional cost to you. Thank You so much for your support!

    Happy Stamping!!


  • Trick or Treat

    Trick or Treat

    Happy Saturday Everyone!

    Sheri here today with a Spooky Cute Halloween card featuring the NEW Dress Up Quokka and Halloween Costume Add On stamp and die set!


    Steps to Create Card:

    • Cut White A2 Top Folding card base: 4 1/4″ x 5 1/2″ (4 1/4″ x 11″, scored at 5 1/2″)
    • Cut Black Mat: 3 15/16″ x 5 3/16″
    • Cut pattern paper panel from the Boo To You paper pack: 3 13/16″ x 5 1/16″
    • Cut Black Rectangle Mat: 3″ x 4 1/4″
    • Cut White Panel: 2 7/8″ x 4 1/8″ (you will ink blend and build scene on this panel)
    • Cut a Tree, Fence, Tomb Stone, Moon & Bat using the Crafter’s Essential Halloween die set. I also added a little freehand hillside to ground my scene.
    • Stamp a Dress Up Quokka and a costume from the Halloween Costume Add On set. Color with your favorite coloring medium (I used alcohol friendly ink and colored with copic markers).
    • For the background panel I ink blended Picked Raspberry & Black Soot Distress Oxides and added a little water for texture.
    • You can also add a little ink blending to your Tomb Stone and Moon. I used Gina K Whisper card stock and ink blended a little Black Soot Oxide around the edges.
    • The sentiment is from the Toil & Trouble Layered Stamp & Die set. I heat embossed it in white on a strip of black card stock.
    • Build your scene and Assemble card.
    • For embellishment I added a few purple stars from the Bewitched Sprinkles Mix.

    Here’s a list of the supplies I used from the store.
    Affiliate Links used at no additional cost to you. Thank You so much for your support!
     

    Happy Stamping!!

  • Let’s Get Crafty

    Let’s Get Crafty

    Hello Crafty Peeps,

    We are making a colorful shaker card with a bit of a twist. Instead of the shaker in the middle of the card it is the frame of the card that is the shaker!

    First, is stamping the card front. Using the sentiment and the squiggles from the Kat Scrappiness stamp set Crafters Gonna Craft line up the images and stamp. I used three squiggles because it filled the card nicely. I then stamped and cut out three markers from the stamp set and colored the tips to match the squiggles.

    Next I used the Kat Scrappiness Never Ending Rectangle dies to cut a frame for the card center and another frame for the outside edge of the shaker card. These were cut from black card stock.

    The markers are attached to the card center matching colors. Any marker hanging off the card is snipped off. The frame was attach.

    The other black frame is adhered to the Kat Scrappiness A-2 Acetate Sheet. Next the center card front is attached to the center of the acetate layer.

    Using foam tape along the entire edge of the card (backside of the card front under the frame) place foam tape. Place a second row of foam tape around the center card creating a trough for the shaker elements. I used Kat Scrappiness Cake Sprinkles for my shaker bits. These bits were placed into the trough.

    Final step is to attach the card front with shaker bits to the card base.

    I hope this inspires you to make a shaker card. Enjoy!

    Kat Scrappiness supply list:

    Kat Scrappiness “Crafters Gonna Craft” Stamp set

    Kat Scrappiness Never Ending Rectangle dies

    Kat Scrappiness A-2 Acetate sheets

    Kat Scrappiness Cake Sprinkles

    Error: Contact form not found.

  • Santa Is Watching Shaker Card

    Santa Is Watching Shaker Card

    Hi Everyone, it’s Tina. I have a fun shaker card to share with you using PhotoPlay Here Comes Santa Patterned Paper, the new Stitched Collage Die along with the Never Ending Rectangles Die. The shaker card is using the Sparkled Clear Confetti Mix. Below is a Process Video showing you how I made this card.

    [youtube https://www.youtube.com/watch?v=aLPAoQm5C8M]

    This card can be used for any occasion by changing the patterned paper, sequin mix and sentiment. Below is a link to all products used. To receive 10% off your order use code: TINA10 at checkout. Thank you for stopping by and have a wonderful day.

    Products Used:


    https://linkdeli.com/widget.js?1533216656914

  • Bright Birthday Wishes

    Bright Birthday Wishes


    Hi Everyone!  Today I have a bold and bright birthday card using the Wood Grain Framed Diamond Wire Die and some pretty blooms from Mudra’s Wild Rose stamp set.

    I started off by die cutting the background  using Gina K. card stock and leaving the  pieces intact.  I love that you can get different looks from this one background die!

    I used some tape on the back to secure everything.

    Next, I wanted to create a frame for my flowers, so I spread out my Never Ending Rectangle dies to find the perfect size.

    I blended some Squeezed Lemonade Distress Oxide Ink all over my chosen panel going from dark to light.

    I thought orange flowers would look nice with the purple and yellow, so I used a variety of Copics to color my stamped flowers.

    A sentiment from Hero Arts finishes the card.


    Thanks so much for joining me today.  Be sure to head over to the Kat Scrappiness shop and feel free to use my coupon code: Heidi10 to receive 10% off your purchase.  Have a great day!


    —SUPPLIES—

    Wood Grain Framed Diamond Wire Die

    Never Ending Rectangle dies

    Squeezed Lemonade Distress Oxide Ink

    Mudra Wild Rose stamp set

    Hero Arts Birthday Messages stamp set

    Copic Markers


  • When Black Cats Prowl

    When Black Cats Prowl

    Hello crafty friends, Cheryl here today with a Halloween card. I used one of Kat’s new stamp sets called Toil & Trouble Layered Stamp Set. It’s really cute! So let’s get to it. Simple card today, but kinda vintage looking.

    I stamped out the cute black cat from KS Toil & Trouble Layered Stamp Set using three shades of dark gray to black. I knew I wanted to mount him onto the black die cut image for the cat and also knew I was using a white card base. So I fussy cut him leaving just a tiny bit of white left showing. I then used foam adhesive and adhered it to the die cut. I stamped green eyes for him and added Glossy Accents to make them shine.

    I cut the first layer of patterned paper using the new KS Cross Stitched Rectangle Dies…LOVE!!! Lol, anyway, I also cut a black piece to layer the stamped sentiment on…which I cut using the KS Never Ending Rectangle Dies. While I had the Never Ending dies out I cut a larger piece in white. I layered that over a bright green pattern from a Lawn Fawn pad called Perfectly Plaid Rainbow Petite Paper Pack. I layered all the papers together and then added it to the card base. Finally, I used some liquid glue and placed the cat. I chose some sequins from Sparkling Manhattan Sequin Mix and some from Grandma’s Garden Sequin Mix and glued to the front.

    I then went to finish off the inside of the card. I stamped the middle layer of the cat stamp in a mid gray ink. I then created a layered sentiment with one from the Toil & Trouble Layered Stamp Set. I took a few more of the sequins and glued them to the inside.

    And that’s it for me today. Hope you like my card. Here’s where you can get these supplies, and many more.

    Kat Scrappiness

    Toil & Trouble Layered Stamp Set

    KS Never Ending Rectangle Dies

    KS Cross Stitched Rectangle Dies

    KS Sparkling Manhattan Sequin Mix

    KS Grandma’s Garden Sequin Mix

    Happy Crafting!

  • Grateful

    Hey my friends, Cheryl again today, with another card project for you. Today’s card is mostly just dies and patterned paper. Added one tiny stamp and a few sequins. So, let’s get to it.

    I used the KS Never Ending Dies and the new KS Border Dies. I also took advantage of some of the cute images in my patterned paper pad. I love to use them, everything coordinates, and they are quick and easy cards. You could whip some out really fast. The papers I used are from Authentique, called Bountiful.

    I used the KS Never Ending Dies to cut the dark patterned paper in the background and also to cut the patterned paper squares. I cut the ivory cardstock and used a fall embossing folder. I matted each of the squares and the ivory piece on rust colored cardstock, for a pop of color. I also cut a piece of the dark brown patterned paper and used the KS Fancy Scalloped Border Dies on the top edge. I chose a sentiment from Hero Arts Thank You Messages and embossed it with gold embossing powder.

    I used foam tape on the back side of the squares and spaced them out evenly from top to bottom. I then added the entire panel to an A2 piece of ivory cardstock. I chose some sequins from KS Sangria Masquerade Sequin Mix, scattered them around and glued in place using liquid glue.

    So that’s it. Easy and yet cute. No one says a nice card has to take a long time to make, and these elements included in paper pads are great to use! Hope you got a bit of inspiration. Here’s where you can find these products and many more.

    Kat Scrappiness

    KS Never Ending Rectangle Dies

    KS Never Ending Square Dies

    KS Fancy Scalloped Stitched Border Dies

    KS Sangria Masquerade Sequin Mix

    Hero Arts Thank You Messages Stamp Set

    DON’T FORGET to use the coupon Cheryl10 to get 10% off your order! Get out your supplies and have fun crafting!


    Save

    Save