Ok, who’s ready for Spring? I’m pretty sure everyone is by now!
In today’s card, I’m showing you a way to use your frame dies and stenciling on vellum paper. This layout is very easy to put together with a few supplies and very versatile for any occasion. If you stay to the end, I have another card I created using the same products.
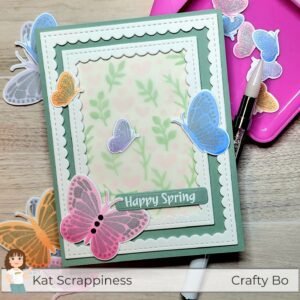
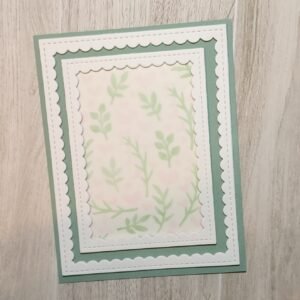
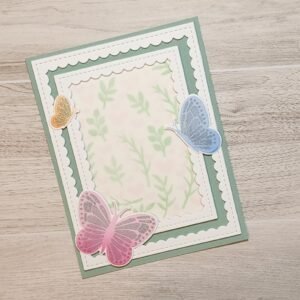
Here is the card I will be discussing in detail below:
To create this card you will need the following products from Kat Scrappiness:
- A2 Reverse Scallop Dies
- Fluttering By Stamps
- Fluttering By Coordinating Craft Dies
- Love Blooms Layered 6×6 Stencil
- Hippity Hoppity Sentiments Clear Stamps
- Kats Crafty Dabbers
In addition to the above, you will need the following supplies:
- Colored cardstock (I used a sage color for the background panel and an ivory color for the layer behind the stenciled vellum)
- White cardstock
- Vellum paper
- Ink pads:
-in light colors (light pink, light green for the stencil);
-other colors for the bottom layer of the butterflies (I used three shades of each – pink, purple, blue, and orange to get the blended look on the butterflies)
-silver ink (or gray or black depending on which you prefer for the top part of the butterflies)
- Stamping platform or acrylic stamping blocks
- Makeup sponge or a regular dry sponge or Kats Crafty Dabbers
- Embossing pad such as VersaMark
- Embossing powder (I used a fine detail white embossing powder)
- Liquid adhesive, or adhesive of your choice
- Small black gem embellishments such as Onyx Black Pearl Mix
Now that you have all the supplies, let’s get started!
Step #1 – Card panel
Take a colored cardstock, like the sage color I used in the example, and cut it to an A2 size (5 ½” x 4 ¼“) and set it aside for later.
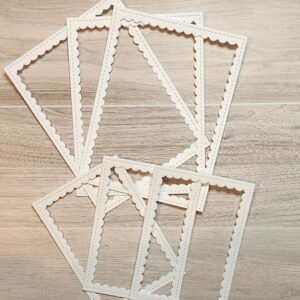
Step #2 – Frames
Using the A2 Reverse Scallop Dies, die cut the largest die 3 times using white cardstock. Do the same with the next largest die from the set and set all of them aside for later.
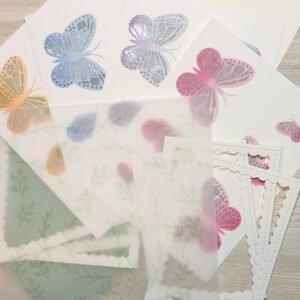
Step #3 – Butterflies (three parts)
Part 1
Line up the three solid butterfly stamps from the Fluttering By Stamps set in your stamping platform. Take the lightest of three of your ink pads and ink the top third of each stamp only. Next, take the medium color of your ink pads and ink the middle of each stamp only. Finally, take the darkest ink pad and ink only bottom part. Now, take the makeup sponge (or clean dabber), and gently blend where the inks meet so any harsh lines will be blended for a nice even blend.
I repeated this process twice to get good color gradation and blending.
Repeat this process for each color butterflies you want to create. Helpful Hint: If you don’t have a stamp positioner, you can die cut each of the butterflies and use the negative as a stencil to do the ink blending instead.
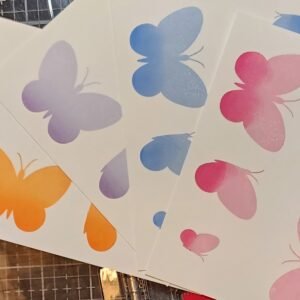
Part 2
Line up the 2nd layer of each of the butterflies and stamp them with silver ink (or gray or black) to apply the detailed layer of the butterflies. I used a silver ink for my card.

Part 3
Using the Fluttering By Coordinating Craft Dies, die cut each of the butterflies out and set them aside.
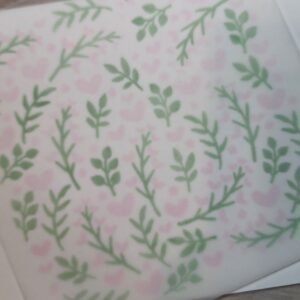
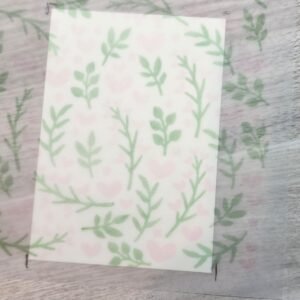
Step #5 – Stencil
Cut a piece of vellum paper 6×6” inches and adhere it to your work surface with low tack tape in a couple spots so it doesn’t move. Next, take the first stencil (the stems) and line this up with your cardstock and adhere this to your work surface with low tack tape.
Using Kats Crafty Dabbers and green ink pad of your choice (I used a light green as I wanted a soft look to the panel), apply ink onto the stencil and remove the stencil when finished.
Line up the second stencil and repeat the process with a new dabber and a light shade of pink (or color of your choice) and apply ink onto the stencil and remove the stencil when finished.
Set this aside to let the ink dry for a few minutes.
Now that you have all the steps covered, let’s create the card!
Step #6 – Adhere the frames
Take the two sets of frames and adhere the small ones together and then adhere the large ones together and set them aside so the glue can dry.
Step #7 – Background
Trim a piece of ivory cardstock the same size as the small frame. Do the same with the vellum piece that was stenciled. Helpful tip: I took the vellum and laid it over the cut piece of ivory cardstock and moved the vellum around until I found the area that I wanted as the background. I then took a pencil and put little marks on top of the vellum where the corners were. I then cut the vellum down using those marks as a guide.
To adhere the vellum, I applied a small thin line of liquid adhesive around the edges of the ivory cardstock, laid the vellum onto it, put a paperweight on top, and left it alone so the glue can adhere fully.
Step #8 – Small Frame w/Stencil Background
Take the small frame that has the stencil background and ivory cardstock and add some liquid glue to the back and adhere it onto the middle of the sage panel.
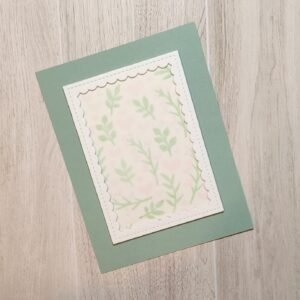
Step #9 – Large Frame
Take the large frame and adhere that to the sage card panel with liquid adhesive. I placed a paperweight on top and let that the glue dry for a few moments.
Step #10 – Adding Butterflies
Select which butterflies you would like to use for your card and lay them onto the card panel. Once you have decided where you want them placed, adhere them to the card base.
Step #11 – Sentiment
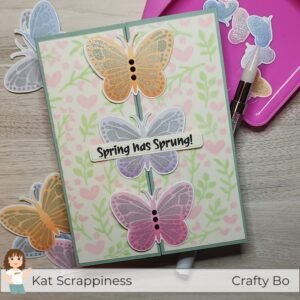
I chose to use Happy Spring from the Hippity Hoppity Sentiments Clear Stamps and heat embossed it using the VersaMark embossing ink and white embossing powder onto the same sage cardstock as the card panel. After die cutting that out, I moved the sentiment around onto the card until I liked the final position and adhered that to the card.
Step #12 – Embellishments
Add your embellishments onto the large butterfly body and/or around the card as well.
Step #13 – Finishing
Adhere this panel onto either a side-folding or top-folding A2 sized card base. And that completes the card!
Die cutting the frames several times adds great dimension to the card but of course you can use one of each if you prefer. I chose to stencil onto vellum instead of directly onto the ivory cardstock cause I felt the vellum gave it a very soft look and it’s a different texture than cardstock.
There’s many options to change this card to suit your needs or skill level. It’s a great basic design to keep in memory for use in a future card.
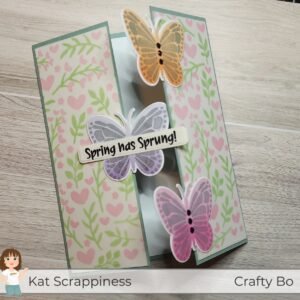
Bonus card:
As promised, here is my second card that I created using the same stencil on vellum paper (adhered to ivory cardstock) and the butterflies but I created it into a gatefold card.
I hope you enjoyed these cards and I also hope you try making a version of them yourself. We would love to see what you create using Kat Scrappiness products. If you haven’t already, please join us over at Kat Scrappiness Facebook page as well as Kat Scrappiness Insiders Facebook page to see everyone’s incredible creations! There’s also Instagram too, Kat Scrappiness, where you will not only find inspiration but fun hops as well!
Also, don’t forget to check out What’s New at Kat Scrappiness for even more crafty inspiration and please subscribe to the Kat Scrappiness newsletter.
Leave a comment to let me know which card do you like better?
Thank you for stopping by and happy crafting!
Crafty Bo