Tag: die cuts

  • How to create a Beautiful Autumn themed Slimline Card?

    How to create a Beautiful Autumn themed Slimline Card?


    handmade autumn slimline card with die cut leaves

    Hello, my crafty friends, I am back with a new blog and card! My apologies for not having found a good rhythm yet, but I promise I’ll do better. 😄 I hope you all like the card I share and if you have any questions, don’t hesitate to leave them in the comments.

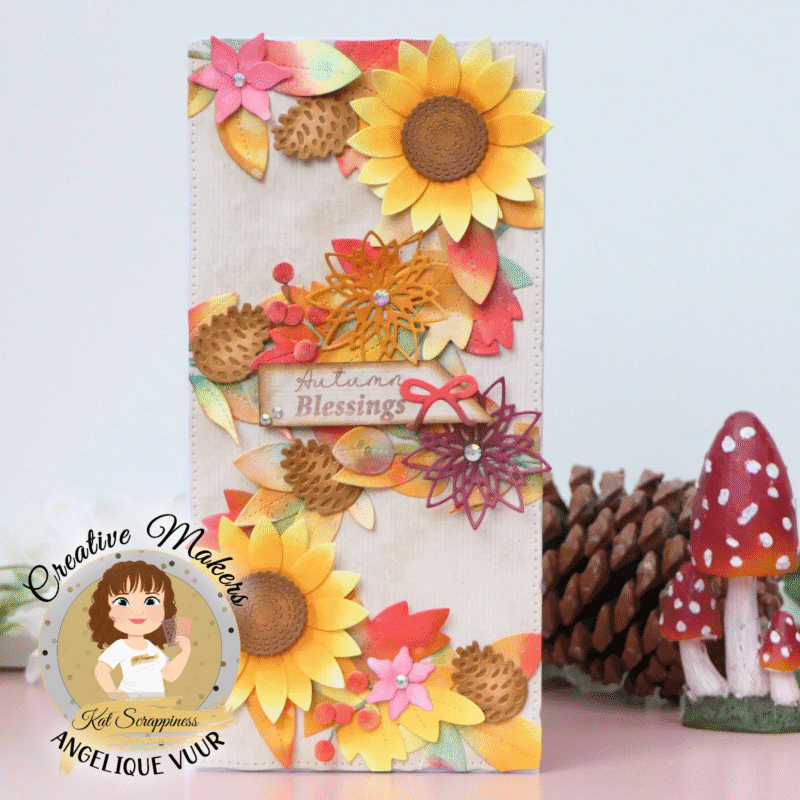
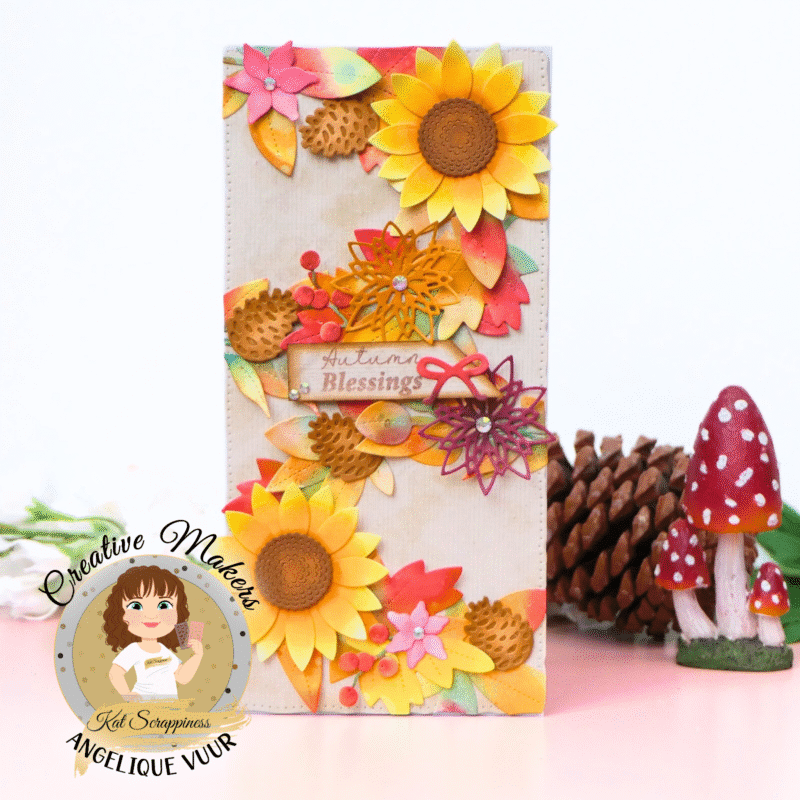
    Today, I’m excited to share a handmade autumn slimline card inspired by the beautiful fall season. Even though the weather is still quite nice here, it’s officially autumn, which means it’s the perfect time to play with warm tones, leaves, and nature-inspired designs.

    For this project, I created a slimline card using several gorgeous dies and a stamp from Kat Scrappiness. If you’re new to slimline cards, they typically measure 3.5 by 8.5 inches—a fun size that gives you plenty of room to get creative. Do you make slimline cards often?

    🧰 Kat Scrappiness Supplies Used:

    📋 Card Details:

    • As I mentioned, the card is a slimline. Start by finding a light-colored cardstock from your paperpads. I chose beige with a light ink smooch. I kept it light, because I didn’t want the background to steal the attention from the beautiful fall colors – those are the star of the show here.
    • I started with a light piece of cardstock, and cut it using a slimline die, I chose a die with a stitched border because I love the look it gives, especially since it ties in with the leaves. But feel free to use whatever you have!
    • You can set the background aside for now because next comes the fun part—die cutting! I always cut a bunch of everything I need. Most of the time, I end up cutting more than I need, but I’d rather have too many than not enough. 😜 For this card, I die-cut everything from white paper since I love to ink blend it myself. I always use Neenah Solar White cardstock because it blends beautifully, but use whatever you’re most comfortable with.

    (more…)

  • A Halloween Boo! Card

    A Halloween Boo! Card

    Hello Friends!!! Nora here on the blog today with a festive Halloween card using some of the FABULOUS Kat Scrappiness Shop Halloween products. Today I focused on using the new Creepy and Kooky Paper Pad and some of the fun KS dies for accents.

    How I created this card:

    • Blend orange ink on the front of an A2, white card base.
    • Die cut a spider web border out of black paper using the Halloween Border Dies.
    • Using the Creepy and Kooky Pattern Paper Pad, cut a piece of pattern paper 1 1/2″ by 5 1/2″ and a piece of striped paper into a 1/4″ by 5 1/2″ strip. Adhere to the top of the card, tucking your border die cut underneath the striped strip.
    • With the Kat Scrappiness Condensed Uppercase Alphabet Dies, die cut the word “boo.” Ink blend the letters with purple ink and adhere to the card front as shown.
    • Use the Kat Scrappiness Boo-gy Ghosts Dies to die cut a ghost, broom and the witch hat out of paper. Adhere the ghost and witch hat to the card front using foam adhesive. Adhere the broom at the end of the sentiment.
    • Fussy cut the candy corn out of the same paper that was used at the top. Adhere randomly to the card front.
    • Cover the candy with Glossy Accents. Use Glossy Accents to add “drips” to the top of the die cut letters in the sentiment and the card is complete!

    I hope this festive card inspires you to create one of your own Halloween creations.

    Thank you for taking the time to stop by today. Be sure to check back in to the Kat Scrappiness Blog to see some more fabulous projects by the Design Team.

    Below are links from the products used from the Kat Scrappiness Shop. Affiliate links are used at no extra cost to you.


  • A Happy Birthday Card

    A Happy Birthday Card

    Hello everyone!! It is Nora here on the blog with a card where I combined the Kat Scrappiness new Birthday Essentials 6 x 8 Paper Pack, the new Happy Birthday w/ Shadow Die and the Birthday Essentials Die Set to create a fun birthday card.

    Card Directions:

    1. Using the largest of the Kat Scrappiness Embossed Edge Rectangle Die, die cut a piece of white cardstock. Ink blend yellow ink on the background and adhere to a white, A2 card base.
    2. Die cut the Kat Scrappiness Happy Birthday sentiment from a piece of blue paper contained in the Birthday Essentials 6×8 paper pack. Cut the sentiment apart and adhere to the top section of the card. Make sure you curve “birthday” to draw the eye in.
    3. The present was created by using the Birthday Essentials Dies and more pieces from the Birthday Essentials 6×8 paper pack. Adhere the present and ribbon together and then glue to the card front.
    4. My last step was to adhere a mix of Basil, Lemon Yellow, Marshmallow and Midnight Sky pearls randomly around the front of the card. I wanted it to look like confetti and tried to pull the colors I used from the paper on my card. This is my favorite part of the card!!

    This card may look simple but it was a ton of fun to create. I hope this inspires you to create your own birthday card!!

    Some affiliate links have been used at no extra cost to you. Below are the Supplies I used for this card:

  • Rainbows

    Rainbows

    Hi, I have been busy creating cards with my recent Kat Scrappiness shipment. I find myself returning to this adorable koala to create. Stamp set is Koala-ty Time.

    I often start my card making process with the background. I used blue card stock and stamped clouds in blue.

    Next I stamped the koala and sentiment. The koala was colored using Copic markers. I cut a banner and stamped the sentiment in black.

    Using the rainbow panel die I cut it out in all the colors you see in order to create the rainbow. (Side note is I now have enough pieces to create this card four more times!)

    Final step is to assemble all the parts onto a card base. As always I feel the need to add a few embellishments which are the pink dots.

    Supplies: KS Koala-Ty Time Stamp set

  • Beach Ball Fun

    Beach Ball Fun

    Hello Friends,

    Decided to create a card in anticipation of the soon to be summer season. Using the Kat Scrappiness Beach Ball Shaker Dimension Set I have created a beach scene.

    I started by designing the background creating a water’s edge with the curved edge die by KS. The water and sand were colored with multiple layers of ink to create the feel of water and sand.

    Next I die cut palm fronds to be placed around the edges.

    A small beach shack was stamped, cut and colored to help with the scene.

    Added the palm fronds to be a back drop of the shaker beachball.

    The final step was to add the pieces to the card front. Using the beachball shaker set I painted the ball blue metallic and added the KS confetti in various colors. The sentiment was added to a banner and attached over the beachball. A few acrylic bubbles were my final touch.

    J

    I hope this card makes you think of a happy time and the happy times to be.

    supplies:

    KS beachball shaker set

    KS confetti sprinkles- various colors

    KS curved edge die

  • Halloween Sale!

    Halloween Sale!

    Hello hello Kat Scrappiness Fans!

    Happy Weekend!

    Weekends and sales are the perfect time for shopping!

    It’s the weekend and we’re having a sale!!

    Right now through Tuesday October 23rd you can pick up all In-Stock Items in the Halloween Category at 20% off!

    That sounds like you should be running over to the store to pick up all of your Halloween goodies!

    No coupon code is required so head over there now!

    Also don’t forget to join our new Facebook group for all of you lovely fans out there! It’s a place to find all of our new releases, sneak peeks and special sales! It’s also a great place to share your projects and hauls to be entered into our giveaway each month.

    For those of you who don’t know we host a giveaway here each month and it’s called Share to Win! It’s very simple. Share your projects or hauls using Kat Scrappiness products. Tag on social media when you post and you’re entered to win the giveaway!

    Want another chance to win some Kat Scrappiness goodies? We host a monthly challenge and all you have to do is link your project or card on our blog! At the end of the month we randomize the names of those who entered and pick a winner! Look for the challenge tab on the top of the blog to enter!

    Enjoy your day! Happy shopping!

  • Happy Father’s Day

    Hello everybody! I am excited to stop by and share with you all, a card that I have created for Father’s Day using some amazing products from Kat Scrappiness.

    I started off by creating my A2 sized card base using 110lb. White Neenah Card Stock. I then cut down a piece of blue Bazzill Cardstock to measure 4-3/8″W x 5-3/8″H and adhered that onto my card base as my card mat.

    One of my favorite dies from Kat Scrappiness is the Condensed Uppercase Alphabet Dies. I used these to die cut the word “DAD” using some gold foiled card stock that I had left over in my stash from a previous project.

    I also die cut three different sized ovals using the Cross Stitched Oval Dies by Kat Scrappiness.

    Have you seen the newly released Dad’s Tools – 6″x 8″ Layered Stamp Set by Kat Scrappiness? This stamp set is amazing! There are a total of 34 stamps in this set. The tools, which include a hammer, screw driver, nails and screws are all layering stamps and there are 12 sentiment/word stamps, making it that much easier to be able to create that perfect masculine card for any occasion. I decided that I was going to use the hammer for my card creation. I started by stamping the hammers handle using Tim Holtz Distress Oxide Inks in Antique Linen, Frayed Burlap and Vintage Photo. For the hammer head, I used Hickory Smoke, Iced Spruce and Black Soot.

    I also decided that I wanted to use one of the sentiments from the Dad’s Tools – 6″ x 8″ Layered Stamp Set as well. I went with the “Happy Father’s Day” stamp, which I stamped with Versamark Ink and heat embossed using Hero Arts Gold Embossing Powder onto the smallest blue oval that I had die cut previously.

    To complete my Father’s Day card, I layered my die cut ovals and centered them at the lower portion of my card. I added foam tape to the “DAD” letters to make them pop up a bit and to make it fun, I wanted to put the hammer through the first “D”. Once all of my card elements were in place and adhered down, I added some small adhesive gems at the top left and bottom right corners to add a bit of interest and complete my card.

    I am happy with how my card has turned out and I hope that you enjoyed my quick tutorial as well.  All of the supplies I have used for this card are listed below and can be found at the Kat Scrappiness Shop. Remember to use Code: Jana10 at checkout to receive 10% off of your order. Thank you again for stopping by and have an amazing day!!!

    Supplies List:

    110lb. Neenah White Card Stock

    65lb. Blue Bazzill Card Stock

    Patterned Paper & Gold Foiled Card Stock

    Condensed Uppercase Alphabet Dies by Kat Scrappiness

    Cross Stitched Oval Dies by Kat Scrappiness

    Dad’s Tools – 6″ x 8″ Layered Stamp Set by Kat Scrappiness

    Antique Linen Distress Oxide Ink Pad by Tim Holtz

    Frayed Burlap Distress Oxide Ink Pad by Tim Holtz

    Vintage Photo Distress Oxide Ink Pad by Tim Holtz

    Hickory Smoke Distress Oxide Ink Pad by Tim Holtz

    Iced Spruce Distress Oxide Ink Pad by Tim Holtz

    Black Soot Distress Oxide Ink Pad by Tim Holtz

    Tsukineko Full-Size Versamark Clear Embossing Ink Pad

    Hero Arts Gold Embossing Powder

    Adhesive Gems

  • Our May 1st Release at Kat Scrappiness!

    Our May 1st Release at Kat Scrappiness!

    Hi everyone!  I’m so excited to share with you our three new products released today.  First up is Dad’s Tools which is a layered stamp set and so much fun!  Perfect for Father’s Day, birthdays, or other masculine cards!

    Dad's Tools

    Here are a few sample cards our design team members made with this stamp set.

    Now for our newest dies!  The first set of dies is called Stitched Flags and it includes SEVEN dies!

    Stitched Flag banner dies

    Here are some samples by our design team:

    Last but not least, our Stitched Fishtail Banners!  There are four banners in this set.

    Here are some samples created by our design team.

    That’s it for today! I hope you love our new stamp set, Dad’s Tools and our new dies, Stitched Fishtail Banners and Stitched Flags!  We have another new release coming later this month so stay tuned!  We also released several new sequins and sequin mixes this month as well!  You can see them HERE.

    Thanks for visiting our blog, be sure to stop by the store and pick up your new favorites! Have a crafty week!

  • All Aboard for Christmas with Angeline

    All Aboard for Christmas with Angeline

    Ho ho ho! It’s just a few days away from Christmas. Angeline here to share with you a Christmas card I made using some fun foilable products and Newton’s Nook Designs stamps.

    I first created the background using Pattern Paper Pack 1 – FOILables – Toner Graphics by Creative Vision S and Thermoweb Decofoil [Lapis Watercolor], by running it through my Heidi Swapp Minc Machine. It’s so fun to just have ready-patterns, foil and you’re done!

    Then I created a snow slope using the Fancy Scalloped Stitched Border Dies by Kat Scrappiness then I arranged the cute Santa in his train with his friends from the Newton’s Nook Designs [All Aboard for Christmas]; which I have colored in with my Copic markers.

    “Choo choo!” All aboard the fun Christmas train 🙂

    Here is the list of supplies I used to make this card. For all the supplies linked, you can get it from Kat Scrappiness store. Do remember to use my code “Angeline10” to get 10% off your order! Happy shopping and Merry Christmas!

    ▬▬▬▬▬★ S U P P L I E S ★▬▬▬▬▬
    Pattern Paper Pack 1 – FOILables – Toner Graphics by Creative Vision S
    Fancy Scalloped Stitched Border Dies by Kat Scrappiness
    Newton’s Nook Designs [All Aboard for Christmas]
    Thermoweb Decofoil [Lapis Watercolor]
    Heidi Swapp Minc Machine
    Copic markers
    Sizzix Big Shot

  • Bicycle Built for You with Angeline

    Bicycle Built for You with Angeline

    Happy mid-week my scrappy friends! Angeline here to share with you a fun card I made using the Lawn Fawn “Bicycle Built for You”  stamp set, dies and Kat Scrappiness sequins.

    So, I first stamped all the cute critters, couple and fun elements on a white cardstock — then colored it with my Copic markers. You can then cut them all out using the Bicycle Built for You Lawn Cuts (Dies) by Lawn Fawn. I also die cut out the white picket fence and road using the Lawn Cuts Little Picket Fence Border & Lawn Cuts Road Border by Lawn Fawn.

    Then, it’s time to assemble everything! Just have fun and create whatever scene you like 🙂 I also inked the background with some Tim Holtz distress oxide inks to create the sky & grass. And finally, it’s a MUST to add some Kat’s pretty sequins coz they are just SO pretty! Here I am using some Rock Candy Sequin Mix by Kat Scrappiness.

    Also, I have a GIVEAWAY! 🙂
    I am giving away this awesome NEW Kat Scrappiness “All the the family” die set (worth $17.99). This is such a fun set to have and you can use it for so many scrappy projects.
    Just head on over to my Instagram (@scrappyscrappy_) for the full details on how to win.
    Giveaway open worldwide and ends on 15th October 2017.

    Here is the list of supplies I used to make this card. For all the supplies linked, you can get it from Kat Scrappiness store. Do remember to use my code “Angeline10” to get 10% off your order! Happy shopping.

    ▬▬▬▬▬★ S U P P L I E S ★▬▬▬▬▬
    Lawn Fawn “Bicycle Built for You” 
    Bicycle Built for You Lawn Cuts (Dies) by Lawn Fawn
    Lawn Cuts Little Picket Fence Border by Lawn Fawn
    Tim Holtz distress oxide inks
    Rock Candy Sequin Mix by Kat Scrappiness
    Aleene’s Quick dry glue
    Thermoweb Mixed Media Adhesive
    Copic markers
    Sizzix Big Shot
    Tim Holtz Distress Sprayer
    Memento ink Tuxedo Black

    SaveSave