Tag: collage medium

  • Merry Christmas My Deer Friend Card

    Merry Christmas My Deer Friend Card

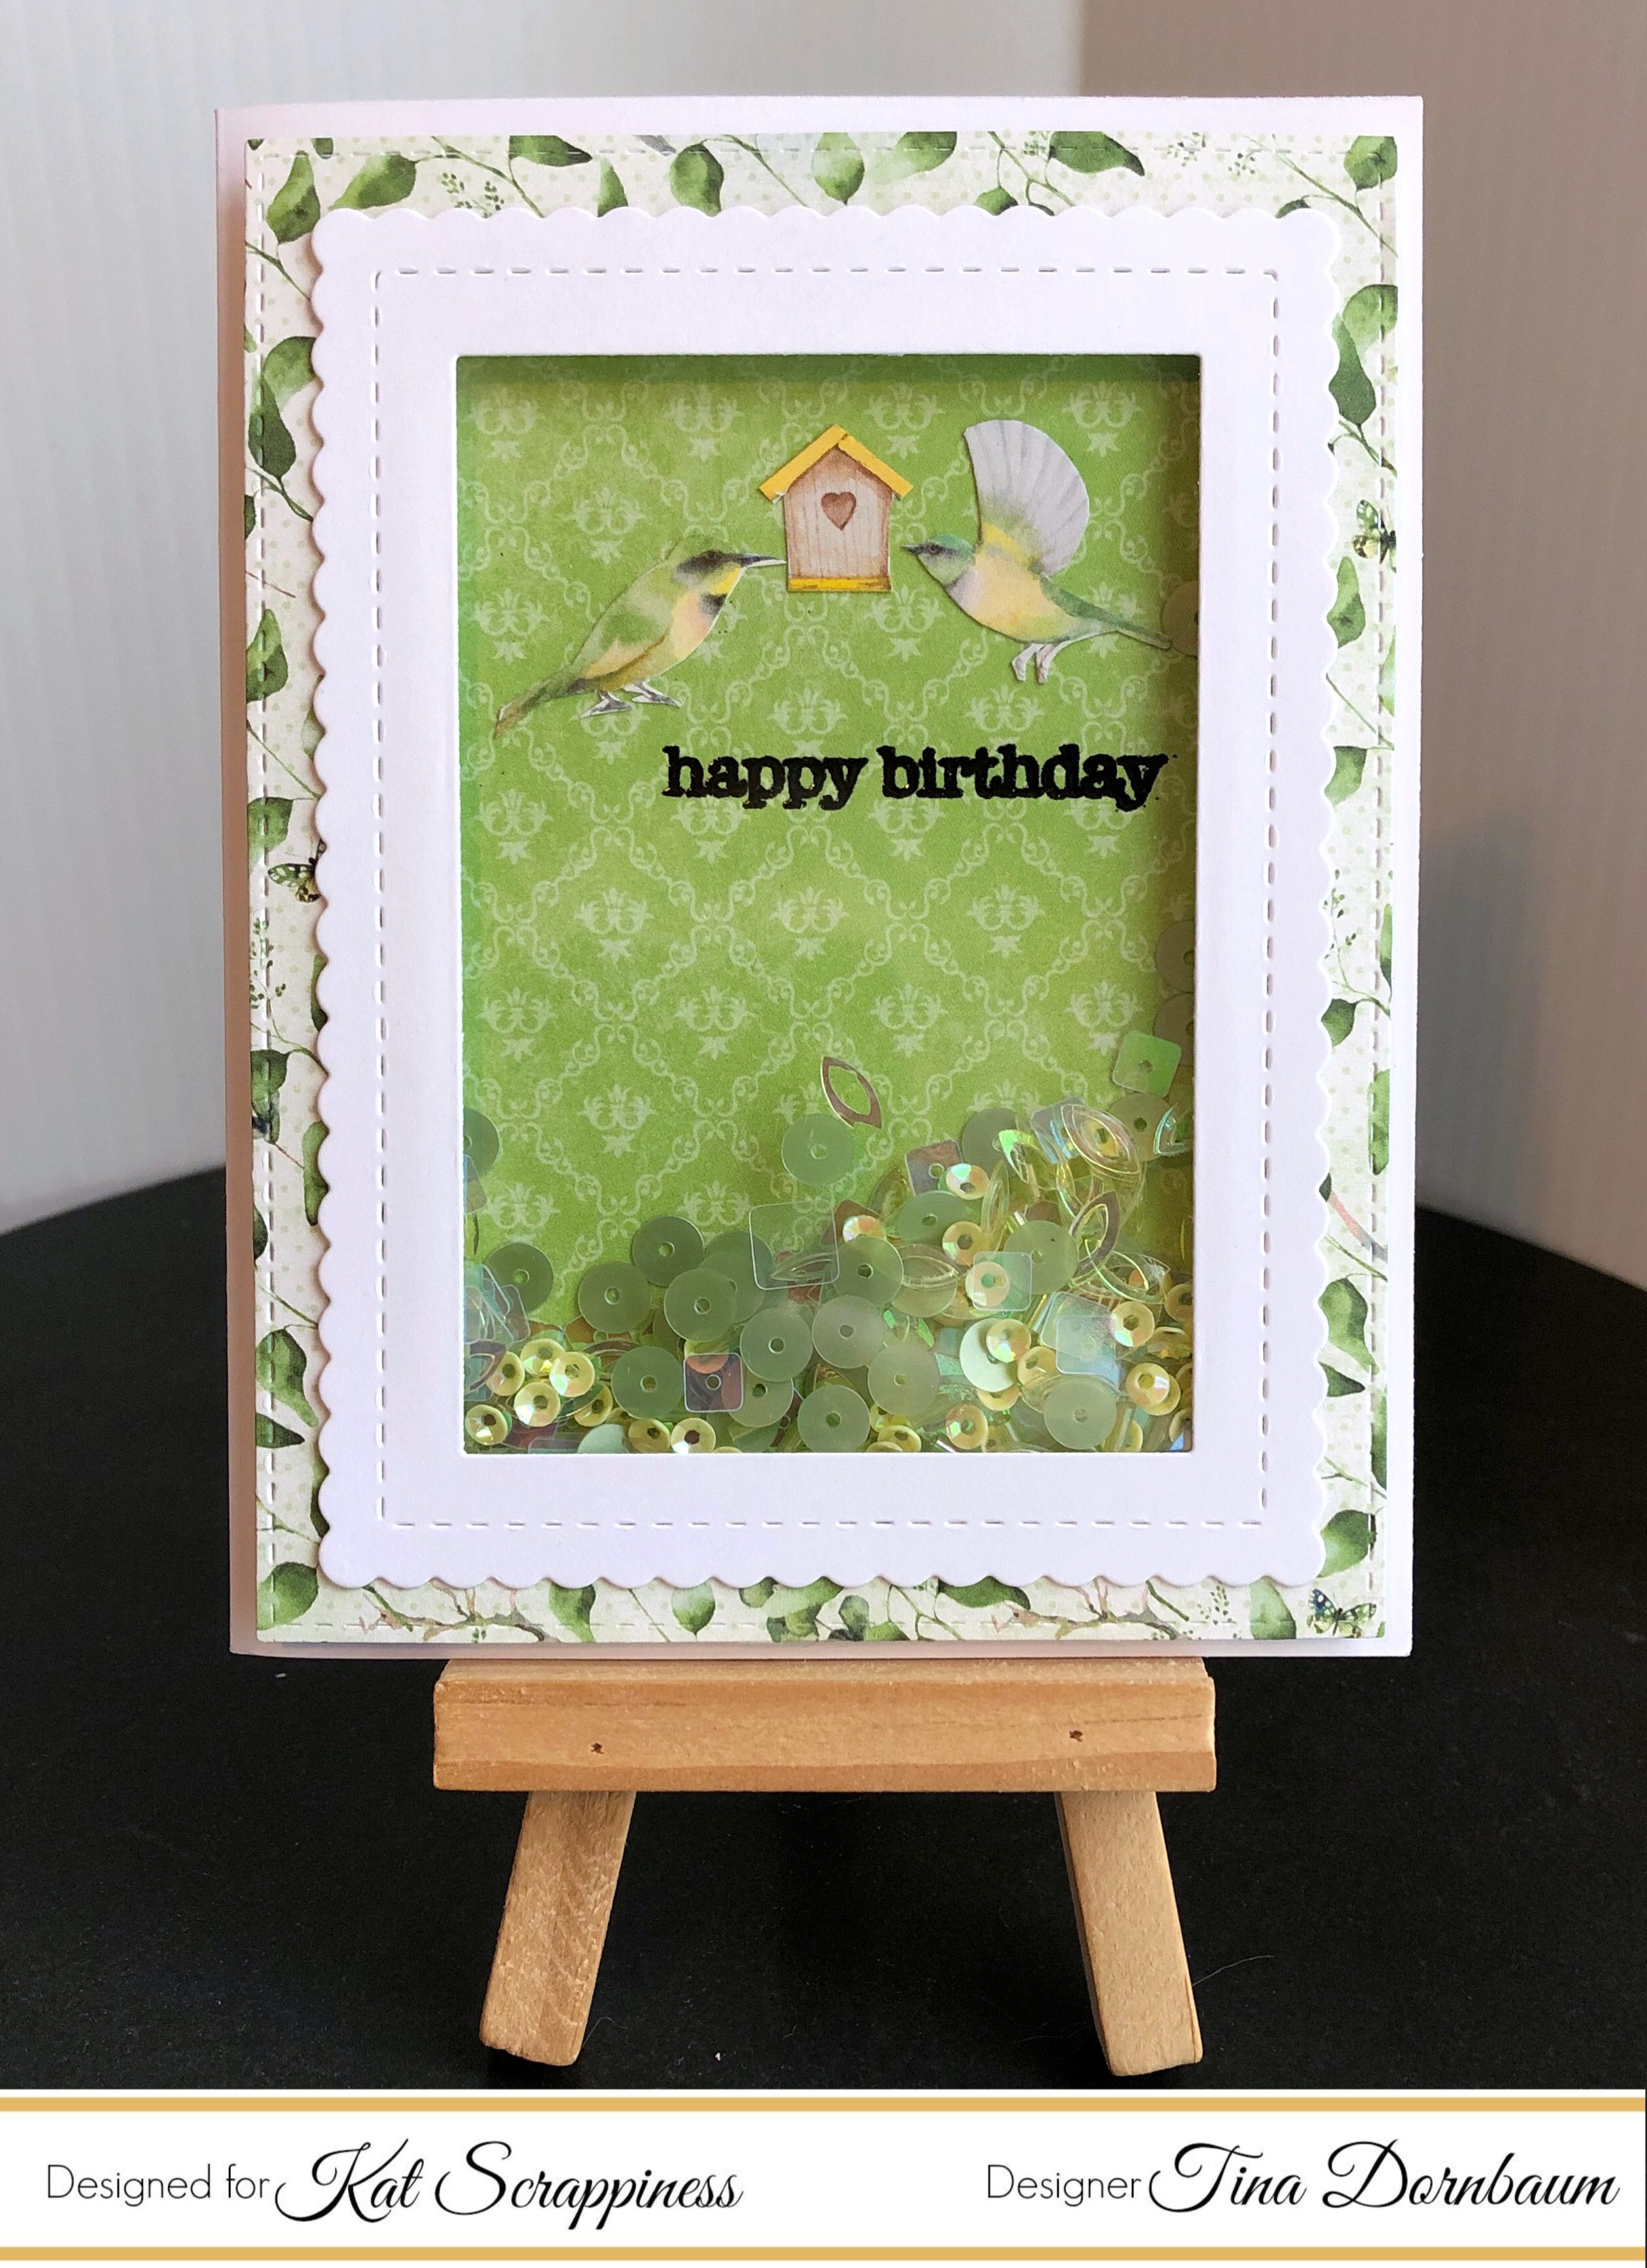
    Hi Everyone, it’s Tina here. This month Kat Scrappiness has a fabulous Merry Critters Stamp Set to help you make your Holiday Cards. It has critters as well as some fun sentiments. Below you will find the steps to replicate this card.

    Step 1 – Trim White Cardstock to 8 1/2″ x 5 1/2″, score at 4 1/4″ and fold in half for a vertical side fold card.

    Step 2 – Trim White Cardstock to 5 1/2″ x 4 1/4″. Apply Distress Oxide Ink using an ink applicator. Start with Stormy Sky at the top and blend in Tumbled Glass leaving an inch at the bottom uncolored. Spritz some water to create droplets. Dab at excess. Apply White Acrylic Paint onto an Acrylic Block. Spray some water and mix it. Using a paintbrush tap the brush to create a snowy scene. Set aside to dry.

    Step 3 – Stamp Merry Critters onto White Cardstock using Versafine Onyx Black Ink. Color using any color medium of your choice. I used Winsor and Newton Promarkers. For added detail use a White Gel Pen to create stripes and circles on the presents and on the tree to create snow. Fussy cut out all the images or use a scan n cut.

    Step 4 – Adhere the background created from Step 2 onto the card front using Nuvo Deluxe Adhesive Glue. Adhere the images to the card using collage medium.

    Step 5 – For added interest and sparkle use Wink of Stella on some of the images.

    I hope you enjoyed today’s card. Below you will find a link to all the products used. To receive 10% off your next order at Kat Scrappiness use code: TINA10 at checkout. Thank you for stopping by and have a wonderful day.

    Products Used:

    https://linkdeli.com/widget.js?1539684774787

  • Spooktacular Card Featuring Fall Crafters Essentials

    Hi Everyone, it’s Tina here today. Kat Scrappiness started a collection called Crafters Essentials which features must have dies in one collection. This month there is the Fall Crafters Essentials which not only makes fabulous Fall Cards but Halloween Cards as well. Today’s card I used it as a super fun Spooktacular Card. Below are the steps to replicate this card.

    Step 1 – Trim White Cardstock to 8 1/2” x 5 1/2”, score at 4 1/4” and fold in half for a horizontal side fold card.

    Step 2 – Trim White Cardstock to 4 1/4” x 5 1/2”. Using an ink applicator apply Distress Oxide Inks to create an Eerie Background. I started with a small circle with Spiced Marmalade, then Barn Door and worked my way out to Dusty Concord, Wilted Violet and Black Soot. I sprayed the background using Sheer Shimmer Sparkle Spritz to add some sparkle and shine. Let it completely dry before moving into the next step.

    Step 3 – Diecut Fall Crafters Essentials using Black Cardstock. I Diecut the bat 3 times, the fence 2 times and the tree. Adhere to card front using Collage Medium.

    Step 4 – Stamp Toil and Trouble Stamp Set sentiment Boo using Versamark. Sprinkle Silver Embossing Powder, remove the excess powder and heat set it with a heat tool.

    Step 5 – For added interest and sparkle using a Crystal Katana apply Purple Jewels with Collage Medium.

    I hope you enjoyed this fun way to use the Fall Crafters Essentials dies. You can change it up and make it into a Fall card by changing the colors and sentiment. Below is a link to all the products used. To receive 10% off your next order with Kat Scrappiness use code TINA10 at checkout. Thank you for stopping by and have a wonderful day!

    Products Used:


    https://linkdeli.com/widget.js?1538726363690

  • Stitched Scallop Heart Pocket Card

    Stitched Scallop Heart Pocket Card

    Hi Everyone, it’s Tina here today. I have a fun Pocket Card to share with you using the Peacock Backdrop Die, Stitched Fancy Scalloped Heart Die, Crafters Essentials II and the Everyday Brush Strokes Stamp Set. Below you will find the steps to replicate this card.

    Step 1 – Trim White Cardstock to 8 1/2″ x 5 1/2″, score at 4 1/4″ and fold in half for a vertical side fold card.

    Step 2 – Diecut Peacock Backdrop using soft patterned paper. Adhere to card using Collage Medium.

    Step 3 – Diecut Stitched Fancy Scalloped Hearts and cut out the center of the heart creating a window.

    Step 4 – Using the diecut Heart trace out the center of the heart to use as a template. Cut out 2 hearts using a sheet protector. Adhere the sheet protector cut out to the inside of the diecut Heart created in step 3 using collage medium. Be careful to pour the Snips & Snails Sequins mix to the middle. Adhere the 2nd sheet protector to cover the sequins. Now carefully apply collage medium to the edges of the pocket and adhere to the front of card. Adhere the diecut Heart on top of the pocket. Let dry.

    Step 5 – Diecut Crafters Essentials II stitched banner and the top arrow shape using White Cardstock. Stamp Everyday Brush Strokes stamp sentiment on the stitched banner diecut using Distress Oxide Bundled Sage. Trim the left side and adhere to the center of the heart using Collage Medium. Adhere the top arrow shape over the stitched banner diecut to create an arrow.

    I hope you enjoyed today’s card. This card can be used for any occasion by changing the colors and sentiment. To receive 10% off on your next order at Kat Scrappiness use code: TINA10 at checkout. Below is a link to all the products used. Thank you for stopping by and have a wonderful day!

    Products Used:


    https://linkdeli.com/widget.js?1537178393842

  • Stitched Diagonal Backdrop Die Card

    Stitched Diagonal Backdrop Die Card

    Hi Everyone, it’s Tina here. We are now August and with it are the new Kat Scrappiness dies and stamp set. Today I am using the new Stitched Diagonal Backdrop Die along with the Crafters Essentials II and the Everyday Brush Stokes Stamp set. Below you will find the steps to replicate this card.

    • Step 1 – Trim White Cardstock to 8 1/2″ x 5 1/2″, score at 4 1/4″ and fold in half for a horizontal side fold card. (A2)
    • Step 2 – Trim Patterned Paper to 5 3/8″ x 4 1/8″ and adhere to card using Clear Double Sided Adhesive Tape.
    • Step 3 – Diecut Stitched Diagonal Backdrop using Patterned Paper. Trim and adhere Patterned Paper to the backside. Adhere entire panel to the card front using Clear Double Sided Adhesive Tape.
    • Step 4 – Diecut Crafters Essentials II using Black Cardstock (the Stitched Fishtail Banner).
    • Step 5 – Stamp Everyday Brush Strokes Sentiment on the diecut from Step 4 using Versamark Ink. Sprinkle Gold Embossing Powder and heat set with a heat tool. Adhere to card using Clear Double Sided Adhesive Tape.
    • Step 6 – Diecut Crafters Essentials using Patterned Paper (Starburst) and adhere to card using Clear Double Sided Adhesive Tape.
    • Step 7 – Optional – Using a Crystal Katana adhere Pastel Pop Sequin Mix using Collage Medium.

    This card can be used for any occasion by changing the Patterned Paper, colors and/or sentiment. To receive 10% off your order at Kat Scrappiness used code: TINA10 at checkout. Below is a link to all products used. Thanks for stopping by and have a wonderful day.

    Kat Scrappiness Products Used:

    https://linkdeli.com/widget.js?1533216656914

  • Crafters Essentials 2 Masculine Card

    Hi Everyone, it’s Tina here. Today I have a masculine card to share with you using the Crafters Essentials II. The Crafters Essentials is packed with 8 dies with one being a border die. Below you will find the steps to replicate this card.

    • Step 1 – Trim White Cardstock to 8 1/2″ x 5 1/2″, score at 4 1/4″ and fold for a vertical side fold card. (A2)
    • Step 2 – Trim White Cardstock to 4 1/4″ x 5 1/2″. Apply Distress Oxide Inks to a craft mat. I used Faded Jeans, Broken China and Peacock Feathers. Spray with water to activate the inks. Dip the cardstock into the ink, heat set, then repeat this step until you have reached the desired effect. Let dry before going to the next step
    • Step 3 – Diecut Crafters Essentials 2 (the Border Die) using the Distress Oxide Background. Turn the patterned and diecut it again. Adhere the Distress Oxide Background to Black Cardstock trimmed to 3 7/8″ x 5 1/8″ using Collage Medium. Adhere the whole panel to front of card using Scor Tape.
    • Step 4 – Diecut Crafters Essentials 2 for the following 1) Large Stitched Fishtail Banner using Black Cardstock 2) Long Stitched Fishtail Banner using Diagonal Patterned Paper 3) Starburst using Distress Oxide (or patterned paper). Adhere all the diecuts to the card using Scor Tape.
    • Step 5 – Stamp sentiment using Versafine Onyx Black Ink
    • Step 6 – For accents add a button with yarn to the center of starburst.

    This card can be used for any occasion by changing the colors and/or sentiment. Below is a link to all products used. To receive 10% off your order use code: TINA10 at checkout. Thank you for stopping by and wishing you a wonderful day.

    Kat Scrappiness Products Used:

    https://linkdeli.com/widget.js?1531470176574

  • Two Cards One Diecut

    Two Cards One Diecut

    Hi Everyone, it’s Tina here. Today I have two cards to share with you using one background die. The new Wood Grain Framed Diamond Wire. This is a fabulous way to get more from your die. I also used the Happy Father’s Day Die for the word Happy. Below are the steps to replicate these cards.

    • Step 1 – Trim White Cardstock to 8 1/2″ x 5 1/2″, score at 4 1/4″ and fold in half for a vertical side fold card. (A2) Do this two times.
    • Step 2 – Trim White Cardstock to 4 1/4″ x 5 1/2″. Using an ink applicator apply Distress Oxide Ink. I started in the middle using Faded Jeans, then applied Broken China on both sides, then Cracked Pistachio on both sides. See below for visual.

    • Step 3 – Diecut Wood Grain Framed Diamond Wire using the Distress Oxide Background. Carefully remove the diecut to keep it in one piece. Add a masking sheet on the top side so that all the pieces remain intact. Card #1 add collage medium to all the small pieces and adhere it to a cardstock trimmed to 4 1/4″ x 5 1/2″. Carefully lift the sheet with the masking sheet. All the small pieces have now transferred to the cardstock. Diecut Double Stitched Rectangles to the cardstock with the small pieces and adhere it to the card front using foam tape. Card #2 add collage medium to the remaining diecut and adhere to card front. See photo below for visual.


    • Step 4 – Card #1 Stamp Everyday Brush Strokes using Versamark Ink on Black Cardstock. Sprinkle White Embossing Powder, heat set it with a Heat Tool. Diecut Stitched Fishtail Banner to the embossed sentiment. Trim left side of the sentiment and adhere to card using Clear Double Sided Adhesive Tape. Diecut Happy Father’s Day (Only Happy – you need to trim a little from the last P and Y) using Black Cardstock. Add Versamark Ink directly to the diecut. Sprinkle Black Embossing Powder, heat set it with a heat tool. Repeat this step 3 times. Adhere to card using Collage Medium. Card #2 Stamp Everyday Brush Strokes using Versamark Ink on White Cardstock. Sprinkle Mermaid Tail Embossing Powder, heat set it with a Heat Tool. Diecut Stitched Fishtail Banner to the embossed sentiment. Adhere to card using Clear Double Sided Adhesive Tape. Diecut Happy Father’s Day (Only Happy – you need to trim a little from the last P and Y) using White Cardstock. Add Versamark Ink directly to the diecut. Sprinkle Mermaid Tail Embossing Powder, heat set it with a heat tool. Repeat this step 3 times. Adhere to card using Collage Medium.
    • Step 5 – Card #1 Add some Pastel Pop Sequins Mix using Collage Medium.
    • Step 6 – Card #2 (to create faux flowers) On a scrap piece of White Cardstock add Distress Oxide Ink Broken China using an ink applicator. Diecut Stitched Scallop Circles (the smallest one 3 times). On a scrap piece of White Cardstock add Distress Oxide Ink Cracked Pistachio using an ink applicator. Diecut Crafters Essentials #1 (the stitched line 3 times). Adhere the diecut Stitched Lines to the card using Collage Medium. Adhere the diecut Stitched Scallop using foam tape on top of the Stitched Lines. Optional add an accent in the center of the Stitched Scallop (example: buttons, sequins or a small flower)


    I hope you enjoyed today’s cards and the fabulous ways to get more out of your dies. These cards can be used for any occasion by changing the colors, embellishments and/or sentiment. Below is a link for all products used. To receive 10% off use code: TINA10 at checkout. Thank you for stopping by and have a wonderful day.

    Kat Scrappiness Products Used:

    https://linkdeli.com/widget.js?1531470176574

  • Stitched Multi Window Frame Card

    Stitched Multi Window Frame Card

    Hi Everyone, it’s Tina here today. Kat Scrappiness has a fabulous Die Set this month called the Crafters Essentials 1. This is packed with 13 dies that are a must have to your collection which can be mixed and matched to create unique cards. For my card I used the Stitched Multi Frame Window and Stitched Fishtail Banner die from this set along with my favorite Double Stitched Rectangles Die. It is topped off with a sentiment from the Everyday Brush Strokes Stamp set. Below are the steps to replicate this card.

    • Step 1 – Trim White Cardstock to 8 1/2” x 5 1/2”, score at 4 1/4”, fold in half for a horizontal side fold card (A2)
    • Step 2 – Diecut Double Stitched Rectangles Die using Patterned Paper. Adhere to front of card using Clear Double Sided Adhesive Tape.
    • Step 3 – Diecut Multi Stitched Frame using White Cardstock. Diecut or Trim Patterned Paper to fit underneath the Multi Stitched  Frame. Place the Multi Stitched Frame in the position you want and adhere the rectangle cutouts using Clear Double Sided Adhesive Tape. Add thin strips of foam tape to the backside of the Multi Stitched Frame and adhere to card.
    • Step 4 – Diecut Stitched Fishtail Banner using Patterned Paper. Add a sentiment using Versafine Onyx Black Ink. Adhere to card using Clear Double Sided Adhesive Tape.
    • Step 5 – Add drops of collage medium adhere Sequins.

    I hope you enjoyed today’s card. This card can be used for any occasion by changing the patterned paper, color and/or sentiment.

    To receive 10% off your order at Kat Scrappiness use code: TINA10 at checkout. Below is a link to all products used. Thank you for stopping by and have a wonderful day!

    Kat Scrappiness Products Used:


  • Stitched Flower Card

    Stitched Flower Card

    Hi Everyone, it’s Tina here today. I have a super fun and fast card to share with you using the new Stitched Scallop Circles Die, Stitched Scallop Rectangles Die along with the Double Stitched Rectangles Die. Below you will find the link to the products used along with the steps to replicate this card.

    • Step 1 – Trim White Cardstock to 8 1/2″ x 5 1/2″, score at 4 1/4″ fold in half for a vertical side fold card.
    • Step 2 – Diecut Stitched Scallop Rectangles using Black Cardstock. Adhere to card using double sided adhesive tape.
    • Step 3 – Diecut Double Stitched Rectangles using Patterned Paper (you want this to be mostly a solid color) Set it aside for now.
    • Step 4 – Diecut Double Stitched Rectangles using a Striped Patterned Paper.
    • Step 5 – Diecut Stitched Scallop Circles 6 times using different Patterned Paper. About half way through the Striped Patterned Paper adhere the Diecut Stitched Scallop Circles using Collage Medium in the center. Once you have all your Stitched Scallop Circles adhered cut out the top half of the Stripe Patterned Paper.
    • Step 6 – Place the Striped Patterned Paper on top of the Solid Patterned Paper and mark the area for the sentiment placement. Stamp Sentiment. For my Hello sentiment I used Versamark Ink and sprinkled Sparkling Embossing Powder then heat set with a heat tool. For my friend I used Versafine Onyx Black Ink.
    • Step 7 – Adhere Solid Background to the front of the card using Double Sided Adhesive Tape. Adhere Stripe Patterned Paper to the front of the card using Foam Tape.
    • Step 8 – Optional – Add Trim Mix II Sequins Mix to the upper part of the card.

    I hope you enjoyed today’s card. This card can be used for any occasion by changing the Color and/or sentiment. Below are links to all the products used. Thanks for stopping by and have a wonderful day!

    Kat Scrappiness Products Used:

    https://linkdeli.com/widget.js?1528877046279

  • Stitched Scallop Picture Frame Shaker Card

    Stitched Scallop Picture Frame Shaker Card

    1. Hi Everyone, it’s Tina here today. I have a fun shaker card video to share with you using the new Stitched Scallop Rectangles Die along with the Double Stitched Rectangles Die and Never Ending Rectangles Die. The shaker card is using the Spring Leaves Sequins Mix. Below is a Process Video to show you how.

    Watch video here or open in YouTube

    I hope you enjoyed today’s Process Video Showcasing the new Stitched Scallop Rectangles Die and the Spring Leaves Sequins Mix. This card can be used for any occasion by changing the sentiment and patterned paper. Below are links to the products used.  To receive 10% off your order at Kat Scrappiness use code: TINA10 at checkout.  Thanks for stopping by and have a wonderful day.

    Kat Scrappiness Products Used:

    https://linkdeli.com/widget.js?1526884908235