Follow:
    Design Team Projects

    Simple Bow Card

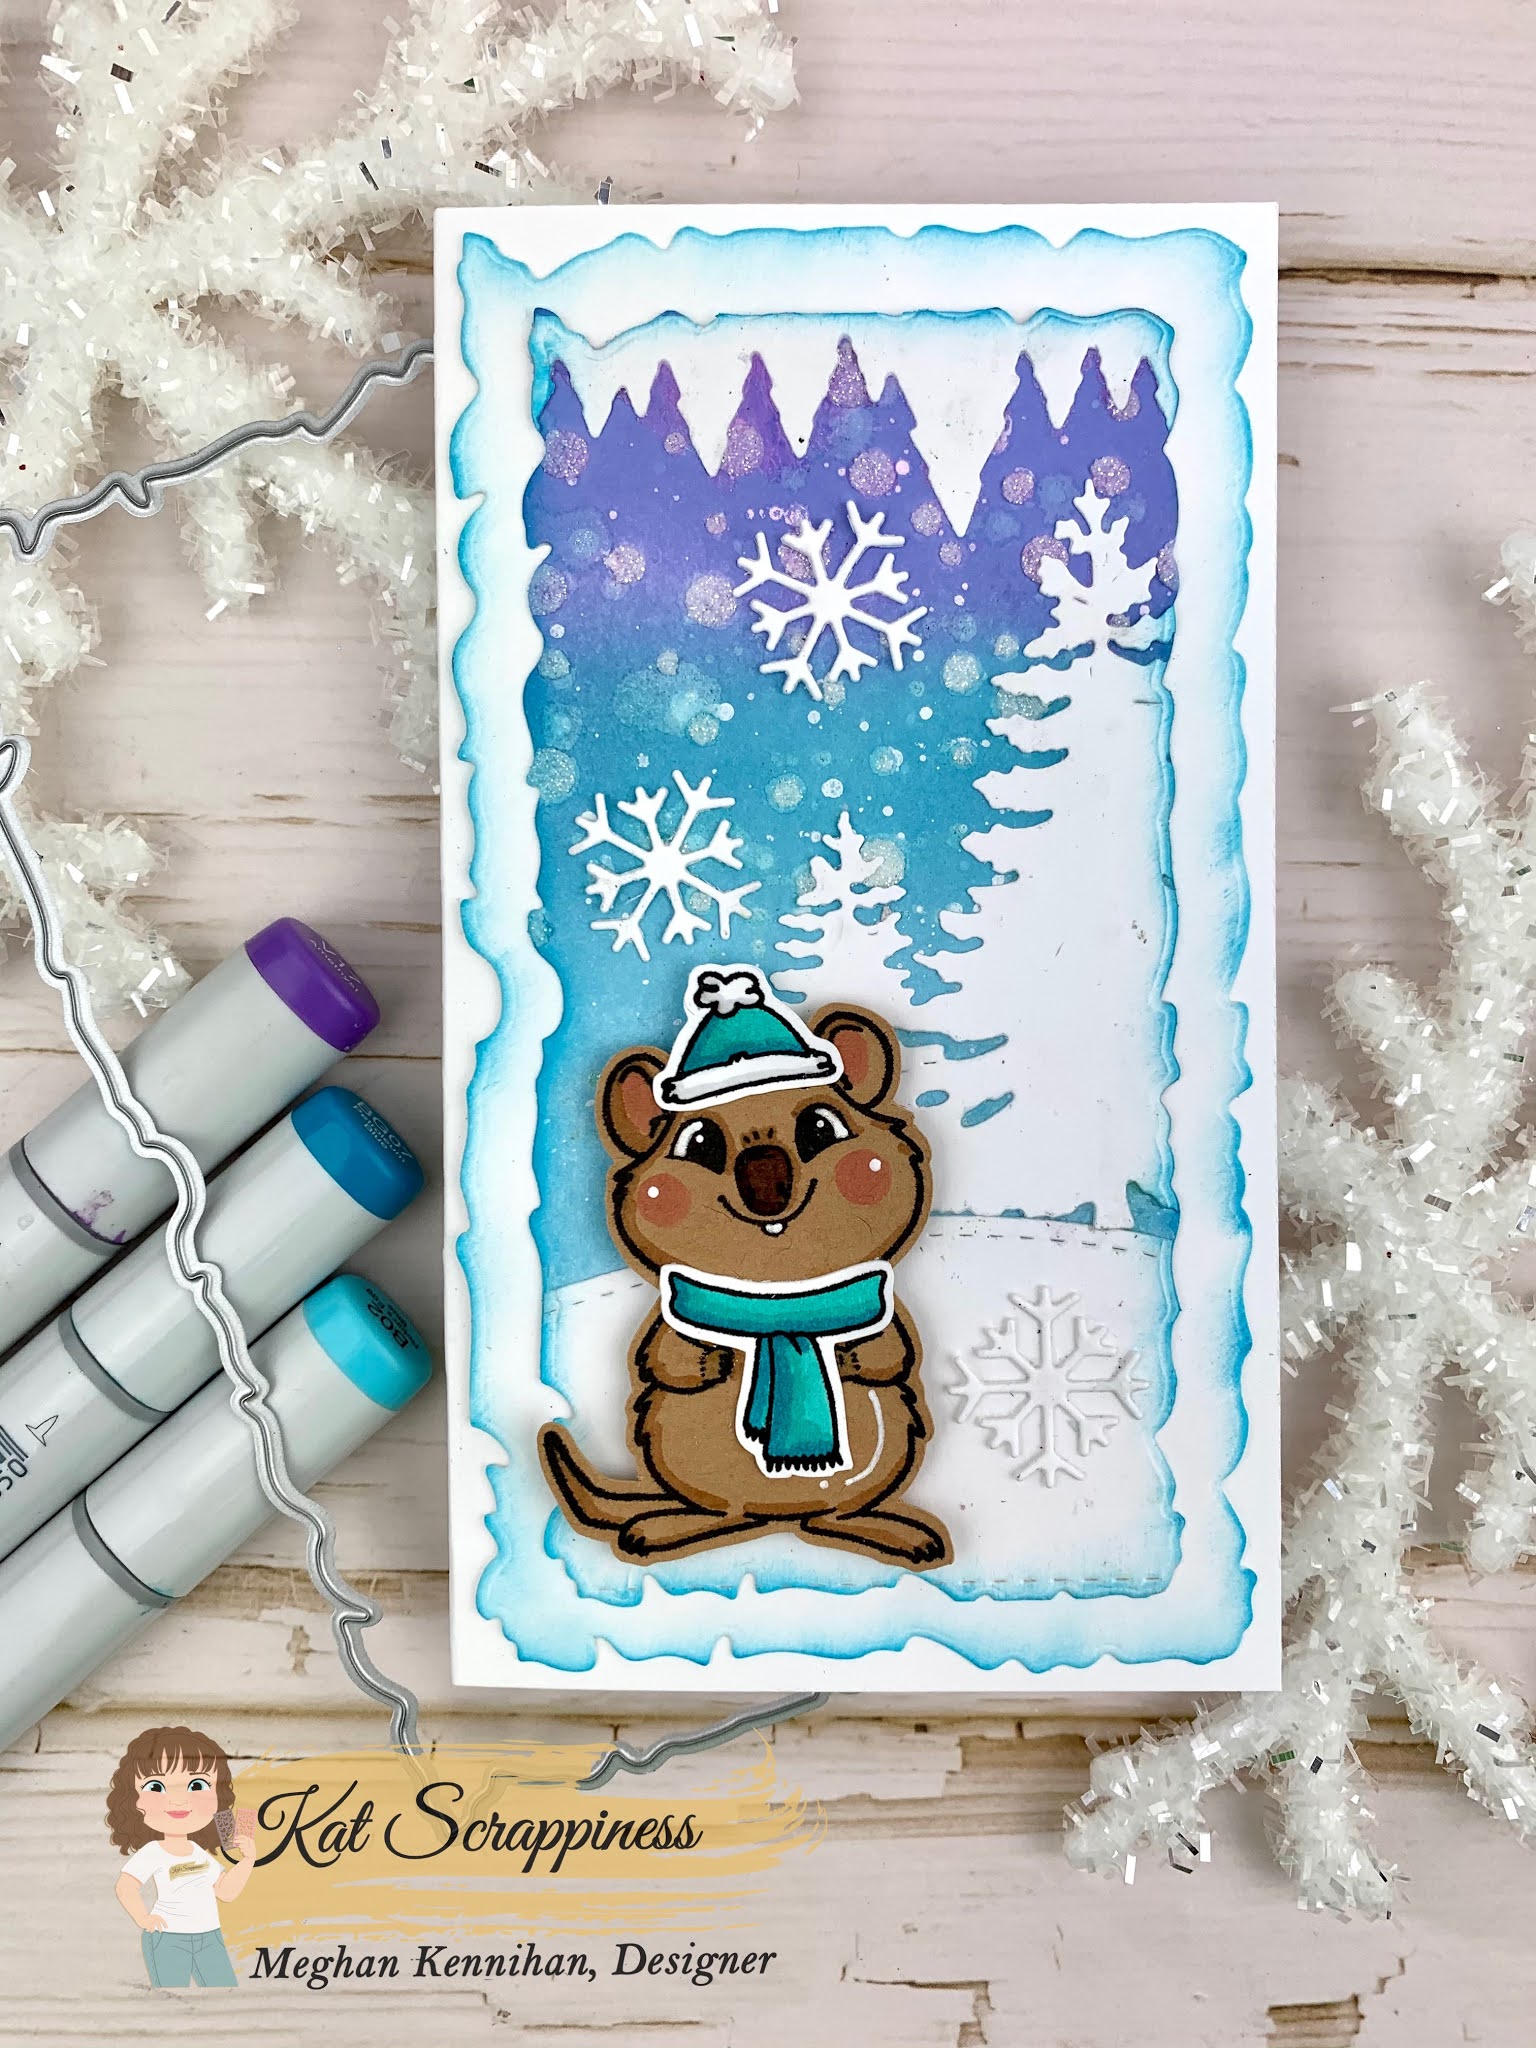
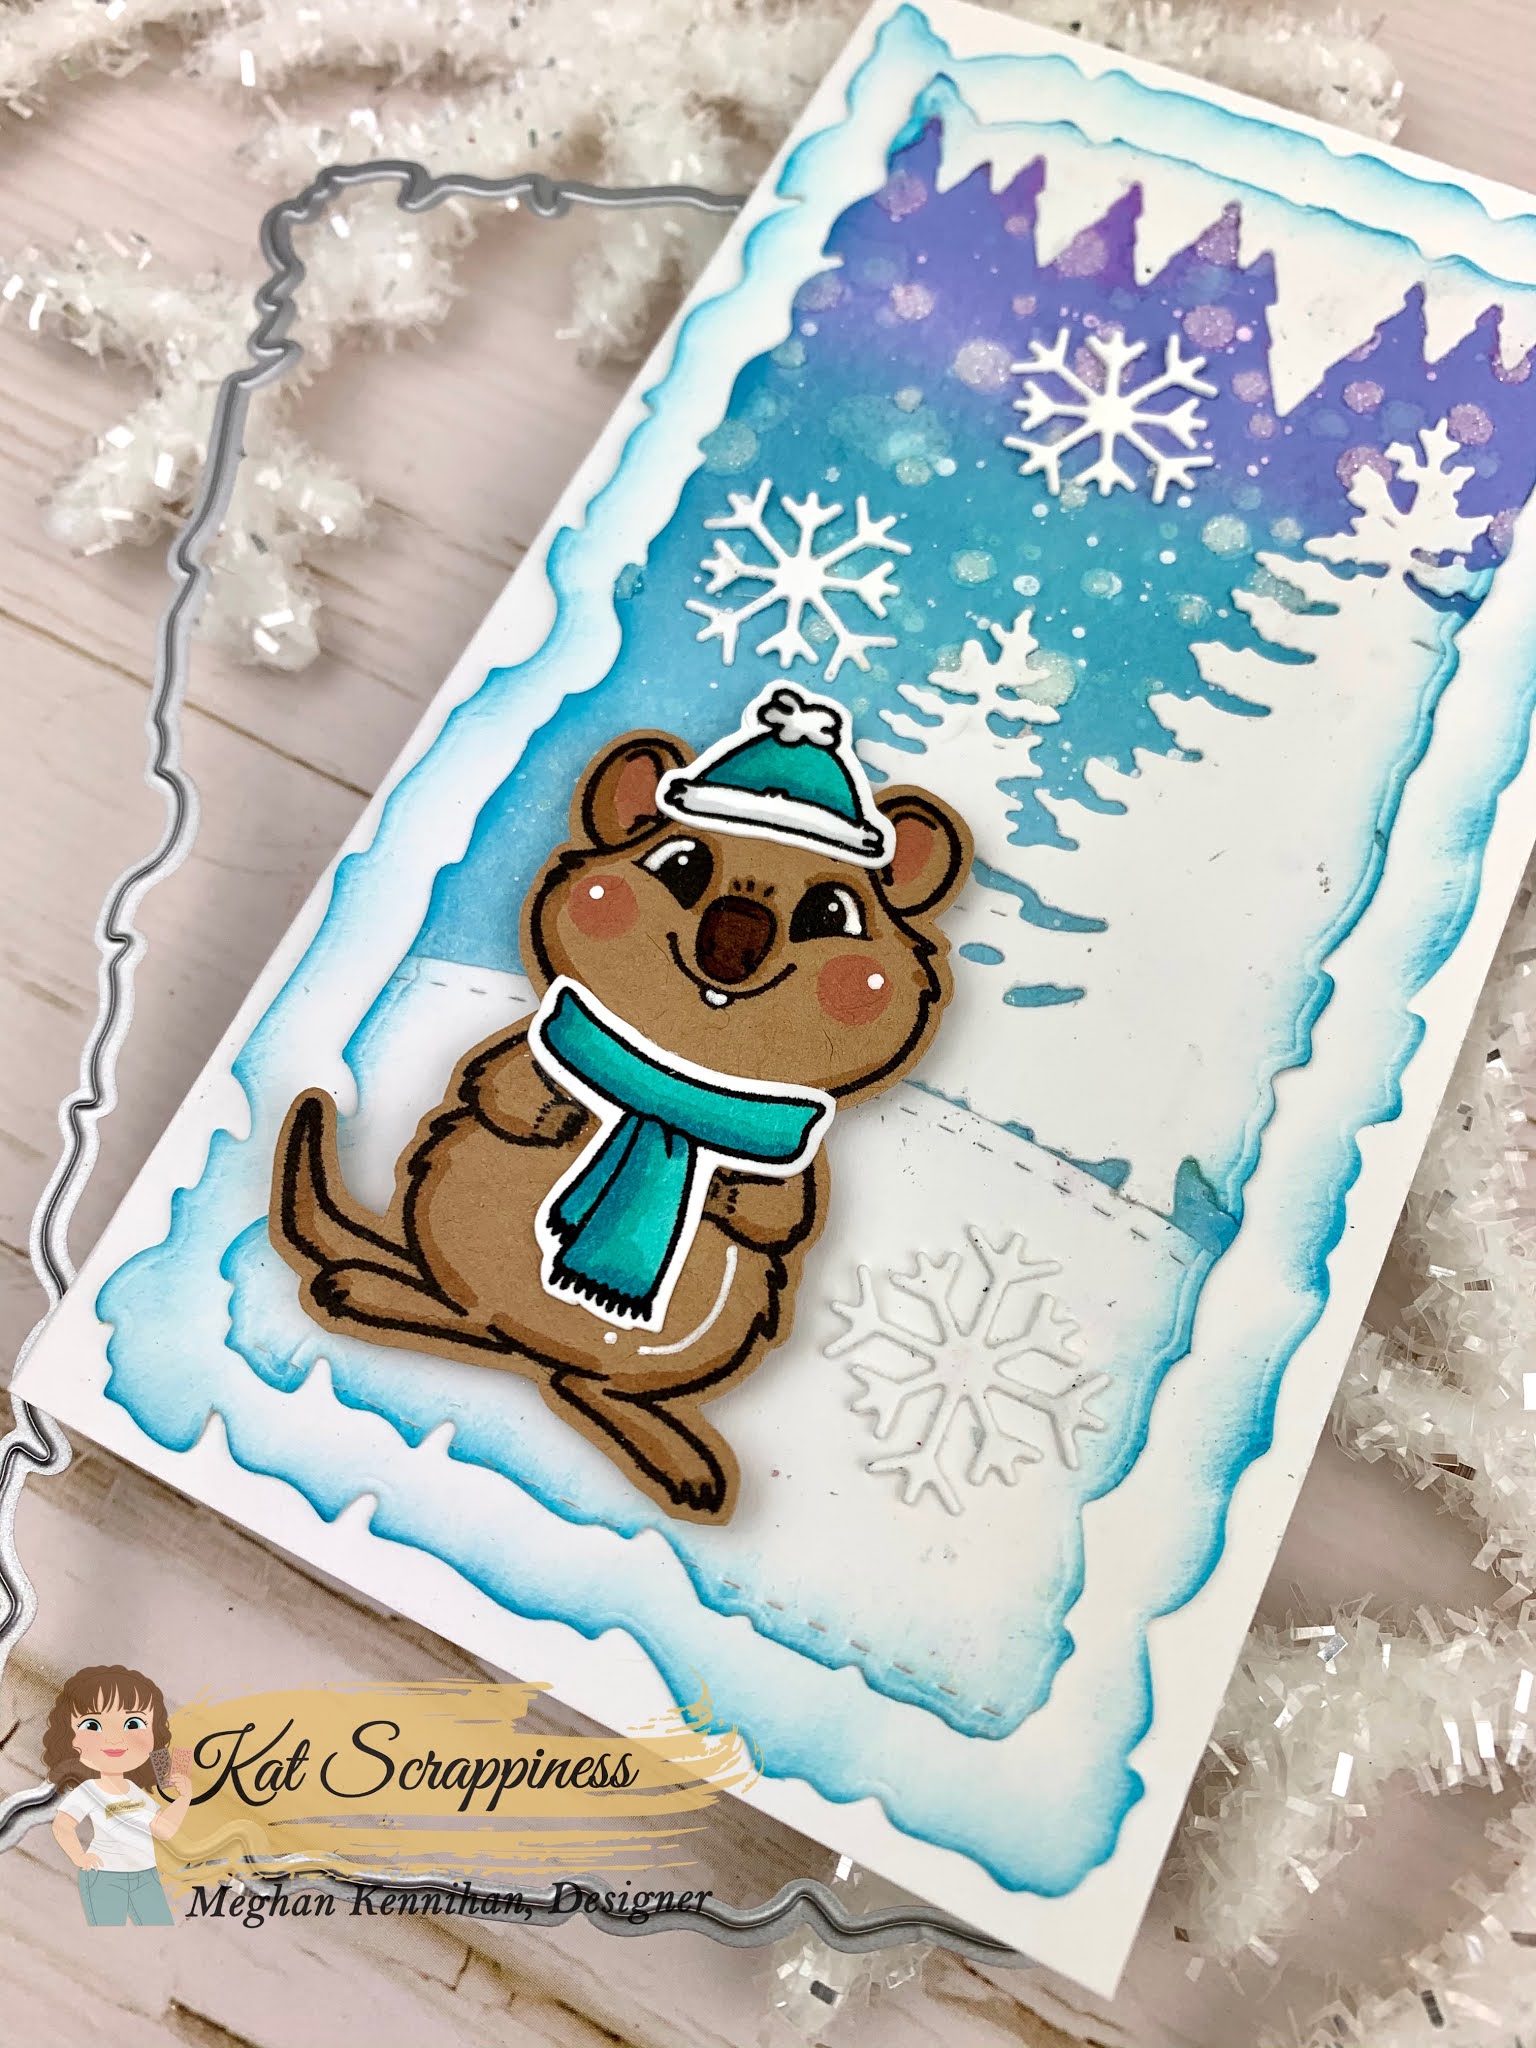
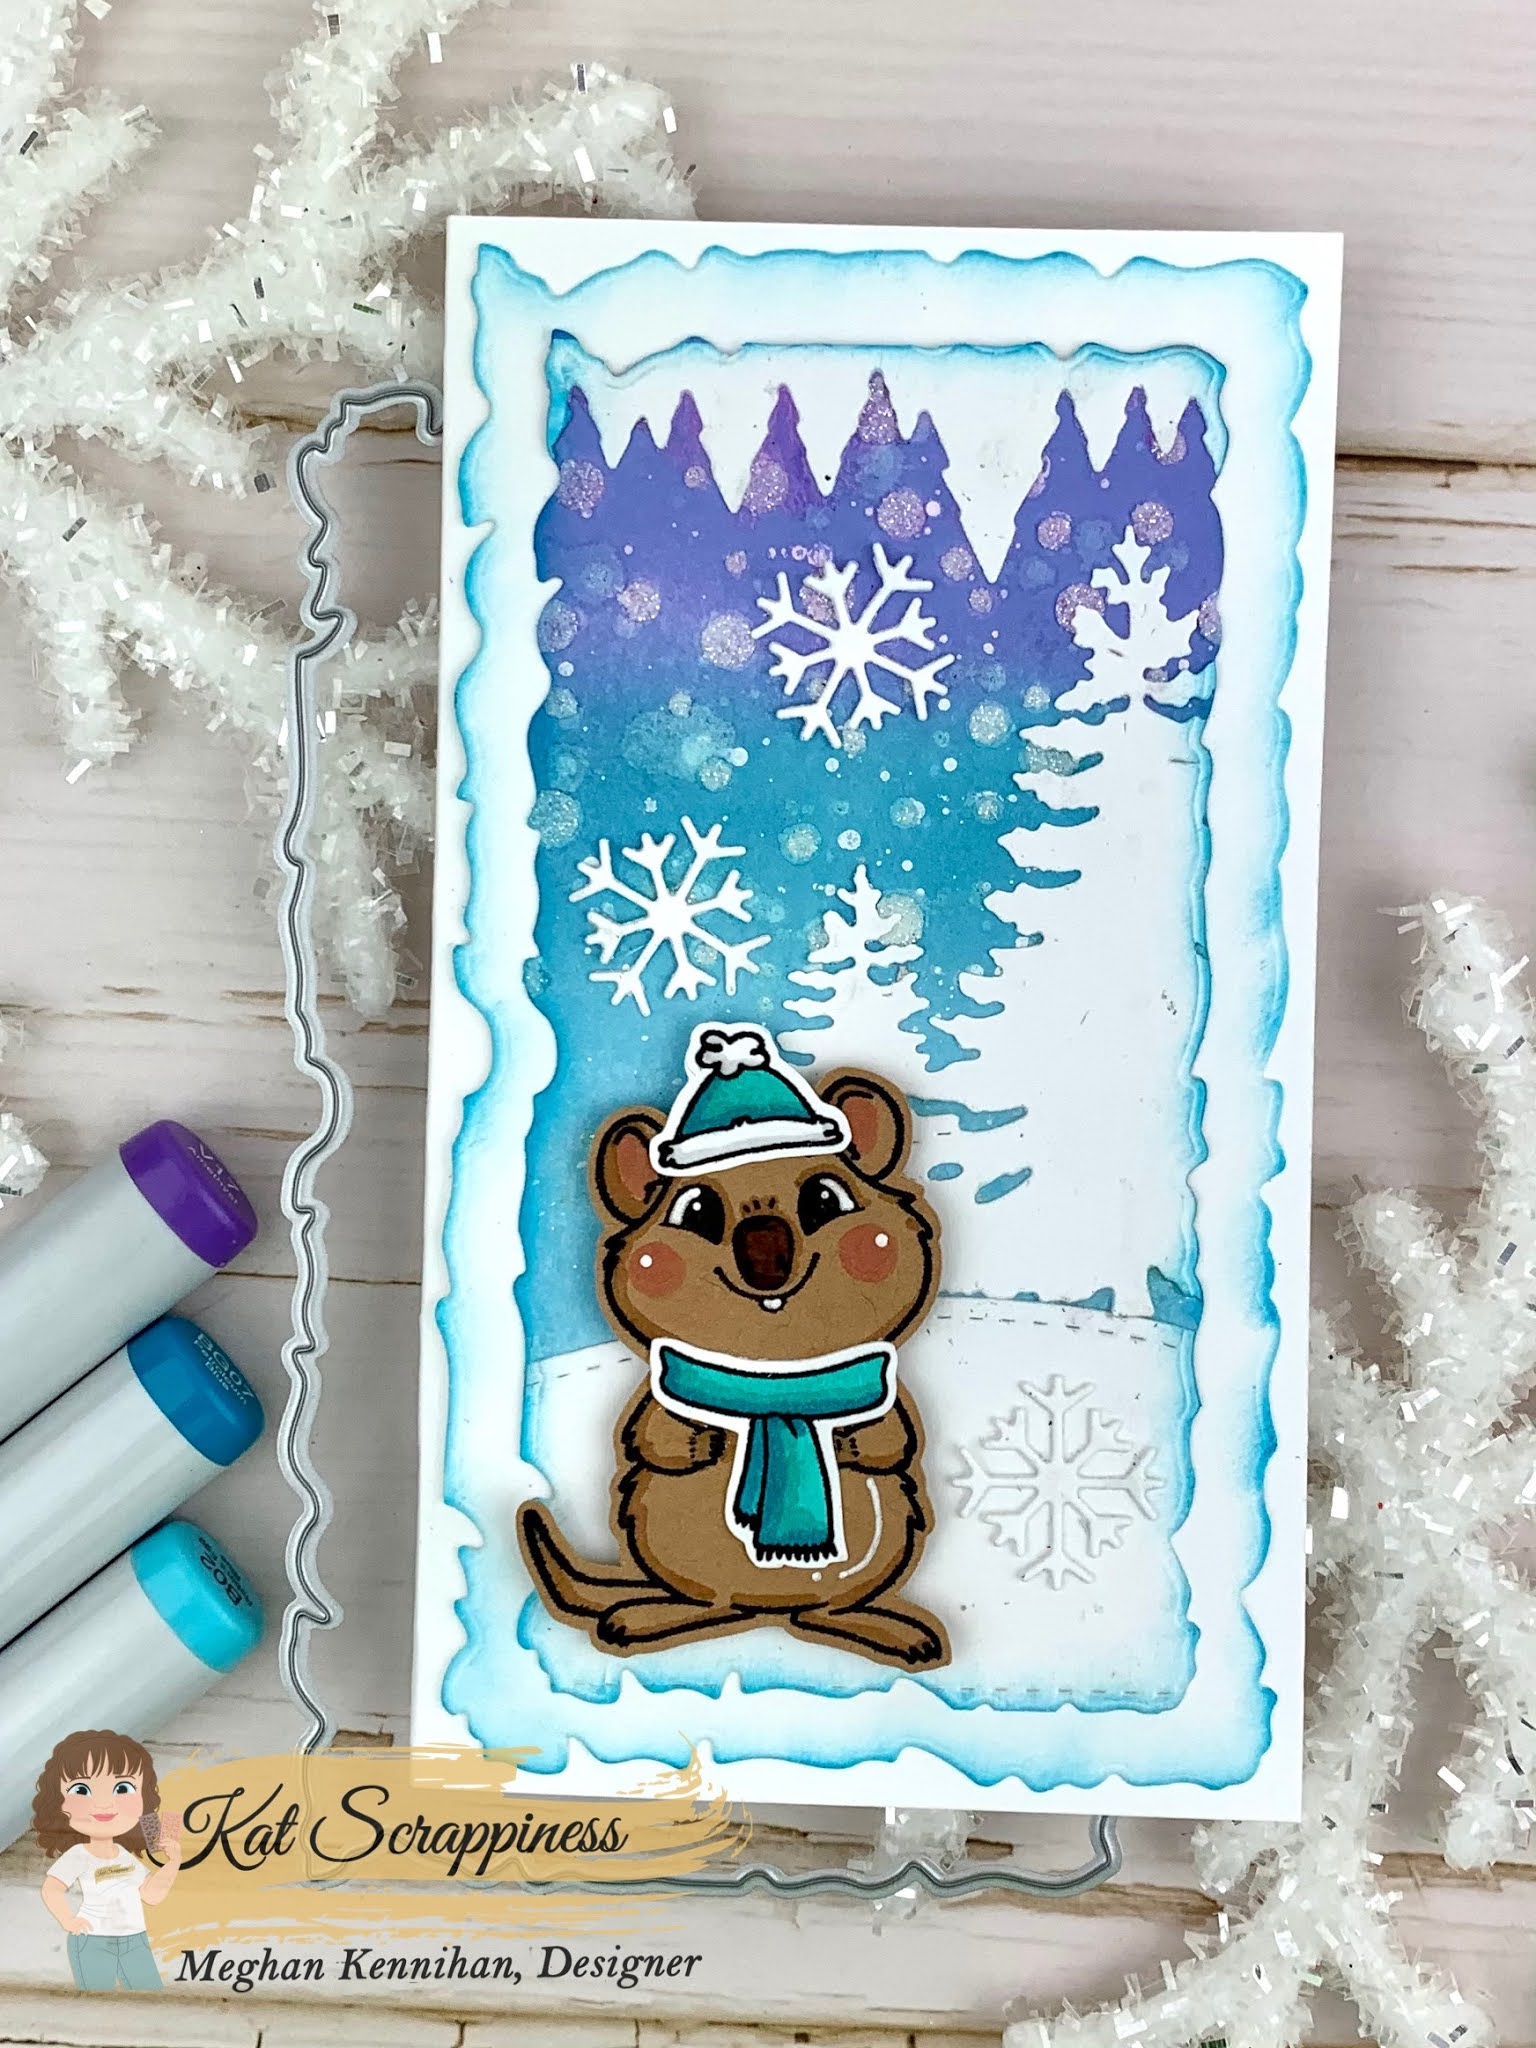
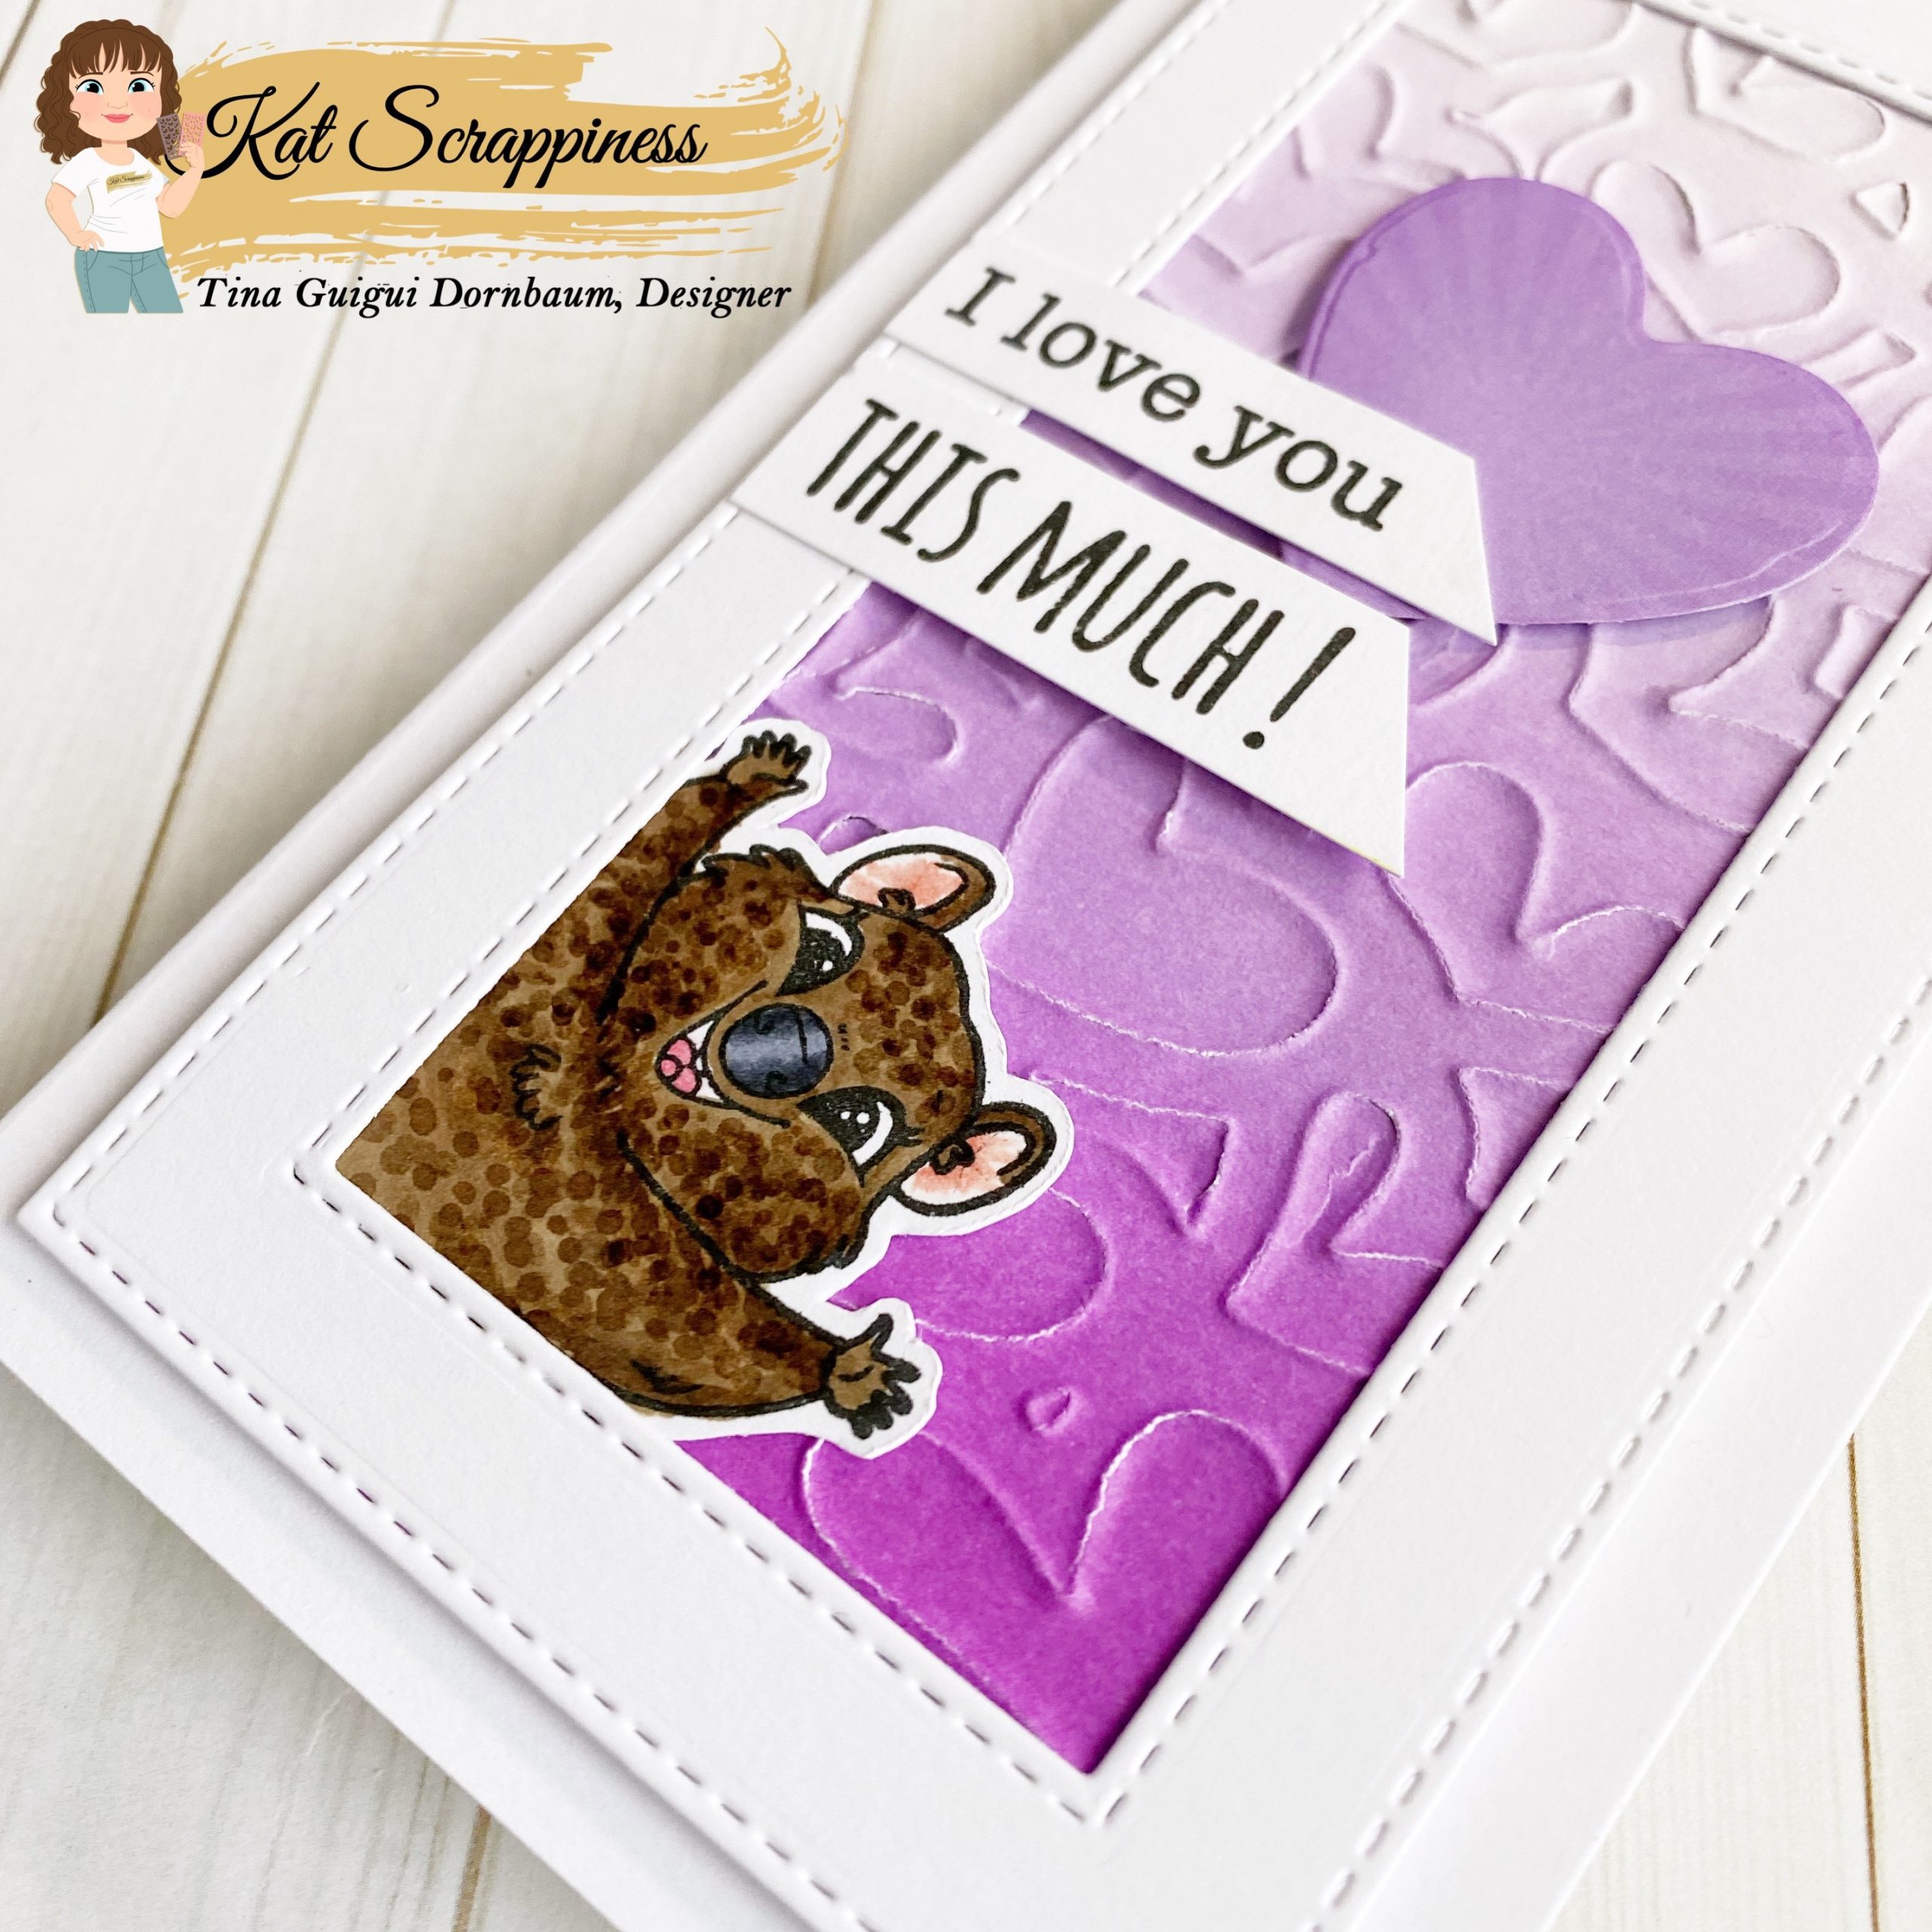
    Hello Friends, Waleska  here happy to be with you this Saturday, today I will be sharing with you an easy way to use the Wrapped Up with a Bow Slimline Dies in a different way.  I hope you like it!


    CARD DETAILS:

    To create this card I die cut the Wrapped Up with a Bow on white cardstock, I cut the sides of the bow and also the up part, you can use a pencil to trace where you want to cut.  I also cut the middle part of the bow from a gold glitter cardstock.

    Then I used oxide inks to color the bows, I did a heavy hand ink blending on the bottom of the bows and I left the up part almost white, I like that contrast.  I assemble the bows and adhered all their parts.  I glue them in the center of the white card base and added the sentiment.  I finally adhered my front piece to a grey card base.

    There are many ways to use your dies, not only for what they where made… think out side the box and use your products in different ways!   Thank you so much for stopping by have a wonderful weekend!


    Waleska

    Design Team Projects

    Quokka in a Winter Wonderland

    Hi Crafty Friends,
    I am loving the NEW Mini Slimline dies from Kat Scrappiness. We are in the middle of WINTER in Chicago with snow and temps below 20 degrees so I created a winter scene using the NEW Distressed Edge Mini Slimline Die, Crafter’s Essentials Winter Dies, Icicle Dies, and Snowflake Kisses Die. The darling little Quokka is all bundled up in his hat and scarf so he is ready for whatever Chicago brings, even another “Polar Vortex”

    Make Crafty Friends Q & A:

    Q: What is the coldest it has been where you live?
    A: Me? It’s be -30 here before

    Please use the links below to grab your goodies, no extra cost to you and I appreciate it!

    Don’t forget to subscribe, follow, and comment on my blog for your chance to win my January Prize and for more giveaways and inspiration follow me on Instagram @MadeByMeghanK

    Supplies:
    Kat Scrappiness Mini Slimline Distressed Edge Die
    Kat Scrappiness Crafter’s Essentials Winter Dies
    Kat Scrappiness Pine Tree/Icicle Duo Die
    Kat Scrappiness Snowflake Kisses Die
    Kat Scrappiness Everyday Quokka Stamp Set

    Newton’s Nook Snow Stencil
    Glitter Paste

    Design Team Projects, New Releases

    You’ve Got Mail

    You’ve Got Mail!  Many of you probably remember being in school and for Valentine’s Day everyone made a shoebox with a slit on top to collect Valentine’s cards, treats and messages – just like a mailbox.  It was so exciting to open the box to find all those messages!  We all still enjoy getting notes and cards — real ones — in the mailbox.

    For my card, I used one of the newest dies, Mini Slimline Distressed Edge, and created a frame with two of the dies.  I made the shaker with a sheet of slimline acetate and several fun sprinkles: This Kiss, Happy Mail and Love Hearts.   I used a smaller sized Mini Slimline Distressed Edge die for the center (which I wanted to look like a scroll) and added one of the adorable Quokka images from the Valentine Quokka set along with two of the sentiments in the set.


    https://linkdeli.com/widget.js?id=f5e8378456858c916708

    Design Team Projects

    “MWAH!” | Valentine Quokkas Mini Slimline Card

    Have you checked out the latest release from Kat Scrappiness? It features an adorable Quokka Valentine stamp set, 6 mini slimline dies, and several Valentine sprinkle collections!


    My card today features the new mini slimline die, “Wood Grain Framed Diamond Wire,” and not one, but TWO quokkas, through the magic of “mirror image stamping.”


    You can find numerous tutorials online on how to do this “mirror image stamping” technique. You will need a stamping platform and  a mirror image rubber or photopolymer stamp block.

    I stamped the first quokka (the one on the right side of my finished card) the usual way on kraft card stock using my Misti stamping platform and fussy cut it out.  


    Then I placed the  mirror image rubber stamp block in my Misti and inked up the quokka again and stamped down on the rubber block several times to ensure there’s enough ink on the block to transfer to card stock in the next step.


    Then I quickly placed the inked rubber block on the inside on my Misti and stamped it down on a second piece of kraft card stock. Viola! I now had a revered image that I could fussy cut out and adhere facing the first quokka on my card.


    I added pink checks with my Copic markers, a bow tie and flowers that came with the “Valentine Quokka” stamp set, and white dots on their cheeks using a gel pen.

    The quokka are “kissing” through a fence I created with the new Kat Scrappiness “Mini Slimline Wood Grain Diamond Wire Die” and some silver card stock. I backed the fence with a sheet of Kat’s A2 size acetate and placed lots of  “Love Heart Sprinkles” inside. Finally, I stamped “Mwah!” (included in the stamp set) and  used one of the “Stitched Fishtail Banner Sentiment Dies” for the Valentine sentiment.


    Thank you so much for stopping by! Don’t forget to check out what’s NEW in Kat’s Shop, and follow my blog and Instagram for more “Kat Scrappiness Amazingness”!


    Stay Safe . . .

    Priscilla 💋❤💘

    The supplies I used are listed and linked below.

    SUPPLIES

    Design Team Projects

    I Love You This Much Mini Slimline Card

    Hi everyone, it’s Tina here. Today’s card is using the new Double Stitched Mini Slimline dies along with the Quokka’N Up Stamp Set. I also used the Heart Panel to emboss on a Ombré Inked Background. Below you will find the steps to create your own card.

    Step 1 – Trim White Cardstock to 7” x 6”, score at 3 1/2” and fold in half for a vertical side fold card. (Mini Slimline)

    Step 2 – Trim White Cardstock to 3 1/2” x 6”. Apply various shades of ink in the same color family using a Blending Brush starting from top lightest color working down to the darkest color. Emboss Heart Panel using your favourite die cutting machine. Be sure to check the sandwich needed to emboss using a die. I embossed the wrong side but decided to keep it as I liked the effect it created. Adhere to card front using Nuvo Deluxe Adhesive.

    Step 3 – Diecut Double Stitched Mini Slimline using White Cardstock (2 dies together) to create a frame. Adhere to card using Nuvo Deluxe Adhesive.

    Step 4 – Stamp Quokka’N Up (image) using Gina K Amalgam Ink on White Cardstock. Color in with alcohol markers of your choice. I used Spectrum Noir Illustrator Markers. Diecut with matching die and adhere to card using Nuvo Deluxe Adhesive.

    Step 5 – Stamp Quokka’N Up (sentiments) using Versafine Onyx Black Ink on White Cardstock. Trim out the sentiments and adhere to card using Nuvo Deluxe Adhesive.

    This card can be used for several occasions by changing the colors, sentiments and image. Below is a link to all the products used. Thank you for stopping by and Happy Crafting!

    Products Used:
    https://linkdeli.com/widget.js?id=f5e8378456858c916708

    Design Team Projects

    Mini Slimline Cards

    Hi everyone, did everyone get a chance to see the new Kat Scrappiness release?  I’m loving the mini slimline size cards.  I can’t stop making them!

    Today I have several cards using the mini slimline dies, the Valentine Quokka stamp set, and one of the new sprinkles.

    My mini slimline card today features the Stitched Scalloped mini slimline dies (my favorite!)  The sentiments are from the Valentine Quokka stamp set.  I also used the Talk About it sprinkles, 3mm pink heart droplets, and the translucent pink heart droplets.

    For my second card, I used the double stitched mini slimline dies with a piece of patterned paper.  I added a double stitched heart and a couple of embossed edged hearts with foam adhesive to give a little more dimension to the card.


    These two cards were featured on the new release blog.  The first one uses the a couple of the wonky stitched mini slimline dies and a quokka from the Valentine Quokka stamp set.  I also used red and pink heart droplets.

    The second card uses the embossed edge mini slimline dies and the Valentine Quokka stamp set.  I also used the Heart Panel die that was released in 2020.

    I’d love to know if you have made any mini slimline cards and what you think about this card size.  Thanks for stopping by!

    Design Team Projects

    Valentine Love

    • Happy Saturday to all my crafty friends. It is time to start making Valentine cards using stamps and dies from the large Kat Scrappiness line of Valentine stamps and dies.
    • I started the card by cutting an A-2 red card base. Next I cut a layer one in white and splattered black craft paint on it. I then cut a thin black frame to add to the layers.

    Using the KS I Love You Shadow die I cut the l and the You out of pink card stock and the love out of red card stock. Then I die cut the shadow in gray for the pink words and black for the red word.

    Next I stamped the kaolas and the foliage from the Koala-ty Time Stamp Set. These images I colored and placed onto the card front. I used foam tape for the koalas. Lastly I added the sentiment tucked in among the stamped images. For my final touch I added a few red Heart sprinkles to the card front.

    Supplies:

    KS red Heart sprinkles

    KS I Love You Shadow die

    KS Koala-ty Time Stamp set