
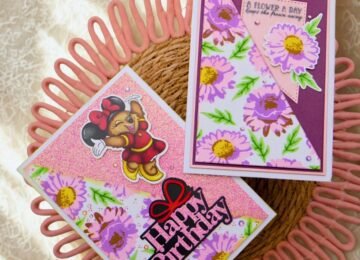
Hello Friends!! Nora here on the blog today with a stamped card using some of the products from the Kat Scrappiness Shop’s Summer Release. I wanted to focus on the new Kat Scrappiness Oopsie Daisy 4 by 6 Layered Stamps and the Kat Scrappiness Oopsie Daisy Coordinating Dies.

I do not have a green thumb so I do not know much about flowers. I always think of daisies being white with a yellow center. Boy was I wrong!!! After doing some research, I discovered that daisies come in purples, pinks, yellows, oranges and every shade in between. For my card, I decided to do something I rarely do-stamp my layers using only one color ink. I had do do multiple layers of that ink to make my flower layers pop but it is a great way to stamp if you don’t have a lot of inks that are supposed to go together.
Here is how I created this card:
- Select an A2 size, white card base. Mine is top folding.
- Die cut the Kat Scrappiness A2 Quilted Backdrop Die out of white cardstock. Adhere this panel to the card base.
- Using the second largest rectangle in the set of Kat Scrappiness A2 Reverse Scallops Dies to die cut a frame out of white cardstock. Adhere to the front of the card using foam adhesive.
- Stamp and die cut the flowers in pink using the Oopsie Daisy Layering Stamps and the coordinating Oopsie Daisy Dies. Then use Copic Markers in the RV family to make dots for the flower centers. You don’t have to do this but I liked how this gave the flowers a little bit of “texture.”
- From the same stamp set, stamp the leaves in green and die cut them with the coordinating dies.
- Adhere the flowers and leaves onto the card front. On my card, I used foam adhesive to pop up one of the flowers.
- Out of black cardstock, die cut the sentiment three times using the Kat Scrappiness Love You Word w/Shadow Die . Adhere the three layers together to give it some dimension and place it on the front of the card. Use some Ranger Glossy Accents over the sentiment to give it some shine.
- The last step is to adhere some Kat Scrappiness Brilliant Lilac Pearl Mix around the sentiment and the card is complete.

I want to thank you for stopping by today. Be sure to visit the Kat Scrappiness Blog often to see what the fabulous projects from the other Design Team members.
There is also a sale going on this weekend. Treat yourself to some fun supplies for the holiday!!

Below is a list of supplies I used on my card. Affiliate links used at no extra cost to you.
- Kat Scrappiness Oopsie Daisy 4 by 6 Layered Stamps
- Kat Scrappiness Oopsie Daisy Coordinating Dies
- Kat Scrappiness A2 Quilted Backdrop Die
- Kat Scrappiness A2 Reverse Scallops Dies
- Kat Scrappiness Brilliant Lilac Pearl Mix
- Neenah Solar White Cardstock
- Bearly Art Precision Craft Glue
- Scrapbook Adhesives Crafty Foam Tape Roll
- Ranger Glossy Accents
No Comments