Tag: versafine

  • Rainbow Clouds Shaker Card With Process Video

    Rainbow Clouds Shaker Card With Process Video

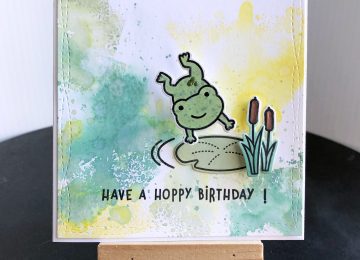
    Hi Everyone, it’s Tina here. There are some new sprinkles in the shop and today’s video is featuring the Kawaii Cloud Sprinkles along with some of my favorite Kat Scrappiness product.

    This card is so much fun and can be used for several occasions by changing the colors and sentiment. Below is a link to all the products used. Right now Kat Scrappiness have a Christmas in July sale. Use code: JULYXMAS at checkout to receive 20% all Christmas/Hannukah and holiday themed products. Thank you for stopping by and have a wonderful day.

    Products Used:

    https://linkdeli.com/widget.js?1559654439292

  • So Hoppy For You Card

    So Hoppy For You Card

    HI Everyone, it’s Tina here. Today I have a sweet card to share with you using the new Hoppy For You Stamp set. I was totally thrilled when I received them as who can resist adorable Roo’s!!! Below you will find the steps to make your own card.

    Step 1 – Trim White Cardstock to 8 1/2″ x 5 1/2″, score at 4 1/4″ and fold in half for a horizontal side fold card. (A2)

    Step 2 – Apply Distress Oxide Broken China and Tumbled Glass to the card front using the Life Changing Brushes to create a Ombre Background. Starting at the top apply Broken China, then work in Tumbled Glass and fading out to nothing.

    Step 3 – Optional – Stamp Border to the edges on top and bottom. (A diagonal stripe) using Versafine Onyx Black Ink.

    Step 4 – Diecut Stitched Scallop Border using White Cardstock 2 times. Adhere to card on top and bottom using foam tape leaving 1/2″ to show the border stamp. If you skipped Step 3 then adhere completely to the top and bottom.

    Step 5 – Stamp Hoppy For You images using Gina K Amalgam Ink on White Cardstock. This is for alcohol coloring and won’t create smudges or smears. Color in the images using alcohol markers of your choice. I used Tri-Blend markers from Spectrum Noir. Fussy cut the images and adhere to card using foam tape and Nuvo Deluxe Adhesive. (Foam Tape only where the images will touch the card front.)

    Step 6 – Stamp Hoppy For You sentiment using Versafine Onyx Black Ink.

    I decided against any added interest and sparkle but you can certainly add some. This card can be used for any occasion by changing the colors and sentiment. Below is a link to all the products used. To receive 10% off your next order use code: TINA10 at checkout. Thank you for stopping by and have a wonderful day.

    Products Used:

    https://linkdeli.com/widget.js?1559654439292

  • I Appreciate You Card

    I Appreciate You Card

    Hi Everyone, it’s Tina here. Today I have a fun process video to share with you using the new Stitched Cloud Backdrop die along with a few other new products from Kat Scrappiness. So sit back and enjoy the video.

    Process Video

    I hope you enjoyed today’s video. This card can be used for any occasion by changing the colors, sentiment and image. A reminder to receive 10% off your next order use code: TINA10 at checkout. Below is a link to all the products used. Thank you for stopping by and have a wonderful day. See you again soon.

    Products Used:


    https://linkdeli.com/widget.js?1552642647875

  • Father’s Day Badge Card

    Father’s Day Badge Card

    Hi Everyone, it’s Tina here today. Father’s Day is right around the corner and Kat Scrappiness has you covered with the new Dad’s Tools Layered Stamp Set and the Stitched Fishtail Banner Dies. I used both to create my card.

    Below are the easy steps to replicate this card.

    • Step 1 – Trim Tan Cardstock to 8 1/2” x 5 1/2”, score at 4 1/4” fold in half for a vertical side fold card (A2)
    • Step 2 – Trim Navy Cardstock to 4” x 5 1/4”. Emboss using an embossing folder of your choice. Adhere to card using Clear Double Sided Adhesive Tape.
    • Step 3 – Diecut Circle using Tan Cardstock
    • Step 4 – Stamp Dad’s Tools sentiment to circle using Versafine Onyx Black Ink.
    • Step 5 – Diecut Stitched Fishtail Banner using Stripe Patterned Paper x 6. Adhere to the backside of circle.
    • Step 6 – Diecut Stitched Fishtail Banner using Tan Cardstock x 2. Adhere to the backside of circle at the bottom. Adhere completed Banner to the front base of card using Clear Double Sided Adhesive Tape.
    • Step 7 – Stamp Dad’s Tools Layered Stamp Set (hammer). Use lightest ink color for solid stamp and as you build it up go a shade darker. Cut out the hammer and adhere to card using Clear Double Sided Adhesive Tape.

    This Badge card can be used for any occasion by changing the image, colors and/or sentiment. To receive 10% off your order at Kat Scrappiness use code: TINA10 at checkout. Thanks for stopping by and have a wonderful day!

    Kat Scrappiness Products Used:


    https://linkdeli.com/widget.js?1526884908235

  • Have A Hoppy Birthday Card With Video

    Have A Hoppy Birthday Card With Video

    1. Hi Everyone, it’s Tina here today to share a process video for a Hoppy Birthday Card. This card features the new Distress Oxides colors, the Toadally Awesome Stamps and Dies by Lawn Fawn, Crystal Nuvo Drops & the Wonky Wavy Stitched Rectangle Dies which can all be found at Kat Scrappiness.

    Below is a full video tutorial showing you how to create this card. You can watch below or on YouTube.

    I hope you enjoyed today’s card. See below for a list of all Kat Scrappiness products used. Use code: TINA10 to get 10% off your order at checkout.

    Have a great day everyone!

    Kat Scrappiness Products Used:


    https://linkdeli.com/widget.js?1521790330479