Tag: under the sea coverplate die

  • Life’s A Beach, Enjoy the Waves!

    Life’s A Beach, Enjoy the Waves!

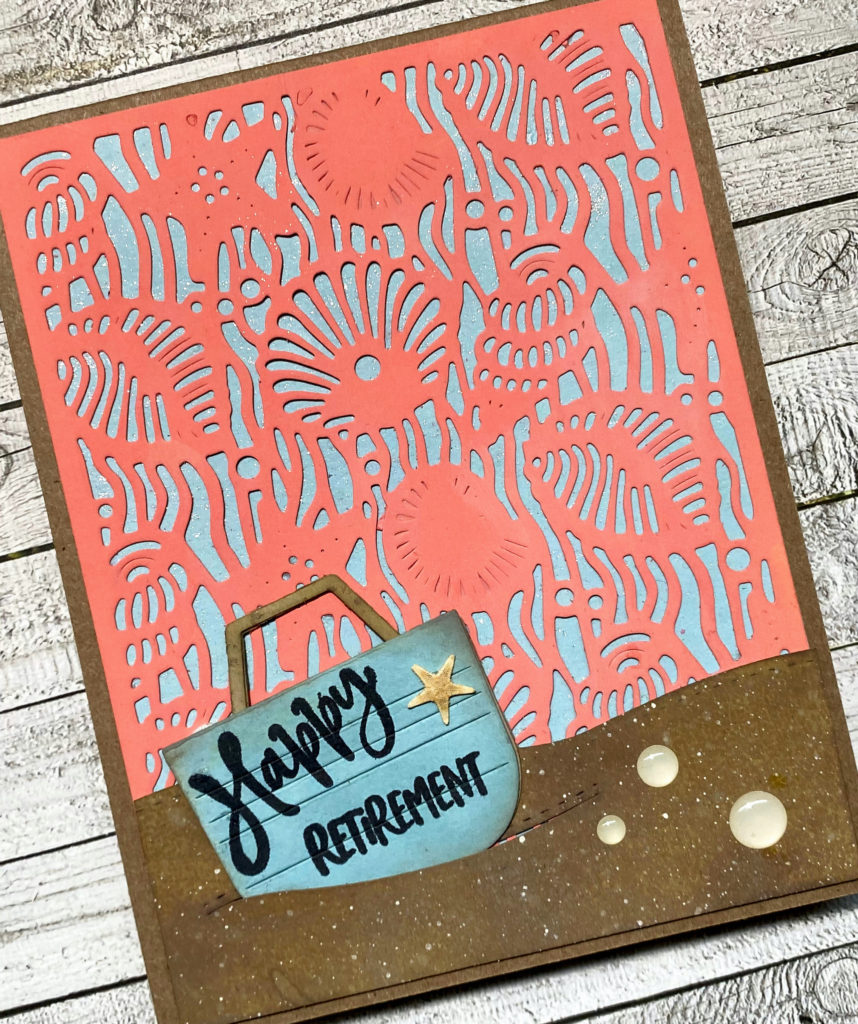
    Happy Tuesday Friends!!

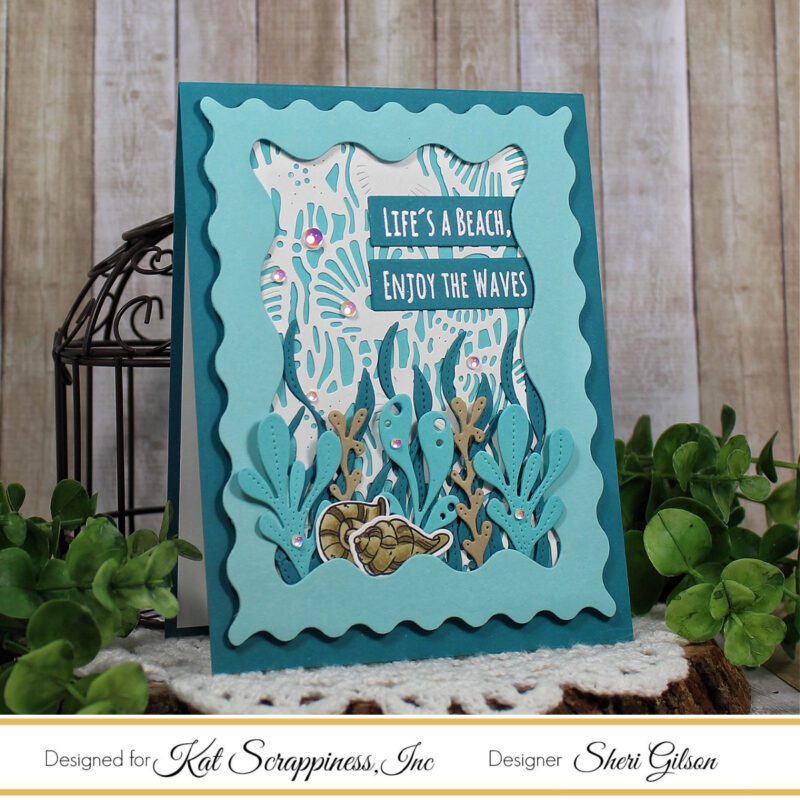
                   It’s Sheri here today with a FUN Summertime card using a mix of stamp and dies from the shop to create a card for a friend going on a cruise!

     Steps to Create Card:

    • Cut A2 Top Fold Card Base: 4 1/4″ x 5 1/2″ (4 1/4″ x 11″, scored at 5 1/2″) – used Gina K. Tranquil Teal card stock.
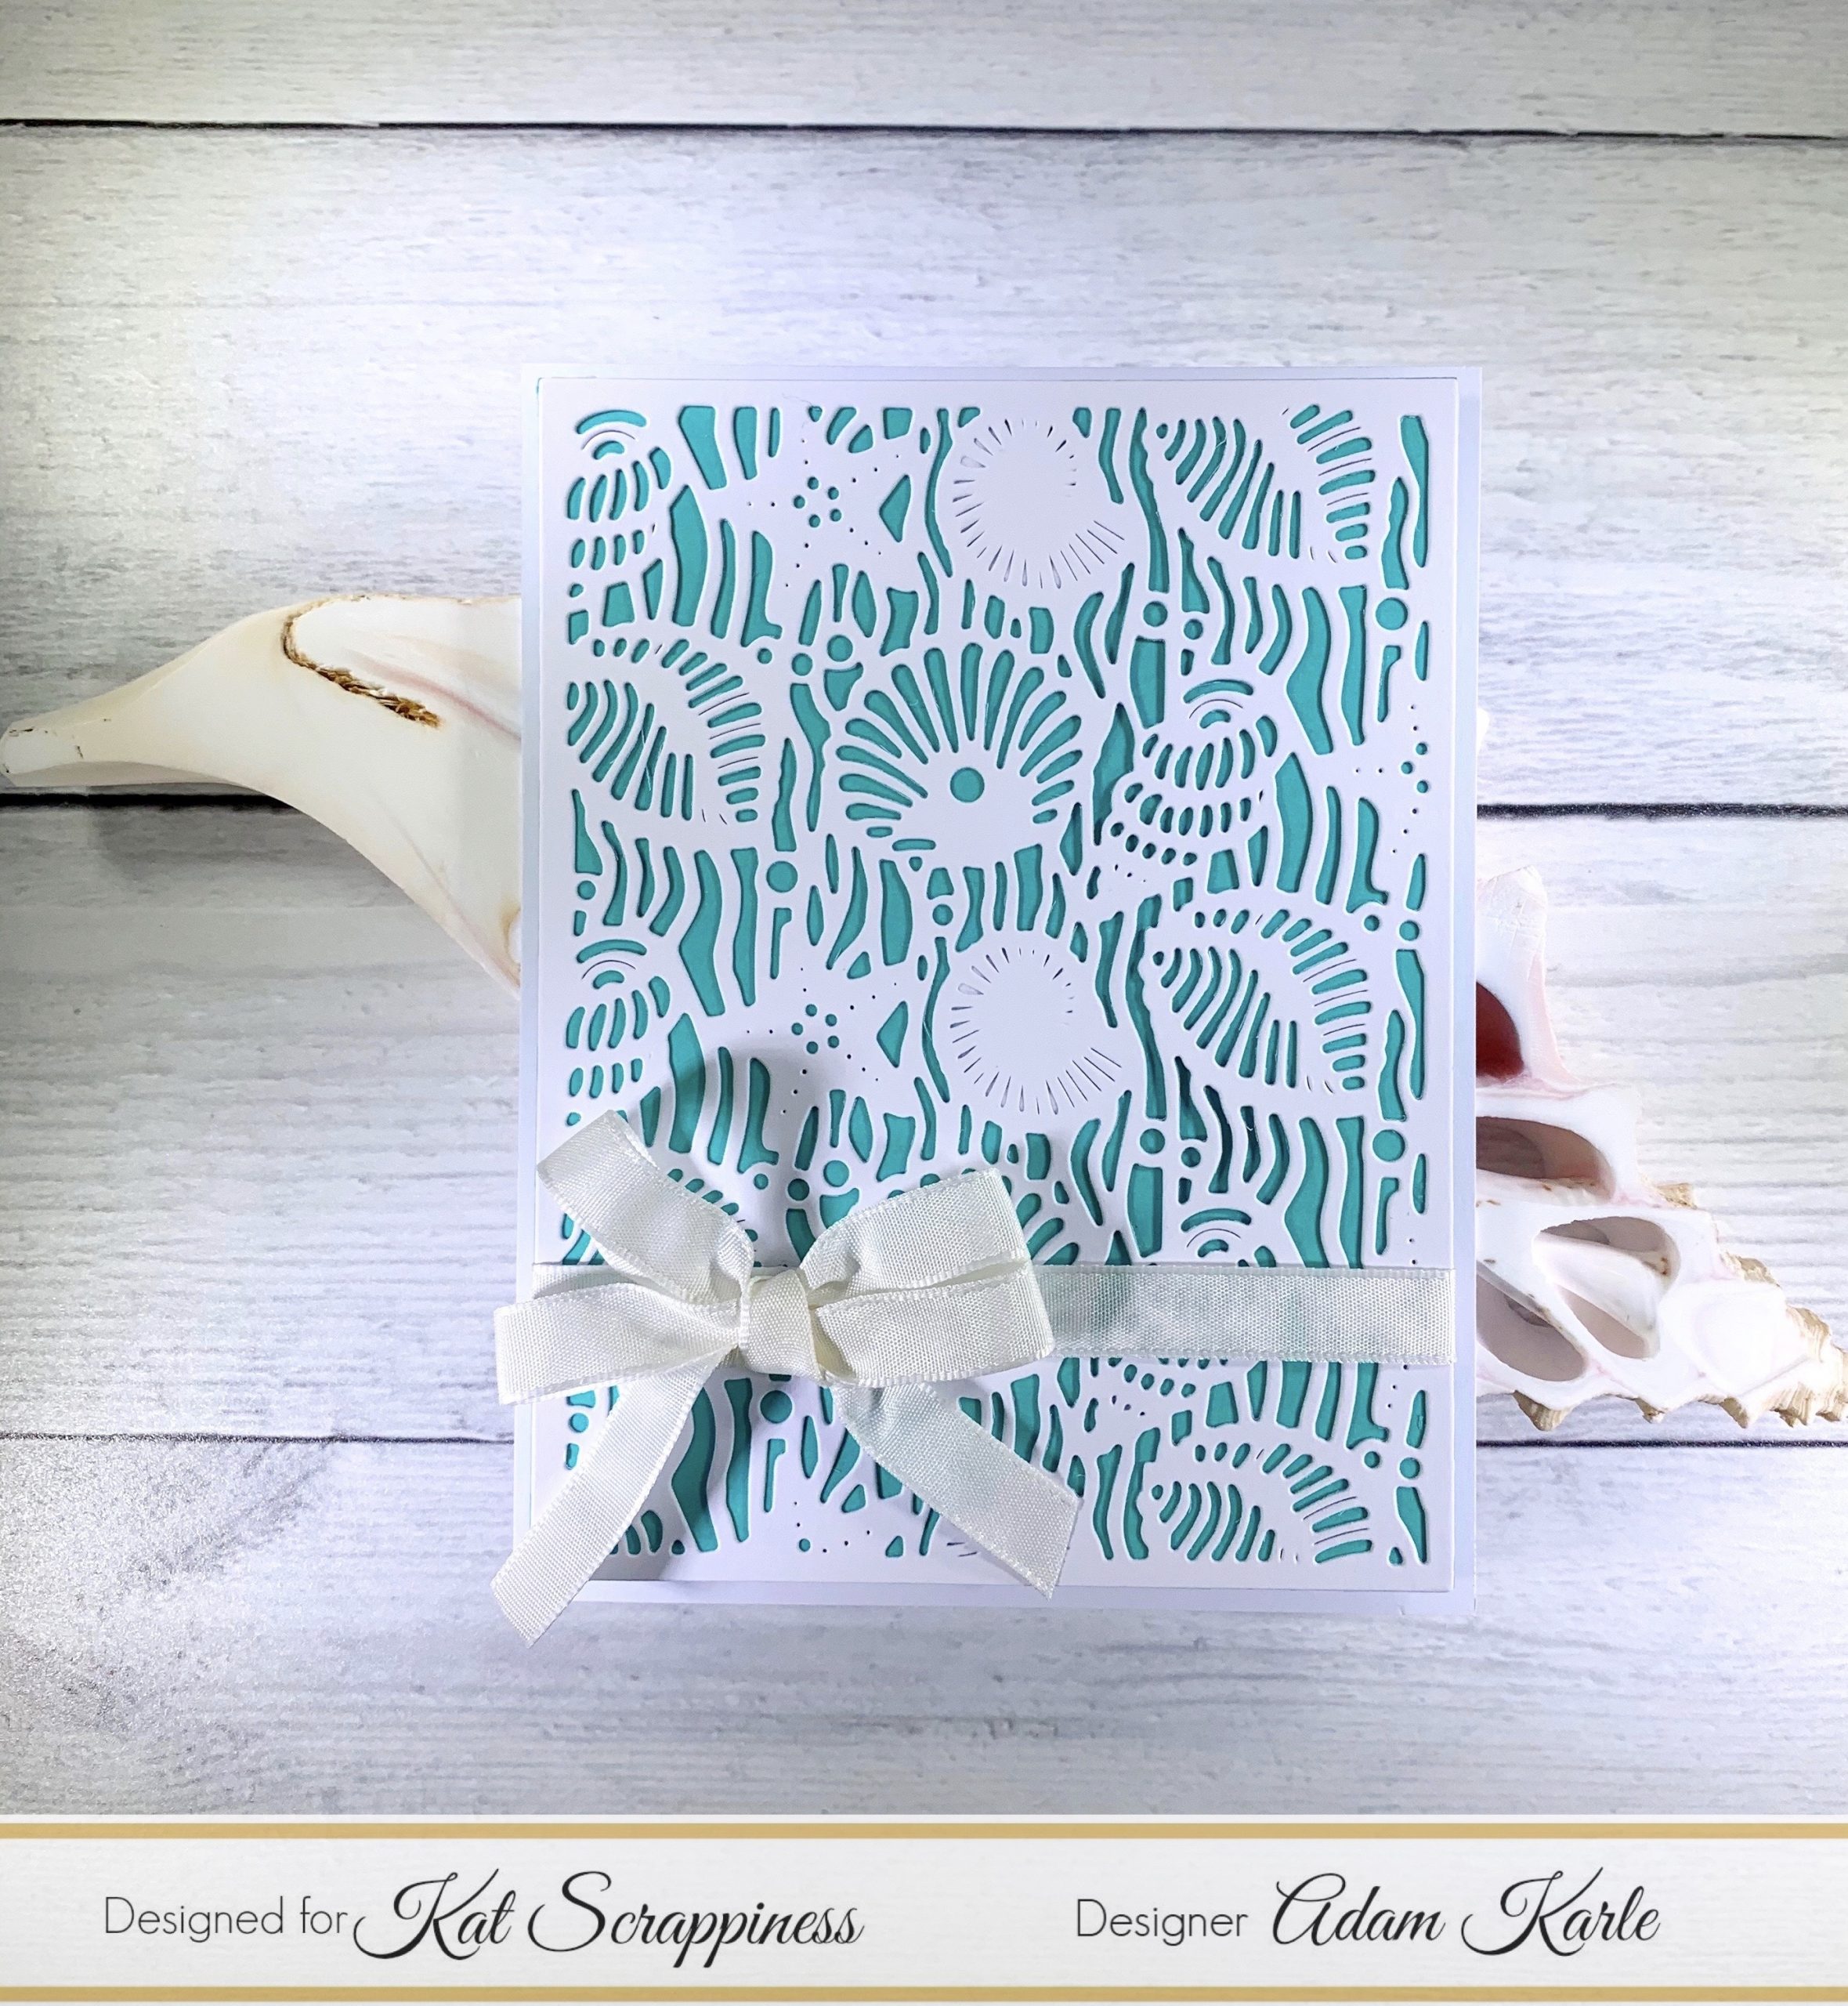
    • Create/cut frame. Take the Second largest die from the Embossed Edge Wavy Frame die set and cut it out of a piece. Next you will take the third largest die from the Wavy Nesting die set and center it on the piece you just cut to create the frame – used Gina K. Sea Glass card stock.
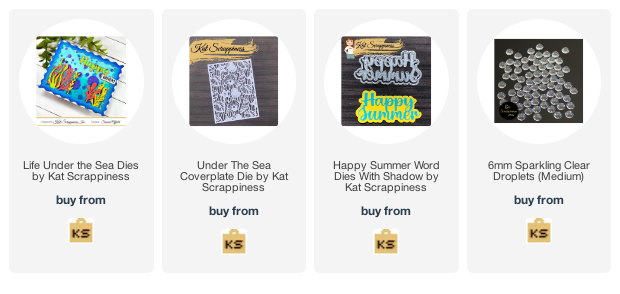
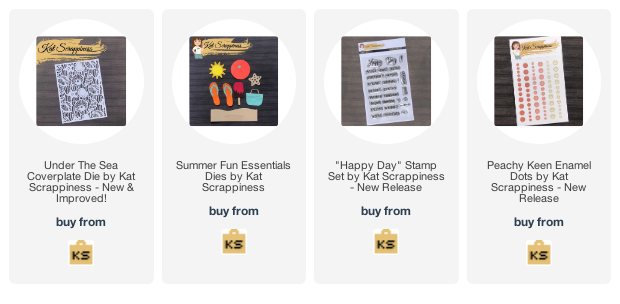
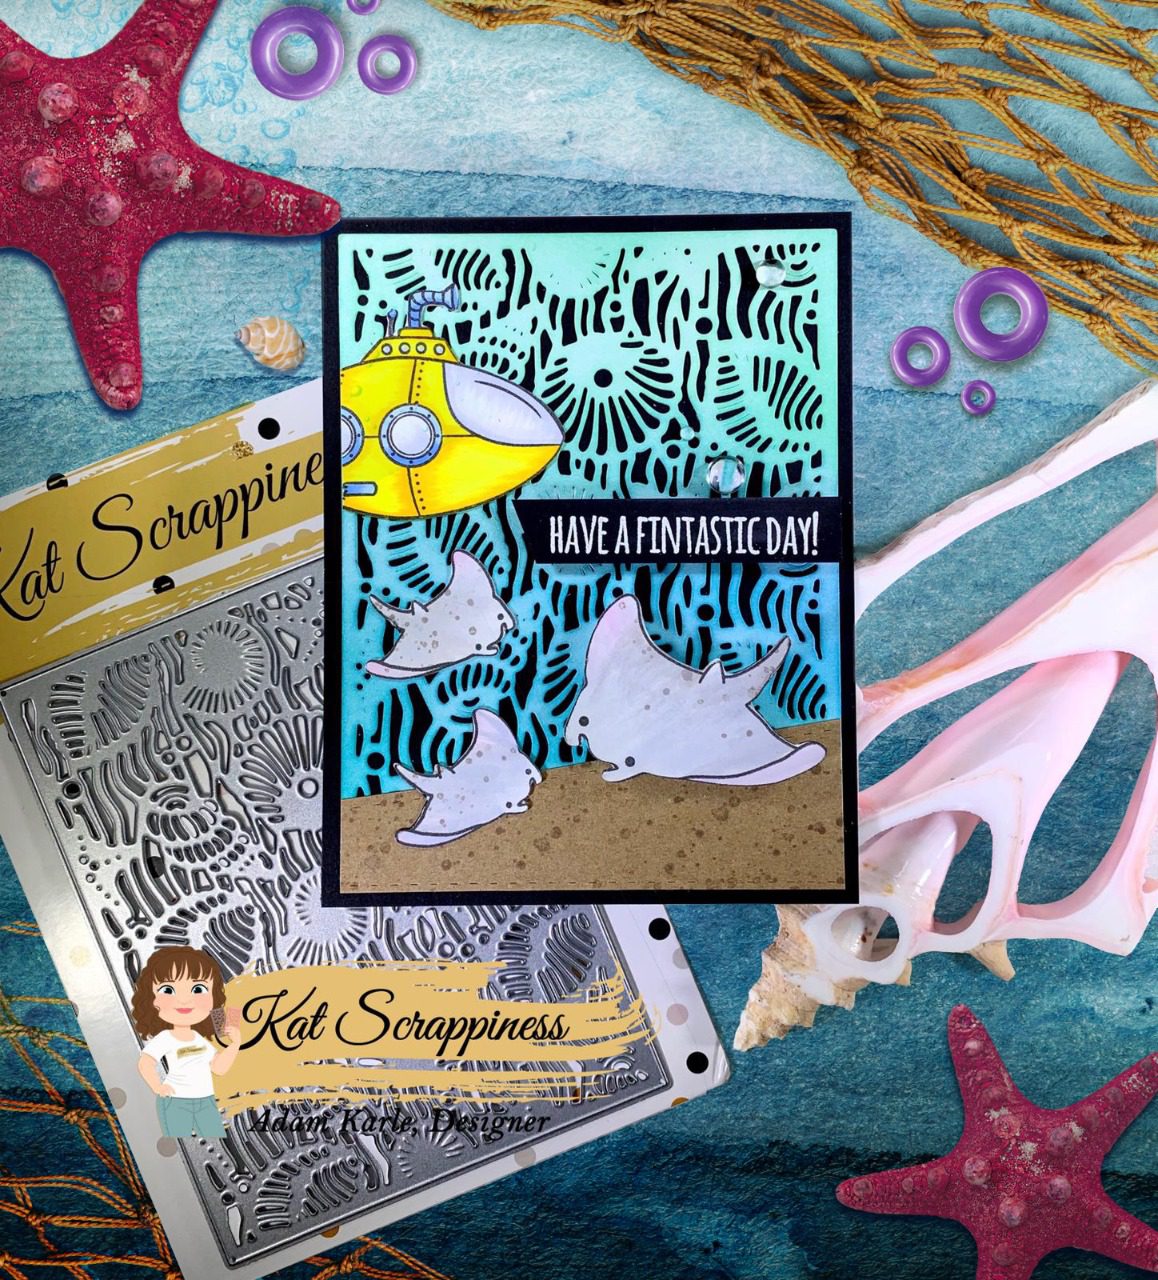
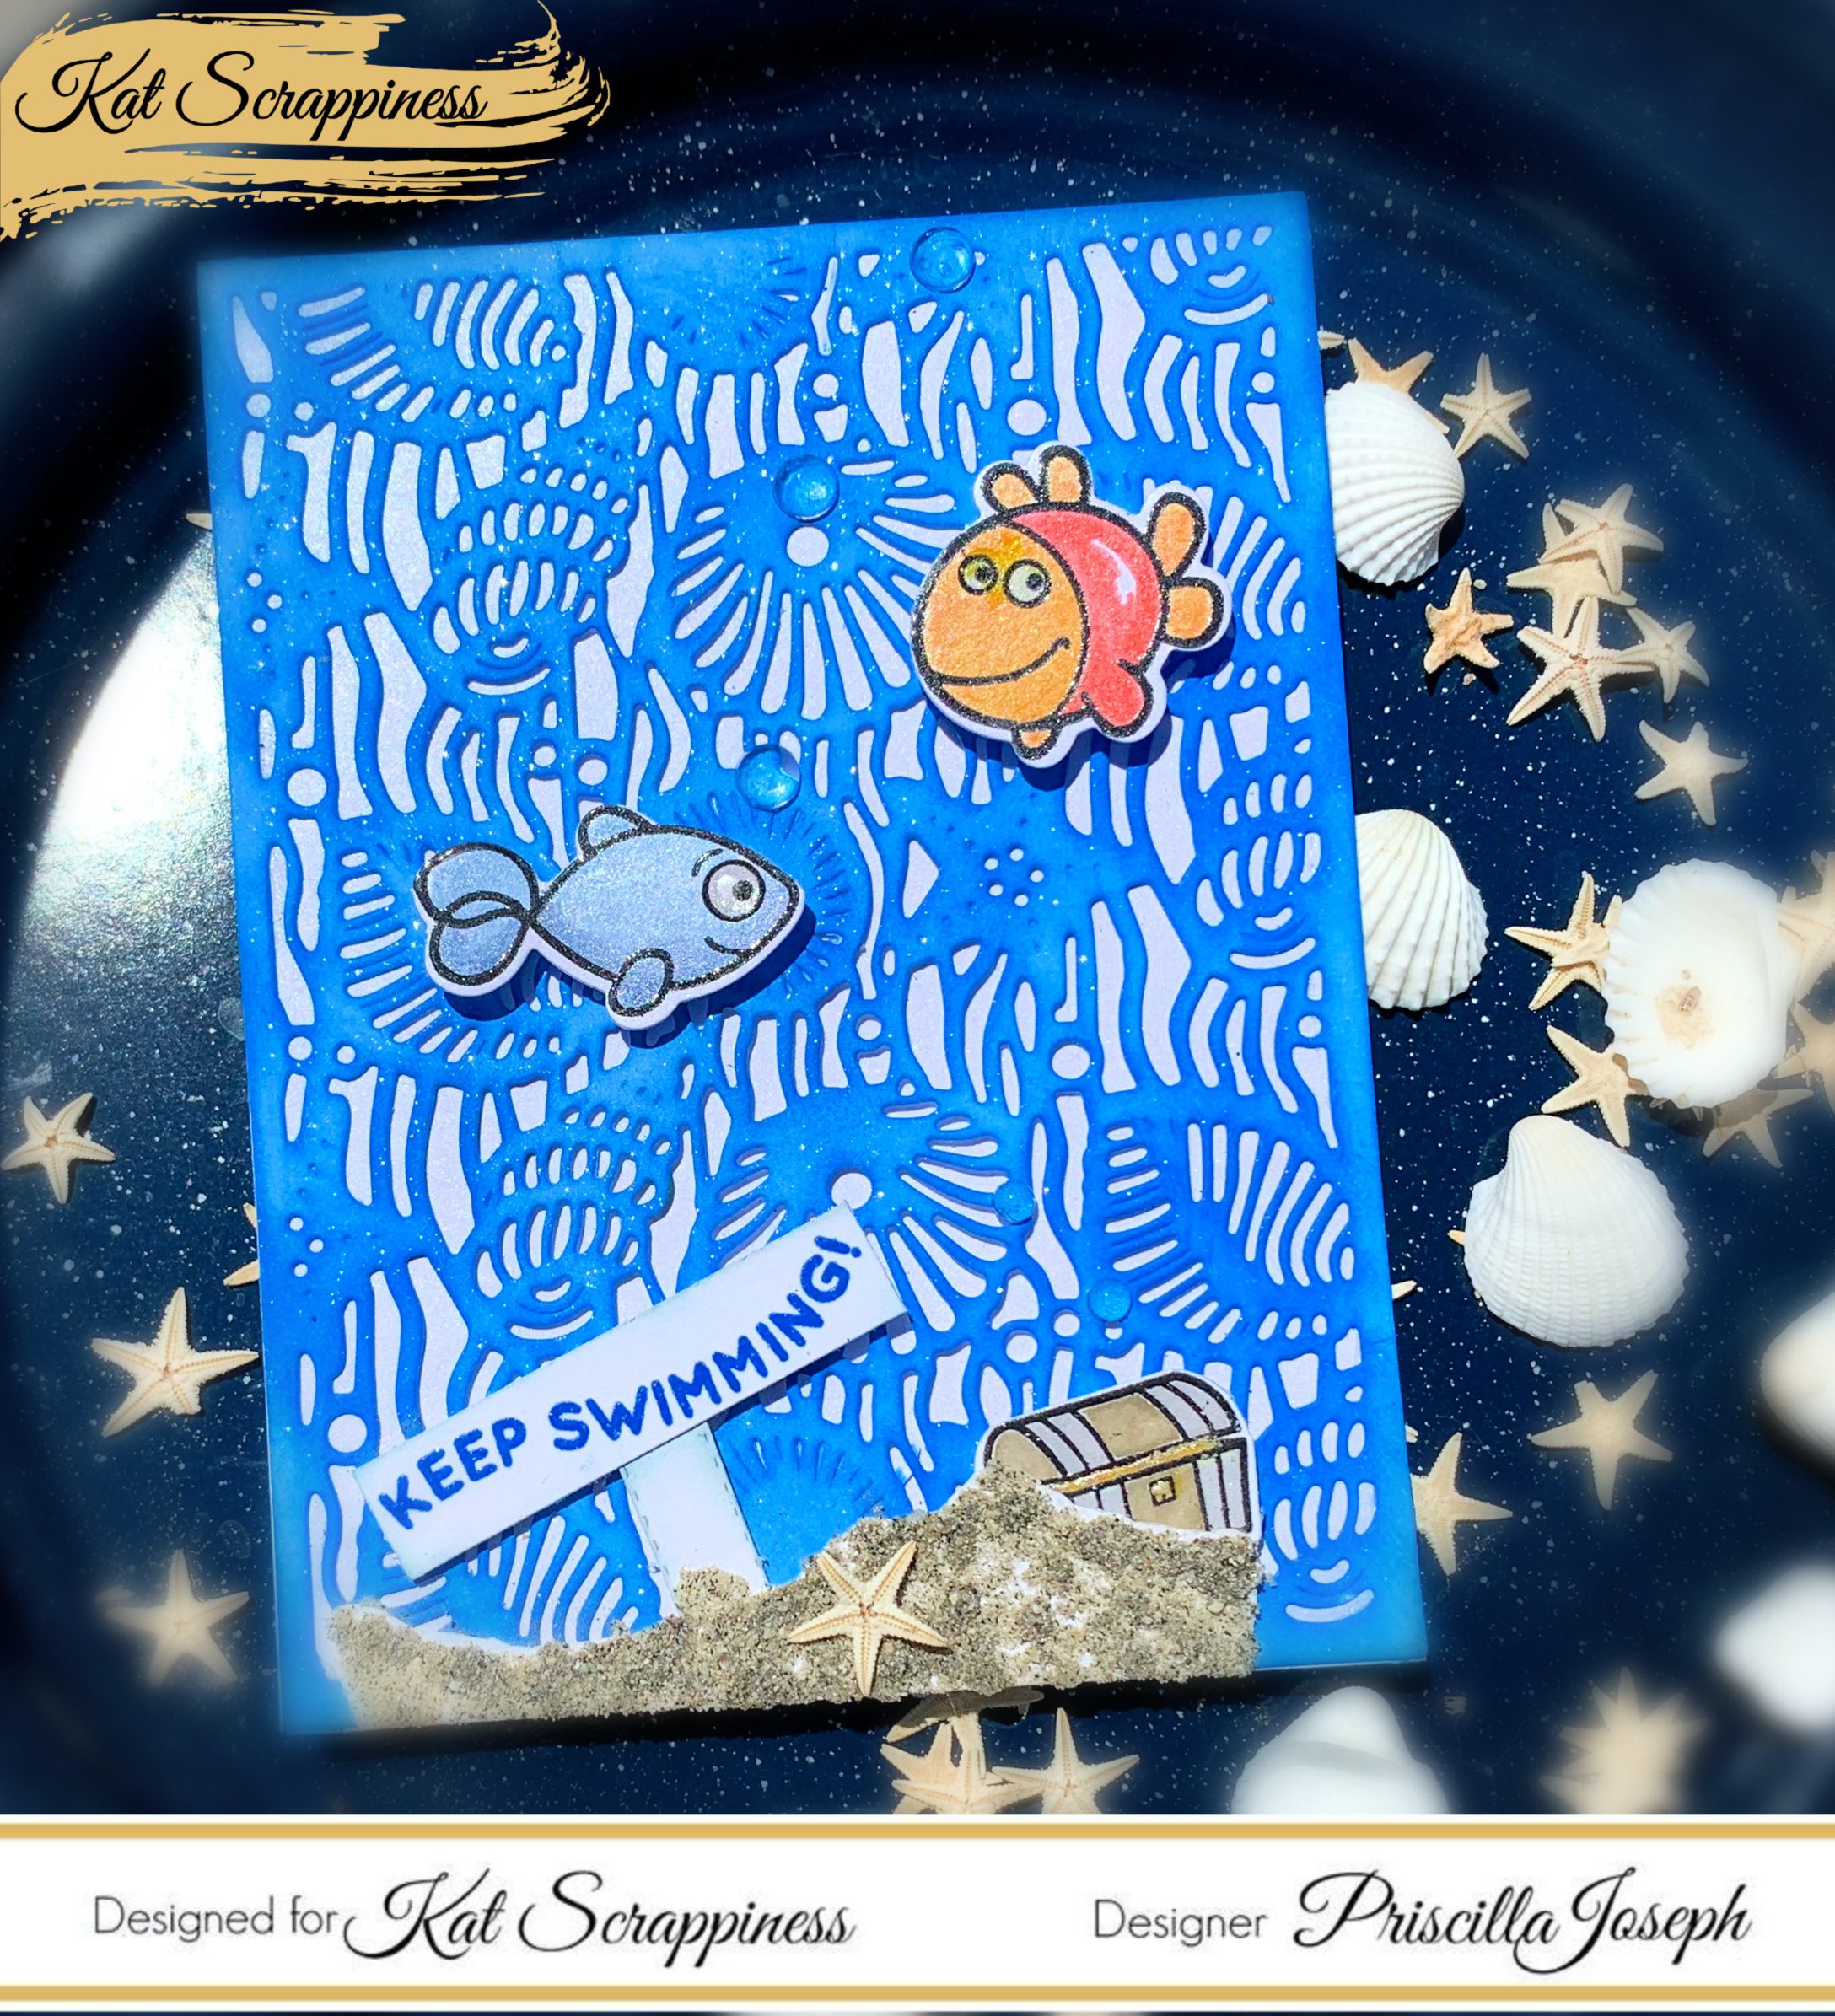
    • Cut out the Under the Sea Coverplate in white card stock and trim to fit under the frame (approximate size: 3 1/4″ x 4 1/2″).
    • Cut piece of card stock to line behind the Under the Sea Coverplate panel – Used Gina K. Turquoise Sea card stock.
    • Cut out pieces from the Life Under the Sea die set to create scene – used Gina K. Tranquil Teal, Turquoise Sea & Kraft card stock.
    • Stamp shells from the Summer Gnome Add-On stamp set, color and cut out with coordinating die set.
    • Stamp & Emboss sentiment from Summer Gnome Add-On stamp set – used Gina K. Tranquil Teal card stock.
    • Assemble card. The only piece I popped up was the frame to give a little extra dimension to the scene.
    • For embellishment I added a few of the White AB Glass Bubble Mix.


    Here’s a list of the supplies I used from the store.
    Affiliate links are used at no additional cost to you. Thank you so much for your support!


    Happy Stamping!!

  • Happy Summer!

    Happy Summer!

    Happy Monday Crafty Friends! Priscilla here from Nubble Light Designs. Today I am sharing a summer card with an ocean theme, fluorescent colors, and REAL sand! I used alcohol inks and several of the neon Copic markers to make today’s card.


    This card features several products from Kat Scrappiness, including the new Life Under the Sea dies, Under the Sea Coverplate die, and the Happy Summer Word Die with Shadow.

    The Life Under the Sea Dies features five different sea plants with clear details that make realistic looking die cuts for all of your ocean themed projects!

    Card Details:

    • Created an A2 top-folding white card base.
    • Mixed several blue shades of alcohol inks on yupo paper  and after they were dry, die cut with the Under the Sea Coverplate die, backed it with white shimmer cardstock, and adhered to the card base.
    • Adhered real sand to the bottom of the card to create the ocean “floor.”
    • Die cut three of the sea plants from the Life Under the Sea dies and colored them with FRV1 (pink), FYR1 (orange), and FY1 (yellow) Copic markers and adhered over the sand.

    • Added mini starfish embellishments around the plants.
    • Die cut the Happy Summer word die several times for added dimension and colored the top layer with the FRV1 Copic marker before adhering to the top of the card.
    • For the finishing touch, added several 6mm Sparkling Clear Droplets for “bubbles.”

    Thank you so much for stopping by! Don’t forget to check out what’s NEW in Kat’s Shop, and follow my blog, Instagram, and Facebook for more “Kat Scrappiness Amazingness”!

    Stay Safe . . .

    Priscilla 🐟🐠

    The supplies I used are listed and linked below. I would be so grateful if you use these affiliate links  to grab your Kat Scrappiness Goodies! No extra cost to you!

  • Happy Retirement!

    Happy Retirement!

    Hi Everyone! Priscilla here from Nubble Light Designs. Today I am sharing a summertime retirement card. So timely as I have just  retired from a 15 year teaching career, so consequently this summer means extra beach time and sun!

    But First . . . 

    CHRISTMAS IN JULY SALE!

    For the background of my card, I used the Under The Sea Coverplate Die by Kat Scrappiness to create a coral colored ocean background adhered over a light blue layer of card stock.


    To create the sandy beach I used the sand die included in the Summer Fun Essentials Dies by Kat Scrappiness and sponged it with Distress Oxide Ink before lightly splattering it with white acrylic paint.

    The beach bag (from the same die collection) was stamped  with “Happy Retirement” – part of the Happy Day stamp set.


    I added 3 enamels dots for the finishing touch.


    And More Sales!

    Thank you so much for stopping by! Don’t forget to check out what’s NEW in Kat’s Shop, and follow my blog and Instagram for more “Kat Scrappiness Amazingness”!

    Stay Safe . . .

    Priscilla 🌞🌑

    The supplies I used are listed and linked below. I would be so grateful if you use these affiliate links  to grab your Kat Scrappiness Goodies! No extra cost to you!

    https://linkdeli.com/widget.js?id=f5e8378456858c916708

  • Thinking Of You Card

    Thinking Of You Card

    Hi everyone, it’s Tina here. Today’s card features the Under The Sea Coverplate inked with a Gel Plate and one of the new Sentiment dies with Shadow topped with the starfish from the Summer Fun Essentials. Below you will find the steps to create your own card.

    Step 1 – Trim White Cardstock to 8 1/2” x 5 1/2”, score at 4 1/4” and fold in half for a vertical side fold card. (A2)

    Step 2 – Apply Distress Oxide Ink Cracked Pistachio, Tumbled Glass and Salty Ocean onto a Gel Plate. Blend the color with a brayer. Place a White Cardstock on top and use the brayer to set the ink onto the Cardstock. Remove and let dry.

    Step 3 – Diecut Under The Sea Coverplate with the panel created from Step 2. Adhere to the card front using Bearly Art Precision Glue.

    Step 4 – Diecut Thinking Of You using White Cardstock for the word and Black Cardstock for the shadow. Assemble and adhere to card using Bearly Art Precision Glue.

    Step 5 – Follow Step 2 to create some Blue Gel Plate Backgrounds using Distress Oxide Salty Ocean. This time sprinkled a little water. Let dry.

    Step 6 – Diecut Summer Fun Essentials (starfish) 3 times using the panel from Step 4. Trace the starfish on the lighter shade to create a backdrop for the starfish. Assemble and adhere to card using Bearly Art Precision Glue.

    Step 7 – For added interest randomly adhere Carolina Blue Pearl Mix with a Pick Up Tool and Bearly Art Precision Glue.

    This card can be for many occasions by changing the colors and changing the sentiment. Below you will find a link to all the products used. Thank you for stopping by and Happy Crafting!

    Products Used:

    https://linkdeli.com/widget.js?id=f5e8378456858c916708

  • Under the Sea

    Under the Sea

    I Hello Friends!

    Today I am making a card with one of my favorite dies. It is the Under the Sea die by Kat Scrappiness. I love how it creates a beautiful back drop with so many options.

    I started this card by cutting a layer 1 in white card stock. I next color blended some blues and teals over the entire piece. Once satisfied with the color range I die cut the background. I cut a card base out of black card stock to mount the Under The Sea Background.

    Once the background was mounted I knew I needed to anchor the growing scene. I cut a piece of brown card stock free hand to create a sandy ocean floor. I dotted this sand with dark brown ink to add dimension to the sand. Now I questioned myself on what was needed to finish the scene. I knew it could use a bright color and a ‘yellow submarine ‘ came to mind. I picked out my sentiment next and embossed it in white on a black banner. Instead of fish I decided on some stingrays to complete the scene. I added some acrylic bubbles and the card was completed.

    I would suggest you use this Kat Scrappiness Die and create your own under the sea card. Enjoy your trip under the sea.

    supplies:

    ks – Under the Sea die

    ks – Acrylic Bubbles

    WOW white embossing powder

  • Clean and Simple

    Clean and Simple

    Hello,

    Today I am sharing a clean and simple all occasion card using a Die from the Kat Scrappiness collection. These type cards are great to have on hand for those unexpected times you need a card but no time to create one.

    I die cut the full card front out of white card stock using the Under the Sea cover plate die.

    I made a white A-2 card base and a teal layer one layer.

    To finish the card I layered all together using foam tape and adding a white ribbon and bow. The inside sentiment will determine for what occasion the card will be used.

    Supplies- KS Under the Sea die

  • Under The Sea

    Under The Sea

    I wish I could go scuba diving. I’d love to see all the wonders of the ocean!  I tried it once, but got very claustrophobic and didn’t get to see much under the sea {insert sad face}.   At least I got a glimpse of it in my craft room using these two beautiful Kat Scrappiness dies!

    For my card, I cut white cardstock using the Under The Sea background die — isn’t it gorgeous?!  I blended two Distress Oxide inks using the Pink & Main Ergonomic Blending Brush over the diecut then placed a piece of silver Craft Perfect Mirror Cardstock behind it.

    Dolphins are such beautiful, graceful animals!  I used the Stitched Dolphins Die set to cut navy cardstock to add the dolphin silhouettes.

    Be sure to follow Kat Scrappiness via blog, Facebook, Instagram and YouTube so you won’t miss any projects the design team shares…not to mention, you’ll be among the first to hear about deals and specials!


    https://linkdeli.com/widget.js?id=f5e8378456858c916708

  • Keep Swimming! | Nautical Card

    Keep Swimming! | Nautical Card

    Hi Everyone, it’s Priscilla here. Today I want to share the card I made for the Kat Scrappiness Blog  featuring the newly released “Under the Sea Coverplate Die.”

    This full A2-sized die makes creating a card so easy. Just die cut, ink (optional), and adhere on a card front. Done! Note: For best results, die cut with a “precision plate” underneath the die before running it through your die cutting machine.

    After I ran this die through my Big Shot, I inked it up using VersaFine Clair Ink in “Paradise” and adhered it to a shimmer white card base. I colored the fish and treasure chest (from my stash)  with Spectrum Noir markers, die cut them out, and adhered them to the card front. I crafted my own sign for the ocean floor and stamped “Keep Swimming!” on it with the same blue ink as the card front.

    I created a hill of sand by adhering real sand  from my favorite beach to it and added a star fish embellishment. Finally, I used the Kat Scrappiness “Sparkling Clear Droplets” in both 6mm and 4mm for ocean bubbles.

    Thank you so much for stopping by! Don’t forget to check out what’s NEW in Kat’s Shop, and follow my blog and Instagram for more “Kat Scrappiness Amazingness”!

    Stay Safe . . .

    Priscilla ??

    The supplies I used are listed and linked below.

    SUPPLIES

  • Under The Sea Coverplate Cards

    Under The Sea Coverplate Cards

    Hi Everyone, it’s Tina here. Today I have two easy and fast cards to share with you using the new Under The Sea Coverplate from Kat Scrappiness. One card is a simple solid background and another is inked in several colours. Below you will find the steps for both cards.

    Card #1


    Card #2

    Card #1

    Step 1 – Trim White Cardstock to 8 1/2” x 5 1/2”, score at 4 1/4” and fold in half for a vertical side fold card. (A2)

    Step 2 – Trim White Cardstock to 5 1/2” x 4 1/4”. Ink the panel using Distress Oxide Inks using Cracked Pistachio, Tumbled Glass and Salty Ocean.

    Step 3 – Diecut Under The Sea Coverplate using the panel created from Step 2. Adhere to card using Nuvo Deluxe Adhesive.

    Step 4 – Diecut or colour an image of your choice related to beach or ocean and adhere to card using Foam Tape.

    Step 5 – Diecut Stitched Sentiment Strip using White Cardstock. A tip: if your sentiment is shorter than the Strip then you can diecut a second time by flipping it and die cutting again.

    Step 6 – Stamp sentiment on the diecut created from Step 5. Adhere to card using Foam Tape.

    Card #2

    Step 1 – Trim White Cardstock to 8 1/2” x 5 1/2”, score at 4 1/4” and fold in half for a vertical side fold card. (A2)

    Step 2 – Trim Patterned Paper of your choice to 5 1/2” x 4 1/4”. Adhere to card using Nuvo Deluxe Adhesive.

    Step 3 – Diecut Under The Sea Coverplate using Kraft Metallic Paper. Adhere to card using Nuvo Deluxe Adhesive.

    Step 4 – Diecut Thank you With Shadow (vellum for the shadow and Patterned paper for the words) Assemble and adhere to card using Nuvo Deluxe Adhesive.

    Using a solid diecut or a coloured diecut changes the look of the Under The Sea Coverplate which makes it a fun background. Below is a link to all the products used. Thanks for stopping by and Happy Crafting!

    Products Used:

    https://linkdeli.com/widget.js?id=f5e8378456858c916708

  • Summer Cards by Martha Lucia

    Summer Cards by Martha Lucia

    Hi there, Martha Lucia here with you! Today I want to share some summerc cards created with the new die cuts from Kat Scrappiness.

    To make this card I used several of the new products. I started with a white card base and die cut the new Under the Sea Coverplate Die onto marina mist card stock. Then I sponged the medium and lower part of the layer using two different colors of distress blue ink. I pasted it over the white card base using crafty foam tape.

    I die cut one the dolphins included on the Stitched Dolphin Die Set onto metallic silver card stock. Then to embellish the card, I created a ball with a circle die and some Hot Pink Candy Sprinkles. For the sentiment, I used one included on the new stamp set Summer Gnome Add On


    The next project is a summer card that I created using images from the new stamp set Summer Gnome. I created a beach scenery with slimline format using the embossed edge nesting slimline dies.

    To color the images, I used Illustrator Markers from Spectrum Noir. Additionally, I fussy cut the images and pasted over the inked layer with crafty foam tape.

    Thank you for stopping by and see you soon with more inspiration!

    Martha Lucia