Tag: sparkling clear jewels

  • I Love You This Much! Card

    I Love You This Much! Card

    Hi everyone, it’s Tina here. I was so happy when I saw the new Quokka’N Up Stamp Set. When my son was younger we used to play a game. How much do you love me? He would hesitantly stick out his arms and when they were fully extended he would say I love you this much! And of course I would tickle him under the arms. That was my inspiration for this stamp set. Below you will find the steps to create your own I Love You This Much! Card.

    Step 1 – Trim White Cardstock to 8 1/2” x 5 1/2”, score at 4 1/4” and fold in half for a vertical side fold card (A2).

    Step 2 – Diecut Double Stitched Rectangle using Patterned Paper. Adhere to card front using Foam Tape.

    Step 3 – Stamp Quokka’N Up (Frame) using Gina K Amalgam Ink on White Cardstock. Create a mask by placing Post it at the edge of the inner outline. Stamp Quokka’N Up (Image). Remove the Post it. Color in the image using Alcohol Markers. I used Spectrum Noir Classique Markers.

    Step 4 – Stamp Quokka’N Up (sentiment) using Versafine Onyz Black Ink beneath the frame from Step 3.

    Step 5 – Diecut Double Stitched Rectangle from the panel created on Step 3 & 4. Adhere to the card front using Nuvo Deluxe Adhesive.

    Step 6 – Optional – Instead of coloring the frame with Markers Stamp Quokka’N Up (Frame) using Versafine Onyx Black Ink on Patterned Paper. Trim out the frame and adhere over the plain frame. If you paper pierce then you don’t need to mask from Step 3.

    Step 7 – For added interest and sparkle randomly adhere Sparkling Clear Jewels using an Embellishment Pick Up Tool and Nuvo Deluxe Adhesive.

    This card can be used for several occasions by changing the patterned paper, colours, and/or sentiment. Below is a link to all the products used. Thank for for stopping by and Happy Crafting!
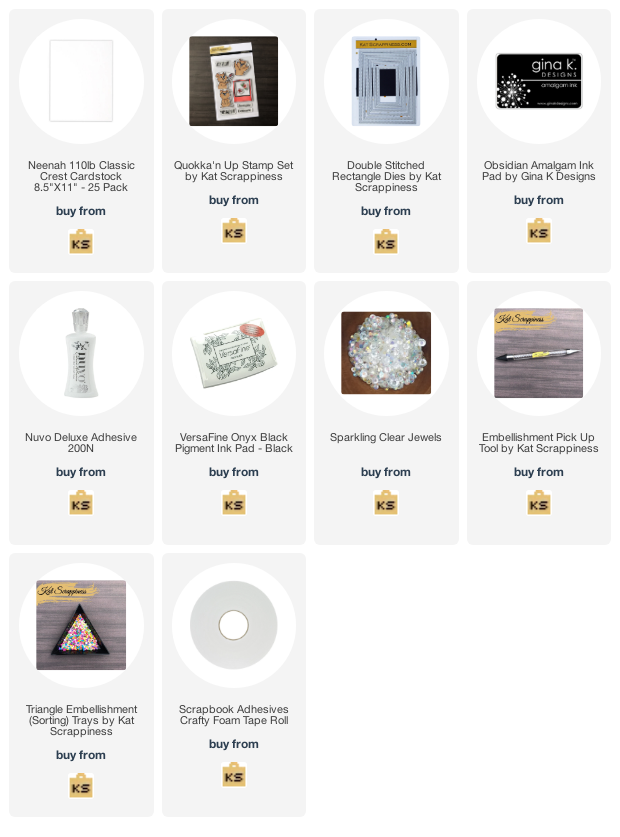
    Products Used:

    https://linkdeli.com/widget.js?id=f5e8378456858c916708

  • Sweet Birthday Wishes Slimline Card

    Sweet Birthday Wishes Slimline Card

    Hi everyone, it’s Tina here. Kat Scrappiness has quite a selection of the Slimline Nesting Dies. I used the Zig Zag Nesting Slimline die for today’s card. Below you will find the steps to create your own Sweet Birthday Wishes Slimline Card.

    Step 1 – Trim White Cardstock to 7” x 8 1/2”, score at 3 1/2” and fold in half for a vertical side fold card (Slimline)

    Step 2 – Trim Black Cardstock to 3 1/4” x 8 1/4” and adhere to card front using Nuvo Deluxe Adhesive.

    Step 3 – Trim White Cardstock to 3 1/2” x 8 1/2” (this can be used from the excess of Cardstock from Step 1). Place a background stencil on top and secure it with painter’s tape or washy tape. Apply ink with a blending brush. I used Distress Oxide Inks in colours Spiced Marmalade, Fired Brick, Mustard Seed, Aged Mahogany for the Flowers and Twisted Citron for the Leaves. I used Post it notes to mask off the areas I did not want colours to blend.

    Step 4 – Diecut Zig Zag Nesting Slimline with the panel created in Step 3 and adhere to card using Nuvo Deluxe Adhesive.

    Step 5 – Diecut Sweet (word die) using Orange Cardstock and adhere to card using Nuvo Deluxe Adhesive.

    Step 6 – Stamp sentiment using Versamark Ink on Black Cardstock, sprinkle White Embossing Powder and remove the excess. Heat set it with a heat tool. Trim out the sentiment and adhere to card using Foam Tape.

    Step 7 – For added interest and sparkle randomly adhere Sparkling Clear Jewels using a Crystal Katana and Nuvo Deluxe Adhesive.

    This card can be used for several occasions by changing the Word Die and sentiment strip. Below is a link to all the products used. Thank you for stopping by and Happy Crafting!

    Products Used:

    https://linkdeli.com/widget.js?id=f5e8378456858c916708

  • The Masked Heart

    The Masked Heart


    Hello, it’s Lisa from Oh So Cute By Lisa here with you on the KS blog and today I have a fun card to share with you using some various Kat Scrappiness dies to make this beautiful one layer card.
    All the credit for my card idea goes to a video I saw recently by Cathy Zielske where she did this technique and I wanted to recreate it with some KS dies today.
    Have you ever used masking paper? If not you really should give it a try! It’s a lot of fun and you can get some really cool effects with it. Essentially it masks off a part of your paper so you can make a design within a certain shape. Another use is to mask off stamped images so you can ink blend a background around them and maintain a one layer card.
    For today’s card I will be masking off my card panel using a heart shape opening so that my design will have a heart shape when I pull up the masking paper.
    Here’s the process:
    I started by cutting out a panel of 110 pound Neenah card stock with the largest Stitched Rectangle die.
    Next I cut out a piece of masking paper that was just slightly larger than my panel and then I cut a heart out of the center of it using one of the hearts from the Layering Hearts die set. Once the heart was cut from the center of the masking paper I laid the paper over the card stock panel so I could start my stamping.
    I chose a simple stamp that resembled a flower and I used 3 different distress oxide inks to stamp the flowers in the heart making sure to overlap the edges of the heart and fill it up completely. Once I stamped all of the flowers in all of the colors, I went back over each of them and did some basic ink blending in the same exact colors.


    Once the stamping and ink blending were done it was time for the big reveal!
    I made a very short video to show you how it looked when I pulled the masking paper off.
                                         [youtube https://www.youtube.com/watch?v=7kyndMdYMcs]
    I could watch that video over and over again, it’s so satisfying!
    Once the heart was revealed it was time to decorate the rest of the card.  I used the Friendship Greetings stamp set for the sentiment. In the center of the heart I stamped the “You are Beautiful” sentiment with black ink and I stamped the second sentiment on black card stock and embossed it with WOW white embossing powder and popped it up on foam tape under the main sentiment.
    And of course I cannot leave well enough alone and I just have to add jewels to all my cards!
    The Sparkling Clear Jewels are hands down my favorite jewels and I use them on almost every card.
    Here is one more look at my card with all of the Kat Scrappiness dies and stamps pictured.
    I really had fun making this card and if you haven’t tried masking paper on your cards I highly recommend it. There are multiple videos on YouTube showing the various techniques you can do.
    Thank you so much for joining me today, I’m so glad you stopped by to check out my latest card and I hope you’ll check out all the fun stamps and dies over at Kat Scrappiness!
    Don’t forget to follow
    Kat Scrappiness on all
    social media platforms to be alerted to new releases, sales and giveaways!
    Have a great day, I already am!
    Lisa  ?
     
  • Lola Happy Birthday Slimline Card

    Lola Happy Birthday Slimline Card

    Hi everyone, it’s Tina here. Slimline cards are the rage right now and Kat Scrappiness has you covered with an awesome selection of dies. Below you will find the steps to create your own Lola Happy Birthday Slimline Card.

    Step 1 – Trim White Cardstock to 7” x 8 1/2”, score at 3 1/2” and fold in half for a vertical side fold card. (Slimline)

    Step 2 – Diecut Wonky Stitched Nesting Slimline using White Cardstock. Adhere to card front using Nuvo Deluxe Adhesive.

    Step 3 – Trim White Cardstock to 2 1/2” x 7 1/2”. Apply Distress Oxide Ink Speckled Egg and Stormy Sky onto a kraft mat, spray with water and dip the panel into the ink. Heat set in between dips and repeat until desired effect is achieved. Set aside to dry.

    Step 4 – Diecut Never Ending Circles to create Balloons using various colours of Cardstock. (If you have a Balloon die then use that instead). Cut out a small triangle to place in back of the circles. Add string to the back using a piece of tape. Adhere to panel created in Step 3. Bottom Balloon is adhered using Foam Tape and Nuvo Deluxe Adhesive to the balance. Trim off the Balloons that is hanging off the edges. Adhere the entire panel to the card front.

    Step 5 – Stamp Lola The Giraffe using Gina K Amalgam Ink on White Cardstock. Colour in with any Alcohol Markers of your choice. I used Spectrum Noir Classique Markers. Fussy cut the image and using a Black marker add Black ink to the edges. While I was doing that my marker slipped and I marked the ear and the foot. To fix this I created a bow to cover the ear and recoloured the feet and that fixed my errors. Wrap the strings around the horn on the left side and adhere the image using Foam Tape

    Step 6 – Stamp Everyday Brush Strokes sentiment using Versafine Onyx Black Ink to the bottom of the card front.

    Step 7 – For added interest and sparkle randomly adhere Sparkling Clear Jewels using a Crystal Katana and Collage Medium.

    This card can be used for many occasions by changing the colours and sentiment. For an example it can be for an anniversary or baby shower, etc. Below is a link to the products used. Thank you for stopping by and Happy Crafting!

    Products Used:

    https://linkdeli.com/widget.js?id=f5e8378456858c916708

  • Christmas is Gnoming!

    Christmas is Gnoming!

    Hi crafters, it’s Caren here today with a Christmas in July card.  Did everyone have a chance to look a the new release goodies?  What was your favorite product?  Mine is the Christmas Gnome stamp set!  It is so cute, and I love the punny sentiments.

    For my card, I used the gnome holding the candy cane with the Christmas is Gnoming sentiment.  I colored the image using Copic markers and cut it out using my Silhouette Cameo machine.  From white card stock, I die cut the Stitched Winter Swirl Backdrop die and applied distress ink using brushes.  I think used one of the Double Stitched Rectangle dies to cut out a portion of this die and layered it on black card stock.

    I found a piece of red snowflake patterned paper in my stash and die cut it with the largest Double Stitched Rectangle die and layered it with black card stock.  I stamped the sentiment using Versamark ink and white embossing powder on the banner die from the Crafters Essentials Fall die set.  I then layered these panels onto a white card base.  I used dimensional adhesive to add the gnome and sentiment banner.  I added a few Sparking Clear jewels to finish off the card.

    Have you started making your Christmas/Holiday cards yet?

    – – –– – –– – –– – –– – –– – –– – –– – –– – –– – –– – –– – –– – –– – –– – –– – –– – –– – –– – –– – –– – –– –

    Here is a link to the Kat Scrappiness shop and direct links for products I used on today’s cards.

    – – – SUPPLIES for today’s project– – – – – – – – – – – – – – – – – – – – – – – – – – – – – – – – – – – – – – –

  • KS July Release – Day 1 – New SlimLine Dies & 4th of July SALES!!!!

    KS July Release – Day 1 – New SlimLine Dies & 4th of July SALES!!!!

    Hello Kat Scrappiness fans!  Welcome to Day 1 of the July release!    We are changing things a bit for our release post and hopefully you’ll be glad why we did it this way!  We have a HUGE release and each design team member was assigned a specific product to feature.  By doing so, you’ll be able to see different products and samples made by the team.  Throughout the month of July,  you will see samples that you haven’t seen from the release posts. This will keep things fresh and interesting, and you will be amazed with what the entire team has in store for you.  Stay tuned and subscribe to our Blog and YouTube channel to see all of these projects.


    Don’t forget that we also have a giveaway every day during the reveals so PLEASE SCROLL THROUGH AT THE END OF THE POST TO FIND OUT HOW TO WIN.


    Before I show you the products, I just want you all to know that Kat Scrappiness is having a 4th of July weekend “SITEWIDE” sale (excludes Slimline products).  Use the coupon code (‘FREEDOM”) to get 15% off.


    For todays reveal, we are showcasing a few Slimline dies –> the Cityscape, Tri-Frames and Double Stitched Nesting with the Coffee Background die and the Christmas Gnome stamp set.  Design Team member, Martha is showcasing (the previously released) Lola the Giraffe stamp set but the coordinating die didn’t come in time for this release.  However, you will still see Martha’s project today.  Here’s what the dies and stamp set looks like:


    Are you ready to see the samples?


    CITY SCAPE SLIMLINE DIE – MARIA RUSSELL


    I created the background by die-cutting masking paper using the Nesting Circle dies.  I ink-blended a Bristol smooth panel with Chipped Sapphire, Faded Jeans, Wilted Violet and Black Soot.  I used a paintbrush to flick some water on the colored panel and dabbed it with paper towel to dry.  Removing the mask revealed the full moon.  I used the Cityscape die to die-cut it in black and kept it simple by adhering it onto the colored panel with liquid glue.  I finished the design by stamping the sentiment with Versafine Onyx black ink and added an enamel heart.  Here’s a closer look:


    For my second card, I wanted to showcase the Cityscape die on an A2 size card to show versatility, die-cutting it a couple of times with some Bristol smooth white card stock and inking them up with some distress oxide inks in rainbow order.


    I used the Sunscape stencil to create a subtle hue for my background.  I finished the design by adding the sentiment from the Everyday Brush Stroke stamp set.  Here’s a closer look:


    TRI-FRAMES SLIMLINE DIE – JO THOMPSON


    This slimline card by Jo is just stunning!  She used the new Tri-Frames die set to die cut them in brown and yellow that matches the colors of Lola the Giraffe, adding a stenciled background using a grass stencil and finishing her design by adding a few colorful butterflies.  


    Here is Jo’s process video for this card:


    DOUBLE-STITCHED NESTING SLIMLINE DIE – JO THOMPSON & MARIA RUSSELL


    Jo used the new Cityscape Slimline die and the Tri-Frames Slimline dies to create this cute shaker card.  For her sentiment, she used the You Rock Sentiment die and used the new Old Glory Sprinkles, just in time for your Patriotic-themed projects.


    Here’s Jo’s process video for this card:


    I went for a simple card.  I die-cut the panel using the Double-Stitched Nesting Slimline dies and stamped the rainbows and other images a few times on the card.  The frame was foam-mounted for added dimension and to finish the design, I added some Sparkling clear jewels.  They are my favorite to use for cards!


    COFFEE BACKGROUND DIE – KATHY SCHWEINFURTH


    I absolutely LOVE this design by Kathy.  The background was die-cut using the new Coffee Background die and ink-blended to look like coffee stain.  She then adhered this piece on some brown card stock to make the images pop.


    Kathy added the coffee cup die-cut from the Layered Coffee Cup die set, popping them up with foam adhesive.  She finished her design by adding the Hooray sentiment and Coffee Beans sprinkles, all available at the shop.


    LOLA THE GIRAFFE – MARTHA GOMEZ


    Even though we didn’t received the coordinating die for Lola the Giraffe because of the delay in shipping, Martha managed to create this cute card using the stamp set.


    Martha stamped the image four times on this card panel and colored them in with alcohol markers.  She die-cut the gingham pattern frame using the new Tri-Frames Slimline die set.  She finished her design by popping up the sentiment and added a few sprinkles.  Here’s a closer look:


    CHRISTMAS GNOME STAMP SET – LISA GOLZBEIN


    Lisa created three (3) adorable Christmas tags using the Christmas Gnome stamp set.  She colored her images with some alcohol markers, and use her Scan N Cut to die-cut them out.  She die-cut the tags three times using the Stitched Scalloped Nesting dies and stamped the sentiment a couple of times to create the background.  She used foam adhesive to pop up the images and the sentiment.  She finished her design by adding a festive red ribbon with some red and white twine.


    We have also changed the giveaway prize so that you can pick what you want from the shop.  Would you like to win a $25 Gift Card to the KS shop?   We will pick one lucky winner!
     
    Here’s how to win:
     
    Leave a comment on this blog post and tell us what project/s inspired you to the most today.  You have until July 6 to leave a comment.  Winners will be announced on Tuesday, July 7thWinners should send an email to: winners@katscrappiness.com to claim their prize within 48 hours.
     
     
    ————SUPPLIES———–

  • You’re a Star Shaker Card

    You’re a Star Shaker Card

    Hello Kat Scrappiness fans, it’s Lisa from Oh So Cute By Lisa and today I’m shakin’ it up on the blog!

    Kat Scrappiness has the most awesome shaker kits and they are super easy to use!

    For my card today I used the Star/Splat Shaker Dimension Set and I filled it with some Party Confetti Sprinkles and some Sparkling Clear Jewels. There are lots of shaker kits available in the shop, here is a list of some of the newer ones:

    Dog House Paw Print Baby Bottle Onesie Teddy Bear

    Large Cloud Small Cloud Television Beach Ball Hot Air Balloon Balloon Car Large Diamond Small Diamond

    Large Splat Star Large Star

    Here is a look at the Shaker Kit, Sprinkles and Jewels on my card:

    This card was a lot of fun to make and super easy!

    I’ll walk you through the steps involved in putting it together.

    ———————————————————————————–

    I started with a kraft card base and I decided to make a smaller card than usual so that the shaker would be the main focus on the card. My card measures 3 1/2″ x 10″ and is scored at the 5″ mark so my completed card is 3 1/2″ x 5″.

    Step 1 – Adhere shaker foam base (included in kit) to front of card using

    Nuvo Deluxe adhesive and give it a minute or two to dry.

    Step 2 – NOW COMES THE FUN PART! Add your shaker bits into the well created by the foam. You can choose whatever you want and lucky for you Kat has a TON of sprinkles, sequins, confetti and other fun bits to make your shaker card SHAKE! I chose the Party Confetti Sprinkles and Sparkling Clear Jewels for my card. Make sure you don’t add too much so you’ll be able to shake those bits!

    Step 3 – Prepare die cut top frame. I traced the die cut star frame in the kit on to patterned paper and cut it out. I used a piece of patterned paper from the Honey Bee Over the Rainbow paper pack. If you don’t want to fussy cut your shape you could paint the frame or use markers on it or even do some heat embossing like I did on this card → Diamond Shaker Card.

    Step 4 – Once your frame looks the way you want it to you can glue the acetate sheet included in the kit to the back of the frame. Now glue your frame to your foam base.  I used Nuvo Deluxe adhesive and it worked perfectly.

    That’s it! 4 EASY steps to a super cute shaker card!

    You can decorate the rest of the card however you want but the shaker portion is quick and easy.  I used the Lawn Fawn Lucky Stars stamp set and heat embossed the sentiment on to black paper using a VersaMark Clear Embossing Pad and some Ranger Super Fine White embossing powder. Since I was using white embossing powder on black paper I made sure to prep my paper with the Inkadinkado Embossing Magic Pad first so I would only have powder melting on my stamped words. I also did some extra accents on my card using a White Gelly Roll Pen size 10. I also die cut 2 small stars from the Lawn Fawn Puffy Star Stackables  out of black paper and made white dash lines with my Gelly Roll pen to decorate the large star.

    To clean my stamps I always use the Lawn Fawn Stamp Shammy and I store it in the Lawn Fawn Stamp Shammy Case so it’s contained and ready to go.

    Here’s another look at the card with some of the supplies I used:

    This card was a blast to make and shaker cards are my all time favorite cards to make!

    Thanks so much for joining me today, head over to Kat Scrappiness and check out all of the amazing shaker kits and embellishments to fill them with!

    Don’t forget to follow Kat Scrappiness on all
    social media platforms to be alerted to new releases, sales and giveaways!

    Have a great day, I already am!

    ? Lisa  ? 

  • Have an Amazing Day | Masculine Wood Framed Cards

    Have an Amazing Day | Masculine Wood Framed Cards

    Hi Everyone, it’s Priscilla here. Today I have three cards using the Kat ScrappinessWood Grain Frame Die.” It is so easy to create “masculine-feeling” cards with this rustic- looking frame die combined with Sizzix “3-D Texture Fades” Embossing Folders and oversized resin embellishments. Plus, don’t forget to scroll to the end of this post to take advantage of our final day of the “President’s Day Sale”!

    Let’s get started!

    This frame die runs through your die cutting machine in one pass, but for an extra “wood grain” look, I suggest using an additional shim before you pass the die through your machine.


    For my first card, I ran the wood grain frame die through using Kraft card stock and then sponged on “Frayed Burlap” Distress Oxide Ink to enhance the “wood grain” look. I ran some eggplant card stock through my Big Shot using the Sizzix “Botanical” 3-D Texture Fades Embossing Folder and then sponged on some matching ink to deepen the embossing. The sentiment “Have an amazing day” was also stamped in Eggplant ink.


    I used deep purple alcohol inks to dye a Prima resin leaf embellishment, which I adhered to the front of the card along with some Kat ScrappinessSparkling Clear Jewels.”


    For my second card, I followed the same procedure, but this time using steel gray card stock with the wood grain frame and combined it with the Sizzix “Foundry” 3-D Texture Fades Embossing Folder.


    The same sentiment was stamped with dark gray ink and the resin leaf was dyed with dark gray alcohol ink. Kat ScrappinessSparkling Clear Jewels” again were the finishing touch.


    For my third and final card of this collection, I used Kraft card stock again for the frame, but this time I sponged “Walnut Stain” Distress Oxide Ink on it to deepen the grain.


    I ran metallic blue card stock through my Big Shot using the Sizzix “Mechanics” 3-D Texture Fades Embossing Folder, and then once again enhanced the texture with dark blue ink..

    The sentiment was stamped with navy ink and the resin leaf was dyed with several shades of blue alcohol ink. Kat ScrappinessSparkling Clear Jewels” again were the finishing touch.


    Thanks for stopping by! And don’t forget to check out what’s NEW in Kat’s Shop, and follow my blog and Instagramfor more “Kat Scrappiness Amazingness”!

    Priscilla

    Last Day of this Sale!

    The supplies I used are listed and linked below.

    SUPPLIES

  • He Is Risen Eclipse Card and Video

    He Is Risen Eclipse Card and Video

    Welcome back to the blog Kat Scrappiness fans, it’s Lisa here with you today!

     I have a fun Eclipse card to share with you and a video

    to go along with it to show you exactly how I made it!

    I have 2 guests in my video today…..

    My cat Poppers who refused to get off of my desk for the video

    so I let her stay, excuse the cat hair….

    My second guest is my daughter Taylor who took over for my

    voiceover about half way through the video.

    I was frustrated and tired and she knows so much about

    card making she agreed to help me out!

    She has a great sense of humor, I love her take on card making!

    Now on to the card.

    This card measures 4″ x 4″ and features the eclipse technique.

    I started out with a panel cut from the Square Zig Zag dies to stamp on.

    I stamped those lovely pastel brush strokes from the

    Everyday Brush Strokes stamp set and then I used the He Is Risen

    trio of crosses die to cut out a focal point.

    I also cut that beautiful trio of crosses out 4 more times in

    aqua card stock to layer under the stamped die cut.

    Once I layered the “built up” trio of crosses back on to the panel,

    they really stood in a very subtle way giving that classic

    eclipse look to the card.

    Sparkling Clear Jewels gave a nice finishing touch to this card!

    It’s much easier to understand in a video so you can check out

    my video here or on YouTube.

    [youtube https://www.youtube.com/watch?v=HfS-LdV0zgs]

    I hope you have enjoyed today’s card and I hope it inspires you

    to make your own eclipse card!  Also please consider joining us over at our

    monthly challenge, this month the theme is “Pastel”.

    Check out this post for more details.

    April Card Challenge

    As always feel free to use my code LISA10 to save

    10% on your order anytime!

    Thanks for stopping by and enjoy your day,

    I already am!

    ?Lisa?

  • January Release  – Day 1 – Lacy Layered Heart Die and Stitched Sentiment Strip Dies

    January Release – Day 1 – Lacy Layered Heart Die and Stitched Sentiment Strip Dies

    Hello Kat Scrappiness fans!  It is the first day of the January reveals and we are super excited to show off our new products!  For day 1, we will be showing you samples made by the team, showcasing the Lacy Layered Heart Die and the Stitched Sentiment Strip dies.  These dies will go perfectly well together or on their own.  Here’s what they look like:


    Lacy Layered Heart Die:


    Stitched Sentiment Strip Dies


    Throughout the month of January, you will be seeing blog posts and/or videos by the girls showing you how they made their cards.  Are you ready to get “wowed” by the design team?  Here are some of their AMAZING projects:


    Caren Bartholomew


    Cynthia Fahlgren


    Lisa Schneider-Golzbein


    Maria L Russell


    Tina Guigui Dornbaum


    I hope you LOVE the projects as much as I do!  Here are the links to the new products:


    Lacy Layered Heart:  –> http://bit.ly/2LTVKzJ

    Stitched Strip Sentiment Dies –> http://bit.ly/2s8I8Ym


    Remember to use the DT Coupon codes to get 10% off your order.  We will have a GIVEAWAY at the end of the reveals on Thursday so keep checking the blog.  Have an amazing day! HAPPY CRAFTING!