Tag: sloth stamp

  • You’re Never Too Old . . . Fall Slimline Card

    You’re Never Too Old . . . Fall Slimline Card

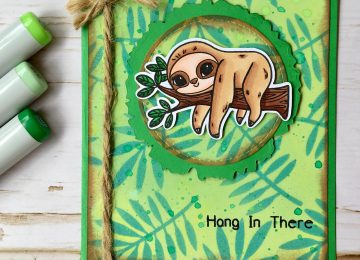
    Happy Wednesday Crafty Friends! Priscilla here from the  Kat Scrappiness  Design Team. Today I am sharing an autumn slimline card featuring Stewart the Sloth hanging out on a beautiful fall day just enjoying the foliage. I used the Kat Scrappiness Stewart the Sloth and Happy Fall Y’all stamp sets to make today’s card. (more…)

  • Stewart the Sloth Sports “Dr. Denton” PJs (and Coffee)  |  Paper Piecing Fun!

    Stewart the Sloth Sports “Dr. Denton” PJs (and Coffee) | Paper Piecing Fun!

    Hi Everyone, it’s Priscilla here. Today I have two cards to share with you using the new “Stewart the Sloth” stamp set, but with a bit of a twist. In my first card, Stewart is ready for bed in his “Dr. Denton” PJs, and enjoying a late night cup of coffee. In my second card, he’s letting you know where coffee ranks on his priority list. LOL! I’ll explain how I made both cards. Let’s get started!

    Whereas in my July 28th blog, I used the stamp image of Stewart hanging from a limb, for today’s cards, I chose the other stamp image — Stewart hugging a cup of coffee.

    For Card #1, I created a mask using a circle die and adhered it to an A2 card base and then sponged several shades of blue Distress Oxide inks over it to create a night sky. I used white pigment ink and Echo Park‘s “Summer Adventure Sky Constellations” to enhance the night sky. I sponged a dark blue Distress Oxide ink over Carta Bella’s “Wander & Find” stencil to create the look of vegetation below. Then I sponged, die cut, and adhered a moon slightly offset as a backdrop for the sloth. I stamped a tree limb from my stash, colored the sloth with Spectrum Noir “Tri-Blend” markers, and then cut him out using my Brother “Scan N Cut” machine. Here’s where the “paper piecing” came into play. I stamped the sloth again on patterned paper and fussy cut out just his PJs before paper piecing them on top of his body. Simply drawing in the back flap and two snaps on his PJs gave the look I was looking for — the “Dr. Dentons” we all wore as kids. LOL!

    The finishing touches were the white heat-embossed sentiment and Kat’s “Sparkling Clear Jewels.”

    For Card #2,Kat’s “Stitched Scalloped Collage Frame Die” created a background that I simply adhered a check patterned paper and a coffee cup embellishment; a black & white die cut image of Stewart placed over a gray coffee splat; and a white heat-embossed“Riley & Company” sentiment in the three open areas.

    Thank you so much for stopping by! Don’t forget to check out what’s NEW in Kat’s Shop, and follow my blog and Instagram for more “Kat Scrappiness Amazingness”!

    Priscilla

    The supplies I used are listed and linked below.

    SUPPLIES

  • Meet Stewart the Sloth By Meghan Kennihan

    Meet Stewart the Sloth By Meghan Kennihan

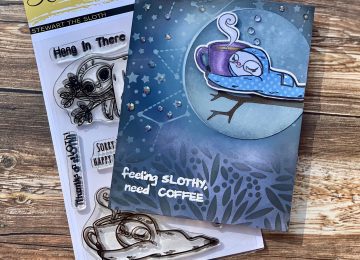
    Hi Crafty Friends,

    Have you seen the CUTEST Sloth ever!?! Meet Stewart the Sloth! He LOVES his coffee and just hanging out! This new stamp set from Kat Scrappiness is full of delightful quotes and cuteness. I hope you enjoy my two cards and they inspire you to pick this cutie up for yourself! I would love to see what you do with him.

    Make Crafty Friends Q & A:

    Q: If you could have a pet sloth, what would you name him?

    A: Me? Speedy (ha, get it?)

    I started my card by creating the panel. I inked it up in Distress Oxide Greens and then splattered it with water and water color greens!

    Next I used this darling leaf stencil and inked the fern leaves all over in Distress Oxide Lucky Clover.

    Then I die cut the circle shape from my panel with Kat Scrappiness Stitched Circle Die and mounted in on a green cardstock frame die cut using the Kat Scrappiness Distressed Edge Circle Die.

    I added Stewart to the middle of the circle and glued the rope to the side of my card.

    I finished my card by inking the edges with brown ink and adding the cute little sentiment.

    For my second card, I used Stewart HUGGING that cup of coffee like his life depends on it!

     I used the same technique to create my panel. Green Distress Oxides and watercolor splatters!

    Next I stenciled on the coffee beans with Kat Scrappiness Gina Marie Coffee Bean Stencil using Distress Oxide Expresso Bean.

     I die cut a scallop border on my green cardstock then diecut a rectangle to mount Stewart on using Kat Scrappiness Stitched Rectangle Die.

     I finished my card with the sentiments and the little brown sequins.

    If I have inspired you, please use the links below to get these cute products and follow me on INSTAGRAM here, and don’t forget to subscribe, follow, and comment!

    Don’t forget it’s our 5th Anniversary and the ENTIRE store is 20% off!!!! Don’t miss out! Help us CELEBRATE!

    Supplies:

    Kat Scrappiness Stewart the Sloth Stamp Set

    Kat Scrappiness Stitched Fishtail Banner Dies

    Kat Scrappiness Gina Marie Coffee Bean Stencil

    Kat Scrappiness Distressed Edge Circle Die

    Kat Scrappiness Stitched Circle Die

    Kat Scrappiness Sequins