Hello everyone!

Here is how I created the card:
- Created the card using the newly released Mail Storm background die to create a shaker card.
- Ink blended a piece of card stock and added it the card base.
- Ink blended another piece of card stock and die cut the background die.
- Added the piece of acetate and adhered it to the background.
- Added foam tape along the edges and adhered it to the background panel.
- With the left over background paper, die cut the word “Hello”.
- Stamped and heat embossed the sentiment from the NEWLY released Simple Sentiments Stamp & Die Bundle
- Assembled the card.
Thank you so much for stopping by, please be sure to visit Kat Scrappiness blog for more inspiration.
Here is a list of supplies I used on my card, Affiliate Links used at no additional cost. Thank you for your support.

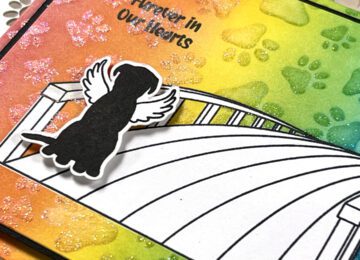
Rainbow Bridge Pet Sympathy Card | Stamping, Masking and Stenciling | Call Me Crafty Al
Hello crafty friends!
It’s Alicia a.k.a. Crafty Al here to share a look at the pet sympathy card that I created using the NEW Rainbow Bridge Sentiments stamp set from Kat Scrappiness, which is part of their NEW Release – Pawsome Dogs.

To get started I stamped the bridge and sentiment from the Rainbow Bridge set onto white cardstock. Then I stamped just the bridge onto some masking paper, cut it out and placed it on top of the white cardstock bridge.

Using a rainbow of inks, I blended the entire piece of cardstock and then I added the NEW Pawprint stencil on top and used the same rainbow colors so the pawprints would stand out. Before removing the stencil, I used some glitter paste in the paw openings, removed the mask and let it dry overnight. Once this was dry the paw prints were sparkly.

I used the largest die in the A2 Frames die set on the card front which left me with a border and center of the ink blended piece. The frame got adhered to a cardbase and the center portion was matted and added to the card base with foam.
To finish off the card I stamped the dog from the Rainbow Bridge stamp set, cut it out and popped it up below the sentiment.
You can check out my video for the full process…
Thanks for stopping by and I hope you enjoyed today’s card!
Alicia / Crafty Al
Related Products:
Kat Scrappiness
Rainbow Bridge Sentiments stamp set: http://shrsl.com/3np6r
Pawprint 6×6 stencil: http://shrsl.com/3ni7l
All NEW Products: http://shrsl.com/3hq9p
A2 Frames die set: http://shrsl.com/3me19
Rainbow Ombre Reverse Crossing Lock Craft Tweezers http://shrsl.com/3np8b
Gina K Designs Masking Magic: https://shrsl.com/3np6w
Lawn Fawn Fairy Dust Stencil Paste: https://shrsl.com/3np76
Versafine – Onyx Black Ink: http://shrsl.com/3np89
Memento – Tuxedo Black Ink: https://shrsl.com/38yw1
MISTI http://shrsl.com/3lyat
**Some links above are affiliate links. I link them up for your convenience and may receive a small commission, at no extra cost to you. I hope you will consider using the links if you decide to purchase the products I share. 🙂

Wishing you a Happy Day!
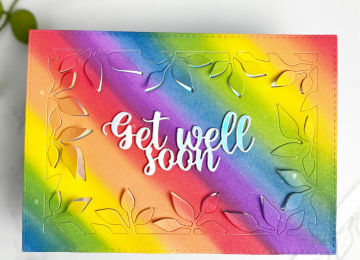
Sheri here today from the Design Team with a CAS (clean & simple) Rainbow card wishing you a Happy Day!

To Create Card:
- Cut A2 Top Fold Card Stock: 4 1/4″ x 11″, scored at 5 1/2″. (Used Gina K: Sea Glass)
- Cut white panel: 4″ x 5 1/4″
- Cut Rainbow out using the After the Rain die. (Used Gina K: Red Hot, Tangerine Twist, Wild Dandelion, Grass Green, Sea Glass, Blue Denim and Wild Lilac)
- Cut clouds from After the Rain and Stitched Puffy Cloud die sets.
- Stamp “Happy Day” from the Happy Day stamp set in black ink.
- Assemble Card. The White panel and top two clouds are popped up with foam tape for a little dimension. This set is optional.
- For embellishment I added Rhinestones: Almandine Garnet (Red Hot), Diamond (Tangerine Twist), Gold Mine (Wild Dandelion), <strong>Emerald (Grass Green), Aqua (Sea Glass), Blue Diamond (Blue Denim), Lilac (Wild Lilac). I also added a few Diamond Rhinestones to the clouds.

Here’s a list of the supplies I used from the store.
Affiliate Links used at no additional cost to you. Thank You so much for your support!


Ink Blended Rainbow Get Well Card

Hi, everyone! This is DT member Nicki of Nicki Hearts Cards here with a cheery ink blended rainbow card. Make sure to hop over to YouTube for all the details on this card.
Let’s get started with the colors you will need to create this beautiful rainbow.

I did a diagonal pattern with my stripes to add extra interest.

Once the ink blended panel was finished, I added some shimmer spray. The shimmer is beautiful on this project and really adds to the design.

After the panel dried, I used the fall foliage die to cut the pattern. I peeled up the leafs to add depth and so that I could add a holographic panel beneath the leaves. I used the same holographic paper to create the sentiment.

Thank you so much for joining me on this project. Make sure to check out the YouTube video for all the details. The links below provide me with a small commission at NO cost to you, so please click through them if you are shopping for anything today!

Simply Amazing!
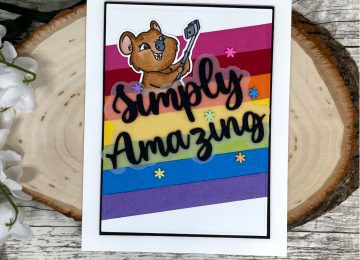
Hello everyone!
It’s Donna Idlet here sharing this FUN Rainbow card featuring products from the NEW October 2021 Release! I’m loving the newly released Box Sentiment Strips. I have used them on my card to create a rainbow background. They can be used for more than stamping sentiments.

- Card Base A2 size 4 1/4″ x 5 1/2″
- Cut Rainbow strips from cardstock in my stash to create the rainbow pattern using the 1/2″ wide strip from the KS Boxed Sentiments Strips die. I added the strips to a piece of cardstock and die cut it with the KS Embossed Edge Rectangle Dies.
- Cut Simply Amazing Sentiment w/shadow out of black card stock & vellum and glued together.
- Stamped, die cut and colored the Quokka from the KS Quokka’n Up Stamp Set.
- I assembled the card and finished it off using the KS Fun Flurries Sprinkles.


Sending Rainbow Hugs Slimline Card
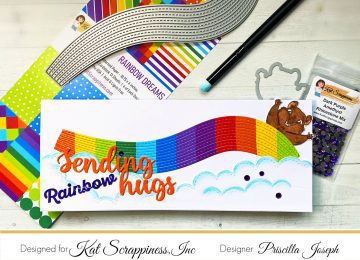
Hi Everyone! Priscilla here from Nubble Light Designs. Today I am sharing a slimline rainbow card, perfect for a friend just needing a (paper) hug. My card features several new products from the Kat Scrappiness August Release.

Check out Kat’s recent Release Post HERE.
Let’s get started!
I used one of the papers in the new Rainbow Dreams Slimline Patterned Paper Pad and Kat’s Slimline Rainbow Die Setto create a striking focal point for my card.

For my sentiment, I used Kat’s Sending Paper Hugs Word Dies; detaching the word “paper” and replacing it with a “Rainbow” stamp from my stash. Next, the Kat Scrappiness Slimline Stitched Cloud Border Die was the perfect compliment to my rainbow! I used one of the new Mini Detail Blending Brushes to lightly edge the clouds in “Tumbled Glass” Distress Oxide ink.

Do you see the adorable quokka peeking out above the rainbow? I used the just released Quokka’n Up Die Set to cut him out.
For my finishing touch, I scattered a few rhinestones from the new Dark Purple Amethyst Rhinestone Mix on the clouds. Kat’s new Embellishment Spoon was perfect for not just scooping up these rhinestones, but also embossing powders, glitters, sprinkles, and pearls.

Thank you so much for stopping by! Don’t forget to check out what’s NEW in Kat’s Shop, and follow my blog and Instagram for more “Kat Scrappiness Amazingness”!
Stay Safe . . .
Priscilla 🌈
The supplies I used are listed and linked below. I would be so grateful if you use these affiliate links to grab your Kat Scrappiness Goodies! No extra cost to you!

Hello Crafty Friend
Hi Everyone!
Today I have a couple of projects using the Swatches stamp set from Kat Scrappiness. These are great stamps to use to keep track of your inks, watercolors and Copics, but they’re also great for all kinds of stamping projects. I love using geometric designs on my cards, and that square was calling my name! The new Hello Crafty Friend word die is the perfect compliment to these colorful cards.
I have a video below showing my process, plus some tips for using solid stamps. I have all products from the Kat Scrappiness shop linked below. Be sure to use my coupon code Heidi10 to receive 10% off your purchase. Have a great day!
[youtube https://www.youtube.com/watch?v=nNKbKeotb70]
–SUPPLIES–

Rainbow Oxide Fairy Circle Card with Angeline
Hello everyone! Angeline here to share with you a rainbow card I made using lots of fun supplies — featuring the NEW Never Ending Circle Dies by Kat Scrappiness.

I thought I would have some fun with this new die set, and create a some-what circle card on an A2 card base. I first inked up the cardstock with lots of juicy Tim Holtz distress oxide inks and created my rainbow piece. Then, I used the dies to cut out lots of circles. I am so glad it turned out good! Kinda reminds me of a vinyl record, don’t you think?
Then, I created a magical fairy scene using the Lawn Fawn Fairy Friends stamp set. I absolutely am in love with Lawn Fawn sets and how superbly cute they are! I also managed to stamp the sentiment — curved along the circle die — using an acrylic block. Don’t worry, it will not ruin your stamps! 🙂

Interested to see how I made this card? Here’s the step-by-step process video from start to finish!
***
Watch video below | Watch video at Youtube
Here is the list of supplies I used to make this card. For all the supplies linked, you can get it from Kat Scrappiness store. Do remember to use my code “Angeline10” to get 10% off your order! Happy shopping.
▬▬▬▬▬★ S U P P L I E S ★▬▬▬▬▬
Never Ending Circle Dies by Kat Scrappiness
Lawn Fawn Fairy Friends stamp set
Tim Holtz distress oxide inks
Nuvo Jewel Drops
Aleene’s Quick dry glue
White cardstock
Colored Pencils
Acrylic Block
Sizzix Big Shot
Tim Holtz Distress Sprayer
Micropore tape/washi
Memento ink Tuxedo Black

You Are My Most Favorite! – Featuring 2-step stencils and Clarity Brushes

Hello everyone! I have a bright and fun project to share with you today. If you haven’t tried the Die Cuts and More 2 step stencils, you should! They are fun, versatile, and beautiful! The stencils paired with the Clarity Stencil Brushes are a match made in heaven. AND…to top it off this design and card were done in under 30 minutes;)

The 2 step stencils are very easy to use and have the most awesome designs. The one used on this card is called Cubicles. Please check out the video below for the detailed description and process on using both the Layering Stencils and the Clarity Stencil Brushes. I can show you so much easier than I can write out the process 😉
Have a great day!
Kelley;)
Video:


