Tag: LOVE card

  • Sending My Love Shaker Card

    Sending My Love Shaker Card

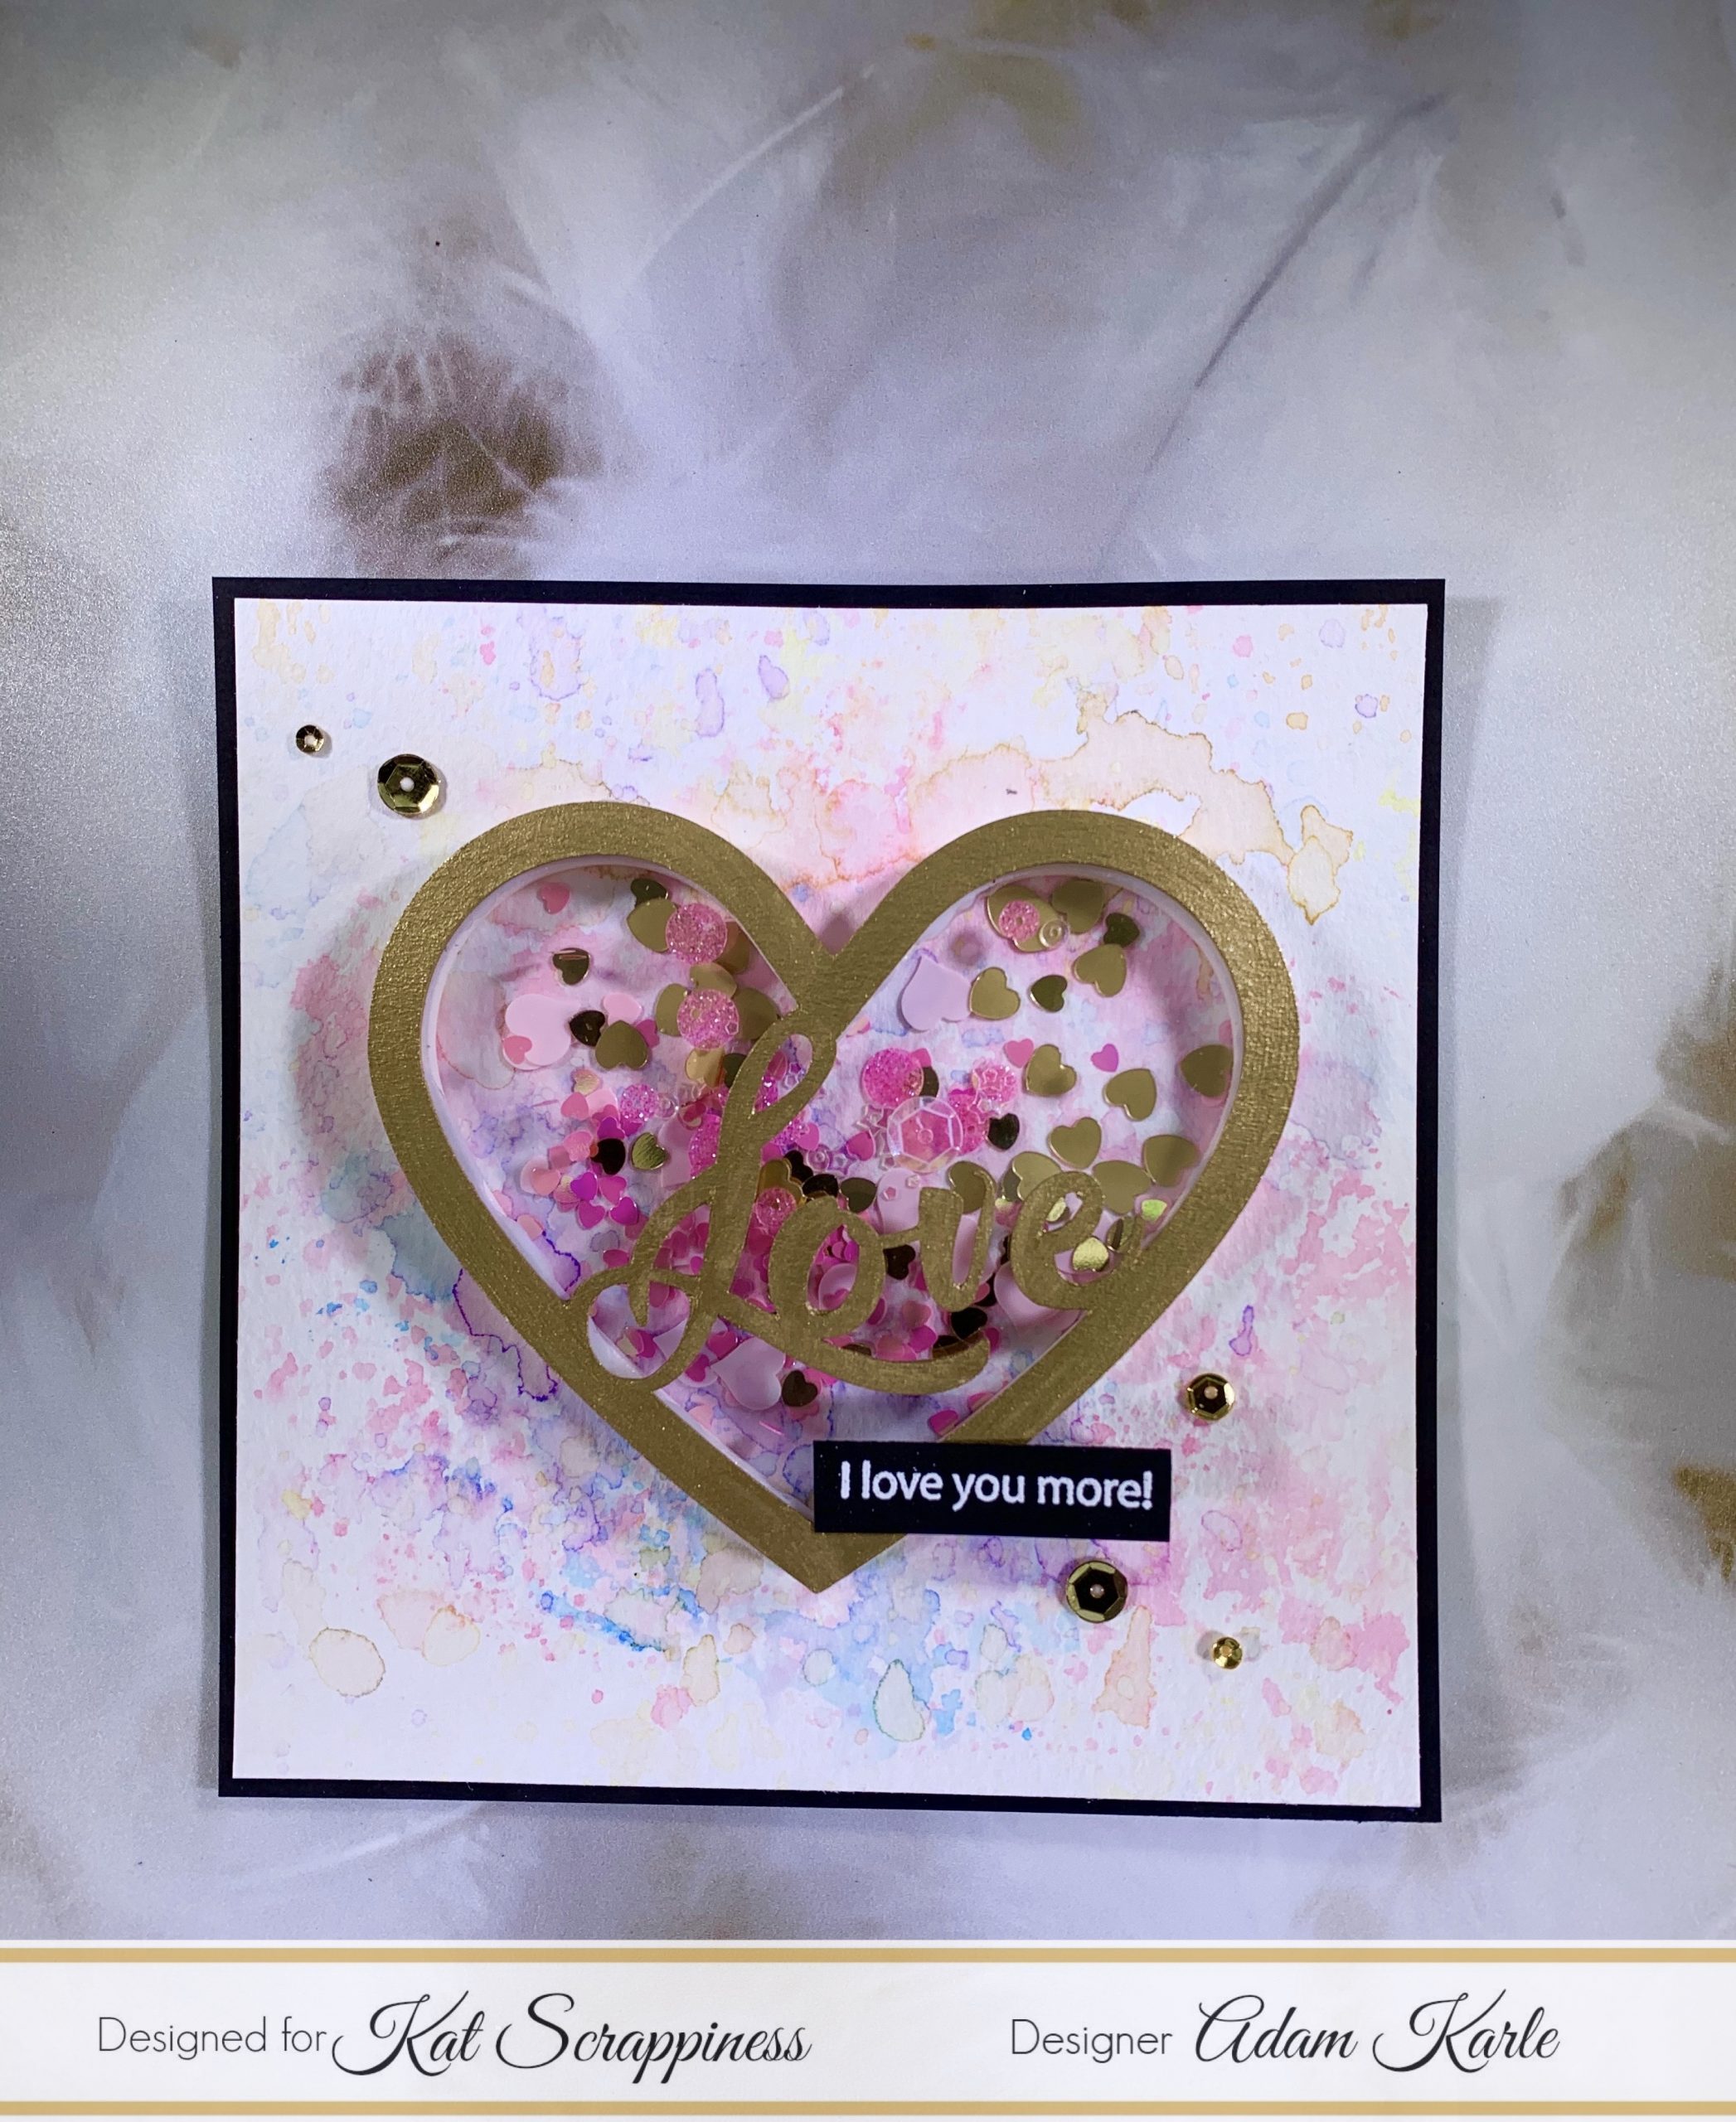
    Hello Friends! Sheri from the Creative Crew here today with a Sending My Love Shaker card featuring the NEW Mail Storm Backdrop Die and Simple Sentiments Stamp & Die Bundle.

    The Mail Storm Backdrop die is designed to cover an A2 size card and I wanted a white border on my card so I created a custom sized card: 4 3/4″ x 6″. I plan to use a 5″ x 7″ envelope.

    Steps to Create Card:

    • Create Card Base: Used Custom Size in order to have white border – 4 3/4″ x 6″ (9 1/2″ x 6″, scored at 4 3/4″). If you prefer a standard A2 card with no white border: 4 1/4″ x 5 1/2″ (4 1/4″ x 11″, scored at 5 1/2).
    • Die Cut Mail Storm Backdrop die with red card stock (used Gina K Red Hot card stock).
    • Cut Acetate to fit behind Mail Storm Backdrop die: 4 3/16″ x 5 7/16″.
    • Assemble Window: Adhere acetate to the back of the Mail Storm Backdrop panel using strong adhesive. Next line the outer rim of the panel with foam tape to create shaker well.
    • Cut Layering White card stock panel: 4 3/16″ x 5 7/16″. This is the panel you will ink blend to create your background (used a combination of Gina K Dusty Rose, Red Hot and Red Velvet). Next you will attach the blended piece directly onto your card base.
    • Stamp and embossed sentiments from the Simple Sentiments Stamp & Die Bundle. Take a piece of black card stock and emboss using White embossing powder. For the best results a stamping tool is recommended.
    • Die cut 3 small hearts using the smallest heart from the Layering Nested Heart die set (used Gina K Red Hot card stock).
    • Pour shaker bits in the center of your card.
    • Assemble shaker by attaching the Mail Storm Backdrop window to the card base.
    • Attach sentiment and hearts to shaker. You can attach with foam tape or directly to the acetate window.
    • For embellishment I added a bit of sparkle to the little hearts with a Spectrum Noir Clear Overlay pen and then used Glossy Accents to create a 3D embellishment.


    Here’s a list of supplies I used that can be found in the store.

    Affiliate Links used at no additional cost to you. Thank you for your support!


    Happy Stamping!!


  • Creating a Single Layer Card with Stamping, Masking and Stenciling | Call Me Crafty Al

    Creating a Single Layer Card with Stamping, Masking and Stenciling | Call Me Crafty Al

    Hello crafty friends!

    It’s Alicia a.k.a. Crafty Al here to share a look at the “I Love You” card that I created with Kat Scrappiness goodies including the NEW Falling Hearts stencil!

    To get started, I stamped two of the quokkas from the Valentine Quokkas stamp set onto the card front, making sure they would fit within the largest heart from the Double Stitched Hearts die set. Next I made a mask of each image and with the largest heart die – keeping the positive and negative pieces.

    I covered up the quokkas with their mask and centered the negative heart mask on the card front before ink blending inside of the heart with red ink. I made sure to keep the edges darker than the center. Once that was done I placed the positive heart mask in the open area and removed the negative. I brought in the Falling Hearts Stencil and ink blended those using the same red.

    After removing all of the masks I was left with a fun, single layer card. To finish it off I added some small hearts from the Love is Love Sprinkles.

    You can check out my video for the full process…

    Thanks for stopping by and I hope you enjoyed today’s card!

    Alicia / Crafty Al

    Related Products:

       Kat Scrappiness

          All NEW Products: http://shrsl.com/3hq9p

          Falling Hearts stencil: http://shrsl.com/3itbk

          Valentine Quokkas stamp set: https://shrsl.com/3bnav

          Double Stitched Hearts die set: http://shrsl.com/3itbn

          Love is Love sprinkles: http://shrsl.com/3itbg

       Art Glitter Glue: http://shrsl.com/37svl

       Jewel Picker: https://shrsl.com/3bedx

    **Some links above are affiliate links. I link them up for your convenience and may receive a small commission, at no extra cost to you. I hope you will consider using the links if you decide to purchase the products I share. 🙂

  • Clean & Simple “Love” A2 Card

    Clean & Simple “Love” A2 Card

    Sheri here today with a CAS (clean and simple) Valentine card idea!

    I love the look of Clean & Simple cards but sometimes struggle with leaving all the white space.

    For today’s card I used the white space to show off the texture of KS NEW Stitched Hearts Cover Plate and just added a trio of hearts and a sentiment! Do you like to make CAS cards?

    Steps to Create Card:

    • Create A2 Top Fold Card Base: 4 1/4″ x 5 1/2″ (4 1/4″ x 11″, scored at 5 1/2″).
    • Cut White Mat: 3 5/8″ x 4 7/8″
    • Take a 4 1/4″ x 5 1/2″ panel and cut it out with the Stitched Hearts Cover Plate. Next you will cut down the panel using the Never Ending Rectangles die set to create a panel measuring  3 1/2″ x 4 3/4″.
    • Cut out 3 hearts using the second largest die from the Nested Heart die set (2 1/2″ x 2 1/2″). I used Gina K Red Hot, Dusty Rose and Innocent Pink for my colored card stock. For a little added texture I ink blended the edges of the hearts with the coordinating ink colors.
    • Cut the “Love” from the I Love You Shadow die set with red glittler card stock.
    • Cut a Vellum belly band to wrap around card behind sentiment measuring 5″ x 1 1/4″.
    • For embellishment I cut out a few tiny hearts from the Heart Dounut Builder die set to sprinkle on the right side of my card.
    • Assemble Card. To add a little dimension, I used foam tape to pop up the card panel to the card base along with the three hearts.


    Here’s a list of the supplies I used from the store.
    Affiliate Links used at no additional cost to you. Thank You so much for your support!


    To Shop SALE, CLICK HERE

    Happy Stamping!!

  • Panda Love

    Panda Love

    Hello Everyone,

    I thought I would finish the month of love “February” with a cute card using Kat Scrappiness products and other items.

    I started with an Embossed Edged Heart Die from Kat Scrappiness cut from water color paper. Next I used the smooshing technique to color the heart. Finally some black ink was splattered onto the heart.

    A black card base and a stripped layer one were cut. The panda stamp is from the Waffle Flower “Be Him” Set. The embossed sentiment is from the B|M Sharon’s Script Stamp Set. All of these products are available on the Kat Scrappiness online store.

    The pieces are assembled into a fun card. Must admit I needed to add a mustache to make him look a bit more dapper. Added a few Gray/silver sequins to complete the card.

    Supplies:

    Kat Scrappiness- Embossed Edged Heart Die

    Kat Scrappiness – Silver City sequins mix

    Waffle Flower – Be Him Stamp

    Gina K – card stock

    Lawn Fawn – Let’s Polka in the Meadow paper

    B|M – Sharon’s Script stamp


  • Love

    Love

    Friends,

    When you get on a track of making themed cards it is some times hard to stop! So, I am sharing one more love card made with Kat Scrappiness Love Heart Shaker card kit and fills.

    I started by cutting a six inch square black card base. Next I cut a layer one square of watercolor paper. Using the smooshing technique I applied various colors of ink to the watercolor paper creating the background for the focal point of the card.

    Now for the shaker component of the card. Using gold paint I colored the heart/love shaker kit.

    I attached the dimensional part of the kit to the background and filled with Kat Scrappiness Cupid’s Arrow Sequins Mix and Rose Medley Sequins mix.

    Finally I Embossed the sentiment onto a small black banner and assembled the pieces. I added a few gold sequins and the card was complete.

    Supplies:

    Kat Scrappiness Love Heart Shaker Card Kit

    Kat Scrappiness Cupid’s Arrow Sequin Mix

    Kat Scrappiness Rose Medley Sequin Mix

  • Paw Print Sprinkles Shaker Card

    Paw Print Sprinkles Shaker Card

    Good morning Kat Scrappiness fans, It’s Lisa here on the blog with you today and I have a fun shaker card using some new Sprinkles that were just released in the shop!

    All you need is LOVE and a dog (or a cat)……. and maybe some Paw Print sprinkles!!

    Today in the Kat Scrappiness shop there are over 30 new sequins and sprinkles mixes

    that were recently released

    and they are SUPER CUTE and SUPER COLORFUL and SUPER SPARKLY!!!

    You are definitely going to want to check them ALL out!

    For my card today I am featuring my favorite one. It’s called Paw Print Sprinkles.

    HOW STINKIN’ CUTE ARE THOSE TINY LITTLE PAW PRINTS???

    The minute I saw them I knew they needed to be paired with Kat’s Pet Sentiments Die Set!

    They are the perfect addition to the paw print die!

    Here is the Card Recipe:

    • I started with a black A2 card base.
    • Next I took the Wonky Wavy Stitched Rectangle Dies and cut out a white layer with the largest die from the set.
    • Now I cut out 3 letters from the Large Alphabet Dies (L, V and E) in red card stock. I laid them out on my white panel so I could position the paw print from the Pet Sentiments Die Set where the O in love would be.
    • I ran the white panel through my die cut machine and cut out the paw print on a slight angle.
    • Once the paw print was cut I backed it with acetate and built foam tape all around it so I could make it into a shaker element.
    • I made sure to section off the bottom of the paw print separately from the top 4 holes so I could add 2 different shaker mixes inside the paw print.
    • The bottom of the paw got the Paw Print sprinkles and the top 4 holes got the red Heart Sprinkles .
    • I applied the shaker panel to the base of the card and added my 3 Large Alphabet Dies and the outline of the paw print in black to the front of the paw print shape.
    I am super happy with how this card turned out! I just love those sweet little Paw Print
    shaker bits and I love how they look inside the paw print die!
    If you are interested in purchasing any of the Kat Scrappiness products I used
    on my card, don’t forget to use code LISA10 to save 10% on your order at checkout.
    Thanks for stopping by and have a wonderful day!
    I already am!
    ?Lisa ?