Tag: handmade

  • January Release  – Day 1 – Lacy Layered Heart Die and Stitched Sentiment Strip Dies

    January Release – Day 1 – Lacy Layered Heart Die and Stitched Sentiment Strip Dies

    Hello Kat Scrappiness fans!  It is the first day of the January reveals and we are super excited to show off our new products!  For day 1, we will be showing you samples made by the team, showcasing the Lacy Layered Heart Die and the Stitched Sentiment Strip dies.  These dies will go perfectly well together or on their own.  Here’s what they look like:


    Lacy Layered Heart Die:


    Stitched Sentiment Strip Dies


    Throughout the month of January, you will be seeing blog posts and/or videos by the girls showing you how they made their cards.  Are you ready to get “wowed” by the design team?  Here are some of their AMAZING projects:


    Caren Bartholomew


    Cynthia Fahlgren


    Lisa Schneider-Golzbein


    Maria L Russell


    Tina Guigui Dornbaum


    I hope you LOVE the projects as much as I do!  Here are the links to the new products:


    Lacy Layered Heart:  –> http://bit.ly/2LTVKzJ

    Stitched Strip Sentiment Dies –> http://bit.ly/2s8I8Ym


    Remember to use the DT Coupon codes to get 10% off your order.  We will have a GIVEAWAY at the end of the reveals on Thursday so keep checking the blog.  Have an amazing day! HAPPY CRAFTING!


  • It’s Beginning to Look a Sloth Like Christmas

    It’s Beginning to Look a Sloth Like Christmas


    Hello my crafty friends!  I hope you all had a wonderful Thanksgiving holiday!  I meant to post on November 23rd but due to my current move and travel schedule, I was not able to organize the post so I apologize for that.  Before I begin, I wanted to let you all know that Cyber Monday is 25% off!  Please use coupon code “MONDAY25”  Hurry and order your favorites before they are gone!


    It’s Maria here with you today I am back with this cute Christmas card, showcasing the Foliage Frame Die, the Slothy Christmas stamp set and matching die by Newton’s Nook and other products available at the shop.


    I started by stamping my images on Neenah solar white card stock and colored the images in with my Copic markers.  I die-cut the images using the coordinating dies.  I also die-cut another piece of Neenah solar white card stock using the Foliage Frame die set.  This die is so beautiful!


    I cut an A2-size piece of Bristol smooth white card stock and inked up this background with some Tumbled Glass and Spun Sugar distress oxide inks, using my mini-ink blending tool.  I put a few drops of my Vintage Photo distress re-inker onto an acrylic block and added a few drops of water then used my watercolor brush to splatter some color onto my colored background.  I adhered this piece onto my card base.


    I added some foam adhesive on the frame to give it a little bit of a dimension.  To finish my design, I adhered my colored images onto the card and covered the Santa hat with some stardust stickles.  Here’s a little close-up:


    Don’t you just LOVE this new Foliage Frame die?  Also the sloth is so cute with that little mouse!  I really love how this card turned out.


    I hope you like my Christmas card today.  Please visit Kat Scrappiness today to order all of the supplies I used.  They are listed and linked below. Don’t forget to take advantage of the Cyber Monday sale using coupon code “MONDAY25” for 25% off your order!


    ———SUPPLIES————


  • November Release Christmas Cards by Maria

    November Release Christmas Cards by Maria

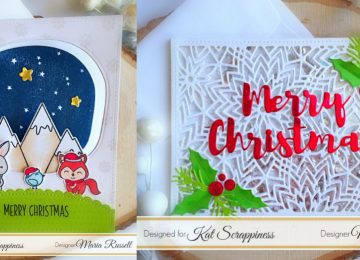
    Maria here on the blog with you today!  Have you checked out the new dies and jewels available now from the November release by Kat Scrappiness?  They are to die for!  I can’t even pick a favorite.  Wait til you see the dies next month, hint, hint!  They are fabulous!!  You really need to save up your Christmas money for those.  Or ask Santa to check out your Christmas wish list at the shop then maybe he will be good to you this year!


    Since my design team package got a little delayed getting to me, I am on catch up mode.  I created two projects for you guys because I really wanted to show them off!  For my projects today, I am featuring the Holly Leaves and Berries die set, Fancy Floral Coverplate die, Merry Critters stamp set, Avery Elle Starry Scene stamp set, 6mm Sparkling clear solid confetti, Metallic Silver Solid Star Confetti, Stitched Scalloped Border Dies and a bunch of other products available at the shop.


    For my first card, I stamped the Merry Critters stamp set and the mountains from the Starry Scene stamp set with a Copic friendly ink and colored them in with my Copic markers.  I fussy-cut the images with my scissors.  On another piece of Neenah solar white card stock, I stamped the mountains from the Avery Elle Starry Scene stamp set.  I adhered this piece onto my A2 size card base.  I used the coordinating die to die-cut both pieces to create the window.  I adhered this piece inside my card.  I also adhered the mountains inside the window.


    I used a patterned paper from Lawn Fawn and die-cut a piece with the Stitched Scalloped Border Dies to create my grass hill.  I adhered this piece onto my foreground and added my little critters.


    To finish my design, I die-cut some gold stars and stamped the little snowflakes with some light gray ink.  Here’s a little close-up:


    I really love how this card turned out.  The critters are so cute.  That little bird reminds me of tweety so much.  The little starry background is just the perfect size to create a beautiful scene to your cards.


    For my second project, I die-cut a piece of some heavy weight white card stock using the Fancy Floral Coverplate die.  I know this die is not really meant for Christmas but I always want to share ideas on how to stretch your dies by using it for any occasion.  I covered this piece with some acetate sheet and added foam adhesive to create my well.  I used the 6 mm sparkling clear solid confetti with the metallic silver solid star confetti for my shaker element.   I know you can barely see them in the photo but trust me, this is so pretty in real life!


    To finish my design, I die-cut the Merry Christmas sentiment with red foil card stock.  I also die-cut the holly leaves and berries with some Lawn Fawn patterned paper and red foil card stock.  I adhered the pieces using my Nuvo liquid adhesive.  Here’s a little close-up:


    The holly leaves are so pretty!  As I mentioned earlier, I can’t pick and choose my favorite from the November release.  They are all AMAZING!!!!!


    I hope you like my projects today.  The supplies I used are listed and linked below.  I would be grateful if you can click on the links provided.  By doing so, I will be getting a little commission at no cost to you!  Please don’t forget to use my coupon code “MARIA10” for 10% off your order at the shop.   Happy crafting!


    ———–SUPPLIES————


  • There’s Snow One Like You!

    There’s Snow One Like You!

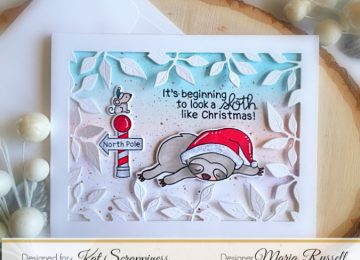
    Hello my crafty peeps! Maria here with you today and I’m back with a Christmas card, showcasing the Merry Critters stamp set.  I LOVE this stamp set so much and I just couldn’t wait to play with it.


    I started by stamping my images on Neenah solar white card stock and colored them in with my Copic markers.  The little yellow bird reminds me so much of tweety!   Here’s what the stamp set look like:


    Since this stamp set didn’t come with coordinating dies, I die-cut the images using my Brother Scan N Cut 2.


    I inked up my background with some distress oxide inks.  I ahve been loving the Tumbled Glass and Spun Sugar color combination lately!  It gives the perfect wintery-sky!  Here’s my card:


    I used some white glittered card stock as well to create my snow hill.  I think this card turned out so cute.  Here’s a little close-up:


    I hope you like my project today.  The supplies I used are listed and linked blow.  Please consider supporting me by clicking on those links.  Don’t forget to use my coupon code “MARIA10” for 10% off your order.  Have an amazing day!


    ——–SUPPLIES———-


  • Happy Fall Card by Jo Herbert

    Happy Fall Card by Jo Herbert

    Hi all, Jo Herbert here bring to you another blog post using the beautiful Happy Fall stampset. I have enjoyed copic colouring this main stamp image from the set.

    I started by repeat stamping the leaf image randomly on a white cardstock slightly smaller than the black top folding card base.  I have chosen a grey ink as this is soft in tone and I didnt want to take away from the cetnre coloured image.

    To maximize the usage of the Stitched Scallop Collage Frame Dies iI rimmed it down to one frame to add as a border for my card. I felt this help frame my copic coloured image. I copic coloured the frame to coordinate with the main image. I did the same for the sentiment strip and heat embossed with white over the top. It’s a great way to colour coordinate and tie in all your creation.

    I have made a youtube of my card making process over on the Kat Scrappiness youtube. Come and visit and say hi. I would love to hear from you.

    To get 10% off your entire order in the Kat Scrappiness store use jo10 on checkout.

    Thank you so much for your lovely comments and support everyone.

    Hugs

    Jo

  • Wine Cards with the September Release by Maria

    Wine Cards with the September Release by Maria

    Hello Kat Scrappiness fans! Maria here with you today with some simple cards featuring the new Peacock Backdrop die, the Wine Not stamp set and the Wine Not Custom craft dies.


    For my first card, I started out by die-cutting the Peacock Backdrop die some Bristol smooth white card stock.  I inked up this piece with some squeezed lemonade, spiced marmalade and picked raspberry distress oxide inks with my mini ink blending tool.  I set this piece aside to dry while I worked on die-cutting the Wine Not Custom craft dies.  I used Neenah smooth white card stock to color the bottle with my Copic markers and used a silver card stock for the wine glass.  I added glossy accents to make it look more realistic.   I also die-cut a frame by using the double stitched rectangle die and the stitched rectangle die.  Here’s the first card:


    I adorned my card with some images from a stamp set by Newton’s Nook and also added the beautiful Champagne jewels.  I love the new jewels collection from the shop.  They are available in a variety of colors.  Here’s another look:


    For my second card, I die-cut the pieces again with some Neenah solar white card stock and colored the die-cut pieces with my Copic markers.  I inked up an A2 size piece of some Bristol smooth white card stock with a stencil from my stash.   I stamped the sentiment from the Wine Not stamp set.  Here’s my second card:


    To finish the design, I also added the cheers sentiment from my stash and the tiny bow is from a die-set by Lawn Fawn.  Here’s another look:


    For my third card, I wanted to create something simple just using the Wine Not stamp set.  I die-cut a piece of some Neenah solar white card stock with the Stitched Fancy Scalloped rectangle die.  I colored the images in with my Copic markers.  To finish my design, I stamped the sentiment using Versafine Vintage Sepia ink.

    I hope you like my cards today.  Which one is your favorite?  The supplies I used are listed and linked below.  Don’t forget to use my coupon code “MARIA10” for 10% off your order at the shop.  Have a nice day!

    ———–SUPPLIES————


  • Missing You Card by Maria

    Missing You Card by Maria

    It feels like it’s been ages ago since I last posted on this blog (or maybe it’s the jet lag talking) but Maria here with you today to share this very simple shaker card, showcasing the Stitched Diagonal Backdrop die with the Missing You Brush Script Word & Sentiment die, the Fab Flowers 4×6 Stamp Set by Lawn Fawn and the Fab Flowers Dies with some Pretty Pink Jewels and Hearts of White Sequin mix.


    I stamped my images with some Lawn Fawn inks using my Tim Holtz stamping platform.  I die-cut the images with its coordinating dies.


    I die-cut another piece of some Neenah 110 lb. card stock using the new Stitched Diagonal Backdrop die.   This die cuts like butter and is perfect for shaker cards!


    I adhered my acetate onto the die-cut and added foam adhesive to create the well for my shaker card.  I poured the Hearts of White Sequin Mix on my card base and positioned it to make it easier for me to adhere my shaker well on top of the card base.


    I also die-cut the “Missing You” Brush Script Word and Sentiment die twice on some black and white card stock.  Since the card has mostly white on it, I wanted to create a shadow behind the Missing You script die so that it stands out, without overwhelming the design of the card.  I adhered this piece on top of the acetate.  Here’s what the card looks like:


    I just love this card design.  I think all the elements I used for this card just complimented each other.  Here’s a little close-up:


    The new Hearts of White Sequin Mix is so beautiful, I cannot wait to order more from the shop.  Also, don’t you just love the stitching details on the die-cut?  I am in-love with this design.


    I hope you like my shaker card today.  The supplies I used are listed and linked below.  Please don’t forget to use my coupon code “MARIA10” for 10% off your order at the shop.  While you’re there, don’t forget to check out the sales and specials going on.  I hope you have a wonderful day and happy crafting!


    ————-SUPPLIES———-


  • Trick or Treat Card

    Trick or Treat Card

    I know it’s only August but I like working on my Halloween cards as early as possible as I make quite a few of them to send to friends.  For my card today I am showcasing the Stitched Scalloped Collage Frame Die, the Lawn Fawn Halloween set and the new Gold Jewels mix and 3mm Transparent Neon yellow Solid Star Confetti mix.


    I started out by stamping my images on Neenah solar white card stock and colored them in with my alcohol markers.  Since I don’t have the coordinating dies for my images I used my Brother Scan N Cut 2 to die-cut them.  I also die-cut the Stitched Scalloped Collage Frame die with some black card stock and used my foam adhesive to create my little well for my shaker card.


    I assembled my shaker card and stamped my sentiment on some orange card stock using the banner die that is included in the Crafter’s Essentials 1 die set.  This die-set is probably one of my all-time favorite dies to use for my projects.


    Here’s my card:


    I didn’t use the traditional orange and black sequins because I felt that it would have overwhelmed the whole card design.


    I love how this card turned out.  The new Gold Jewels mix is beautiful!  Here’s another look:


    Before I end this post, I wanted to let you guys know that Kat Scrappiness is having a 20% off sale on all Neat & Tangled products, using coupon code “NEAT20” and this is only valid until August 19, 2018.


    I hope you guys got inspired today.  Please use my coupon code “MARIA10” for 10% off your order.  Remember, you cannot combine this coupon code with other sales in the shop.  Thank you for stopping by and have a wonderful day!  Happy crafting!


    ————-SUPPLIES————


  • Just A Little Hello

    Just A Little Hello

    Howdy Kat Scrappiness fans!  Maria here on the blog today with a simple card, showcasing the Crafter’s Essentials 1 die set.  If you are waiting for this die-set, you are in luck because they are arriving back in stock next week!  If you haven’t ordered this yet, you can now reserve it so that you don’t have to wait again.


    To make things easier for me, I started out by choosing a sketch pattern from the Kat Scrappiness site (you can see this photo on the product sample).  I downloaded this sketch and inserted this piece in the envelope with the dies so I can use them for my future projects.  Sometimes, it is helpful to have it when you’re not feeling crafty!  I am having one of those days since the majority of my supplies are currently loaded in a shipping container, en-route to our home in FL.


    I die-cut some A2 size card stock with the rounded-edge rectangle die.  I used the same die to die-cut a patterned paper.


    I used the long strip die that is included in the set to die-cut another piece of some white card stock (slightly a different color from my card base).  I also used the stars die to die-cut  one pin pink, blue and yellow.


    I stamped my images on some Neenah solar white card stock and colored it in with my Copic markers.  I die-cut the image with the coordinating die.  To finish my design, I stamped the sentiment using Versafine Onyx Black ink and used my belli-roll pen to add more details to the images.  Here’s my card:


    I love the simplicity of this card.  I didn’t do a lot as you can tell, but it turned out really cute!  This sketch is also perfect to create a “Welcome Baby” card.  Here’s another look:


    This Crafter’s Essentials 1 die set is definitely a must-have for any paper crafter.  I think the little stitched star die is just the right size to add to your projects.  I love the stitching details to it as well.


    I hope you like my card today.  Please don’t forget to use my coupon code “MARIA10” for 10% off your order at the shop.  Don’t forget to check the clearance section too!  I wish you all a wonderful day!  Happy crafting!


    ———SUPPLIES————


  • Crafter’s Essentials 1 Cards by Maria

    Crafter’s Essentials 1 Cards by Maria

    Hello my crafty friends! I hope you are all having a great week so far! Maria here with you today sharing some cards, showcasing the new Crafter’s Essentials 1 die set and a lot of products available at the shop.  This Crafter’s Essentials 1 die-set is a must-have!  This set contains 12 steel-rule dies that you can use for all of your paper crafting projects!  Here’s what it looks like:


    For my first card today, I stamped some images on some white card stock with my Lawn Fawn Jet black ink using my Tim Holtz Stamping Platform tool.  I colored the images in with my Copic markers and die-cut them using the coordinating dies.


    I also die-cut another piece of white card stock using the storybook die from the set.  I wanted to create a birthday card.  I stamped the small images on the card stock and assembled my card.


    I really love how this card turned out.  There are so many possibilities using this Crafter’s Essentials 1 die-set.  I also love all of the stitching details! Here another look:


    For my second card below I wanted to use some new sequin and confetti mixes from the Shop and some Nuvo crystal drops.  I also used the new My Tribe stamp set by Honey Bee Stamps.   Here’s my shaker card:


    This shaker card is actually going to a friend of mine who is also crazy about crafting!  I am so thankful that she is a part of my tribe!


    I hope you got inspired today.  The Crafter’s Essentials 1 die set is sold out at the moment but more are coming in the next 7 days or so.  You can RESERVE the dies so you don’t miss out again.  The supplies I used are listed and linked below.  Have an amazing day and happy crafting!


    ————-SUPPLIES————-