Tag: Foam Tape

  • Shaker Card Tips featuring the NEW Summer Release!

    Shaker Card Tips featuring the NEW Summer Release!

    Hi, this is Nicki from the DT! I’m here today to share some fun shaker card tips. For all the details, make sure to watch the YouTube video.

    First, I used the A2 Reverse Scallop frames, A2 Quilted Backdrop Die and acetate sheets to make the shaker window.

    acetate sheets, quilted cover, reverse scallop

    After securing the acetate to the frame, I added 2 layers of foam tape strips. Once the foam tape is in place, you must use a powder tool to make sure that extra adhesive doesn’t attach to the shaker pieces.

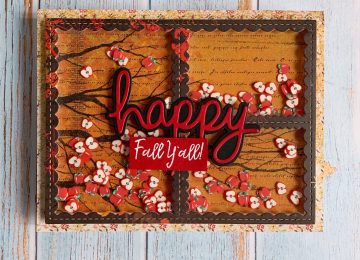
    Next, attach the shaker window to the front of the card with shaker pieces in place. Now, add the foliage and sentiment to the front of the window. Make sure to use double sided adhesive instead of liquid glue to do this for the best results.

    Here is another look at the final card! Make sure to check out the supply list and click on these links if you are shopping soon. Happy crafting!

    Nicki Baxley, Nicki Hearts Cards, card making

    Supplies:

    A2 Quilted Backdrop Die

    A2 Reverse Scallop Dies

    Stitched Foliage Dies

    White Diamond Sequin Mix

    Friendship Greetings Stamp Set

    Telescopic Embossing Powder Tool with Retractable Brush

    A2 Acetate Sheets

    3D Foam Strips White by Couture Creations

    Elizabeth Craft Double Sided Adhesive Sheets

    Elizabeth Craft Double Sided Adhesive 0.125

    WOW! Metallic Silver Super Fine Embossing Powder

    Versamark Embossing Ink


    <!– LinkDeli Code Start –>
    <a class=”linkdeli-image” target=_blank href=”https://linkdeli.com/view/7b6cb70e-11e2-440a-9bdd-9e9df403bfc5″ rel=”nofollow”><img src=”https://linkdeli.s3.amazonaws.com/public/placeholders/7b6cb70e-11e2-440a-9bdd-9e9df403bfc5.jpg”></a>
    <!– LinkDeli Code End –>

  • Nothing Says Fall Better Than Apples

    Nothing Says Fall Better Than Apples

    Hi Everyone, it’s Tina here. Summer is coming to an end and although I will miss flip flops and single layered clothing that means Fall will be here soon. Fall is one of my favorite seasons for the beauty and the activities. I still look at the changing color of the leaves with wonder. It is also brings my favorite activity. Apple picking which is what inspired today’s card. This is also a good opportunity to use your Fall Patterned Paper. Below are the steps to create your own card.

    Step 1 – Trim White Cardstock to 8 1/2″ x 5 1/2″, score at 4 1/4″ and fold in half for a horizontal side fold card (A2)

    Step 2 – Trim Pattern Paper to 5 1/2″ x 4 1/4″ and adhere to card using Nuvo Deluxe Adhesive.

    Step 3 – Diecut Scalloped Collage using Pattern Paper. Adhere an acetate sheet to the backside using Double Sided Adhesive Tape. Double your Foam Tape for added dimension and adhere it on top of the Acetate Sheet at the edges. I used Foam Tape to separate each window. Trim a piece of Pattern Paper to use as your background. Add the Apple Sprinkles to the background making sure they are positioned in the right area. Remove the release sheet from the Acetate Panel and adhere to the background. Adhere the whole panel to the card front using Nuvo Deluxe Adhesive.

    Step 4 – Diecut Happy using Red Cardstock (The die is from my stash). I diecut the shadow die using Black Cardstock. Assemble and adhere to card using Nuvo Deluxe Adhesive.

    Step 5 – Stamp Happy Fall Y’All sentiment using Versamark on Red Cardstock. Sprinkle White Embossing Powder and remove the excess. Heat set it with a heat tool. Trim the edges and adhere to card front using Nuvo Deluxe Adhesive and a small piece of Foam Tape underneath on the left side.

    This card can be used for many occasions by changing the patterned paper, sentiments and sprinkles. Below is a link to all the products used. Thanks for stopping by and have a wonderful day!

    Products Used:

    https://linkdeli.com/widget.js?1559654439292