Tag: Fanciful Spaces

  • Watercoloring with Distress Inks

    Watercoloring with Distress Inks


    Hi there! Hannah here! 😀 Today I have a technique video to share!

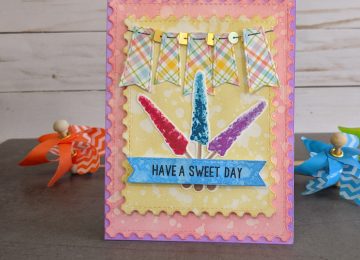
    I created this card and I thought I’d show you how! Watercoloring with Distress Inks is one of my favorite techniques the colors stay true to the ink, and the ink moves so wonderfully. You can dilute it as much as you want, or keep it as strong and rich as you wish.

    This card was the perfect reason to showcase Kat’s new Stitched Flag Dies! The sentiment I used is from the new Dad’s Tools stamp set, which just shows you how versatile the set is!

    Have a quick look at my video!

    [youtube https://www.youtube.com/watch?v=Xux1h4HreEA]

    I hope you enjoyed my card(s) and my video. I also hope that you took my mistakes to heart, it is just paper and it is a great learning experience!

    This has been Hannah Rubenstahl, of Fanciful Spaces, hoping you have a crafty day, and if you need any of the products I used, feel free to use my discount code: Hannah10!

    Products used:

    Stitched Flag Dies by Kat Scrappiness
    Dad’s Tools Stamp Set by Kat Scrappiness
    Wonky Wavy Stitched Rectangle Dies by Kat Scrappiness
    Distress Inks
    Memento Tuxedo Black Ink
    Watercolor Paper
    Blue Cardstock
    Neenah Solar White 110lb
    Scor Tape
    EK Tools 3d Strips
    Glue Tube by Lawn Fawn
    Fun Foam

  • Have a Sweet Day!

    Have a Sweet Day!

    Hannah here! Today I’m bringing you a card that I simply adored making. I enjoy making nearly all the cards I make, but some of them I love more than others. I love adding depth to my cards, I also love moving elements, which is one reason why I love shaker cards. But I REALLY love moving elements when they aren’t expected.

    Sequins provide that perfect opportunity for movement out of the unexpected. Why? Because you can string them via the holes in the center! I’ve done this for Kat Scrappiness before for a Halloween card and a Fall card. Using a needle and thread I attached both sequins and some Stitched Flag Dies.

    When these guys move on a card, it is positively delightful!

    To create the depth in the card, I backed the various layers with fun foam. Fun Foam is a very inexpensive way to create volume on a card, much less expensive than other alternatives on the market.

    You can see here, the fun foam layered on the backside of a panel. Additionally, you can see the Scor-Tape and the Ranger Multi Medium Matte. The first is used to attach the fun foam to the next layer of paper, the later to ensure my string stays put.

    I was very much inspired by the fun bright colors found in the Perfectly Plaid Spring Lawn Fawn paper. The Distress Oxides: Wilted Violet, Worn Lipstick, Squeezed Lemonade, and Salty Ocean accented the paper quite nicely. So I made some card panels and cut them out using the Stitched Rectangle Postage Dies and the NEW Stitched Fishtail Banner Dies!

    Oh, those YUMMY rock candy sticks? Oh, those delicious things are from the Rock Candy Layered stamp set by Kat Scrappiness! I chose to use my Altenew inks for the layering, they work so perfectly with layered sets like this.


    When everything is all together this, BRIGHT and SHINY card is what you create!


    All but the center flag move, and look at the layers! It is such a fun card!


    I think this is the perfect card to send to someone “just because.” If you are interested in any of the products I have used, especially the NEW ones, you can find them below. Feel free to use my discount code Hannah10 for 10% off. 🙂

    Stitched Flag Dies by Kat Scrappiness
    Stitched Postage Stamp Edge Rectangle Dies by Kat Scrappiness
    Stitched Fishtale Banner Dies by Kat Scrappiness
    Rock Candy Layered Stamp Set by Kat Scrappiness
    Spring Leaves Sequin Mix by Kat Scrappiness
    Perfectly Plaid Spring paper by Lawn Fawn
    Distress Oxide
    Altenew Inks
    Memento Tuxedo Black Ink
    Scor-Tape
    Ranger Multi Medium Matte
    Fun Foam
    Embroidery Thread

    This has been Hannah Rubenstahl, of Fanciful Spaces, sincerely hoping you have a crafty day!

  • Dad’s Tools – Happy Father’s Day

    Dad’s Tools – Happy Father’s Day

    Hi there! It is Hannah, bringing you a Father’s Day card! We’ve got just about a month to get those cards to the father figures in our lives, there is no time like the present to start working on them!

    Fortunately, Kat has a new layered stamp set called Dad’s Tools! This set is PERFECT for Father’s Day, men’s birthdays, or just because. There is such a wide range of sentiments in this set you’ll always find a use for it!

    I started by smooshing Distress Inks: Blueprint Sketch, Salty Ocean, and Tumbled Glass onto some Watercolor Paper. Then I use the largest of the Distressed Edge Rectangle Dies, by Kat Scrappiness, to cut a panel of that out. The finishing touch, on that panel, was to create a vignette look by adding the same Distress Ink along the edges.

    Next, I stamped out my hammer. I chose to use Altenew Inks, as this is what I had on hand, however you should look at your grays and browns. You can mix brands! You might have a variety of different companies that work well for you! You’ll want 4 grays and 4 browns. If you are interested you can message Kat and see if she is able to special order something for you too. 😀

    The hammers I cut out using my Scan-n-Cut, however, it would be really easy to fussy cut. I laid them out to figure out where they would go on my card and then stamped out my sentiment accordingly. This sentiment was stamped using Memento Tuxedo Black and then clear embossed. Finally, I popped my hammers up using foam squares. The watercolor panel was then adhered to some coordinating cardstock I had on hand and voila! The perfect Father’s Day card! Super easy and super fun!


    This has been Hannah Rubenstahl, of Fanciful Spaces. It is my sincerest hope that I have inspired you to create! If you need the Dad’s Tools stamp set or any other products at Kat Scrappiness, please feel free to use my discount code Hannah10!

    Products Used:

    Dad’s Tools Stamp Set by Kat Scrappiness
    Distressed Edge Rectangle Dies by Kat Scrappiness
    Distress Inks
    Altenew Inks
    Memento Tuxedo Black
    WOW! Clear Embossing Powder
    Foam Squares
    Scor-Tape
    Coordinating Cardstock, Navy Blue
    Neenah Solar White Cardstock in 80 & 110lb

  • Create a Faux Coffee Look!

    Create a Faux Coffee Look!

    Hi there! Hannah, here, with another Kat Scrappiness project!

    Kat seems to have a huge love of coffee. She and her design team participate in several “coffee” themed blog hops throughout the year it seems, and she has a whole section in her shop dedicated to Coffee Themed Products.

    Recently she came up with two brand new products in her line that were both coffee related. Her “Got Coffee” die and her new Layered Coffee Cup die are two of the newest Kat Scrappiness brand products in her shop. Today’s card is using both of those, as well as a stamp from another new KS product: Owl Envelope Art stamp set.

    First, I die cut the coffee cup bits out of Neenah Solar White cardstock. For the center portion of the cup, where a logo might go, I lightly dusted it all over with Altenew’s Rose Quartz and the edges with Altenew’s Puffy Heart. In the center of this, I stamped the small owl from the Owl Envelope Art stamp set. I also covered some of the small portions of the lid with the same Altenew inks.

    Next, using some light grey Copic markers I created a curved or shadowed effect. Basic Copic coloring rules applied here, sticking with either a W, C, or N and then using alternating colors. I relied heavily on the “0” to ensure a smooth transition to white.

    Using a liquid adhesive, Ranger Multi Medium Matte, I layered most of my coffee cut bits and adhered them together. If you are confused as to how to go about building the cup, there is a fabulous guide Kat has put together:


    Then came the fun part! Playing with Yupo paper and Copic markers! You can see my video here:

    Taking some Neenah Desert Storm paper I cut out the largest rectangle from the Cross Stitched Rectangle dies. Along the edges gently dusted the beautiful Delicata Golden Glitz.  Using the same Delicata ink I performed the same technique on a light pink doily I had.

    Using pink fun foam I cut out the “got coffee” sentiment. As it turned out the pink in the foam was pretty much the same pink in the doily and a complimentary one to the other pinks in the cup, therefore I left the foam naked and didn’t cover it with adhesive and paper.

    I trimmed my Yupo paper down to an A2 length and die cut out the inner portion of my cup. This die cut portion was a total mistake on my part, I didn’t have the plans above when I was crafting the card. However, I like how it tied the cup in with the background, created movement in my card, and looked like coffee!

    I layered everything on top of a light pink A2 card front using my favorite dot runner and Ranger Multi Medium Matte, then finished off the look by sparkling gold dots everywhere.

    I rather like the final look of this card! If you like it and are in need of any of the following products please feel free to use my discount code HANNAH10 at checkout!

    Products Used:

    Layered Coffee Cup die by Kat Scrappiness
    “Got Coffee?”
    sentiment die by Kat Scrappiness
    Owl Envelope Art
    stamp set by Kat Scrappiness
    Cross Stitched Rectangle die by Kat Scrappiness
    Delicata Golden Glitz Ink
    Ranger Multi Medium Matte Adhesive
    Yupo Paper
    Fun Foam
    Neenah Solar White in 80 and 110lb
    Neenah Desert Storm in 80lb
    Momento Tuxedo Black

    Are you participating in our monthly challenges? Each month we have a new challenge whose theme is picked out from our Design Team members. You create your project, based on the theme, and making sure you use at least one Kat Scrappiness product and you could win a $25 store discount! This month’s link can be found above, at the top of this page, or here!

    This has been Hannah Rubenstahl, from Fanciful Spaces, hoping you have an epic crafting day.

  • Making Your Kat Scrappiness Die Cut Sentiments Faux Enamel!

    Making Your Kat Scrappiness Die Cut Sentiments Faux Enamel!

    What do you do when you need a sweet card for encouragement? You break out your Kat Scrappiness supplies, that is what!!!! 🙂

    Hi there, this is Hannah and I have a very easy, and very sweet, card for you today. Along the way, I show you how to add an impactful impression with a faux enamel look!

    I created a video, showing you the whole process here:

    Take a look at these close up photos:

    The pictures don’t even do the shine justice! In real life, this practically GLEAMS! I hope I’ve inspired you! This is Hannah Rubenstahl of Fanciful Spaces if you need to do some shopping at the Kat Scrappiness shop, feel free to use my discount code: HANNAH10 at checkout!

    Share to Win!

    Also, don’t forget the Share to Win campaign! If you share your cards that you’ve made using products purchased at Kat Scrappiness, or even your purchases on social media you could possibly WIN store credit! Make sure to use the hashtag #katscrappiness when you post!

    The products I used in making this card are:

    Sweet Word & Sentiment Die by Kat Scrappiness
    Large Alphabet Dies by Kat Scrappiness
    Distressed Edge Rectangle Dies by Kat Scrappiness
    Ranger Multi Medium Matte
    Ranger Glossy Accents
    Wink of Stella
    Retro Christmas Shaker Pack by Kat Scrappiness
    Neenah Solar White Classic Crest in 80 and 110lb
    Copic Markers
    Tape Runner

  • Chocolate Valentines

    Chocolate Valentines

    Valentines Day is coming! Fortunately, you are in luck because Kat Scrappiness is your Valentine’s headquarters! Kat has so many amazing products in store and there is still quite a lot of time to get your order in! I have a card which was really quick to create but packs a lot of love!

    I started with the new Distressed Edge Rectangle Dies I used the largest rectangle die cut a panel with Neenah Solar White in 80lb. Then using the Mini Hearts Stencil from CC Designs and some Distress Oxides I covered that panel with pink hearts! FUN!

    I heat set my hearts and dusted them thoroughly with an embossing buddy, then using Hero Arts Gold Embossing Powder I heat embossed a sentiment from Kat’s Chocolate Lover’s Sentiment Stamp Set.

    Going back to the same rectangle dies, I chose two smaller ones and taped them together to cut out a pink rectangle out of some pink cardstock I had. While the dies were still taped together I cut out several white rectangles out of less expensive cardstock which would be used to allow the sequins to move around in the card. I think in the end I used about 4 or 5 white sections for enough bulk.

    I cut a rectangle out of acetate and adhered that to the back of the pink frame using Scor-Tape. Then I started adding my white rectangle layers.

    I took an A2 sized sheet of that same pink cardstock and adhered that to my card base (Neenah Solar White 110lb) using my favorite tape runner, then using the same taper runner I adhered my heart/rectangle panel. Using more Scor-Tape I started to adhere the pink rectangle frame in the center, however, I only adhered one side. I very carefully snuck some sequins from the Hearts O’Plenty sequin pack, then I sealed up the other three sides.

    And voila! It was done! It didn’t take a huge amount of time, but it did come with a lot of love! Any person would LOVE to receive this card from you! If you need any of these products, use HANNAH10 at check out for 10% off.

    I used the following products on this card:

    Distressed Edge Rectangle Dies by Kat Scrappiness
    Chocolate Lover’s Sentiment Stamp Set by Kat Scrappiness
    Mini Hearts Stencil by CC Designs
    Distress Oxides
    Acetate
    Scor-Tape
    Hero Arts Gold Embossing Powder
    Hearts O’Plenty Sequin Mix by Kat Scrappiness
    Neenah Solar White in 80 and 110 lbs
    Pink Cardstock
    Tape Runner

    And don’t forget! Kat Scrappiness is still looking for Design Team members! Get your applications in!

    Design Team Call

  • Hannah’s Top 10!

    Hannah’s Top 10!

    Hi there! Hannah Rubenstahl here, from Fanciful Spaces! I can not believe that this is my first Kat Scrappiness blog post for 2018! I am so excited to see what this new year brings to us! With the coming of the new year, I thought it would be a great time to go over my top 10 products that can be found in the Kat Scrappiness shop! Kat carries her own brand of stamps, dies, and sequins, but she also carries a variety of other products! My list combines all of these to bring you, what I think, is the best of the best!

    I have a video for you, showcasing these products down below, first here is a collage of my faves!

    I also have a card for you! I made this card last year, and I wanted to create a video for it, but never got around to it. I wanted to share it anyway because I thought it was clever and fun!

    I started by taking an 8.5″ x 5.25″ piece of paper and scoring it so that the front panel of my card was bisected to open in the center.

    Then I took Kat’s Fancy Scalloped Stitched Border Dies and just cut off the edge of the two center portions.

    I took some Lawn Fawn paper, cut it down so that it covered the front panels, and also cut with the Fancy Scalloped Edges. I covered the inside with blue cardstock, in order to help hide the scars my die cutting machine left on the underside of my white paper and to add an extra something special on the inside. I needed to offset the fold line so it would fold correctly, which took some trial and error. I also traced the curve of the scalloped edges so that that design element would carry through to the inside.

    I colored and die cut these ADORABLE critters from Lawn Fawn using the For You, Deer Stamp and Die sets and snuck those in between the layers of paper, being careful that they overlapped and didn’t cross in front of each other. I used my tape runner to adhere the paper and the cardstock panels, however, I used just a touch of Scor-Tape to help adhere the critters.

    I silver embossed the outside edges of my card to help give a more finished look with Hero Arts Silver Embossing Powder, however, this embossing powder from Lawn Fawn would be a perfect substitute! I also silver embossed the inside sentiment which is from Hero Arts, a set called Poster Christmas Carols.

    Whew, that card took quite a bit of math and work, but it is so different that I think it was worth it! I love the inner sentiment, it still works for these cold January days making that Hero Arts sentiment set work outside of just the Christmas season!

    The products I used for this card are:

    Fancy Scalloped Stitched Border Dies by Kat Scrappiness
    Perfectly Plaid Winter Petite Paper 6×6 by Lawn Fawn
    Silver Embossing Powder by Lawn Fawn
    For You, Deer Stamp Set by Lawn Fawn
    For You, Deer Dies by Lawn Fawn
    Poster Christmas Carols by Hero Arts
    Scor-Tape
    Tape Runner
    Neenah Solar White Cardstock in 80 and 110lb
    Blue Cardstock

    If you are interested in any of the Christmas themed products I used you can save 30% by using 2017CLEARANCE at checkout! This works from now until the 15th and is only good for Christmas items.

    If you are looking to save money but aren’t shopping for Christmas items, use HANNAH10 at checkout!

    Now, back to that Top 10!

    My video:

    [youtube https://www.youtube.com/watch?v=fhm2d4A7FpE]

    Or, check them out here:

    Never Ending Rectangle Dies
    Never Ending Circle Dies
    Stitched Postage Stamp Dies
    Stitched Scalloped Nesting Tag Dies
    Scor-Tape Sheets
    Scor-Tape
    Inkadinkado Masking Paper
    Ranger Multi Medium Matte
    Distress Oxide
    Kat Scrappiness Sequins
    Kat Scrappiness Sparkling Clear Droplets

    Now that we made it through all that, have you applied to be a part of the Kat Scrappiness Design Team yet? If not, what are you waiting for?!?!?! This design team is so supportive, and Kat is so incredible, you’ll kick yourself for not trying!

    Design Team Call

  • It’s Beginning to Look a Lot Like Christmas

    It’s Beginning to Look a Lot Like Christmas

    Indeed, the snow has finally decided to arrive in Northeast Ohio, my kiddo can’t wait to play in the snow, and as I type this I can see the lights of our Christmas tree in my peripheral vision. Delightful, this time of year can be stressful, but so so delightful!

    The card I am sharing today came from a session where I was just playing around with my Kat Scrappiness products and challenging myself to use her oval dies. Ovals are hard for me, so I wanted to see if I could make something work with them. I had very adventurous ideas about creating a scene with her Stitched & Layered Snowman Die and then opted to skip that for more detail on her lovely Stitched & Layered Christmas Tree Die!

    Because I am feeling stressed for time, I was looking for something simple and easy that I could create that gave me the fulfilled feeling I was looking for and providing me with a project I could feel proud of at the same time. An impossible trio, I know, however with Distress Oxides and Kat’s stitched dies I think I might have achieved it. To start, I cut out the tree die and just messed around with a variety of Distress Oxide greens until I got something that pleased me.

    I did something similar with the background, playing with Distress Oxides in blues, however, I also splashed water on it in order to activate the oxide aspect of the ink. After this was heat set I sprayed it down with Imagine Crafts Sparkle Sheer Shimmer Spray because I love things to sparkle! Isn’t it BEAUTIFUL?!?!?! Even though it, and the water from playing with the Distress Oxides, warped my paper, it didn’t matter in the end!

    Next, I took a sheet of Neenah Desert Storm Craft Cardstock, trimmed it down to an A2 size, then I cut a whole in the center with that oval die I challenged myself to use! I used one of the Never Ending Oval Dies, and then distressed the outside of the panel and the inside hole with more Distress Oxide. After I placed a sheet of acetate down on the back side, I started to glue down my tree with some Ranger Multi Medium Matte. I had cut the ornaments for the tree out of white cardstock, including the star, and just colored them with some Copic Markers, then I glued them as well.

    Then I started to build my shaker card. I used the Clear AB Star Confetti and the snowflakes that can be found in the Frosty II Sequin Mix. I Iove mixing and matching sequin mixes. If you would like to see the steps of building a shaker card, using fun foam, I would like to direct your attention here.

    I brought the oval theme to the inside of the card by using the Cross Stitched Oval Dies and layering them. I also used a sentiment found in the Hero Arts Poster Christmas Carols sentiment set.

    I finished off this card by adding some Sparkling Clear Droplets, I have SO MANY of these. I LOVE them so much that every time I place an order I add a bag to my cart! I loved making this card. I loved challenging myself to work with something that I generally struggle with. This was a lot of fun to make!

    If you’d like to see the products I used, you can do so, and save by using Hannah10! See the list below!

    Never Ending Oval Dies By Kat Scrappiness
    Cross Stitched Oval Dies By Kat Scrappiness
    Stitched and Layered Christmas Tree Die By Kat Scrappiness
    Poster Christmas Carols by Hero Arts
    Frosty II Sequin Mix by Kat Scrappiness
    Clear AB Star Sequins by Kat Scrappiness
    Sparkling Clear Droplets by Kat Scrappiness
    Sparkle Sheer Shimmer Spritz Spray
    Scor-Tape
    Fun Foam
    Ranger Multi Medium Matte
    Distress Oxide
    Memento Tuxedo Black

  • 12 Cards Using the Kat Scrappiness Chocolate Lovers Card Kit!

    12 Cards Using the Kat Scrappiness Chocolate Lovers Card Kit!

    WOW! Does this card kit pack a PUNCH! I easily got 12 cards out of it with a lot of extra material left over to make a whole bunch more, and that isn’t even including the stamps and dies that are included!!! Those stamps and dies you’ll always have!

    Look at the amazing cards that I made with this box!

    I LOVE LOVE LOVE that layered chocolate stamp, and it is SO VERY EASY to use! I made a video of my making about 6 of these cards, and I show how to line up the stamps so that it is easy peasy!

    [youtube https://www.youtube.com/watch?v=qG0F1_HeCOo]

    And if you’d like to see a little quick talk about my constructing of all of these cards watch here:

    [youtube https://www.youtube.com/watch?v=zqnDkBD2ymo]

    These cards are AMAZING! I had such a great time playing with them! Kathleen, from Kat Scrappiness, did an AMAZING job curating this kit! She also offers two add-ons to the kit, these are AMAZING, I love them, you’ll want to get them as well! Check out everything here:

    Chocolate Lover’s Card Kit
    Chocolate Lover’s Sentiment Stamp Set
    Wonky Wavy Stitched Heart Dies
    Additionally, you’ll want to make sure you’ve got:
    Altenew Coffee Break Mini Ink Pad
    Distress Inks
    Delicata Inks
    VersaMark Embossing Ink
    Silver Embossing Powder
    Gold Embossing Powder
    Ranger Multi Medium Matte

    Ranger Fine Tip Applicator
    1/4″ Scor Tape
    Scor Tape Sheets
    Fun Foam

  • Felt Christmas Tags

    Felt Christmas Tags

    Hi, everyone! How was your Thanksgiving! I imagine there are still quite a few full tummies out there, Thanksgiving leftovers are my FAVORITE! Today is one of the biggest shopping days of the year, Black Friday! Who here is shopping? I’m a couch shopper myself, I dislike the crowds. Fortunately for us, Kat Scrappiness has a GREAT sale going on!

    Make sure you take advantage of this, it’s a fabulous deal! It even applies to the new Chocolate Lovers Card Kit! I have the kit in my hot little hands, and I’ll be sharing projects I make with it shortly. It truly is delicious and amazing! You can also get Kat Scrappiness dies and sequins on sale! These products are already at such a discounted rate, they almost never go on sale. This really is a great sale!

    Now that you’re ready to shop, with a discount code, let’s move on to a project you’ll want to add to your list for this Christmas season! This project is really wonderful and so easy to do. You can die cut your items and stitch them together whenever you find you’ve got free time. I made these while watching television with my husband!

    I used the Kat Scrappiness Stitched Scalloped Nesting Tags to create gift card or money holders. The largest of these dies is more than perfect to sew on either her Design a Gingerbread Man or her Stitched and Layered Snowman. These can be accent a gift under the tree or hang as ornaments on the tree!

    I used 100% wool felt to die cut, the dies cut through the fibers like butter. First, I stitched the larger images on, in one case it was the Gingerbread Man, on the other, it was the Snowman. For the smaller elements, I glued them on with some Ranger Multi Medium Matte. When the glue was dry, and it didn’t take long, I stitched the tag fronts to the backs. I used a blanket stitch for the Gingerbread man, but I wasn’t happy with how the scallops looked. I left them, as is so that you can see my results. For the Snowman, I stitched them together with a running stitch, the result was MUCH nicer. The stitching that the dies left made a nice line for me to work on, ensuring that my stitches looked even and straight!

    It probably took me an hour to assemble each tag, it would take a more accomplished seamstress less time, I’m sure. But, like I said, this hour was found just watching television with my husband. I can also find other random hours throughout my day, such as waiting for doctor’s appointments and picking up my kiddo from school.

    If you’re looking for the products I used, they can be found below, remember to shop the Kat Scrappiness Black Friday/Cyber Monday sale to save 15% on your supplies!

    Stitched Scalloped Nesting Tags by Kat Scrappiness
    Stitched and Layered Snowman Die by Kat Scrappiness
    Design a Gingerbread Man by Kat Scrappiness
    Ranger Multi Medium Matte
    100% Wool Felt
    Embroidery Floss
    Ribbon