Tag: embossing powder

  • Together We Can Make a Difference | Ukraine Strong Bundle #ksukrainestrong | Call Me Crafty Al

    Together We Can Make a Difference | Ukraine Strong Bundle #ksukrainestrong | Call Me Crafty Al

    Hello crafty friends!

    It’s Alicia a.k.a. Crafty Al here to share a look at the card that I created using products from Kat Scrappiness’s Ukraine Strong collection – which is now available as single products also.

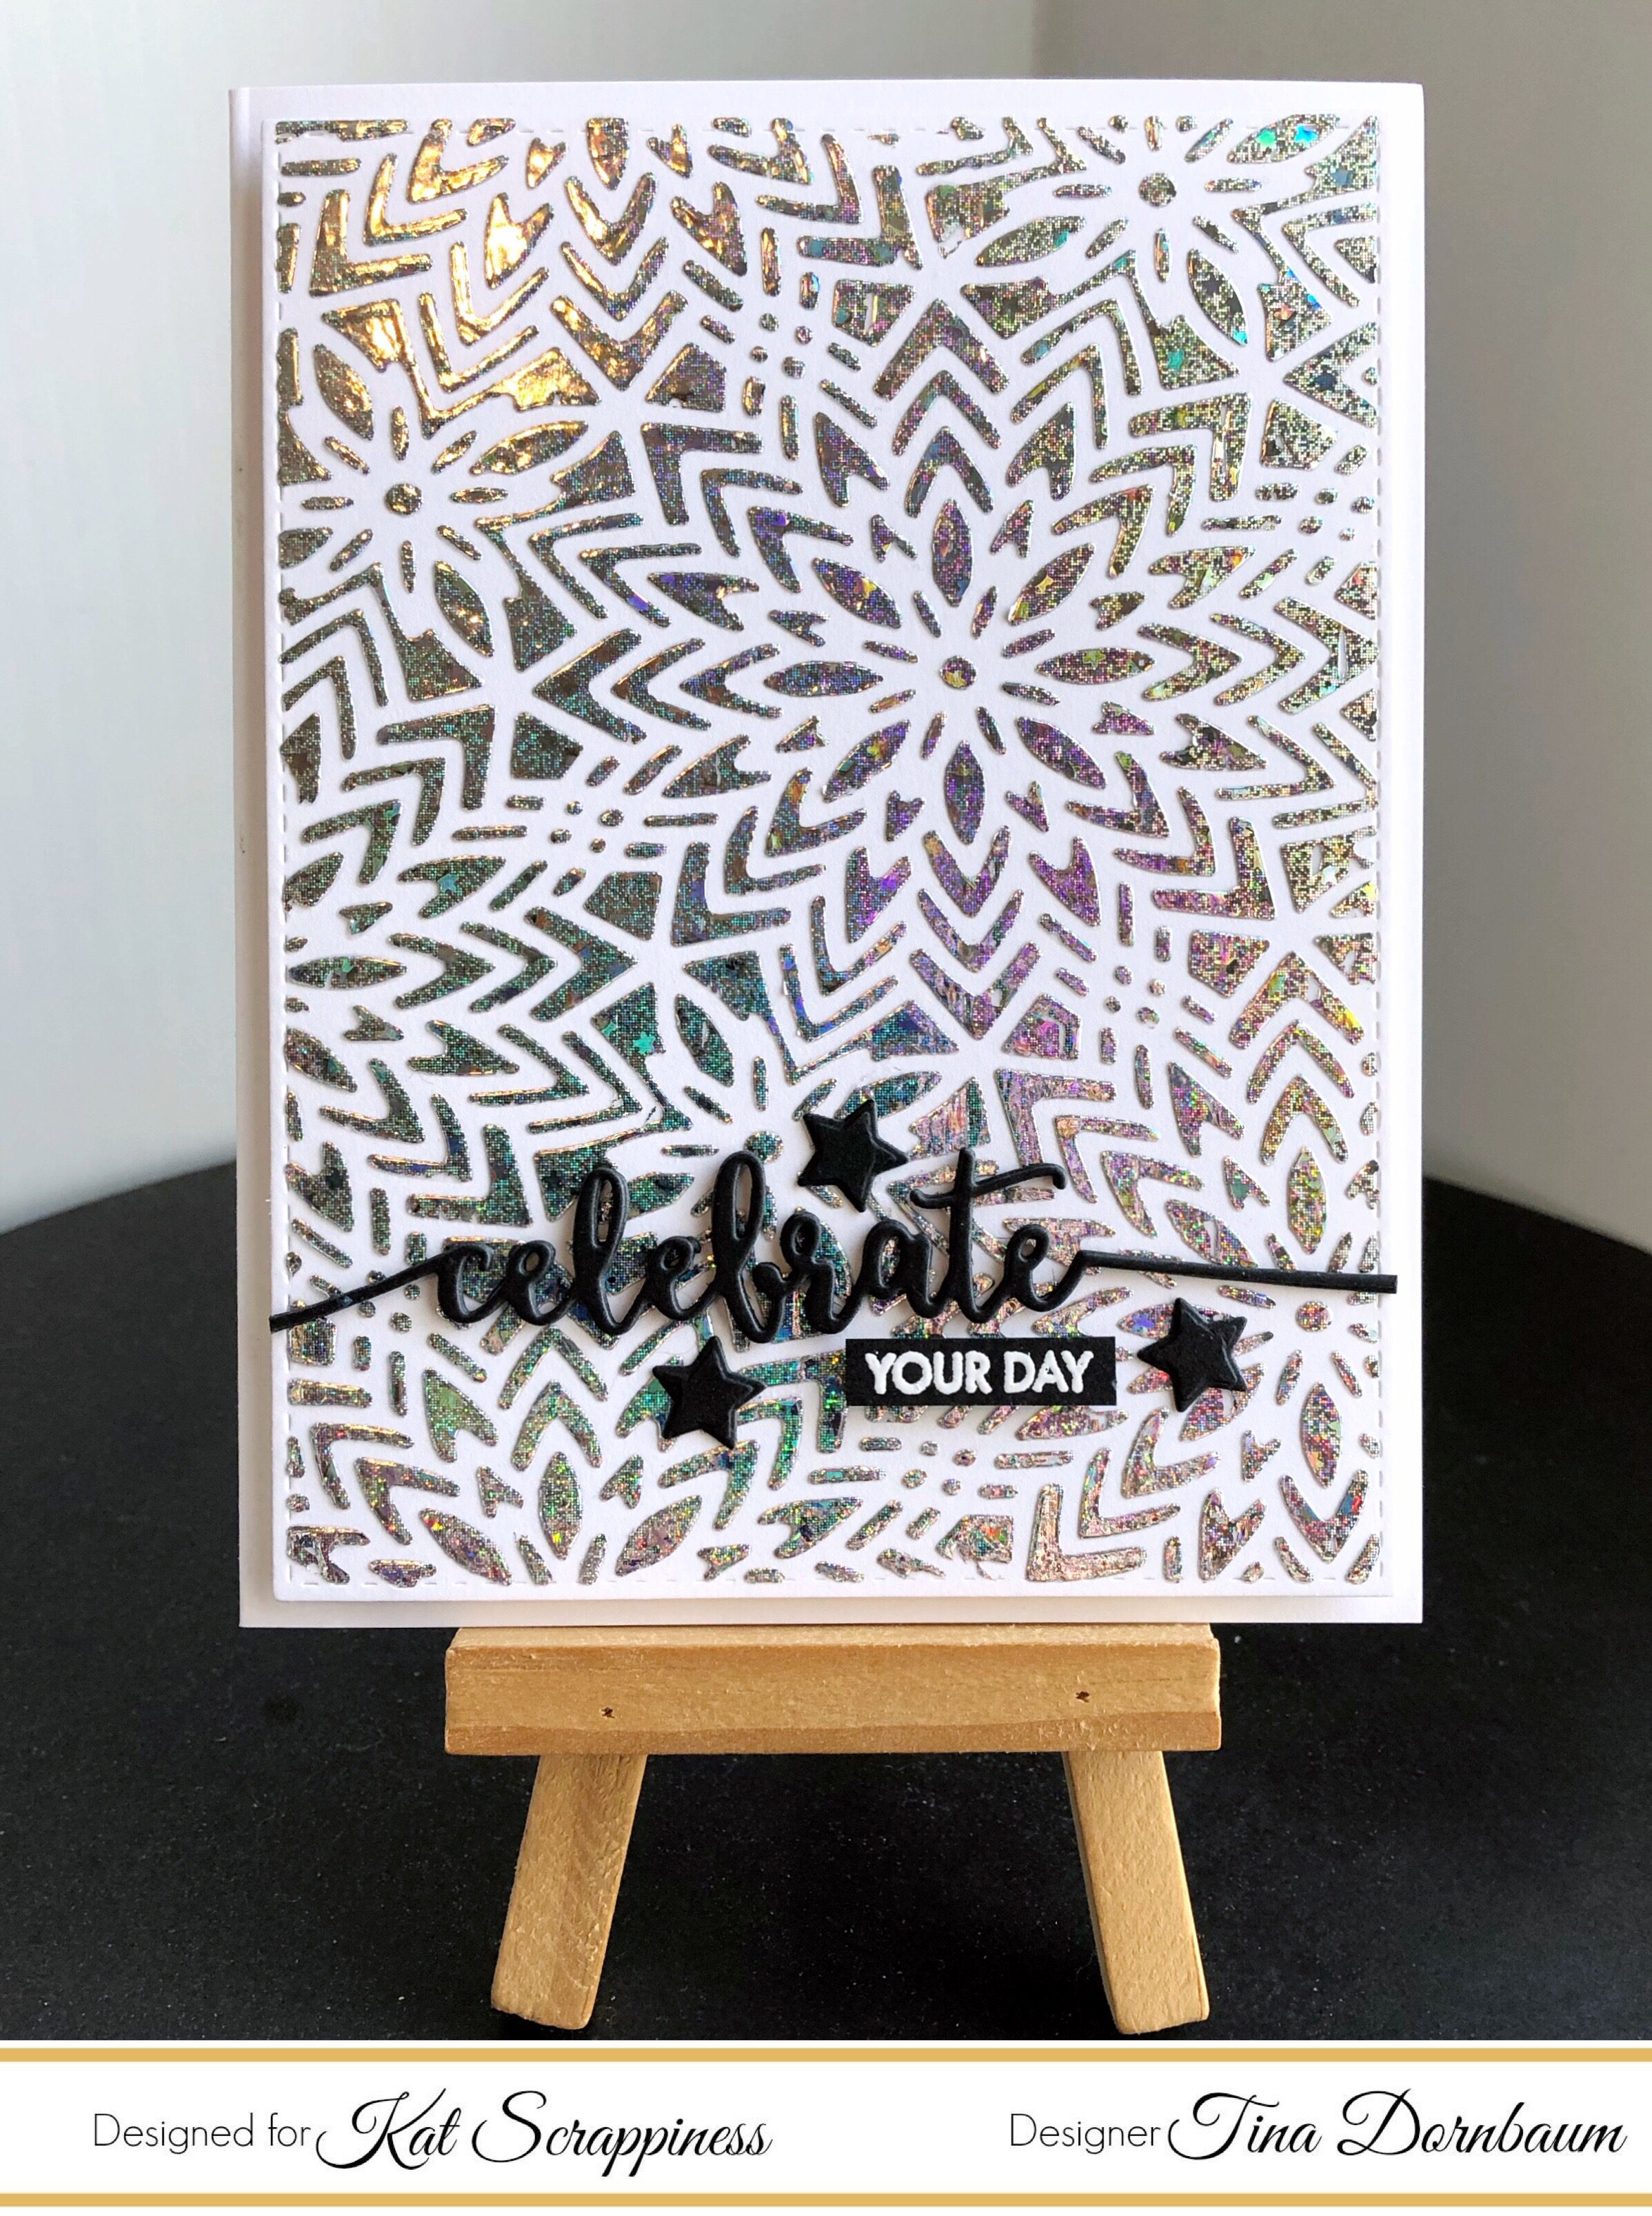
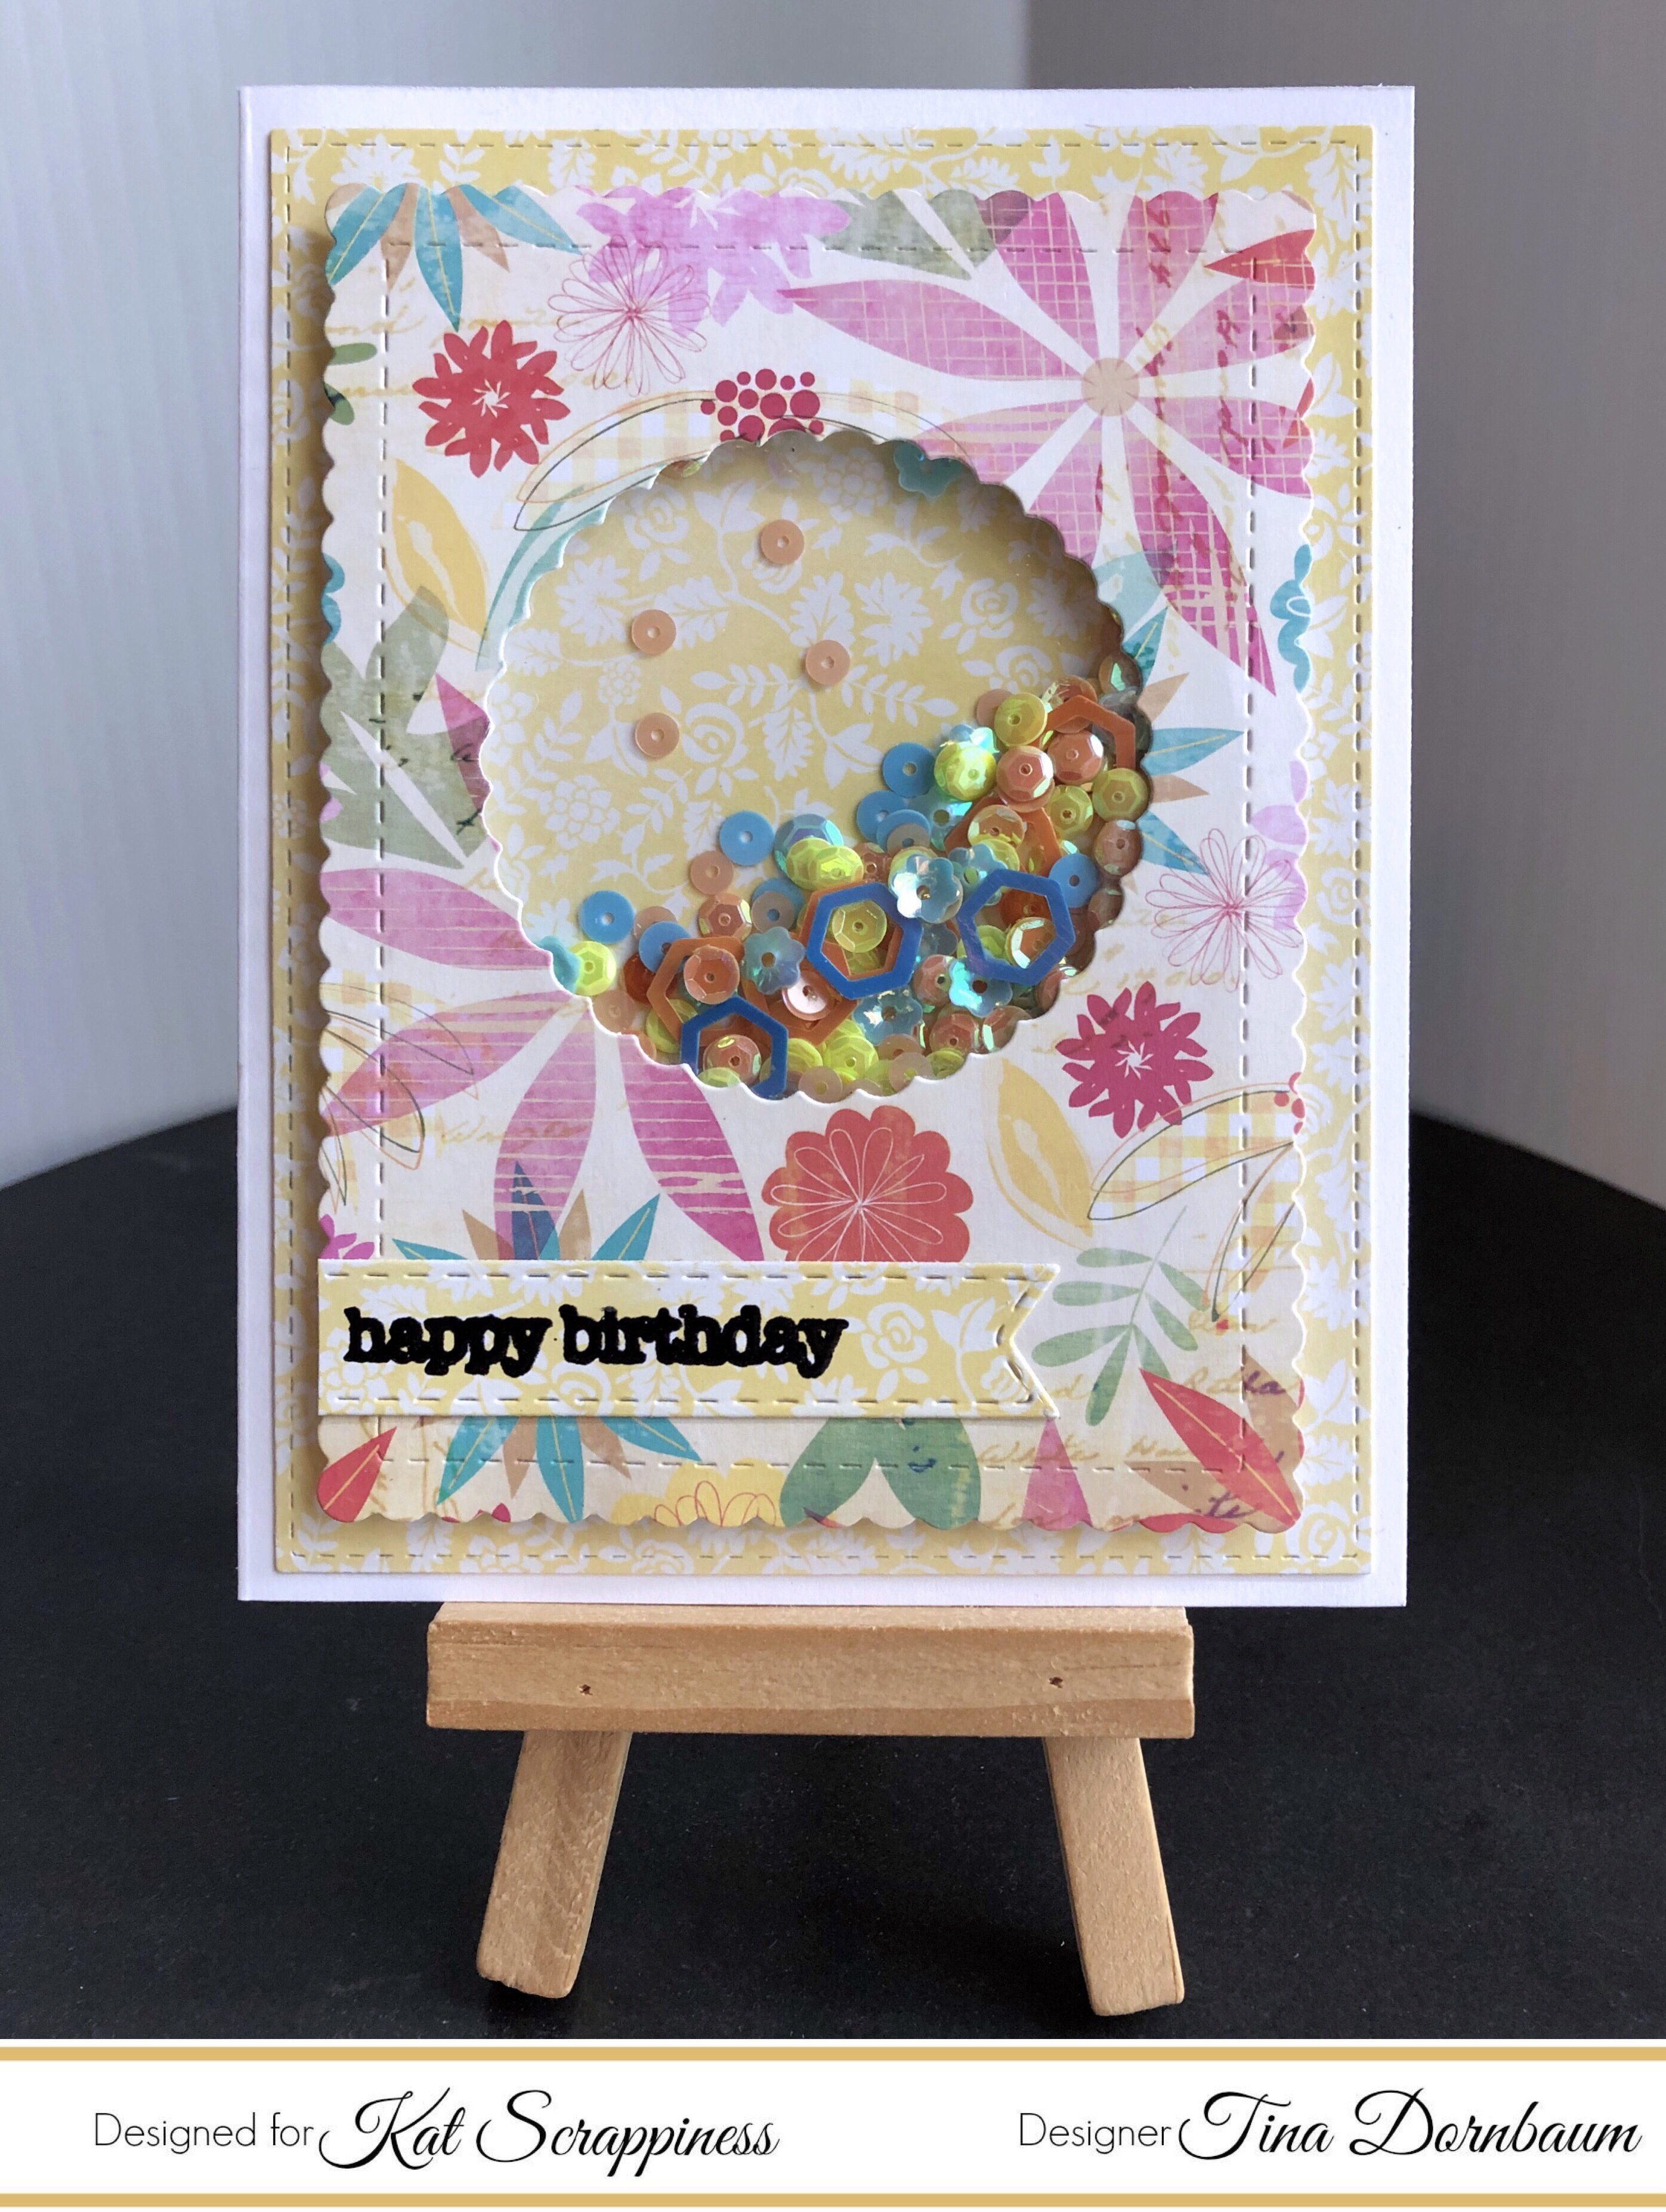
    To get started I stamped the solid flower and flower center in yellow and blue inks. To add detail, I used the flower outline stamp on top of each one using embossing ink and white embossing powder. Each of these was cut out using the coordinating die.

    I used the NEW A2 Quilted Backdrop coverplate die to create a piece for the card front and die cut the sentiment using one of the die from the Double Stitched Hearts die set.

    After gluing the flowers in place, I popped the heart up in place using foam tape and added shine with the Sparkling Snow Pearl Mix.

    You can check out my video for the full process…

    Thanks for stopping by and I hope you enjoyed today’s card!

    Alicia / Crafty Al

    Related Products:

       Kat Scrappiness

          Ukraine Strong

             Bundle http://shrsl.com/3lyav

             Stamp Set http://shrsl.com/3lyax

             Coordinating Dies http://shrsl.com/3lyay

             Paper Pad http://shrsl.com/3lyb1

          All NEW Products: http://shrsl.com/3hq9p

          A2 Quilted Backdrop Coverplate Die http://shrsl.com/3k7ec

          Double Stitched Heart Dies http://shrsl.com/3itbn

          Sparkling Snow Pearl Mix https://shrsl.com/3831u

          Telescopic Embossing Powder Tool with Retractable Brush: http://shrsl.com/3blw2

          Triangle Embellishment Tray: http://shrsl.com/37sxh

          Embellishment Organizer: http://shrsl.com/37sxi

        MISTI http://shrsl.com/3lyat

       Jewel Picker https://shrsl.com/3bedx

       Art Glitter Glue: http://shrsl.com/37svl

    **Some links above are affiliate links. I link them up for your convenience and may receive a small commission, at no extra cost to you. I hope you will consider using the links if you decide to purchase the products I share. 🙂

  • Shake,Shake,Shake

    Shake,Shake,Shake


    Error: Contact form not found.

    Hello fellow crafters,

    I wanted to share this shaker card I made, I tried something new for me. I am using Kat Scrappiness sprinkles that I find so colorful that I wanted to ensure they were showcased in the best way. I decided to make a see through card so the fill was visible from the front and the back.

    I started by making my layered frame. This frame had to be made twice so it looked great from the back also.

    I determined the size of the frame based on a standard 5×7 card. I used acetate behind each frame to form the “bread” part of this shaker sandwich I was creating. Next I cut fun foam to fit between the frames to form the shaker space. I used two layers of the foam to give the sprinkles enough room to move.

    Using glue I assembled the layers. I filled the inside with many different colors of candy sprinkles then glued the top on.

    Next I die cut the sentiment using the Kat Scrappiness Hooray die and Shadow. Before attaching this sentiment to the front window I wrote a message to the recipient on the back of it so it could be read through the back. I embossed a sub sentiment on black and attached under the die cut.

    I think this made a fun card.  I hope you try making one too. The sentiment dies from Kat Scrappiness all work well with this type card so give it a go.

    Supplies: KS candy sprinkles – green, purple, blue, yellow, hot pink and candy explosion sprinkles

    KS – Hooray die and shadow

  • How To Foil Using Your Background Dies

    How To Foil Using Your Background Dies

    Happy New Years Everyone, it’s Tina here. I wish you all an awesome year ahead! By now the holidays have passed and life is returning to normal. Today I wanted to share a card with you using your Background Dies to create a foiled background. Below you will find the steps to recreate this fun technique and how I used the Fancy Floral Coverplate Die.

    Step 1 – Trim White Cardstock to 8 1/2” x 5 1/2”, score at 4 1/4” and fold in half for a vertical side fold card (A2)

    Step 2 – Diecut Fancy Floral Coverplate using White Cardstock. Place the diecut on White Cardstock and secure it with Painter’s Tape. Using Deco Foil Transfer Gel apply with a Palette Knife over the stencil created. Once stencil is thoroughly covered gently remove the stencil. Let the background dry for an hour or until the Transfer Gel has turned clear.

    Step 3 – Place Foil Paper over the background and insert it into a folded photocopy paper. Pass it in your laminator. I passed it twice. Remove the Foil Paper and what you have is a beautiful foiled background. See photos below.

    Step 4 – Diecut Double Stitched Rectangles to the background created from Step 3 – Adhere to card using Foam Tape.

    Step 5 – Diecut sentiment 3 times and adhere all layers using Collage Medium and adhere to card.

    Step 6 – Stamp sentiment using Versamark on Black Cardstock. Sprinkle White Embossing Powder and remove the excess. Heat set it with a heat tool. Trim and adhere to card using foam tape.

    Step 7 – Optional – For added interest Diecut Stitched & Layered Christmas Tree (the star) 3 times and adhere to card using Nuvo Deluxe Adhesive.

    I hope you enjoyed another way to use your background dies. This card can be used for any occasion by changing the background, color and sentiment. Below is a link to all the products used. Thanks for stopping by and have a wonderful day!

    Products Used:

    https://linkdeli.com/widget.js?1543923411530


  • Fancy Floral Cards

    Fancy Floral Cards

    Hi Everyone, it’s Tina here. Today I have 2 cards to share with you using the Fancy Floral Coverplate die and word sentiments. Below you will find the steps to replicate this card.

    Step 1 – Trim white cardstock to 8 1/2″ x 5 1/2″, score at 4 1/4″ and fold in half for a vertical side fold card.

    Step 2 – Trim white cardstock to 5 1/2″ x 4 1/4″. Apply Distress Oxide Ink using an ink applicator. For the Awesome card use Seedless Preserves, Tattered Rose and Antique Linen. For the Happy card use Chipped Sapphire, Peacock Feather and Tumbled Glass.

    Step 3 – Diecut Fancy Floral Coverplate (x2) using Silver Glitter Cardstock. Adhere to backgrounds from Step 2 and then adhere the entire panels to the card front using Nuvo Deluxe Adhesive Glue.

    Step 4 – Diecut Stitched Fishtail Banners (x2) using Black Cardstock. Stamp sentiment using versamark. Sprinkle White Embossing Powder, remove the excess and heat set it with a heat tool. Adhere to cards using Nuvo Deluxe Adhesive Glue.

    Step 5 – Diecut Word die (x3) using Black Cardstock. Diecut the shadow word die using White Cardstock. Adhere all the layers using collage medium and then adhere to the card slightly overlapping the sentiment banner.

    I hope you enjoyed today’s cards. These cards can be used for any occasion by changing the colors and sentiments. Below is a link to all the products used. To receive 10% off your order at Kat Scrappiness use code: TINA10 at checkout. Thank you for stopping by and have a wonderful day.

    Products Used:


    https://linkdeli.com/widget.js?1543923411530

  • Holiday Cards With Crafter Essentials Winter Dies

    Holiday Cards With Crafter Essentials Winter Dies

    Hi Everyone, it’s Tina here. Today I have a couple of holiday cards to share with you using the new Crafters Essentials Winter dies. You can make those last minute cards with these dies and use some fancy cardstock to give it that extra festive feel. Below I will show you the steps to create these cards using Foiled Cardstock and Glitter Cardstock. Please note that it is extremely hard to photograph the Foiled Card but it is stunning in real life.

    Card #1 using Foiled Cardstock

    Step 1 – Trim White Cardstock to 8 1/2″ x 5 1/2″, score at 4 1/4″ and fold in half for a horizontal side fold card. (A2)

    Step 2 – Diecut Crafters Essentials Winter using Teal Foiled Cardstock for background, Green Foiled Cardstock for trees, and Silver Foiled Cardstock for hills. Adhere background and bottom layered hill using Nuvo Deluxe Adhesive glue. Adhere the trees using Nuvo Deluxe Adhesive glue.

    Step 3 – Stamp Merry Critters sentiment to the top layer of hill created from step 2 using Versamark. Use an anti static powder tool before you stamp. Sprinkle White Embossing Powder and remove the excess. Heat set it with a heat tool. Adhere the top layer hill using Nuvo Deluxe Adhesive glue.

    Card #2 using Glitter Cardstock

    Step 1 – Trim White Cardstock to 8 1/2″ x 5 1/2″, score at 4 1/4″ and fold in half for a horizontal side fold card. (A2)

    Step 2 – Diecut Crafters Essentials Winter using Soft Blue Cardstock for background, Green Cardstock for trees, and Silver Glitter Cardstock for hills. Adhere all diecuts using Nuvo Deluxe Adhesive glue.

    Step 3 – Stamp Merry Critters sentiment just above the hill on the left side 2 using Versamark. Use an anti static powder tool before you stamp. I shaped the sentiment to follow the shape of the hill. Sprinkle White Embossing Powder and remove the excess. Heat set it with a heat tool.

    I hope you enjoyed today’s cards. You can try other versions of these cards by using patterned paper Christmas themed. To receive 10% off your order use code: TINA10 at checkout. Below is a link to all the products used. Thank you for stopping by and have a wonderful day.

    Products Used:
    https://linkdeli.com/widget.js?1543923411530

  • Spooktacular Card Featuring Fall Crafters Essentials

    Hi Everyone, it’s Tina here today. Kat Scrappiness started a collection called Crafters Essentials which features must have dies in one collection. This month there is the Fall Crafters Essentials which not only makes fabulous Fall Cards but Halloween Cards as well. Today’s card I used it as a super fun Spooktacular Card. Below are the steps to replicate this card.

    Step 1 – Trim White Cardstock to 8 1/2” x 5 1/2”, score at 4 1/4” and fold in half for a horizontal side fold card.

    Step 2 – Trim White Cardstock to 4 1/4” x 5 1/2”. Using an ink applicator apply Distress Oxide Inks to create an Eerie Background. I started with a small circle with Spiced Marmalade, then Barn Door and worked my way out to Dusty Concord, Wilted Violet and Black Soot. I sprayed the background using Sheer Shimmer Sparkle Spritz to add some sparkle and shine. Let it completely dry before moving into the next step.

    Step 3 – Diecut Fall Crafters Essentials using Black Cardstock. I Diecut the bat 3 times, the fence 2 times and the tree. Adhere to card front using Collage Medium.

    Step 4 – Stamp Toil and Trouble Stamp Set sentiment Boo using Versamark. Sprinkle Silver Embossing Powder, remove the excess powder and heat set it with a heat tool.

    Step 5 – For added interest and sparkle using a Crystal Katana apply Purple Jewels with Collage Medium.

    I hope you enjoyed this fun way to use the Fall Crafters Essentials dies. You can change it up and make it into a Fall card by changing the colors and sentiment. Below is a link to all the products used. To receive 10% off your next order with Kat Scrappiness use code TINA10 at checkout. Thank you for stopping by and have a wonderful day!

    Products Used:


    https://linkdeli.com/widget.js?1538726363690

  • Two Cards One Diecut

    Two Cards One Diecut

    Hi Everyone, it’s Tina here. Today I have two cards to share with you using one background die. The new Wood Grain Framed Diamond Wire. This is a fabulous way to get more from your die. I also used the Happy Father’s Day Die for the word Happy. Below are the steps to replicate these cards.

    • Step 1 – Trim White Cardstock to 8 1/2″ x 5 1/2″, score at 4 1/4″ and fold in half for a vertical side fold card. (A2) Do this two times.
    • Step 2 – Trim White Cardstock to 4 1/4″ x 5 1/2″. Using an ink applicator apply Distress Oxide Ink. I started in the middle using Faded Jeans, then applied Broken China on both sides, then Cracked Pistachio on both sides. See below for visual.

    • Step 3 – Diecut Wood Grain Framed Diamond Wire using the Distress Oxide Background. Carefully remove the diecut to keep it in one piece. Add a masking sheet on the top side so that all the pieces remain intact. Card #1 add collage medium to all the small pieces and adhere it to a cardstock trimmed to 4 1/4″ x 5 1/2″. Carefully lift the sheet with the masking sheet. All the small pieces have now transferred to the cardstock. Diecut Double Stitched Rectangles to the cardstock with the small pieces and adhere it to the card front using foam tape. Card #2 add collage medium to the remaining diecut and adhere to card front. See photo below for visual.


    • Step 4 – Card #1 Stamp Everyday Brush Strokes using Versamark Ink on Black Cardstock. Sprinkle White Embossing Powder, heat set it with a Heat Tool. Diecut Stitched Fishtail Banner to the embossed sentiment. Trim left side of the sentiment and adhere to card using Clear Double Sided Adhesive Tape. Diecut Happy Father’s Day (Only Happy – you need to trim a little from the last P and Y) using Black Cardstock. Add Versamark Ink directly to the diecut. Sprinkle Black Embossing Powder, heat set it with a heat tool. Repeat this step 3 times. Adhere to card using Collage Medium. Card #2 Stamp Everyday Brush Strokes using Versamark Ink on White Cardstock. Sprinkle Mermaid Tail Embossing Powder, heat set it with a Heat Tool. Diecut Stitched Fishtail Banner to the embossed sentiment. Adhere to card using Clear Double Sided Adhesive Tape. Diecut Happy Father’s Day (Only Happy – you need to trim a little from the last P and Y) using White Cardstock. Add Versamark Ink directly to the diecut. Sprinkle Mermaid Tail Embossing Powder, heat set it with a heat tool. Repeat this step 3 times. Adhere to card using Collage Medium.
    • Step 5 – Card #1 Add some Pastel Pop Sequins Mix using Collage Medium.
    • Step 6 – Card #2 (to create faux flowers) On a scrap piece of White Cardstock add Distress Oxide Ink Broken China using an ink applicator. Diecut Stitched Scallop Circles (the smallest one 3 times). On a scrap piece of White Cardstock add Distress Oxide Ink Cracked Pistachio using an ink applicator. Diecut Crafters Essentials #1 (the stitched line 3 times). Adhere the diecut Stitched Lines to the card using Collage Medium. Adhere the diecut Stitched Scallop using foam tape on top of the Stitched Lines. Optional add an accent in the center of the Stitched Scallop (example: buttons, sequins or a small flower)


    I hope you enjoyed today’s cards and the fabulous ways to get more out of your dies. These cards can be used for any occasion by changing the colors, embellishments and/or sentiment. Below is a link for all products used. To receive 10% off use code: TINA10 at checkout. Thank you for stopping by and have a wonderful day.

    Kat Scrappiness Products Used:

    https://linkdeli.com/widget.js?1531470176574

  • Stitched Scallop Shaker Card

    Stitched Scallop Shaker Card

    Hi Everyone, it’s Tina here today. I have a fun shaker card to share with you using the new Stitched Scallop Circles Die and Stitched Scallop Rectangles Die with the Sun Kissed Sequins Mix. Below are the steps to replicate this card.

    • Step 1 – Trim White Cardstock to 8 1/2″ x 5 1/2″, score at 4 1/4″ and fold in half for a vertical side fold card.
    • Step 2 – Diecut Double Stitched Rectangles using Patterned Paper. This will be your background.
    • Step 3 – Diecut Stitched Scallop Rectangles Die using Patterned Paper (the Die is one up from Background). Diecut Stitched Scallop Circles slightly higher than mid center. (This is your window).
    • Step 4 – Using Never Ending Circles Die diecut the patterned paper from Step 2 one die bigger than the Stitched Scallop Circle created from Step 3 (make sure to position the window over the patterned paper). Adhere the background to the front of the card. You will need to diecut an acetate sheet with the same size Never Ending Circles Die.
    • Step 5 – Turn over the patterned paper from Step 3 and adhere the acetate using Clear Double Sided Adhesive Tape or Collage Medium. Adhere foam tape all around the circle (2 layers) and to the rest of the panel (2 layers). Use an anti-static powder tool inside the circle at the edges of the foam tape. This will help to remove the stickiness. I have a video of a similar shaker card if you need a visual instruction. You can go here.
    • Step 6 – Add sequins. Remove the release sheet from the foam tape. Adhere the circle backside created from Step 4. Use Clear Double Sided Adhesive to the circle and remove the release sheet. Now adhere the whole panel to the front of the card.
    • Step 7 – Stamp sentiment from Everyday Brush Strokes using Versamark on patterned paper. Sprinkle black embossing powder and heat it using a heat tool. Diecut Stitched Fishtail Banners to the sentiment. Trim the left side of diecut and adhere to card using Clear Double Sided Adhesive Tape.

    This card can be used for any occasion by changing the patterned paper, color and/or sentiment. Below is a link to all Kat Scrappiness Products Used. Thanks for stopping by and have a wonderful day.

    Kat Scrappiness Products Used:

    https://linkdeli.com/widget.js?1529497022105

  • Got Coffee Card Plus Video

    Got Coffee Card Plus Video

    Hi Everyone, it’s Tina here today. By now you have seen the new Layered Coffee Cup Build It Die. I have a video below showing you not only how to assemble it but how you can make it into a flip card/tag. This card features the new Layered Coffee Cup Die & Got Coffee Sentiment Die, as well as the Double Stitched Rectangle DieWonky Wavy Stitched Rectangles Die, and Distress Oxides, which can all be found at Kat Scrappiness.

    Below is a full video tutorial showing you how to create this card. You can watch below or on YouTube.

    If you want to save the directions on how to assemble the Layered Coffee Cup I have added it below. Just right click on the image and save to your desktop, laptop, tablet or phone.

    I hope you enjoyed today’s card. See below for a list of all Kat Scrappiness products used. Use code: TINA10 to get 10% off your order at checkout.

    Have a great day everyone!

    Kat Scrappiness Product Used:


    https://linkdeli.com/widget.js?1522321046703

  • Sweet Rockin’ Day!

    Sweet Rockin’ Day!

    Hi Everyone, it’s Tina here today. By now you have seen the new stamp release for March! Today I am showcasing Rock Candy Stamps. Rock Candy is a build it stamp to help you create a realistic Rock Candy. I did search for Rock Candy to see the colors they come in and below is an inspiration photo which inspired my card. Below you will find the steps to replicate this card.

    • Step 1 – Cut White Cardstock to 8 1/2″ x 5 1/2″. Score and fold in half to form a vertical side-fold card base. Finished size: 4 1/4″ x 5 1/2″ (A2)
    • Step 2 – Trim White Cardstock to 4″ x 5 1/4″. Apply Distress Oxide using an ink applicator. I used Picked Raspberry, Twisted Citron & Salty Ocean. Spray water to oxidize the inks and create splatters. Let dry. Adhere to the front of card using clear double sided tape. See below photo for finished panel.

    This card is super fun for Children and can be used for any occasion by changing the colors and sentiment.

    Below is a link to all products used for this card. If you would like to receive 10% off your order use coupon code Tina10. Thanks for stopping by and have a wonderful day.

    Kat Scrappiness Products Used


    https://linkdeli.com/widget.js?1519981290002