Tag: Embossed Edge Wavy Frame Dies

  • Boo

    Boo

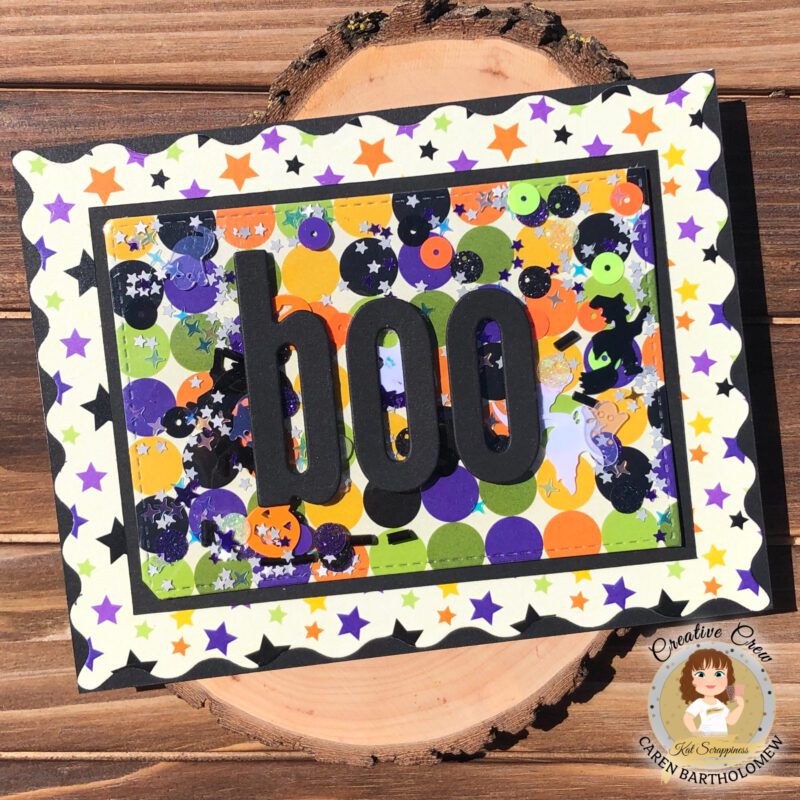
    Happy Wednesday everyone.  It’s Caren here on the blog today.  I have a fun Halloween edge to edge shaker card for you today using lots of Kat Scrappiness products!

    Here is how I created the card:

    Thanks for stopping by!

    – – –– – –– – –– – –– – –– – –– – –– – –– – –– – –– – –– – –– – –– – –– – –– – –– – –– – –– – –– – –– – –– –

    Here is a link to the Kat Scrappiness shop and direct links for products I used on today’s card.

    – – – SUPPLIES for today’s project– – – – – – – – – – – – – – – – – – – – – – – – – – – – – – – – – – – – – – –

  • Life’s A Beach, Enjoy the Waves!

    Life’s A Beach, Enjoy the Waves!

    Happy Tuesday Friends!!

                   It’s Sheri here today with a FUN Summertime card using a mix of stamp and dies from the shop to create a card for a friend going on a cruise!

     Steps to Create Card:

    • Cut A2 Top Fold Card Base: 4 1/4″ x 5 1/2″ (4 1/4″ x 11″, scored at 5 1/2″) – used Gina K. Tranquil Teal card stock.
    • Create/cut frame. Take the Second largest die from the Embossed Edge Wavy Frame die set and cut it out of a piece. Next you will take the third largest die from the Wavy Nesting die set and center it on the piece you just cut to create the frame – used Gina K. Sea Glass card stock.
    • Cut out the Under the Sea Coverplate in white card stock and trim to fit under the frame (approximate size: 3 1/4″ x 4 1/2″).
    • Cut piece of card stock to line behind the Under the Sea Coverplate panel – Used Gina K. Turquoise Sea card stock.
    • Cut out pieces from the Life Under the Sea die set to create scene – used Gina K. Tranquil Teal, Turquoise Sea & Kraft card stock.
    • Stamp shells from the Summer Gnome Add-On stamp set, color and cut out with coordinating die set.
    • Stamp & Emboss sentiment from Summer Gnome Add-On stamp set – used Gina K. Tranquil Teal card stock.
    • Assemble card. The only piece I popped up was the frame to give a little extra dimension to the scene.
    • For embellishment I added a few of the White AB Glass Bubble Mix.


    Here’s a list of the supplies I used from the store.
    Affiliate links are used at no additional cost to you. Thank you so much for your support!


    Happy Stamping!!

  • Summer Quokka Card Tutorial!

    Summer Quokka Card Tutorial!

    Good morning Kat Scrappiness Friends!

    Tasha here sharing a Summer card tutorial featuring the super cute Summer Quokka Stamp and Die Sets!

    The cool surfer quokka was stamped with black hybrid ink and colored with Copic Markers. I used the coordinating die set to cut of the image and the little pal and shovel set; so cute!

    For the background I used a cloud stencil and created my own wave stencil using the Embossed Edge Wavy Frame Dies.I also used the Layered Sun and Stitched Wave Die to create a beach scene.

    See my full tutorial for more details!

    [youtube https://www.youtube.com/watch?v=oDHbIgfG5rA]

    Lastly, I added layers of bright paper from the Summer Vibes Paper Pad and attached several Kat Scrappiness Enamel Dots to the sky. I also stamped the word “Hello” in a tan ink color on the sand to complete this Summer card.

    Thank you for checking out today’s project and I hope you are having a great weekend!

    -Tasha


  • Birthday Fishes Mini Slimline Card

    Birthday Fishes Mini Slimline Card

    Hi everyone, it’s Tina here. I used the Life Under The Sea and Embossed Edge Wavy Frame Dies to create a sea scene Birthday card. Below are the steps to create your own card.

    Step 1 – Trim White Cardstock to 7″ x 6″, score at 3 1/2″ and fold in half for a vertical side fold card. (Mini Slimline)

    Step 2 – Trim White Cardstock to 3 1/2″ x 6″. Apply any water reactive Inks of your choice onto a craft mat to create a background. I used Distress Oxide Inks in colors Tumbled Glass, Broken China, Salty Ocean and Uncharted Mariner. Spray water to the inks and dip your cardstock to it. Heat set the cardstock in between each application for favorable results. Let dry.

    Optional – Spray the background with a Shimmer Spray. I used Brutus Monroe Shimmer Mist Pearl which enhanced the oceanic background I was going for. Adhere to card using Bearly Art Precision Glue.

    Step 3 – Trim White Cardstock to 3 1/2″ x 6″. Diecut Embossed Edge Wavy Frame using the trimmed panel. Adhere to card front leaving a little opening at the inner bottom.

    Step 4 – Diecut Life Under The Sea in various colors. I used White, Teal, Blue and Soft Green Cardstocks. Arrange and adhere to card using Bearly Art Precision Glue.

    Step 5 – Stamp sentiment of your choice to the inner top right using Versafine Onyx Black Ink.

    Step 6 – For added interest and sparkle randomly adhere Sparkling Snow Pearl Mix using Bearly Art Precision Glue.

    This card can be used for several occasions by changing the sentiment. Below is a link to all the products used. Thank you for stopping by and Happy Crafting!

    Products Used:


    https://linkdeli.com/widget.js?id=f5e8378456858c916708