Tag: Acetate

  • Meet the Quouses in a Christmas Sky: Handmade A7 Card Tutorial

    Meet the Quouses in a Christmas Sky: Handmade A7 Card Tutorial

    Hello, my crafty friends!

    Angelique here with another fun Christmas blog for you! This one is perfect for anyone who needs a little extra inspiration, started crafting a bit late (we’ve all been there!), or just wants to make a few more handmade Christmas cards this year.

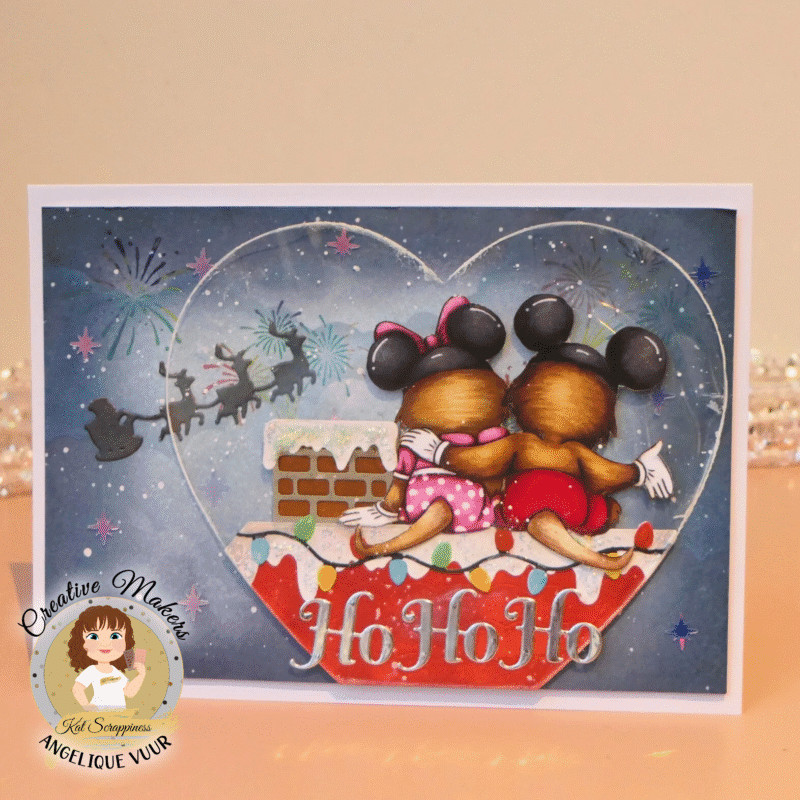
    Today’s card is totally different from my previous ones, and I hope it gives you some fresh ideas, especially on how to use products that aren’t actually Christmas-themed. I used the adorable Meet the Quouses” set from Kat Scrappiness, and honestly… sitting on the roof like that, they have the best view over all the Quokkas celebrating below!
    So let’s get started, everyone!

    🧰 Kat Scrappiness Products Used


    📋 Card Details

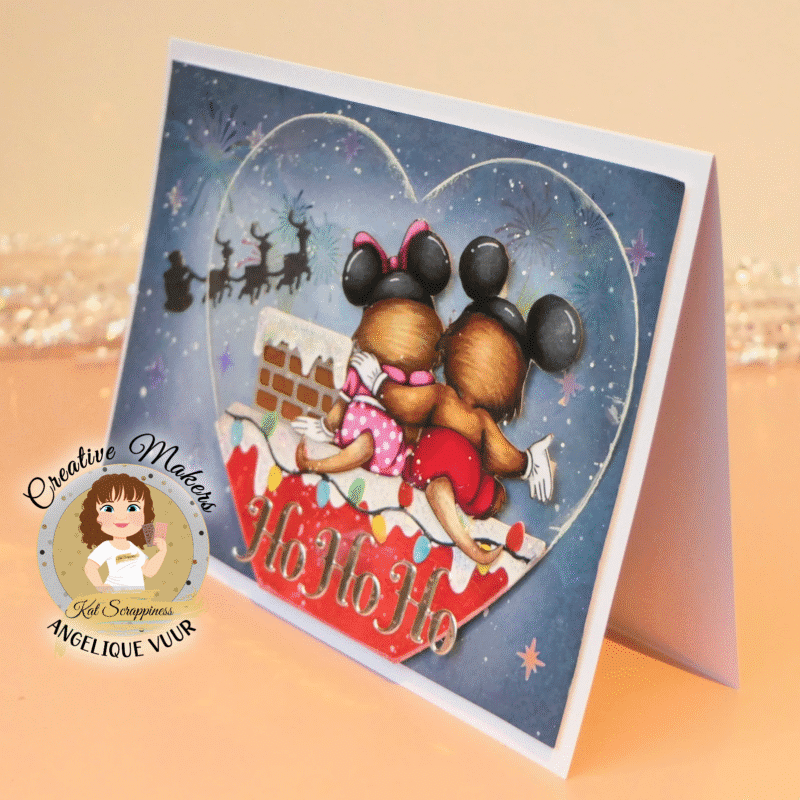
    This card is A7 (5″ x 7″), because the acetate heart is quite large and really steals the show!

    First, create an A7 card base and fold it on the long side.
    Cut a piece of Neenah Solar White cardstock slightly smaller than 5″ x 7″ so you’ll have a clean white border.

    Using the Scene Builder Stencil, blend a sky full of soft clouds.
    Don’t worry about keeping them too light — the entire panel will be inked with blue. The edges should be a darker blue, fading to a softer tone in the center. You can see the effect in the photos below.

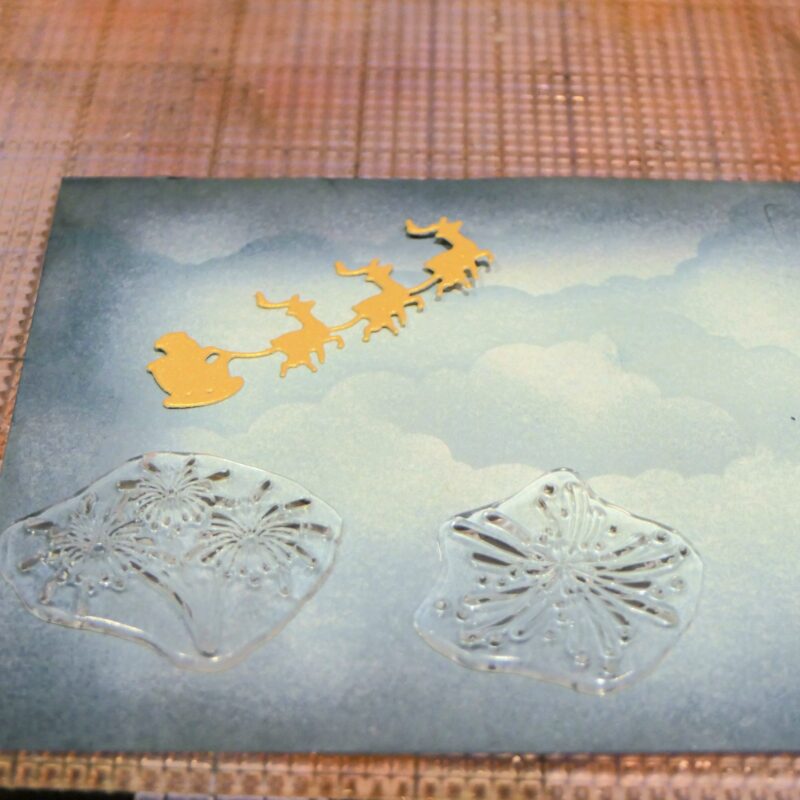
    Next, using the fireworks stamps from the Meet the Quouses Stamp Set, stamp fireworks in both corners and once again in the middle. I used a mix of colors, but black ink also works beautifully.
    Once that’s done, set the background aside.

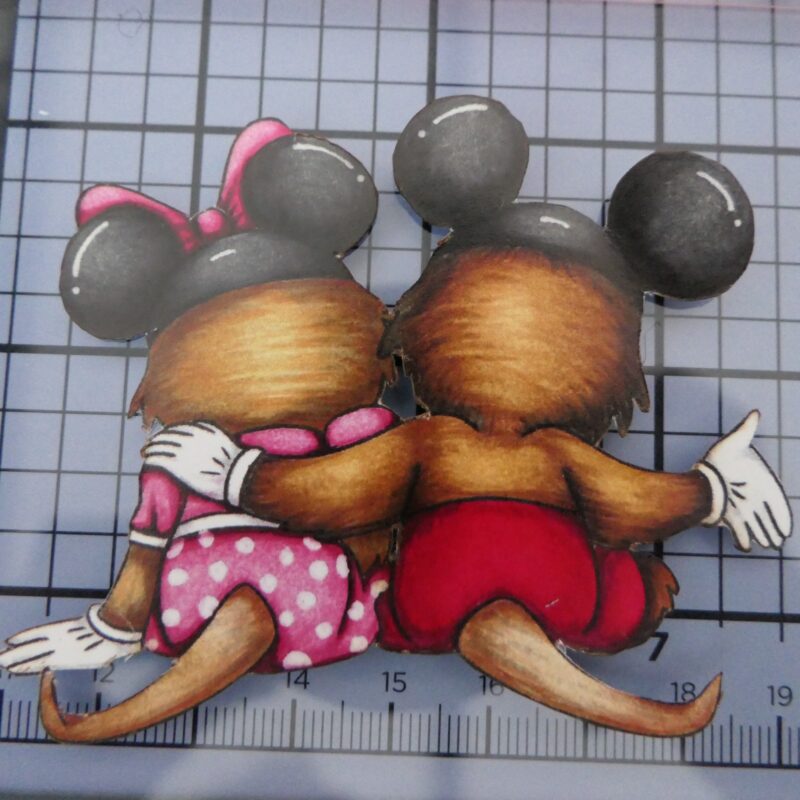
    Preparing the Quouses

    I used one of the Quouses from the Ephemera Pack, already colored. The only extra thing I did was trim off the white border with scissors. Not necessary, but it makes the look even cleaner and cuter.

    Creating the Roof Scene

    From the Up On The Rooftop die set, I cut all pieces from Neenah Solar White – except Santa and the dormer, which I didn’t use.
    From The Night Before Christmas Window Scene dies, I cut Santa and the reindeer from pearlescent gold. Later, I changed my mind and colored it black with a glitter pen, this looked much nicer!

    I also cut out the sentiment from silver colored cardstock. I only used the words, the “Ho Ho Ho”, not the shadow.

    Then you Ink-blend all the pieces, you can choose colors of your own preference and assemble the little rooftop scene.

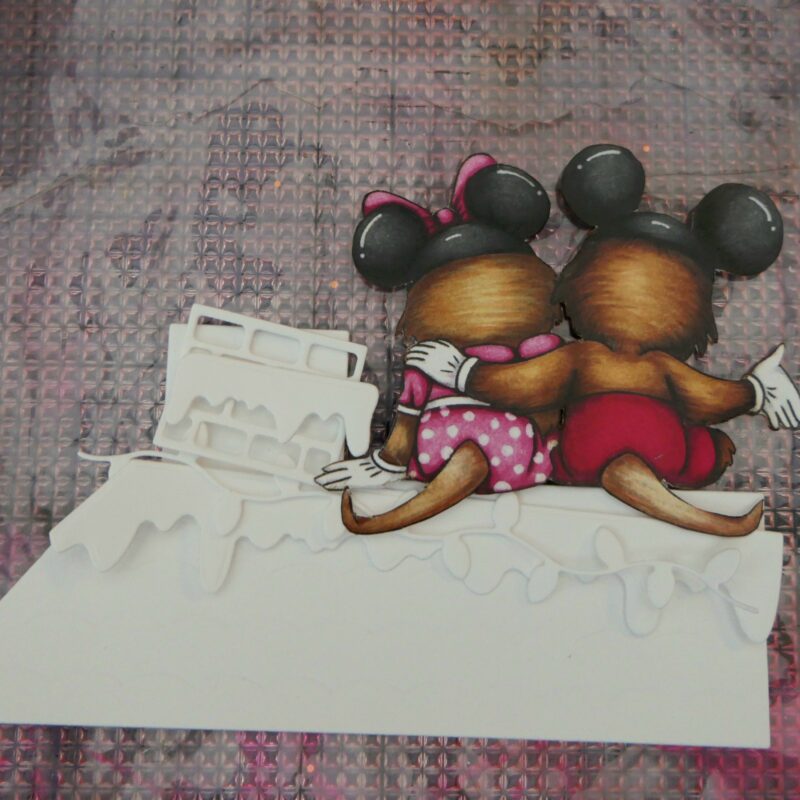
    Building the Acetate Heart

    Using the largest heart from the Embossed Edge Heart Craft Dies and cut a heart from acetate.

    Now the roof needed to be trimmed so it fits perfectly inside the heart. Once you’re sure of the placement, trim carefully and adhere the roof onto the acetate.
    You can see this step in the picture below.

    TIP: use a little bit of low stick tape so the die and roof will stay in the right position.

    Add Stickles Glitter Glue – Icicle to give the snowy roof a sparkly, frosty look.
    Then use white Stazon ink to add a white, snowy edge to the acetate heart.
    (Be patient: this takes a while to dry. You can heat it, but some acetate warps very fast, so be careful!)

    You can also use a little white paint or gesso instead. Normal ink doesn’t stay on acetate.

    When everything is dry, adhere the Quouses on top of the roof.

    Final Assembly

    Dry-fit the heart on your background panel so you can see where to place:

    After adhering these, place thin foam tape behind the heart – only where it won’t show – and attach it to your background.

    Finally, adhere the entire piece to your A7 card base… and your magical Christmas card is ready to spread joy!

    Thank you so much for stopping by and reading my blog!
    I hope you enjoyed this Christmas card idea, and I would love to see your version if you decide to make it,  feel free to tag me!

    Good luck with all your festive crafting, and I’ll see you in the next Christmas card tutorial!

    Don’t forget to check out What’s NEW at Kat Scrappiness for even more crafty amazingness!

    Hugs,

    Angelique ☃️

    Angels Happy Cards for Kat Scrappiness

  • Merry Christmas – Mason Jar Shaker

    Merry Christmas – Mason Jar Shaker

    Happy Friday everyone.  It’s Caren here on the blog today.  Have you  started your Christmas cards yet?  I try to make them throughout the year, but I’m always scrambling in November!  I have a fun Christmas shaker card for you today using lots of Kat Scrappiness products!


    Here is how I created the card:

    Thanks for stopping by!

    – – –– – –– – –– – –– – –– – –– – –– – –– – –– – –– – –– – –– – –– – –– – –– – –– – –– – –– – –– – –– – –– –

    Here is a link to the Kat Scrappiness shop and direct links for products I used on today’s card.

    – – – SUPPLIES for today’s project– – – – – – – – – – – – – – – – – – – – – – – – – – – – – – – – – – – – – – –

  • Christmas Ornament Shaker

    Hello Friends Waleska here, to share a Christmas card with some very whimsical colors! I wanted to create a Christmas card but using some fun colors not the traditional… Do you like traditional Christmas or prefer some different non traditional colors?   I hope you like my card today, this new shaker dies are so much fun and very versatile to create.


    CARD DETAILS:

    To start with my card I always like to get some inspiration of color combos, I found this beautiful color combination on pinterest.  I started with my background using two shades of oxide inks in colors Picked Raspberry and Spun Sugar, I tried to leave a little white space in the center of my blending to create a focus on my main piece, (the shaker ornament).

    I then cut one of the Shaker Ornaments from the new Christmas Shaker Ornaments dies in a teal color cardstock and create the shaker, I also diecut some leaves, for the leaves I used white acrilic paint and a dry brush to create some snow texture and I also added white glitter for some snow sparkle.

    I finally adhere the snowy leaves on top of my inked panel and also added the shaker in the middle, I filled my shaker with gold stars to go along my ornament I stamped the sentiment with versamark ink and finally I added some white and gold splatters.

    I just love this new ornament dies, the Design Team has made some beautiful projects with them! Thank you so much for stopping by today! I hope you liked my card and can be inspired to use some fun colors for your Christmas cards.


    Waleska Galindo


  • Shake,Shake,Shake

    Shake,Shake,Shake


    Error: Contact form not found.

    Hello fellow crafters,

    I wanted to share this shaker card I made, I tried something new for me. I am using Kat Scrappiness sprinkles that I find so colorful that I wanted to ensure they were showcased in the best way. I decided to make a see through card so the fill was visible from the front and the back.

    I started by making my layered frame. This frame had to be made twice so it looked great from the back also.

    I determined the size of the frame based on a standard 5×7 card. I used acetate behind each frame to form the “bread” part of this shaker sandwich I was creating. Next I cut fun foam to fit between the frames to form the shaker space. I used two layers of the foam to give the sprinkles enough room to move.

    Using glue I assembled the layers. I filled the inside with many different colors of candy sprinkles then glued the top on.

    Next I die cut the sentiment using the Kat Scrappiness Hooray die and Shadow. Before attaching this sentiment to the front window I wrote a message to the recipient on the back of it so it could be read through the back. I embossed a sub sentiment on black and attached under the die cut.

    I think this made a fun card.  I hope you try making one too. The sentiment dies from Kat Scrappiness all work well with this type card so give it a go.

    Supplies: KS candy sprinkles – green, purple, blue, yellow, hot pink and candy explosion sprinkles

    KS – Hooray die and shadow

  • Embossed Edge Dies & More by Martha Lucia

    Embossed Edge Dies & More by Martha Lucia

    Hi there! Martha Lucia here with you. Today I am featuring the fabulous Embossed Edge Die Cuts released at the beginning of this month and more die cuts from Kat Scrappiness.

    Embossed Edge Dies & More by Martha Lucia

    I used the Embossed Edge Heart set, the Butterfly Backdrop Die and the stamp set Let’s Get Caffeinated. to create my first card. I stamped one of the sentiments included on the Let’s Get Caffeinated stamp set onto whisper white card stock with Memento Tuxedo Black Ink and die cut it with one of the middle size hearts included on the Embossed Edge Heart. The photo don’t make justice but the advantage of these die cuts is that you can get the deep on the border and the emboss design at the same time.

    Embossed Edge Dies & More by Martha Lucia

    To create the background, I used the Butterfly Backdrop Die from Kat Scrappiness. I cut the card base using Mint Macaron and covered it with a second layer of designer paper. then I pasted the Butterfly Backdrop Die over the decorated layer and colored some of the negative parts with markers. I pasted the them with double sided foam tape in the corresponding place. As final touch, I splattered the entire layer with a few drops of Glimmer Mist.

    Embossed Edge Dies & More by Martha Lucia

    My next card is featuring the Crafters Essentials Fall Dies from Kat Scrappiness and Mystical Leaves Sprinkles.

    Embossed Edge Dies & More by Martha Lucia

    To make this I used Pool Party card stock for the card base and Crumb Cake card stock for the second layer. I die cut the second layer with the panel layer included on the Crafters Essentials Fall Dies set. I also die cut some leaves in different colors from the same die cut panel.

    Embossed Edge Dies & More by Martha Lucia

    I inked the panel with different colors of Harmony Water Reactive Dye Ink from Spectrum Noir. I used the next colors of ink: Crushed Velvet, Fuchsia, Honey Pot and Grasshopper. I coordinated the colors of the ink whit the leaves that I die cut. Just to add more interest to the card, I embossed the leaves with a textured embossing folder and tie them with natural hemp tread.  As final touch, to decorate the window, I just paste behind of the panel a small piece of Acetate to create a shaker area and decorate with the Mystical Leaves Sprinkles. The sentiment is an image from a fall set from Hero Arts, stamped with StazOn Pigment Ink Snowflake.

    Embossed Edge Dies & More by Martha Lucia

    For my next card, I used the Embossed Rectangle Dies and the stamp set Happy Fall Y’all!. I inked a complete layer of whisper white card stock with three different colors of Harmony Inks by Spectrum Noir. It is a water reactive die with brilliant colors that mixed give me colors of the fall. I die cut all the rectangles with over the inked layer and interchange the position at the time of paste it.

    Embossed Edge Dies & More by Martha Lucia

    I stamped one of the images included on the Happy Fall Y’all onto basic black cardstock with VersaMark and Gold embossing powder. Then I colored some parts of the image with Metallic color pencils from Spectrum Noir.

    UPDATE: The embossed Edge Rectangle Dies are now out of stock. First, thank you for your support but If you are interested in know when the die will be available again, just add your email to the notification box at the store and you will be the first to know that they are back!

    Thank you for stopping by!

    Martha Lucia

  • “Thankful For You” Shaker Card featuring Wood Grain Framed Diamond Wire Die by Kat Scrappiness

    Hello crafty Friends! I am super excited to stop in today to share a card I created using the newly released Wood Grain Framed Diamond Wire Die and other amazing products by Kat Scrappiness.

    I must admit that I am in LOVE with all of the new dies that Kat Scrappiness has been releasing and the new Wood Grain Framed Diamond Wire Die is now one of my fav’s!!!

    To begin creating my card, I first decided to work on all of my die cuts. I started out die cutting the Wood Grain Framed Diamond Wire Die by Kat Scrappiness using 110lb White Card Stock.

    I then die cut my sentiment using the “Thankful for you” Brush Script Word & Sentiment Die by Kat Scrappiness out of some Card Stock from my ReCollections “Magic Hour” 6X6 Paper Pad.

    Because my card base is the standard A2 sized card and because I knew I was going to create a shaker, I then cut a piece of acetate and a piece of card stock (again from the ReCollections “Magic Hour” 6X6 Paper Pad) about 1/8″ smaller than my card base.

    I adhered the Wood Grain Framed Diamond Wire Die Cut onto the piece of acetate using some Nuvo Deluxe Adhesive and set it to the side to let it dry.

    Once dried, I flipped it over and applied Scotch Foam Tape along the edges.

    I then used the Fluffy Clouds Sequin Mix Shaker Card Fillers as well as the AB White Butterfly Confetti Shaker Card Filler as my sequin mix and carefully applied the completed Wood Grain Framed Diamond Wire Die Cut (from the previous step), over the sequins to create my shaker.

    And to complete my shaker card, I then adhered my sentiment over the top of the Wood Grain Framed Diamond Wire Die Cut.

    I am extremely pleased with how this shaker card has turned out and I hope that you have enjoyed today’s quick tutorial on how to create your own shaker card. You can find a complete list of all of the supplies used in this tutorial below. Remember to use Code: Jana10 during check out at the Kat Scrappiness Store to receive 10% off of your order. Thank you for visiting and have a fabulously crafty day!!!

    Supplies Used:

    Wood Grain Framed Diamond Wire Die by Kat Scrappiness

    “Thankful for you” Brush Script Word & Sentiment Die by Kat Scrappiness

    Fluffy Clouds Sequin Mix – Shaker Card Fillers

    AB White Butterfly Confetti – Shaker Card Fillers

    Nuvo Deluxe Adhesive 200N

    Acetate

    110lb. ReCollections White Card Stock

    Patterned Card Stock from ReCollections “Magic Hour” 6X6 Paper Pad

    Scotch Foam Adhesive