Follow:
    New Releases

    Got Coffee Card Plus Video

    Hi Everyone, it’s Tina here today. By now you have seen the new Layered Coffee Cup Build It Die. I have a video below showing you not only how to assemble it but how you can make it into a flip card/tag. This card features the new Layered Coffee Cup Die & Got Coffee Sentiment Die, as well as the Double Stitched Rectangle DieWonky Wavy Stitched Rectangles Die, and Distress Oxides, which can all be found at Kat Scrappiness.

    Below is a full video tutorial showing you how to create this card. You can watch below or on YouTube.

    If you want to save the directions on how to assemble the Layered Coffee Cup I have added it below. Just right click on the image and save to your desktop, laptop, tablet or phone.

    I hope you enjoyed today’s card. See below for a list of all Kat Scrappiness products used. Use code: TINA10 to get 10% off your order at checkout.

    Have a great day everyone!

    Kat Scrappiness Product Used:


    https://linkdeli.com/widget.js?1522321046703

    Challenges & Hops

    April Card Challenge – Envelope Art!

    Congratulations to Entry #1 (My doodling envelope art) – Your are the winner for April!  We have emailed you with instructions on how to redeem your gift card!

    Hi everyone this is Mona Leonard, Kat Scrappiness Design Team Manager and I am here today to share the April Card Challenge for Kat Scrappiness. Since our new release this month are envelope stamps I thought this would be the perfect theme for this challenge.

    We challenge you to create some envelope art (mail art) and submit your photos in our challenge for a chance to win a $25.00 gift card to Kat Scrappiness! Here are two new “Envelope Art” stamps released by Kat Scrappiness this month:


    While you do not “have” to use our products, we would love to see how you incorporate your Kat Scrappiness stamps and/or dies in your project!  You can stamp, color, die cut, doodle, anything you can think of to decorate your envelope.

    To enter, submit a photo of your project below (Click on the “Add Your Link” button) and we will randomly pick the winner at the end of the month. Good Luck!


    News

    Got Coffee?


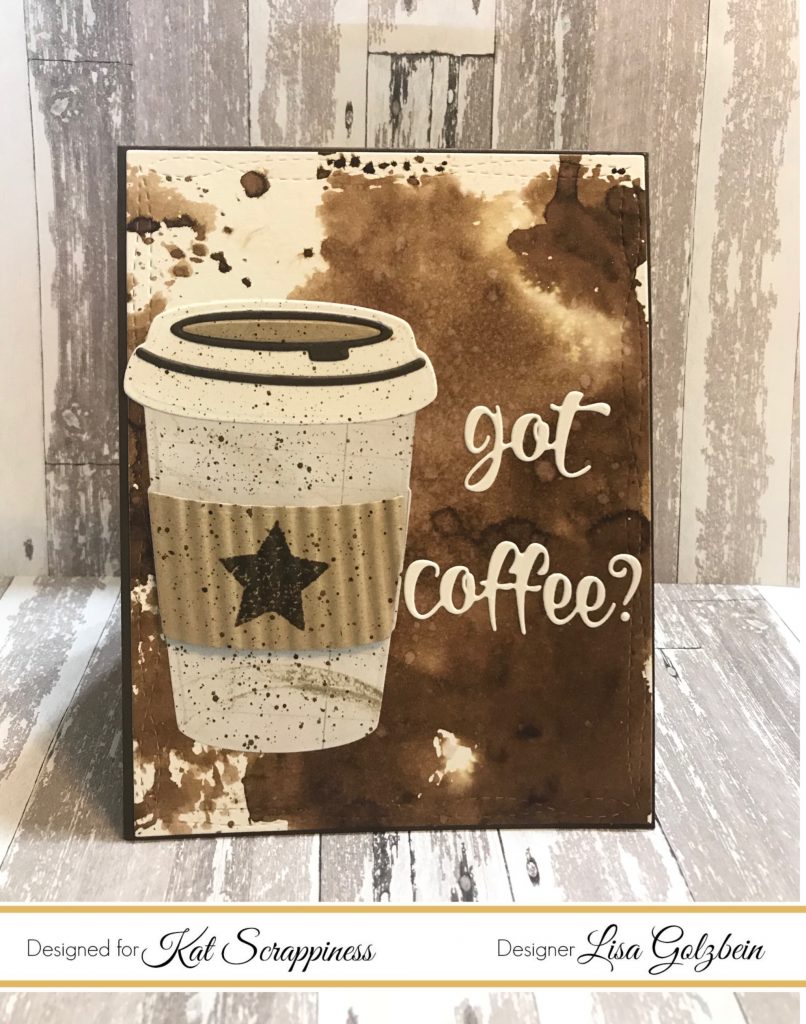
    Welcome back Kat Scrappiness fans!  It’s Lisa and I’m back today to share a cup of coffee with you.  If you’ve already had your morning cup, pour another and relax.  This month Kat has come out with an awesome new Layered Coffee Cup Die and I’m in love!  I’m a big fan of all coffee themed projects.  I’m not a huge coffee drinker but since I work night shift at the hospital I do find myself reaching for it at 3 and 4 in the morning to stay awake.  If the truth be told I just enjoy a little coffee in my half and half…. heh heh heh.

    Ok enough coffee talk, on to the card.  I wanted this card to have a “coffee stained” background so of course I reached for my Ground Espresso colored Distress Ink pad and  I “smooshed” (technical crafty term) some ink onto a piece of acetate and then sprayed it with water.  When the ink was moving around I placed the acetate onto a piece of watercolor paper and the results were gorgeous!  I then assembled my coffee cup out of various colors of card stock and patterned paper.

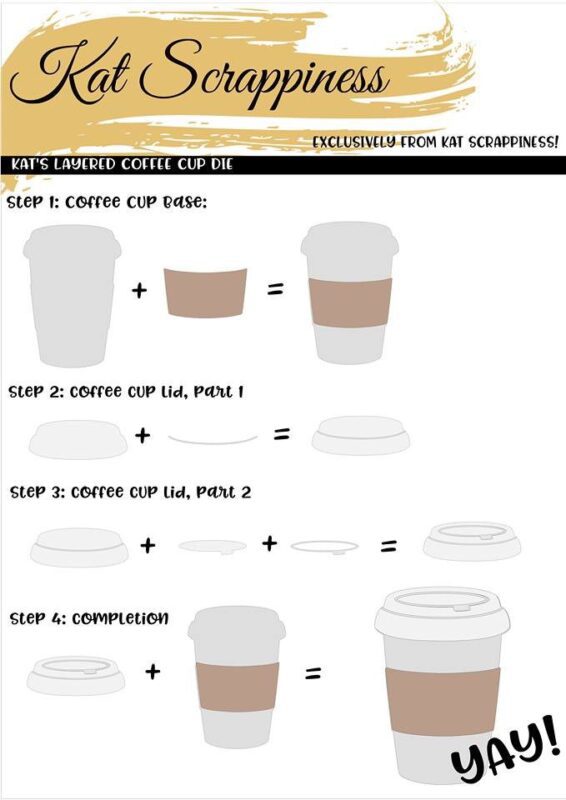
    Here is a very handy instruction sheet to show you how to assemble the pieces from the die.

    For the coffee cozy section of the die I used kraft cardstock and I stamped a star from the new Kat Scrappiness Swatches stamp set.  After that I ran the cozy through my paper crimper to give it a realistic look with some dimension and I added it to the cup with some foam tape.  When the coffee cup was fully assembled I added some paint splatter with the Ground Espresso color to the whole cup.  I just love the added interest paint splatter gives to any project!

    For my sentiment I used the new Kat Scrappiness “Got Coffee?” die and added it to the side of the card.  This sentiment is awesome and uses a fun whimsical font that is perfect for any coffee themed card.

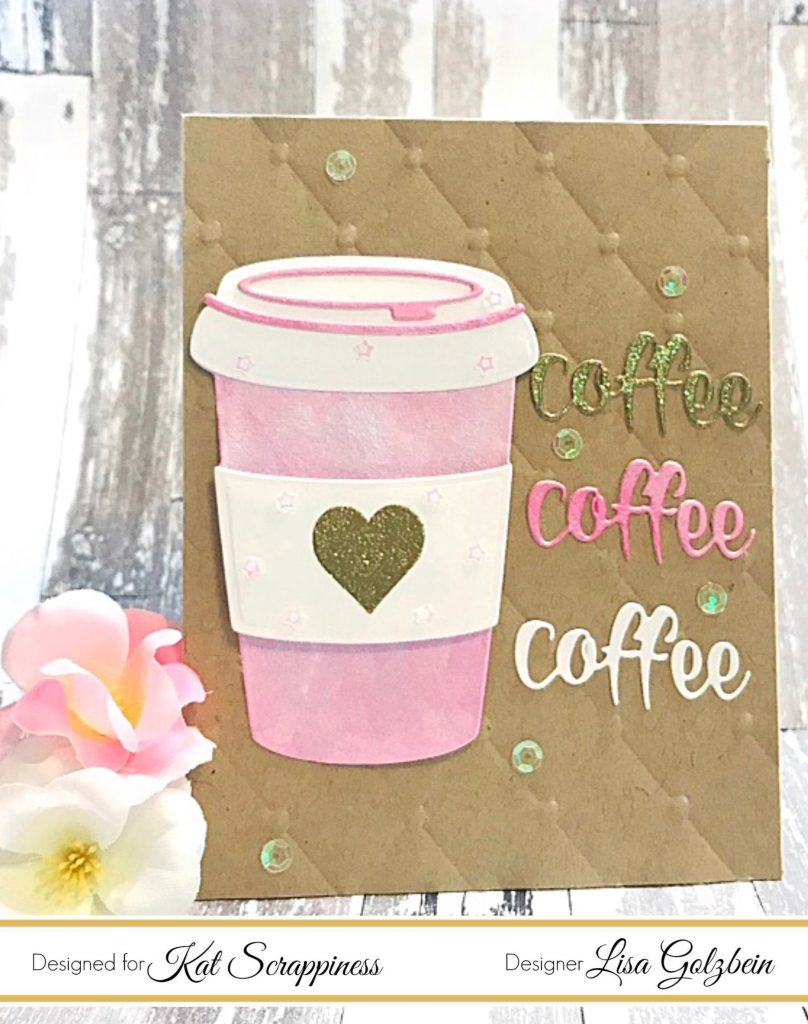
    For this next card I used just the word “coffee” and cut it out 3 times in different colors for a fun look.  I painted the coffee cup with a pink pearlescent color from the Kuretake Gansai Pearl colors watercolor set and I added a heart to the cozy from the “Swatches” stamp set and heat embossed it with Ranger Gold powder.  I placed it on a diamond embossed background and added some fun

    Kat Scrappiness Barbie sequins for a feminine touch.

    Such a different look with the same die!

    If you added the sentiment “Wanna” above this die, it would make a cute card for a friend inviting them to get together over coffee reading “Wanna Get Coffee?”

    This coffee cup die makes it easy to create an eye catching card in no time!

    Make sure to stay tuned this month to the blog to see what my talented fellow design team members have come up with for this die and all of the other new release stamps and dies!  You’ll be glad you did!

    That’s all for today, I am glad you stopped by and I hope you have a great day crafty friends!

    I already am!

    Lisa

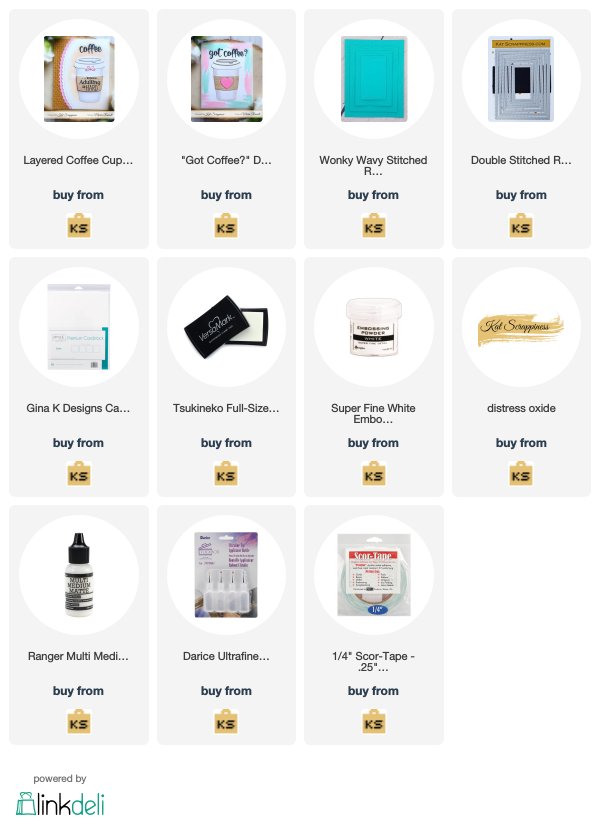
    Supplies used on Coffee cards:

    Be sure to use code: Lisa10 to get 10% off of your purchase at checkout!

    Layered Coffee Cup Die

    Got Coffee Word Die

    Swatches Stamp Set

    Barbie Sequin Mix

    Ground Espresso Distress Ink

    Kuretake Gansai Pearl Watercolors

    Ranger Gold Embossing Powder

    Design Team Projects

    Hello My Crafty Friend Shaker Card

    Hello, everyone! It’s Siqi today with a full shaker card that features an ink-blending background which coordinate the colors of the sequins I used for this shaker card along with a beautiful die cut sentiment from Kat Scrappiness April release that just came out.

    So for my ink-blending panel, I simply used some thin masking tape to mask off a strip pattern on an A2 size cardstock. I chose Distress Oxide ink in Carved Pumpkin, Squeezed Lemonade, and Salty Ocean to do a soft blending look.

    I then grabbed a stamp storage pocket from Avery Elle in the size large. I fused around the ink-blending panel inside but leave one side open to put some sequins in it. The sequins I used today is from Kat Scrappiness Sun Kissed Sequins Mix.

    After fuse the last side of my shaker card sealed, I used my scissors to trim around the fused edges.

    For the sentiment, I chose the new sentiment die from Kat Scrappiness called Scripty “Hello My Crafty Friend” Die. I die cut it with some white cardstock and adhere it down on my shaker card. I then used my shimmer marker to go over the words to add some shine. And the card is finished.

    I love shaker cards because you don’t always find it in the store which makes it very special. Remember to use the discount code: Siqi10 to get 10% off you order! Have a great week!

    Supply List:

    Kat Scrappiness Sun Kissed Sequin Mix

    Kat Scrappiness “Hello My Crafty Friend” Die

    Avery Elle Stamp & Die Storage Pockets 50/Pkg – Large 5.5″X7.25

    Squeezed Lemonade Distress Oxide Ink Pad by Tim Holtz

    Carved Pumpkin Distress Oxide Ink Pad by Tim Holtz

    Salty Ocean Distress Oxide Ink Pad by Tim Holtz

    Inkadinkado Stamping Mask Paper 7″X5″ 12/Pkg

    Gina K Designs Cardstock 8.5″X11″ 12/Pkg – White

    Ranger Multi Medium Matte .5 oz

    Clear Overlay Sparkle Markers by Spectrum Noir – 3pc


    Design Team Projects

    Hello Crafty Friend

    Hi Everyone!

    Today I have a couple of projects using the Swatches stamp set from Kat Scrappiness.  These are great stamps to use to keep track of your inks, watercolors and Copics, but they’re also great for all kinds of stamping projects.  I love using geometric designs on my cards, and that square was calling my name!  The new Hello Crafty Friend word die is the perfect compliment to these colorful cards.

    I have a video below showing my process, plus some tips for using solid stamps.  I have all products from the Kat Scrappiness shop linked below.  Be sure to use my coupon code Heidi10 to receive 10% off your purchase.  Have a great day!

    Heidi


    [youtube https://www.youtube.com/watch?v=nNKbKeotb70]

    –SUPPLIES–

    Design Team Projects

    Distress Oxide Stamping with April NEW Release!

    Hello crafty friends! I’m so excited to show you one of the new Kat Scrappiness stamp sets and diecuts for the April release. I love a beautiful scripty word diecut and Kat has nailed it with this Hello Crafty Friend Die. My favorite thing is that the words are separate so you can use just the hello, the hello friend, or the whole sentiment.

    The inspiration for this card was the shape of the stamps in the Swatches stamp set. I have a full video tutorial for you today that you can watch below or on YouTube.

    [youtube https://www.youtube.com/watch?v=WoRGP2sM7LU]

    I started by stamping the shapes on some plain white paper using Distress Oxide inks because the dye and pigment blend leads to better stamping results with solid stamping.

    Then I die cut out the patterned paper I had made with the Wonky Wavy die of the same shape. I created a Distress Oxide background with the same colors and added a bit of interest with my Distress Sprayer. In the video I only show the circle card but as you can see I also created a heart card and changed up the sentiment.


    https://linkdeli.com/widget.js?1522321046703

    Design Team Projects

    Patriotic Thanks


    Hi Friends! kel here today to share a patriotic card using the new Swatches stamp set!!

    This one is semi-quick and simple because I’m putting together a whole bunch of cards to send over to a friend who collects cards and sends them to troops stationed overseas! So I needed to be able to make a small stack of these cards fairly quickly, and wanted to stick with a simple layout.

    I stamped the star from the new Swatches stamp set all over the background with my Versamark Ink Pad before heat embossing it so that it stood out nicely. I used clear embossing powder to make sure that my stars would stay nice and bright white!

    Then I went over the background with some blue Distress Inks and my blending tool. I used Tumbled Glass, Salty Ocean, and Chipped Sapphire, starting with the lightest color (Tumbled Glass) in the middle and working my way out with the darkest color (Chipped Sapphire) at the edges. The last thing I did was add the “thanks” sentiment, stamped using Memento Tuxedo Black ink. For the record, I LOVE using this Memento black ink pad for stamping sentiments because it makes a nice dark print.

    Love this Swatches stamp set! So many uses for these stamps, and I can’t wait to actually make some swatches with it too haha!!

    lovies, =o) kel

    Supplies Used (use code kel10 for 10% off your order!):