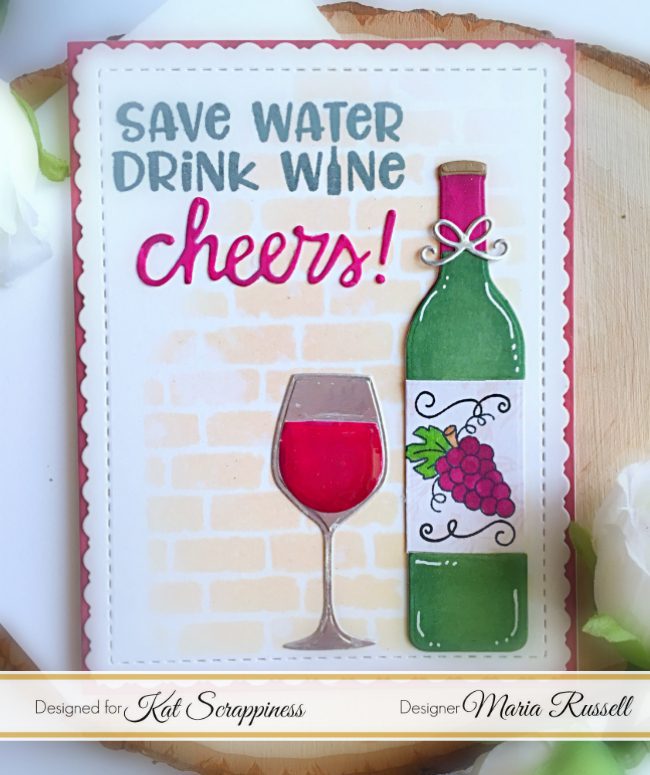
Follow:
    Design Team Projects

    Halloween Cards – Toil & Trouble

    Hi everyone.  Today I’m showcasing the Toil & Trouble stamp and die set from Kat Scrappiness.  I’ve created two Halloween cards using the layered cat and skull from this set.  I usually liking make cute Halloween cards, so using “creepy” images was a change for me.  I love the way these two cards turned out, and they are too creepy!!


    For my first card, I stamped the cat with three shades of gray ink and then used black versafine ink for the eyes on white card stock.  I die cut it out with the coordinating cat die.  I stamped and heat embossed the sentiment on a Kat Scrappiness stitched flag die.  I found some great striped black, orange, silver, and white paper in my stash for the backdrop for my card.  I used the double stitched circle dies from Kat Scrappiness to cut a stitched circle out of orange card stock.  I adhered the cat to the circle with foam tape and added some black jewels below the cat.  I also used foam adhesive for the stitched banner die and added two orange jewels.

    For my second card, I stamped the skull using the same three shades of gray ink on some light gray card stock.  I then used the coordinating die to cut each of them out.  I adhered them to my card with foam tape.  I die cut the word boo four times using the condensed lowercase alphabet dies from Kat Scrappiness out of black card stock. I glued the four together to give it some dimension.  I stamped the happy halloween sentiment also from the  Toil & Trouble stamp set with versafine black ink on gray card stock and adhered that on top of the boo letters. 

    Thanks for stopping by and happy stamping!

    – – –– – –– – –– – –– – –– – –– – –– – –– – –– – –– – –– – –– – –– – –– – –– – –– – –– – –– – –– – –– – –– –

    Use code caren10 for a 10% discount in the Kat Scrappiness shop.

    – – – SUPPLIES for today’s project– – – – – – – – – – – – – – – – – – – – – – – – – – – – – – – – – – – – – – –

    Design Team Projects

    BOO! Halloween Shaker Card with Toil & Trouble

    Fall is my favorite season and it is that time of the year when I start creating Halloween cards to send to my friends.  Is orange the new pink during Halloween? haha!  I’m back today with this very simple Halloween shaker card, showcasing the Toil & Trouble stamp set with matching dies.  This stamp set was released last year but they are still available at the shop.


    I started out by stamping my cat image on some white card stock using shades of gray and black inks.  Even though this image has a coordinating die, I went ahead to fussy-cut the image.


    I die-cut and dry-embossed some white card stock with an embossing folder from my stash.  The middle part cuts out so I colored those pieces with my Copic markers.  I adhered this piece onto my card base, and added some 6 mm Black Flat Flower Sequins and Metallic Silver Solid Star Confetti with my Nuvo Craft Spoon.


    I adhered some acetate and added foam adhesive to create my shaker well.  I adhered my embossed card panel onto my card base.


    To finish my design I adhered the cat and added the Witch’s hat and the black bats, then stamped the sentiment next to the cat.   I also added some color to the cat’s ears with my Copic markers.  Here’s a little close-up:


    I love the simplicity of this card.  I also used my white gel pen to add some details to the witches hat.  I love how this card turned out.


    I hope you like my project today.  Please don’t forget to use my coupon code “MARIA10” for 10% off your order at the shop.  I would also be very grateful if you could click on the items I listed below to purchase the products I used today.  Have a wonderful day and happy crafting!


    ———–SUPPLIES——–


    Design Team Projects, News

    Pink Fresh Watercolour Card

    Hi All, Jo here and welcome to my blog post using one of my favourite ‘go to’ items in my Kat Scrappiness collection. The Crafters Essential II Dies is one of my favourites and loved using it on today’s card creation.  With watercolour cardstock I have die cutted the main large background die from the collection. The stitching details around the whole die and the chevrons detail adds such a fun element.

    I have heat embossed with the WOW Embossing Powder the Pearl White embossing powder the image from Pink Fresh Studio stampset towards the left hand side of the watercolour cardstock.  I have very loosely watercoloured the image in working around the image first  as a light colour wash then making my way colouring in the image.

    I wrapped some black twine around the bottom half of the watercoloured cardstock then adhered down with foam mount tape.  From the same stampset I have heat embossed on black cardstock the Opaque Bright White embossing powder as this stand out so bright on black hence the name LOL I have double mounted this to add dimension to the card.

    To finish the card off I added some 4mm clear sequins throughout the card.

    I have created a Youtube for you to enjoy this cardmaking process.

    To get 10% off your entire order in the Kat Scrappiness store use jo10 on checkout.

    Thank you so much for your lovely comments and support everyone.

    Hugs

    Jo

    Design Team Projects

    Pumpkin Spice & Everything Nice

    It’s Lisa here on the blog today and guess what Kat Scrappiness fans?  Pumpkin Spice season is fast approaching and today’s card should put you in the mood!  I wanted to use the Layered Coffee Cup Die to create a Pumpkin Spice Latte card and I thought it would look great against a fall colored background.  To make such a background I decided to watercolor with some Distress Inks.  I took 3 colors, Mustard SeedSpiced Marmalade and Peeled Paint and I watercolored a background and then splattered it with black paint.

    After it dried I took my Peacock Backdrop Die and cut it out.  The next step was to cut out a piece of brown paper with the Stitched Scalloped Rectangle Die.  I used the 2 largest sizes in the set and I nested them in each other and ran them through my vagabond.  That left me with a frame that I could put around the watercolor panel to finish it off.

    Once I had my background done I moved on to creating the coffee cup for the front of the card. I die cut the Layered Coffee Cup Die in dark brown, the koozie in craft and the top in white. I used a white gel pen to add stitching around the coffee cup and koozie to give it a finished look.

    I added a pumpkin die cut from my stash to the front of the koozie. I cut it out in orange paper and  dry embossed it using a polka dot embossing folder to give it some texture.

     I thought that this pumpkin could use a little something extra so I popped a dark brown heart to the front for some extra cuteness.

    Now that the coffee cup was finished, I needed a little something to adorn the top of the coffee cup. I wrapped a piece of twine around the top of the cup and hand punched the word “enjoy” out with a mini tag punch.  I didn’t have the word enjoy in a stamp in a font I liked so I computer generated it.

    Now I needed a sentiment so I printed out a cute one using the same font as the little “enjoy” tag.  I layered the sentiment onto a piece of orange card stock.

    Inking the edges really allowed it to stand out.

    Last but not least I added Orange Jewels all around the sentiment and the

    coffee cup for some added sparkle!

    If you use my code “Lisa10” in the shop you can save 10% on your order!

    All in all I think that this card came out beautiful!

    Hope you enjoy!
    Have a great day, I already am!

    ☕️ Lisa  ☕️

    Products Used:

    Design Team Projects

    Bright Coffee Fun!

    Hi Friends! kel here today to share a bright and fun coffee card using the new Let’s Get Caffinated stamp set =o)

    I definitely wanted to make the sentiment the focus of the card because it’s so cute!! I think it would be super cute to make it like a multi-colored subway art kinda thing too… something to try next!!


    The sentiment was stamped with Memento black ink. I used the super cute coffee cups from the Coffee Chick stamp set by Your Next Stamp to randomly stamp out a background and then colored them up with my Copics. I wanted to stick with a fun and bright scheme but kinda messed up the spacing of the 3 colors which is why you’ll see a couple darker shares of green and orange in there haha!! After stamping out my sentiment, I trimmed it out to fit on a nice bright turquoise cutout from the Stitched Postage Stamp Edge Rectangle dies and popped it up on some 3d squares. The last thing I did was add some glitter to the flowers on the cups because glitter=more fun!

    Thanks for stopping by, see you again soon!

    lovies, =o) kel

    Supplies Used (use code kel10 for 10% off your order!):

    Design Team Projects, New Releases, News

    Wine Cards with the September Release by Maria

    Hello Kat Scrappiness fans! Maria here with you today with some simple cards featuring the new Peacock Backdrop die, the Wine Not stamp set and the Wine Not Custom craft dies.


    For my first card, I started out by die-cutting the Peacock Backdrop die some Bristol smooth white card stock.  I inked up this piece with some squeezed lemonade, spiced marmalade and picked raspberry distress oxide inks with my mini ink blending tool.  I set this piece aside to dry while I worked on die-cutting the Wine Not Custom craft dies.  I used Neenah smooth white card stock to color the bottle with my Copic markers and used a silver card stock for the wine glass.  I added glossy accents to make it look more realistic.   I also die-cut a frame by using the double stitched rectangle die and the stitched rectangle die.  Here’s the first card:


    I adorned my card with some images from a stamp set by Newton’s Nook and also added the beautiful Champagne jewels.  I love the new jewels collection from the shop.  They are available in a variety of colors.  Here’s another look:


    For my second card, I die-cut the pieces again with some Neenah solar white card stock and colored the die-cut pieces with my Copic markers.  I inked up an A2 size piece of some Bristol smooth white card stock with a stencil from my stash.   I stamped the sentiment from the Wine Not stamp set.  Here’s my second card:


    To finish the design, I also added the cheers sentiment from my stash and the tiny bow is from a die-set by Lawn Fawn.  Here’s another look:


    For my third card, I wanted to create something simple just using the Wine Not stamp set.  I die-cut a piece of some Neenah solar white card stock with the Stitched Fancy Scalloped rectangle die.  I colored the images in with my Copic markers.  To finish my design, I stamped the sentiment using Versafine Vintage Sepia ink.

    I hope you like my cards today.  Which one is your favorite?  The supplies I used are listed and linked below.  Don’t forget to use my coupon code “MARIA10” for 10% off your order at the shop.  Have a nice day!

    ———–SUPPLIES————


    Design Team Projects

    Wine Not

    Hello everyone!  Have you seen the latest items released from Kat Scrappiness?  On today’s card, I’m featuring several of these new products.  My favorite – the Peacock Backdrop die – it is so beautiful and elegant.  I’m going to have to resist using it on every card!

    For the back panel of this card, I used the double stitched circles from Kat Scrappiness to cut out a circle on a 4 1/4 x 5 1/2 piece of kraft cardstock.  Behind this I layered a piece of deep purple card stock die cut using the Peacock Backdrop die.  Behind this I added a piece of dark gray card to match the Wine Not sentiment I heat embossed on to the panel.  I used the Wine Not dies to create the wine bottle.  I found a piece of patterned paper that had script writing on it – I thought this was perfect for the body of the wine bottle.  I popped that up on the card using adhesive foam tape.

    I added silver jewels on the wine bottle and sparkling clear jewels on the peacock backdrop to give a little sparkle to the card.  I thought the card was missing something in the upper right corner so I add three drops of the clear glass drops by Fabrika.


    – – –– – –– – –– – –– – –– – –– – –– – –– – –– – –– – –– – –– – –– – –– – –– – –– – –– – –– – –– – –– – –– –

    Use code caren10 for a 10% discount in the Kat Scrappiness shop.

    Thanks for stopping by and happy stamping!

    – – – SUPPLIES for today’s project– – – – – – – – – – – – – – – – – – – – – – – – – – – – – – – – – – – – – – –