Author: Tina Dornbaum

  • Poinsettia With Plaid Background Card

    Poinsettia With Plaid Background Card

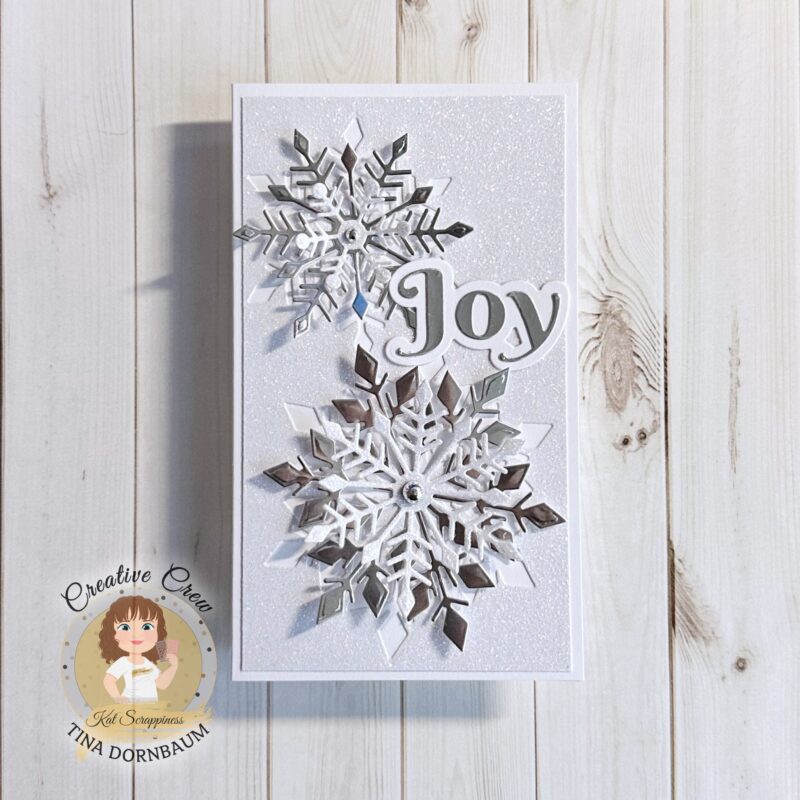
    Hi everyone, it’s Tina here. I can’t believe the year is almost over and the holidays is nearly upon us. For my last post in 2022 I am sharing a card using the beautiful Layered Poinsettia Dies. Below are the steps to create your card.

    Step 1 – Trim White Cardstock to 8 1/2″ x 5 1/2″, score at 4 1/4″ and fold in half for a vertical side fold card. (A2)

    Step 2 – Trim White Glitter Cardstock to 4 1/4″ x 5 1/2″ and adhere to card front using Bearly Art Precision Glue.

    Step 3 – Diecut Buffalo Plaid using White Cardstock and adhere to card front using Bearly Art Precision Glue.

    Step 4 – Diecut Layered Poinsettia using Pink and Green Cardstock. Assemble each layer using Bearly Art Precision Glue. Optional: For added interest and sparkle spray Hero Arts White Iridescent Spray or any Spray you have in your stash. Once dry adhere to card using Bearly Art Precision Glue.

    Step 5 – Diecut Joy w/Shadow using Pink Cardstock for word and White Cardstock for shadow. Assemble and adhere to card using Bearly art Precision Glue.

    Wishing you all a Happy Holidays and see you 2023! Below is a link to all the products used. Thanks for stopping by and Happy Crafting!

    Products Used:


    https://linkdeli.com/widget.js?id=f5e8378456858c916708

  • Snowflake Joy Mini Slimline Card

    Snowflake Joy Mini Slimline Card

    Hi everyone, it’s Tina here. I have a holiday card to share with you which can be used as a New Year’s Card using the Snowflake Trio Dies. Below are the steps to create your own card.

    Step 1 – Trim White Cardstock to 7″ x 6″, score at 3 1/2″ and fold in half for a vertical side fold card. (Mini Slimline)

    Step 2 – Trim White Glitter Cardstock to 3 1/4″ x 5 3/4″. Diecut Snowflake Trio using the 2 largest dies on the trimmed White Glitter Cardstock. Keep the diecuts and adhere the panel to the card front using Bearly Art Precision Glue. Diecut the Snowflakes Trio using White Glitter Cardstock and Silver Matte Cardstock in various sizes. Using Bearly Art Precision Glue adhere the Silver Matte diecuts, then top it with the White Glitter diecuts.

    Step 3 – Adhere Silver Pearl Mix to the center of the Snowflakes using Bearly Art Precision Glue.

    Step 4 – Diecut Joy with Shadow (Joy using Silver Matte Cardstock and Shadow using White Cardtock). Assemble and adhere to card using Bearly Art Precision Glue.

    This card can be used for several occasions by simply changing the sentiment. For example, use Happy Birthday sentiment for someone who celebrates their birthday in the Winter Season. Below is a link to all the products used. Thank you for stopping by and Happy Crafting!

    Products Used:


    https://linkdeli.com/widget.js?id=f5e8378456858c916708

  • Best Day Ever Mini Slimline Card

    Best Day Ever Mini Slimline Card

    Hi everyone, it’s Tina here. With the time change and colder weather coming I decided I wanted a cheerful card. I used the Mason Jar Shaker Dies along with the Summer Vibes and Hop Into Easter Paper Pad to create this happy card. I love how it turned out. Below you will find the steps to create your own card.

    Step 1 – Trim White Cardstock to 7″ x 6″, score at 3 1/2″ and fold in half for a vertical side fold card. (Mini Slimline)

    Step 2 – Trim Hop Into Easter Paper Pad to 3 1/2″ x 6″ and adhere to card front using Bearly Art Precision Glue.

    Step 3 – Diecut Mason Jar Shaker using Summer Vibes for the back of the shaker, the back of the lemon and lime, back for the strawberry. Hop Into Easter for the front of the shaker. White Cardstock for the straw and top of the lemon and lime. Trim Mini Slimline Acetate to slightly larger than the window and adhere to the back side of the front shaker diecut and then adhere foam tape. Add Citrus Twist Sprinkles. Remove the release sheet from the foam tape and adhere the back diecut to seal in the sprinkles. Adhere to card front using Bearly Art Precision Glue. Assemble the lemon, lime, strawberry and adhere to the card.

    Step 4 – Stamp Simple Sentiments using Versafine Onyx Black Ink on White Cardstock. Diecut with the matching die. You now have many sentiments for future cards. Select the sentiment of your choice and adhere to card front using Bearly Art Precision Glue.

    This card can be used for several occasions by changing the colors and/or sentiments. Below is a link to all the products used. Thank you for stopping by and Happy Crafting!

    Products Used:


    https://linkdeli.com/widget.js?id=f5e8378456858c916708

  • Furever In Our Hearts Mini Slimline Cards

    Furever In Our Hearts Mini Slimline Cards

    Hi everyone, it’s Tina here. Last month there was a fabulous Cat and Dog release from Kat Scrappiness for our fur babies. There was also a stamp set with sympathy. Today I am showing 2 cards I made for female and male. Below you will find the steps to create your own cards.

    Step 1 – Trim White Cardstock to 7″ x 6″, score at 3 1/2″ and fold in half for a vertical side fold card. (Mini Slimline)

    Step 2 – Trim Coloured Cardstock (pink for female and teal for male) to 3 1/2″ x 6″. Place Pawprint 6×6 Stencil on top of the trimmed Cardstock. Add Versamark over the stencil, remove and sprinkle Wow Matte Dull Embossing Powder. Remove the excess and heat set it with a Heat Tool.

    Step 3 – Diecut Mini Slimline Double Rectangles using the backgrounds created in Step 2. Adhere each panel to a card base use Bearly Art Precision Glue.

    Step 4 – Diecut Embossed Edge Heart using the same Coloured Cardstock as the base from Step 2. Place the diecuts in a Misty Stamping Platform and using Versafine Onyx Black Ink Stamp the sentiment, cat with wings and hearts. Let dry before you colour the hearts with an alcohol marker. However colouring in the hearts is optional. Adhere to heart to the card front using Foam Tape.

    Below you will find a link to all the products used. Thank you for stopping by and Happy Crafting!

    Products Used:
    https://linkdeli.com/widget.js?id=f5e8378456858c916708

  • Got Coffee? Mini Slimline Card

    Got Coffee? Mini Slimline Card

    Hi everyone, it’s Tina here. I have a shaker card to share using the new Cuppa Love Shaker Dies along with the Cuppa Love 6×8 Paper Pad and Marshmallow Sprinkles. Below is the steps to create your own card.

    Step 1 – Trim White Cardstock to 7″x6″, score at 3 1/2″ and fold in a half for a vertical side fold card. (Mini Slimline)

    Step 2 – Diecut Mini Slimline Double Stitched using Cuppa Love 6″x8″. Adhere to card front using Bearly Art Precision Glue.

    Step 3 – Diecut Layered Got Coffee using Mint Green Cardstock for the word and Brown Cardstock for the shadow. Assemble and adhere to card front using Bearly Art Precision Glue.

    Step 4 – Diecut Cuppa Love Shaker using Cuppa Love 6″x8″ for the front, Brown Cardstock for the back and Mint Green for the spoon. Trim Mini Slimline Acetate and adhere to back side of the front diecut using Bearly Art Precision Glue. Add Foam Tape to the edges. Add Marshmallow Sprinkes inside and remove the release sheet from the tape. Add the back which seals the shaker. Adhere to card using Bearly Art Precision Glue.

    This card can used used for several occasions by simply changing the sentiment. Below is a link to all the products used. Thank you for stopping by and Happy Crafting!

    Products Used:
    https://linkdeli.com/widget.js?id=f5e8378456858c916708

  • Rainbow Wishes Mini Slimline Card

    Rainbow Wishes Mini Slimline Card

    Hi everyone, it’s Tina here. I have a fun Rainbow card to share using the new Confetti Party Rainbow dies and the Simple Sentiments Bundle Pack. Below you will find the steps to create your own card.

    Step 1 – Trim White Cardstock to 7″ x 6″, score at 3 1/2″ and fold in half for a horizontal top fold card. (Mini Slimline)

    Step 2 – Diecut Slimline Cloud Border using White Cardstock to use as a stencil. Place the diecut on the card front and use a Blender Brush along the edge to create clouds. Repeat until you get to the bottom.

    Step 3 – Diecut Confetti Party Rainbow using Holographic Paper. The paper I used has all the colors from the Rainbow and was perfect for this die set. Diecut Confetti Party Rainbow using White Cardstock for the cloud. Adhere to card using Bearly Art Precision Glue.

    Step 4 – Stamp Simple Sentiments using Versafine Onyx Black Ink on White Cardstock. Diecut with the matching die. You now have many sentiments on hand for many different occasions. Adhere Rainbow Wished using Bearly Art Precision Glue.

    Step 5 – For added interest and sparkle randomly adhere Clear Tear Shaped Droplets using Bearly Art Precision Glue.

    The photos don’t do the card justice for I added a little video to show you how it reacts to light.

    Rainbow Card

    Below you will find the link to all the products used. Thank you for stopping by and Happy Crafting!

    Products Used:


    https://linkdeli.com/widget.js?id=f5e8378456858c916708

  • Mini Slimline Halloween Scene Card

    Hi everyone, it’s Tina here. I have a Mini Slimline Halloween Scene card to share using the Creepy & Kooky 6×6 Paper Pad and the Crafter Essentials Halloween Dies. Below you will find the steps to create your own card.

    Step 1 – Trim White Cardstock to 7″ x 6″, score at 3 1/2″ and fold in half for a horizontal top fold card. (Mini Slimline).

    Step 2 – Trim Creepy & Kooky 6×6 Paper Pad to 2 15/16″ x 6″. Adhere to card front using Bearly Art Precision Glue.

    Step 3 – Diecut Crafters Essentials Halloween using various colors of cardstock. Adhere the fence, tree, moon, pumpkins and tombstone using Bearly Art Precision Glue. I forgot to add green cardstock behind the fence but I don’t mind the white space behind. But if you prefer the green then adhere it before adding the fence right after Step 2.

    Step 4 – Diecut Happy Halloween with Shadow using White cardstock for the shadow and Black cardstock for the word. Assemble and adhere to card using Bearly Art Precision Glue.

    Below is a link to all the products used. Thank you for stopping by and Happy Crafting!

    Products Used:


    https://linkdeli.com/widget.js?id=f5e8378456858c916708

  • Happy Halloween Mini Slimline Card

    Happy Halloween Mini Slimline Card

    Hi everyone, it’s Tina here. I have a clean and simple Halloween Mine Slimline Card to share using the Crafters Essentials Halloween dies and the new Creepy & Kooky 6×6 Paper Pad from Kat Scrappiness. Below is the steps to create your own card.

    Step 1 – Trim White Cardstock to 7” x 6”, score at 3 1/2” and fold in half for a vertical side fold card.

    Step 2 – Trim Creepy & Kooky 6×6 Paper pad 3 1/2” x 6” and adhere to card front using Bearly Art Precision Glue.

    Step 3 – Trim White Cardstock to 3” x 5 3/4”. Diecut Never Ending Circles using masking paper. Attach the diecut circle to the trimmed White Cardstock. Apply medium Grey Ink to the edges and remove the masking paper.

    Step 4 – Diecut Crafters Essentials (bats) using Black Cardstock and adhere to card front using Bearly Art Precision Glue.

    Step 5 – Stamp Happy Day greeting using Versafine Onyx Black Ink.


    All products used are linked down below. Thank you for stopping by and Happy Crafting!

    Products Used:


    https://linkdeli.com/widget.js?id=f5e8378456858c916708

  • Happy Day Mini Slimline Card

    Happy Day Mini Slimline Card

    Hi everyone, it’s Tina here. If you have ever been in a creative slump or looked at your supplies and don’t know where to begin, then here is a helpful tip when you feel overwhelmed. Simply create backgrounds for future cards. Creating backgrounds is very therapeutic. I like to make a batch of them and once in a while I flip through them until one of them gives me an idea. I usually add an image or diecut along with a sentiment and your done. Below you will find the steps to create your own card.

    Step 1 – Trim White Cardstock to 7″ x 6″, score at 3 1/2″ and fold in half for a vertical side fold card. (Mini Slimline)

    Step 2 – Trim White Cardstock to 6″ x 6″. Place the Floatings Dots Stencil on top and apply ink of your choice using a Blender Brush in rainbow order.

    Step 3 – Diecut Mini Slimline Stitched Rope using the background create from Step 2. Adhere to card using Bearly Art Precision Glue.

    Step 4 – Diecut Summer Fun Essentials (Beach Ball) using White Cardstock. Color it using any medium of your choice. I used Copics using the same rainbow colors as my background. Adhere to card using Foam Tape.

    Step 5 – Diecut Happy Father’s Day using Black Cardstock. The sentiment is attached for the words Happy and Day (disgard Father’s) and adhere to card front using Bearly Art Precision Glue.

    Be sure to create some backgrounds for those creative slumps. This is also helpful when you need to make a last minute card. Below is a link to all the products used. Thank you for stopping by and Happy Crafting!

    Products Used:
    https://linkdeli.com/widget.js?id=f5e8378456858c916708

  • Birthday Fishes Mini Slimline Card

    Birthday Fishes Mini Slimline Card

    Hi everyone, it’s Tina here. I used the Life Under The Sea and Embossed Edge Wavy Frame Dies to create a sea scene Birthday card. Below are the steps to create your own card.

    Step 1 – Trim White Cardstock to 7″ x 6″, score at 3 1/2″ and fold in half for a vertical side fold card. (Mini Slimline)

    Step 2 – Trim White Cardstock to 3 1/2″ x 6″. Apply any water reactive Inks of your choice onto a craft mat to create a background. I used Distress Oxide Inks in colors Tumbled Glass, Broken China, Salty Ocean and Uncharted Mariner. Spray water to the inks and dip your cardstock to it. Heat set the cardstock in between each application for favorable results. Let dry.

    Optional – Spray the background with a Shimmer Spray. I used Brutus Monroe Shimmer Mist Pearl which enhanced the oceanic background I was going for. Adhere to card using Bearly Art Precision Glue.

    Step 3 – Trim White Cardstock to 3 1/2″ x 6″. Diecut Embossed Edge Wavy Frame using the trimmed panel. Adhere to card front leaving a little opening at the inner bottom.

    Step 4 – Diecut Life Under The Sea in various colors. I used White, Teal, Blue and Soft Green Cardstocks. Arrange and adhere to card using Bearly Art Precision Glue.

    Step 5 – Stamp sentiment of your choice to the inner top right using Versafine Onyx Black Ink.

    Step 6 – For added interest and sparkle randomly adhere Sparkling Snow Pearl Mix using Bearly Art Precision Glue.

    This card can be used for several occasions by changing the sentiment. Below is a link to all the products used. Thank you for stopping by and Happy Crafting!

    Products Used:


    https://linkdeli.com/widget.js?id=f5e8378456858c916708