Tag: versamark

  • Melted Metal Heart Valentine | Layered Heat Embossing

    Melted Metal Heart Valentine | Layered Heat Embossing

    Hello crafty friends!

    It’s Alicia a.k.a. Crafty Al here to share a look at the quick and easy card that I created for Valentine’s Day using some of the new products from Kat Scrappiness.

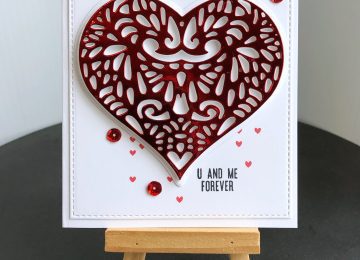
    I created a piece of custom cardstock by double heat embossing it using Versamark and Detail Gold embossing powder. These pieces then got cut using the melting / frosting die from the Scoop of Love die set and the word die from the Love You Sentiment with Shadow die set.

    The “melted metal” top got placed onto the solid heart from the Scoop of Love die set and this piece was adhered with foam tape to the card base which already had a piece cut using the Stitched Hearts Coverplate die. I added the sentiment with help from some press-n-seal and then decorated with red and pink hearts from the My Valentine enamel dots.

    You can check out my video for the full process…

    Thanks for stopping by and I hope you enjoyed today’s card!

    Alicia / Crafty Al

    Related Products:

    Kat Scrappiness

          Scoop of Love die set: http://shrsl.com/3crra

    Love You sentiment w/shadow die: http://shrsl.com/3cru9

          Stitched Hearts Coverplate die: http://shrsl.com/3bnap

          My Valentine enamel dots: http://shrsl.com/3crr2

       Versamark Ink Pad: http://shrsl.com/3crub

       Detail Gold Embossing Powder: http://shrsl.com/3crr5

       Art Glitter Glue: http://shrsl.com/37svl

    **Some links above are affiliate links. I link them up for your convenience and may receive a small commission, at no extra cost to you. I hope you will consider using the links if you decide to purchase the products I share. 🙂

  • Using Black To Make Colors Pop With The Medallion Coverplate

    Using Black To Make Colors Pop With The Medallion Coverplate

    Hi Everyone, It’s TIna here. Today I have 2 cards to share with you using the new Medallion Coverplate die and I will show you how to get the colors pop using Distress Oxide Inks and Black Cardstock. Below are the instructions to create your own card.

    Card 1

    Card 2

    Step 1 – Trim White Cardstock to 8 1/2″ x 5 1/2″, score at 4 1/4″ and fold in half for a vertical side fold card. (A2) (Card 1 and 2)

    Step 2 – Trim White Cardstock to 5 1/2″ x 4 1/4″. Apply Distress Oxide Ink using Picket Fence Life Changing Brush. (Card 1 and 2)

    Panel for Card 1

    Panel for Card 2

    Step 3 – Diecut Medallion Coverplate using Black Cardstock. (Card 1) Diecut Medallion Coverplate using Panel 2. (Card 2)

    Step 4 – Card 1 – Adhere Medallion Coverplate black diecut to Panel 1 (Trim off excess of panel) and then to card front using Nuvo Deluxe Adhesive.

    Card 2 – Adhere Medallion Coverplate Panel 2 to Black Cardstock then trim 1/8″ all around and adhere to card front.

    Step 5 – Stamp Sentiment using Versamark, sprinkle White Embossing Powder, remove excess and heat set it with a heat tool. (Card 1 and 2)

    Step 6 – Card 1 – Stamp and color image and adhere to card above the sentiment.

    Card 2 – Adhere Pastel Pop Sequins for added interest.

    Card 1


    Card 2

    I hope you enjoyed today’s cards using the Medallion Coverplate. These cards can be used for any occasion by changing the colors and sentiment. To receive 10% off your order at Kat Scrappiness use code: TINA10 at checkout. Below is a link to the products used. Thank you for stopping by and have a wonderful day.

    Products Used:

    https://linkdeli.com/widget.js?1549439153802

  • Lacy Layered Heart Madness

    Lacy Layered Heart Madness

    Hi Everyone, it’s Tina here. I have 5 cards to share with you today using the new Lacy Layered Heart Dies. I sort of went crazy lol. This die is so versatile and below you will see the possibilities are endless. This post will be a little long and I will give brief descriptions on how I created each one. All cards are A2 size (5 1/2″ x 4 1/4″). So let’s get started.

    For this card I diecut the Lacy Layered Heart Die (pattern) will foil cardstock and fun foam, the solid with white cardstock. I adhered the foil diecut on top of the fun foam and adhered it to the solid white diecut. I diecut the Double Stitched Rectangles using white cardstock. I added the sentiment from the Say It With Hearts stamp set and stamped mini hearts before adhering the whole panel to a card front. For some added interest I adhered sequins.

    For this card I used the pattern paper from American Crafts Loves Me 6×6. I diecut a Double Stitched Rectangles using white cardstock and adhered to the card front. I diecut Lacy Layered Heart the solid using patterned paper and adhered to the card front. I diecut Double Stitched Squares using the pattern paper which included a sentiment and adhered to the card. I diecut Stitched Sentiment Strip using the patterned paper and adhere to card. For added interest I adhered some Heart Sprinkles.

    For this card I embossed a piece of white cardstock and diecut it with the Double Stitched Rectangles die and adhered it to the card front using foam tape. Using a scrap piece of cardstock I added Distress Oxide Inks and diecut it using the Lacy Layered Heart solid and white cardstock for the pattern. I adhered both to the card. I diecut I Love You Shadow colored for the shadow and white for the sentiment. I adhered both to the card stock. I kept this one clean but you could add some Crystal Nuvo Drops Morning Dew for some added interest.

    For this card I used the Nuvo Glimmer Paste Moonstone with a Heart Stencil on white cardstock. Once dry I diecut it with the Double Stitched Rectangles and adhered it to the card front. I diecut the Lacy Layered Heart solid and pattern using red cardstock and adhered it to the right edge of card. I trimmed off the excess.  I stamped and colored an image and adhered it using foam tape. I diecut some little hearts and covered them with Crystal Nuvo Drops Morning Dew. I stamped the sentiment from the Say It With Hearts Stamp Set.

    For my last card I used the Life Changing Brushes to create a soft pastel background. I diecut it with the Double Stitched Rectangles and adhered it to the card front landscape. I diecut the Lacy Layered Heart pattern in white cardstock and adhered over the inked background. I inked on a scrap piece of cardstock one of the colors from my background and stamped the sentiment from the Say It With Hearts using versamark and heat embossing. I adhered it to the card using foam tape.

    I hope you enjoyed the many ways you can use the Lacy Layered Heart dies. You can also use it as a stencil or dry emboss it in your diecut machine. Below is a link to all the products used. Thank you for stopping by and have a wonderful day!

    Products Used:

    https://linkdeli.com/widget.js?1547805645855

  • How To Foil Using Your Background Dies

    How To Foil Using Your Background Dies

    Happy New Years Everyone, it’s Tina here. I wish you all an awesome year ahead! By now the holidays have passed and life is returning to normal. Today I wanted to share a card with you using your Background Dies to create a foiled background. Below you will find the steps to recreate this fun technique and how I used the Fancy Floral Coverplate Die.

    Step 1 – Trim White Cardstock to 8 1/2” x 5 1/2”, score at 4 1/4” and fold in half for a vertical side fold card (A2)

    Step 2 – Diecut Fancy Floral Coverplate using White Cardstock. Place the diecut on White Cardstock and secure it with Painter’s Tape. Using Deco Foil Transfer Gel apply with a Palette Knife over the stencil created. Once stencil is thoroughly covered gently remove the stencil. Let the background dry for an hour or until the Transfer Gel has turned clear.

    Step 3 – Place Foil Paper over the background and insert it into a folded photocopy paper. Pass it in your laminator. I passed it twice. Remove the Foil Paper and what you have is a beautiful foiled background. See photos below.

    Step 4 – Diecut Double Stitched Rectangles to the background created from Step 3 – Adhere to card using Foam Tape.

    Step 5 – Diecut sentiment 3 times and adhere all layers using Collage Medium and adhere to card.

    Step 6 – Stamp sentiment using Versamark on Black Cardstock. Sprinkle White Embossing Powder and remove the excess. Heat set it with a heat tool. Trim and adhere to card using foam tape.

    Step 7 – Optional – For added interest Diecut Stitched & Layered Christmas Tree (the star) 3 times and adhere to card using Nuvo Deluxe Adhesive.

    I hope you enjoyed another way to use your background dies. This card can be used for any occasion by changing the background, color and sentiment. Below is a link to all the products used. Thanks for stopping by and have a wonderful day!

    Products Used:

    https://linkdeli.com/widget.js?1543923411530


  • Fancy Floral Cards

    Fancy Floral Cards

    Hi Everyone, it’s Tina here. Today I have 2 cards to share with you using the Fancy Floral Coverplate die and word sentiments. Below you will find the steps to replicate this card.

    Step 1 – Trim white cardstock to 8 1/2″ x 5 1/2″, score at 4 1/4″ and fold in half for a vertical side fold card.

    Step 2 – Trim white cardstock to 5 1/2″ x 4 1/4″. Apply Distress Oxide Ink using an ink applicator. For the Awesome card use Seedless Preserves, Tattered Rose and Antique Linen. For the Happy card use Chipped Sapphire, Peacock Feather and Tumbled Glass.

    Step 3 – Diecut Fancy Floral Coverplate (x2) using Silver Glitter Cardstock. Adhere to backgrounds from Step 2 and then adhere the entire panels to the card front using Nuvo Deluxe Adhesive Glue.

    Step 4 – Diecut Stitched Fishtail Banners (x2) using Black Cardstock. Stamp sentiment using versamark. Sprinkle White Embossing Powder, remove the excess and heat set it with a heat tool. Adhere to cards using Nuvo Deluxe Adhesive Glue.

    Step 5 – Diecut Word die (x3) using Black Cardstock. Diecut the shadow word die using White Cardstock. Adhere all the layers using collage medium and then adhere to the card slightly overlapping the sentiment banner.

    I hope you enjoyed today’s cards. These cards can be used for any occasion by changing the colors and sentiments. Below is a link to all the products used. To receive 10% off your order at Kat Scrappiness use code: TINA10 at checkout. Thank you for stopping by and have a wonderful day.

    Products Used:


    https://linkdeli.com/widget.js?1543923411530

  • Holiday Cards With Crafter Essentials Winter Dies

    Holiday Cards With Crafter Essentials Winter Dies

    Hi Everyone, it’s Tina here. Today I have a couple of holiday cards to share with you using the new Crafters Essentials Winter dies. You can make those last minute cards with these dies and use some fancy cardstock to give it that extra festive feel. Below I will show you the steps to create these cards using Foiled Cardstock and Glitter Cardstock. Please note that it is extremely hard to photograph the Foiled Card but it is stunning in real life.

    Card #1 using Foiled Cardstock

    Step 1 – Trim White Cardstock to 8 1/2″ x 5 1/2″, score at 4 1/4″ and fold in half for a horizontal side fold card. (A2)

    Step 2 – Diecut Crafters Essentials Winter using Teal Foiled Cardstock for background, Green Foiled Cardstock for trees, and Silver Foiled Cardstock for hills. Adhere background and bottom layered hill using Nuvo Deluxe Adhesive glue. Adhere the trees using Nuvo Deluxe Adhesive glue.

    Step 3 – Stamp Merry Critters sentiment to the top layer of hill created from step 2 using Versamark. Use an anti static powder tool before you stamp. Sprinkle White Embossing Powder and remove the excess. Heat set it with a heat tool. Adhere the top layer hill using Nuvo Deluxe Adhesive glue.

    Card #2 using Glitter Cardstock

    Step 1 – Trim White Cardstock to 8 1/2″ x 5 1/2″, score at 4 1/4″ and fold in half for a horizontal side fold card. (A2)

    Step 2 – Diecut Crafters Essentials Winter using Soft Blue Cardstock for background, Green Cardstock for trees, and Silver Glitter Cardstock for hills. Adhere all diecuts using Nuvo Deluxe Adhesive glue.

    Step 3 – Stamp Merry Critters sentiment just above the hill on the left side 2 using Versamark. Use an anti static powder tool before you stamp. I shaped the sentiment to follow the shape of the hill. Sprinkle White Embossing Powder and remove the excess. Heat set it with a heat tool.

    I hope you enjoyed today’s cards. You can try other versions of these cards by using patterned paper Christmas themed. To receive 10% off your order use code: TINA10 at checkout. Below is a link to all the products used. Thank you for stopping by and have a wonderful day.

    Products Used:
    https://linkdeli.com/widget.js?1543923411530

  • Life Begins After Coffee Card

    Life Begins After Coffee Card

    Hi Everyone, it’s Tina. Today I am sharing a card I made using the new Peacock Backdrop Die along with the Let’s Get Caffeinated Stamp Set. Below you will find the steps to replicate this card.

    Step 1 – Trim White Cardstock to 8 1/2″ x 5 1/2″, score at 4 1/4″ and fold in half for a vertical side fold card. (A2).

    Step 2 – Trim Brown Cardstock to 4 1/4″ x 5 1/2″, or create your own using Distress Oxide Ink Walnut Stain.

    Step 3 – Diecut Peacock Backdrop to Kraft Cardstock. Remove all the small pieces and adhere to Cardstock from Step 2 using Collage Medium. (I use the Darice Fine Tip Applicator on the Collage Medium for easy application).

    Step 4 – Trim Stripe Patterned Paper to 1 3/4″ x 4 1/4″. Adhere to card using Clear Double Sided Adhesive Tape.

    Step 5 – Stamp Let’s Get Caffeinated on Kraft Cardstock using Versamark. Sprinkle Copper Embossing Powder and heat set it with a heat tool. Diecut Never Ending Circles to the sentiment. Diecut Stitched Scalloped Circles Die using Brown Cardstock, or create your own using Distress Oxide Ink Walnut Stain. Adhere sentiment to the Stitched Scalloped Diecut using Collage Medium. Adhere the whole panel to the card using foam tape.

    Step 6 – For added interest adhere hearts or sequins above the sentiment.

    This card can be used for any occasion by changing the image, colors and/or sentiment. Below are links to all the products used. To receive 10% off your order use code: TINA10 at checkout. Thanks for stopping by and have a wonderful day!

    Kat Scrappiness Products Used:

    https://linkdeli.com/widget.js?1533216656914

  • Crafters Gonna Craft Cards

    Crafters Gonna Craft Cards

    Hi Everyone, It’s Tina here. Today I have 3 cards to share with you using the Crafters Gonna Craft Stamp set. It is such a fun stamp set that I found myself making cards one after another. Below you will find the steps to replicate these cards.

    Card with Distress Oxide Background

    • Step 1 – Trim White Cardstock to 8 1/2″ x 5 1/2″, score at 4 1/4″ and fold in half for a vertical side fold card. (A2)
    • Step 2 – Trim Black Cardstock to 4″ x 5 1/4″ and adhere to card front using Clear Double Sided Adhesive.
    • Step 3 – Trim White Cardstock to 4 1/4″ x 5 1/2″. Stamp Crafters Gonna Craft using Versamark Ink. Sprinkle White Embossing Powder and heat set it with a heat tool.
    • Step 4 – Apply Distress Oxide Ink starting at bottom darkest to lightest going towards the top. (I used Squeezed Lemonade, Wild Honey & Abandoned Coral.)
    • Step 5 – Diecut Stitched Scalloped Border Die using the background created at the top. Adhere to card using Clear Double Sided Adhesive.
    • Step 6 – Adhere White Jewels using Collage Medium. The Crystal Katana is a great tool to pick up the jewels and place them.

    Cards One Layer

    • Step 1 – Trim White Cardstock to 8 1/2″ x 5 1/2″, score at 4 1/4″ and fold in half for a vertical side fold card. (A2)
    • Step 2 – Stamp Crafters Gonna Craft directly on the card front using Versafine Onyx Black Ink. Color one above the sentiment or color all. I colored one and stamped in color the brush stroke.
    • Step 3 – Optional – Add Sequins for interest.

    The Crafters Gonna Craft stamp set is such a versatile stamp set. You can have so much fun making your own backgrounds on a one layer card or adding a layer as the examples I have shown you. Below is a list of all products used. To receive 10% off your order use code TINA10 at checkout. Thank you for stopping by and have a wonderful day.

    Products Used:

    https://linkdeli.com/widget.js?1533216656914

  • Stitched Diagonal Backdrop Die Card

    Stitched Diagonal Backdrop Die Card

    Hi Everyone, it’s Tina here. We are now August and with it are the new Kat Scrappiness dies and stamp set. Today I am using the new Stitched Diagonal Backdrop Die along with the Crafters Essentials II and the Everyday Brush Stokes Stamp set. Below you will find the steps to replicate this card.

    • Step 1 – Trim White Cardstock to 8 1/2″ x 5 1/2″, score at 4 1/4″ and fold in half for a horizontal side fold card. (A2)
    • Step 2 – Trim Patterned Paper to 5 3/8″ x 4 1/8″ and adhere to card using Clear Double Sided Adhesive Tape.
    • Step 3 – Diecut Stitched Diagonal Backdrop using Patterned Paper. Trim and adhere Patterned Paper to the backside. Adhere entire panel to the card front using Clear Double Sided Adhesive Tape.
    • Step 4 – Diecut Crafters Essentials II using Black Cardstock (the Stitched Fishtail Banner).
    • Step 5 – Stamp Everyday Brush Strokes Sentiment on the diecut from Step 4 using Versamark Ink. Sprinkle Gold Embossing Powder and heat set with a heat tool. Adhere to card using Clear Double Sided Adhesive Tape.
    • Step 6 – Diecut Crafters Essentials using Patterned Paper (Starburst) and adhere to card using Clear Double Sided Adhesive Tape.
    • Step 7 – Optional – Using a Crystal Katana adhere Pastel Pop Sequin Mix using Collage Medium.

    This card can be used for any occasion by changing the Patterned Paper, colors and/or sentiment. To receive 10% off your order at Kat Scrappiness used code: TINA10 at checkout. Below is a link to all products used. Thanks for stopping by and have a wonderful day.

    Kat Scrappiness Products Used:

    https://linkdeli.com/widget.js?1533216656914

  • Two Cards One Diecut

    Two Cards One Diecut

    Hi Everyone, it’s Tina here. Today I have two cards to share with you using one background die. The new Wood Grain Framed Diamond Wire. This is a fabulous way to get more from your die. I also used the Happy Father’s Day Die for the word Happy. Below are the steps to replicate these cards.

    • Step 1 – Trim White Cardstock to 8 1/2″ x 5 1/2″, score at 4 1/4″ and fold in half for a vertical side fold card. (A2) Do this two times.
    • Step 2 – Trim White Cardstock to 4 1/4″ x 5 1/2″. Using an ink applicator apply Distress Oxide Ink. I started in the middle using Faded Jeans, then applied Broken China on both sides, then Cracked Pistachio on both sides. See below for visual.

    • Step 3 – Diecut Wood Grain Framed Diamond Wire using the Distress Oxide Background. Carefully remove the diecut to keep it in one piece. Add a masking sheet on the top side so that all the pieces remain intact. Card #1 add collage medium to all the small pieces and adhere it to a cardstock trimmed to 4 1/4″ x 5 1/2″. Carefully lift the sheet with the masking sheet. All the small pieces have now transferred to the cardstock. Diecut Double Stitched Rectangles to the cardstock with the small pieces and adhere it to the card front using foam tape. Card #2 add collage medium to the remaining diecut and adhere to card front. See photo below for visual.


    • Step 4 – Card #1 Stamp Everyday Brush Strokes using Versamark Ink on Black Cardstock. Sprinkle White Embossing Powder, heat set it with a Heat Tool. Diecut Stitched Fishtail Banner to the embossed sentiment. Trim left side of the sentiment and adhere to card using Clear Double Sided Adhesive Tape. Diecut Happy Father’s Day (Only Happy – you need to trim a little from the last P and Y) using Black Cardstock. Add Versamark Ink directly to the diecut. Sprinkle Black Embossing Powder, heat set it with a heat tool. Repeat this step 3 times. Adhere to card using Collage Medium. Card #2 Stamp Everyday Brush Strokes using Versamark Ink on White Cardstock. Sprinkle Mermaid Tail Embossing Powder, heat set it with a Heat Tool. Diecut Stitched Fishtail Banner to the embossed sentiment. Adhere to card using Clear Double Sided Adhesive Tape. Diecut Happy Father’s Day (Only Happy – you need to trim a little from the last P and Y) using White Cardstock. Add Versamark Ink directly to the diecut. Sprinkle Mermaid Tail Embossing Powder, heat set it with a heat tool. Repeat this step 3 times. Adhere to card using Collage Medium.
    • Step 5 – Card #1 Add some Pastel Pop Sequins Mix using Collage Medium.
    • Step 6 – Card #2 (to create faux flowers) On a scrap piece of White Cardstock add Distress Oxide Ink Broken China using an ink applicator. Diecut Stitched Scallop Circles (the smallest one 3 times). On a scrap piece of White Cardstock add Distress Oxide Ink Cracked Pistachio using an ink applicator. Diecut Crafters Essentials #1 (the stitched line 3 times). Adhere the diecut Stitched Lines to the card using Collage Medium. Adhere the diecut Stitched Scallop using foam tape on top of the Stitched Lines. Optional add an accent in the center of the Stitched Scallop (example: buttons, sequins or a small flower)


    I hope you enjoyed today’s cards and the fabulous ways to get more out of your dies. These cards can be used for any occasion by changing the colors, embellishments and/or sentiment. Below is a link for all products used. To receive 10% off use code: TINA10 at checkout. Thank you for stopping by and have a wonderful day.

    Kat Scrappiness Products Used:

    https://linkdeli.com/widget.js?1531470176574