Tag: Simple Sentiments Stamp & Die Bundle

  • No Peeking

    No Peeking

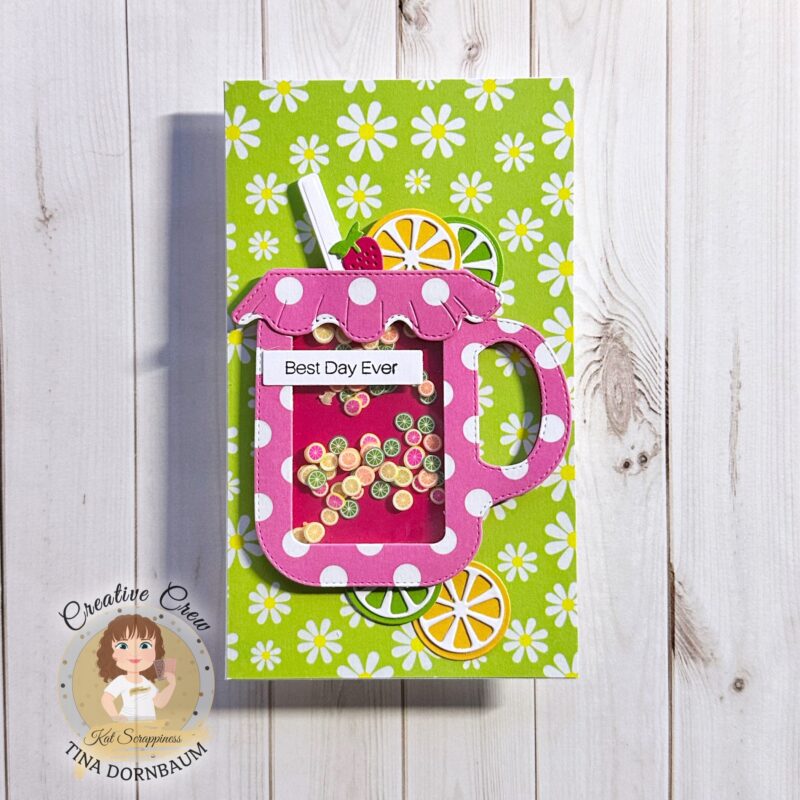
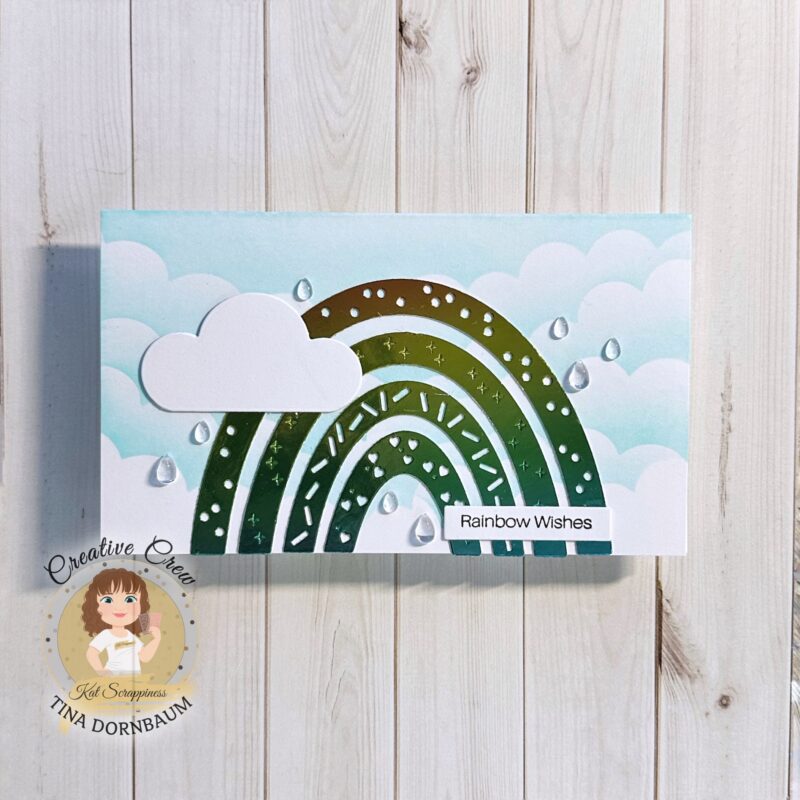
    Hello Crafty Friends! Priscilla here from Nubble Light Designs. Today I am sharing a holiday card all wrapped in a bow, using the Kat Scrappiness newly released “Wrapped Up with a Bow Craft Die” and “Small Poinsettia Craft Dies.”

    Along with the Kat Scrappiness Wrapped Up with a Bow Craft Die and Small Poinsettia Craft Dies, I added the Simple Sentiments – Holiday Edition Stamps/Dies and Brilliant Gold Snowflake Sequins to make today’s card.

    Card Details:

    • Created an A2 top-folding white card base.
    • Embossed a green layer of cardstock with a striped embossing folder and adhered it to the card base.

    • Created the bow using the new Wrapped Up with a Bow Craft Die and burgundy velvet cardstock and adhered it to the green top layer.
    • Die cut several layers of poinsettias using both khaki and gold glitter card stocks.

    Thank you so much for stopping by! Don’t forget to check out what’s NEW in Kat’s Shop, and follow my blog,Instagram, and Facebook for more “Kat Scrappiness Amazingness”!

    Priscilla 🎀

    I would be so grateful if you use my affiliate links in this post to grab your Kat Scrappiness Goodies! No extra cost to you!

  • Best Day Ever Mini Slimline Card

    Best Day Ever Mini Slimline Card

    Hi everyone, it’s Tina here. With the time change and colder weather coming I decided I wanted a cheerful card. I used the Mason Jar Shaker Dies along with the Summer Vibes and Hop Into Easter Paper Pad to create this happy card. I love how it turned out. Below you will find the steps to create your own card.

    Step 1 – Trim White Cardstock to 7″ x 6″, score at 3 1/2″ and fold in half for a vertical side fold card. (Mini Slimline)

    Step 2 – Trim Hop Into Easter Paper Pad to 3 1/2″ x 6″ and adhere to card front using Bearly Art Precision Glue.

    Step 3 – Diecut Mason Jar Shaker using Summer Vibes for the back of the shaker, the back of the lemon and lime, back for the strawberry. Hop Into Easter for the front of the shaker. White Cardstock for the straw and top of the lemon and lime. Trim Mini Slimline Acetate to slightly larger than the window and adhere to the back side of the front shaker diecut and then adhere foam tape. Add Citrus Twist Sprinkles. Remove the release sheet from the foam tape and adhere the back diecut to seal in the sprinkles. Adhere to card front using Bearly Art Precision Glue. Assemble the lemon, lime, strawberry and adhere to the card.

    Step 4 – Stamp Simple Sentiments using Versafine Onyx Black Ink on White Cardstock. Diecut with the matching die. You now have many sentiments for future cards. Select the sentiment of your choice and adhere to card front using Bearly Art Precision Glue.

    This card can be used for several occasions by changing the colors and/or sentiments. Below is a link to all the products used. Thank you for stopping by and Happy Crafting!

    Products Used:


    https://linkdeli.com/widget.js?id=f5e8378456858c916708

  • Sending My Love Shaker Card

    Sending My Love Shaker Card

    Hello Friends! Sheri from the Creative Crew here today with a Sending My Love Shaker card featuring the NEW Mail Storm Backdrop Die and Simple Sentiments Stamp & Die Bundle.

    The Mail Storm Backdrop die is designed to cover an A2 size card and I wanted a white border on my card so I created a custom sized card: 4 3/4″ x 6″. I plan to use a 5″ x 7″ envelope.

    Steps to Create Card:

    • Create Card Base: Used Custom Size in order to have white border – 4 3/4″ x 6″ (9 1/2″ x 6″, scored at 4 3/4″). If you prefer a standard A2 card with no white border: 4 1/4″ x 5 1/2″ (4 1/4″ x 11″, scored at 5 1/2).
    • Die Cut Mail Storm Backdrop die with red card stock (used Gina K Red Hot card stock).
    • Cut Acetate to fit behind Mail Storm Backdrop die: 4 3/16″ x 5 7/16″.
    • Assemble Window: Adhere acetate to the back of the Mail Storm Backdrop panel using strong adhesive. Next line the outer rim of the panel with foam tape to create shaker well.
    • Cut Layering White card stock panel: 4 3/16″ x 5 7/16″. This is the panel you will ink blend to create your background (used a combination of Gina K Dusty Rose, Red Hot and Red Velvet). Next you will attach the blended piece directly onto your card base.
    • Stamp and embossed sentiments from the Simple Sentiments Stamp & Die Bundle. Take a piece of black card stock and emboss using White embossing powder. For the best results a stamping tool is recommended.
    • Die cut 3 small hearts using the smallest heart from the Layering Nested Heart die set (used Gina K Red Hot card stock).
    • Pour shaker bits in the center of your card.
    • Assemble shaker by attaching the Mail Storm Backdrop window to the card base.
    • Attach sentiment and hearts to shaker. You can attach with foam tape or directly to the acetate window.
    • For embellishment I added a bit of sparkle to the little hearts with a Spectrum Noir Clear Overlay pen and then used Glossy Accents to create a 3D embellishment.


    Here’s a list of supplies I used that can be found in the store.

    Affiliate Links used at no additional cost to you. Thank you for your support!


    Happy Stamping!!


  • Rainbow Wishes Mini Slimline Card

    Rainbow Wishes Mini Slimline Card

    Hi everyone, it’s Tina here. I have a fun Rainbow card to share using the new Confetti Party Rainbow dies and the Simple Sentiments Bundle Pack. Below you will find the steps to create your own card.

    Step 1 – Trim White Cardstock to 7″ x 6″, score at 3 1/2″ and fold in half for a horizontal top fold card. (Mini Slimline)

    Step 2 – Diecut Slimline Cloud Border using White Cardstock to use as a stencil. Place the diecut on the card front and use a Blender Brush along the edge to create clouds. Repeat until you get to the bottom.

    Step 3 – Diecut Confetti Party Rainbow using Holographic Paper. The paper I used has all the colors from the Rainbow and was perfect for this die set. Diecut Confetti Party Rainbow using White Cardstock for the cloud. Adhere to card using Bearly Art Precision Glue.

    Step 4 – Stamp Simple Sentiments using Versafine Onyx Black Ink on White Cardstock. Diecut with the matching die. You now have many sentiments on hand for many different occasions. Adhere Rainbow Wished using Bearly Art Precision Glue.

    Step 5 – For added interest and sparkle randomly adhere Clear Tear Shaped Droplets using Bearly Art Precision Glue.

    The photos don’t do the card justice for I added a little video to show you how it reacts to light.

    Rainbow Card

    Below you will find the link to all the products used. Thank you for stopping by and Happy Crafting!

    Products Used:


    https://linkdeli.com/widget.js?id=f5e8378456858c916708

  • Just a Note to Say Hello

    Just a Note to Say Hello

    Hello everyone!

    It’s Donna Idlet here sharing a card using the NEWLY released products! I am featuring the Kat Scrappiness Mail Storm background die and the Simple Sentiments Stamp & Die Bundle. I created a shaker card using some embellishments from Kat Scrappiness.

    Here is how I created the card:

    • Created the card using the newly released Mail Storm background die to create a shaker card.
    • Ink blended a piece of card stock and added it the card base.
    • Ink blended another piece of card stock and die cut the background die.
    • Added the piece of acetate and adhered it to the background.
    • Added foam tape along the edges and adhered it to the background panel.
    • With the left over background paper, die cut the word “Hello”.
    • Stamped and heat embossed the sentiment from the NEWLY released Simple Sentiments Stamp & Die Bundle
    • Assembled the card.

    Thank you so much for stopping by, please be sure to visit Kat Scrappiness blog for more inspiration.

    Here is a list of supplies I used on my card, Affiliate Links used at no additional cost. Thank you for your support.


    https://linkdeli.com/widget.js?id=f5e8378456858c916708