Tag: Say it with hearts stamp set

  • Happy Love Day Card

    Happy Love Day Card

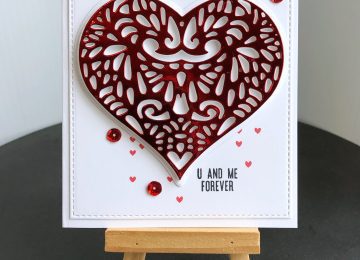
    Hi everyone, it’s Tina here. Today I am sharing a card using the new After The Rain dies with the Double Stitched Rectangles die and the Say It With Words Stamp Set. Below is the steps to create your own card.

    Step 1 – Trim White Cardstock to 8 1/2” x 5 1/2”, score at 4 1/4” and fold in half for a vertical side fold card. (A2)

    Step 2 – Create a DIY background using a Gel Press. Trim White Cardstock to 5 1/2” x 4 1/4”. Apply Distress Oxide Inks in Tumbled Glass, Broken China, Salty Ocean onto a Gel Press. Mix the colors with a brayer. Splash some water and place the Cardstock onto the Gel Press and then a copy paper. Add pressure to make sure the ink transfers onto the Cardstock. Remove Cardstock and let dry.

    Step 3 – Diecut Double Stitched Rectangles using the panel created in Step 2. Adhere to card using Nuvo Deluxe Adhesive.

    Step 4 – Diecut After The Rain (rainbow layers) using White Cardstock. Color in each rainbow layer in the colors of the rainbow using Alcohol Markers. I used Spectrum Noir Classique Markers. Adhere to card front using Nuvo Deluxe Adhesive.

    Step 5 – Diecut After The Rain (clouds 2 times) using White Cardstock. Stamp one cloud with Say It With Hearts using Versafine Onyx Black Ink. I did a little stamp surgery to Happy Valentine’s Day by placing Washi tape over the word Valentine’s. I inked the stamp using Versafine Onyx Black Ink and removed the Washi tape and then stamped. Stamp the Heart using Red Ink. (This replaces the word Valentine’s).

    Step 6 – Diecut or Stamp an image of a small bird and adhere just above the cloud.

    Step 7 – Optional – Randomly adhere Red Heart Sprinkles using a Pick Up Tool and Nuvo Deluxe Adhesive.

    This card can be used for several occasions by changing the sentiment. Below is a link to all the products used. Thank you for stopping by and Happy Crafting!

    Products Used:
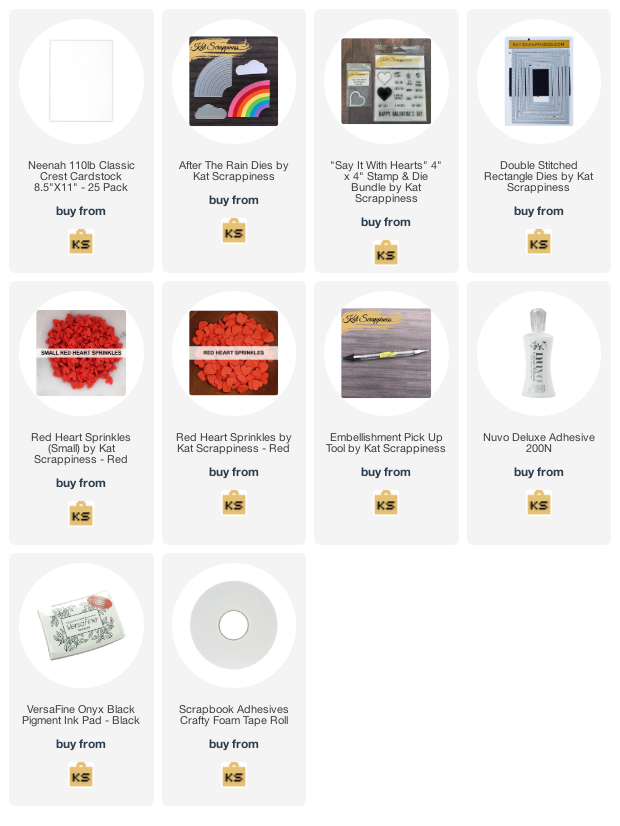
    https://linkdeli.com/widget.js?id=f5e8378456858c916708

  • Floral Heart Card

    Floral Heart Card

    Hi Everyone, it’s Tina here. This month is the month of love and whether you want to create a Valentine’s Day card or just a card showing your love the new Floral Heart Die has you covered. Below you will find the steps to create your own Floral Heart Card.

    Step 1 – Trim White Cardstock to 8 1/2” x 5 1/2”, score at 4 1/4” and fold in half for a vertical side fold card. (A2)

    Step 2 – Create a DIY background by applying Distress Oxide Inks in several colours, then place a stencil on top applying the same colours.

    Step 3 – Diecut Double Stitched Rectangles using the panel created from Step 2. Adhere to card using Nuvo Deluxe Adhesive.

    Step 4 – Diecut Floral Heart using White Cardstock and Red Cardstock. Adhere the White Diecut to the bottom of the Red Diecut. Adhere to card using Nuvo Deluxe Adhesive.

    Step 5 – Stamp Say It With Words on Vellum using Versamark. Sprinkle Gold Sparkle Embossing Powder and remove the excess. Heat set it with a Heat Tool. Trim the sentiment and adhere to card by placing little drops of Nuvo Deluxe Adhesive in back of the stamped areas.

    Step 6 – Randomly adhere Red Heart Sprinkles using a Crystal Katana and Collage Medium. For added interest apply Crystal Nuvo Drops Morning Dew on top of the Red Heart Sprinkles.

    This card can be used for many occasion by changing the colours and/or the sentiment. Below is a link of all the products used. Thank you for stopping by and have a wonderful day.

    Products Used:
    https://linkdeli.com/widget.js?1559654439292

  • Dear Friend You Are Perfect Card

    Dear Friend You Are Perfect Card

    Hi Everyone, it’s Tina here. Kat Scrappiness has a new original die that uses letters to shape a heart. Some of those letters create a word that allows you to customize what you want to say. I chose to create a card for a friend instead of as a Valentine’s card. Below are the steps to create your own card.

    Step 1 – Trim White Cardstock to 8 1/2”  x 5 1/2”, score at 4 1/4” and fold in half for a vertical side fold card. (A2)

    Step 2 – Create a DIY background by applying ink in various shades of red. Stamp a Script Background using White Ink. Let dry.

    Step 3 – Diecut Valentine Word Search using the background created from Step 2. Carefully remove the diecut. I had no problems keeping all the pieces intact. Poke out only the letters to form a word. Leaving all the other pieces. Adhere to the front of the card using Nuvo Deluxe Adhesive.

    Step 4 – Apply ink in red to a scrap piece of White Cardstock. Stamp Say It With Hearts (Dear Friend) using Versamark. Sprinkle White Embossing Powder and remove the excess. Heat set it with a Heat Tool. Diecut Say It With Hearts. Add some more ink to the edges. Adhere to card using Foam Tape. (Optional – Adhere some thin yarn or thread beneath the heart for some added interest)

    Step 5 – Randonly adhere Red Heart Sprinkles using a Crystal Katana and Collage Medium.

    The Valentine Word Search die can be used for several occasions by simply selecting the words of your choice, changing your background and colours. Below is a link to all the products used. Thank you for stopping by and have a wonderful day!

    Products Used:

    https://linkdeli.com/widget.js?1559654439292

  • Say It With Hearts And Heart Cards

    Say It With Hearts And Heart Cards

    Hi Everyone, it’s Tina here. I am sharing 3 cards so I apologize for the longer post. Starting in 2019 I loved creating my own backgrounds. I used to be a paper hoarder. Although I still hoard 6 x 6 paper pads my love for DIY backgrounds is still strong. I love it when a stamp set allows you to create backgrounds. Say It With Hearts is such a cute stamp set because it brings back my youth with the Heart Candies and makes for a fun background. I also love making alcohol backgrounds and never use them. I will show you how the Layering Nested Heart die can showcase an alcohol background without it overtaking the entire card. Below are the three cards I created using the Say It With Hearts Stamp Set and the Layering Nested Heart Die.

    All cards are trimmed on White Cardstock to 8 1/2″ x 5 1/2″, scored at 4 1/4″ and folded in half for a vertical side fold card. (A2)

    Diecut Layering Nested Heart 6 times on scrap paper. Use washi or temporary tape to adhere all the hearts to align on a White Cardstock trimmed to 5 1/2″ x 4 1/4″. Place the die over the temporary diecut. This will fit in perfectly. You will need to do this to all 6 hearts. Diecut Double Stitched rectangles to the panel created. Trim your alcohol background so that it will fit underneath the panel and adhere to card front using Nuvo Deluxe Adhesive. Adhere the top panel using Foam Tape. Stamp sentiment on Black Cardstock using Versamark, sprinkle White Embossing Powder and heat set it with a heat tool. Trim and adhere to the center using Nuvo Deluxe Adhesive. See additional photos for visual.

    This card is super simple to make and best made using a stamp positioner tool. In various colours of Distress Oxide Inks I stamped the Solid Heart from the Say It With Hearts. When all your hearts are stamped and the ink is dry stamp the mini sentiments inside of the hearts using Versamark, sprinkle White Embossing Powder and heat set it with a Heat Tool. Diecut the panel using Double Stitched Rectangles and adhere to card using Foam Tape. Stamp sentiment on Black Cardstock using Versamark, sprinkle White Embossing Powder and heat set it with a heat tool. Diecut the sentiment using Stitched Fishtail Banners and trim off the left side then adhere to card using Foam Tape. For added interest I applied Nuvo Jewel Drops in various colours on top of White Heart Sprinkles. Let dry and then adhere to card using Collage Medium. See additional photos for visual.

    Trim White Cardstock to 5 1/2″ x 4 1/4″ and Diecut Double Stitched Circle. This will be your top layer and can be used as a guide for the next step. Directly on the card front I stamped various colours of Distress Oxide Inks with the Solid Heart from the Say It With Hearts to fit inside of the circle panel. When all your hearts are stamped and the ink is dry stamp the mini sentiments inside of the hearts using Versamark, sprinkle White Embossing Powder and heat set it with a Heat Tool. Adhere the circle panel to the card front using Foam Tape. For added interest Diecut Layering Nested Hearts in various sizes in Red Cardstock and adhere to card using Nuvo Deluxe Adhesive. Stamp sentiment on Black Cardstock using Versamark, sprinkle White Embossing Powder and heat set it with a heat tool. Diecut the sentiment using Stitched Fishtail Banners and trim off the right side then adhere to card using Foam Tape.

    These cards are using non traditional colours for Valentine’s. What’s fun is that you can change the colours on any of them to make it as soft or bright as you want. Below is a link to all the products used. Thank you for stopping by and have a wonderful day!

    Products Used:

    https://linkdeli.com/widget.js?1559654439292

  • Easy Valentine’s Day Card With Video

    Easy Valentine’s Day Card With Video

    Hi Kat Scrappiness fans! It’s Lisa here with you on the blog and

    today I want to share an easy

    Valentine’s Day card with you that has a beautiful ink blended background.

    I also have a quick video so you can see how I made this card.

    I used 3 of the new products we have in the store, I’ll link all of the products below.

    This card came together very quickly but the ink blending and beautiful

    Lacy Layered Heart in silver foil card stock give it a very elegant look.

    Here are the products I used on this card:

    Lacy Layered Heart die

    Stitched Sentiment Strip dies

    Stitched Scalloped Rectangle dies

    Say it With Heart stamps

    Picked Raspberry Distress Ink

    Spun Sugar Distress Ink

    Versafine Black Onyx Ink

    Nuvo Adhesive

    I also have a video to show you how I made this card.

    You can watch it here or on YouTube.

    [youtube https://www.youtube.com/watch?v=8YXyTloUsQ8]

    All of the products listed above are available in the Kat Scrappiness store

    and you can save 10% on your order if you use code Lisa10.

    Have a great day, I already am!

    ?Lisa?

  • Lacy Layered Heart Madness

    Lacy Layered Heart Madness

    Hi Everyone, it’s Tina here. I have 5 cards to share with you today using the new Lacy Layered Heart Dies. I sort of went crazy lol. This die is so versatile and below you will see the possibilities are endless. This post will be a little long and I will give brief descriptions on how I created each one. All cards are A2 size (5 1/2″ x 4 1/4″). So let’s get started.

    For this card I diecut the Lacy Layered Heart Die (pattern) will foil cardstock and fun foam, the solid with white cardstock. I adhered the foil diecut on top of the fun foam and adhered it to the solid white diecut. I diecut the Double Stitched Rectangles using white cardstock. I added the sentiment from the Say It With Hearts stamp set and stamped mini hearts before adhering the whole panel to a card front. For some added interest I adhered sequins.

    For this card I used the pattern paper from American Crafts Loves Me 6×6. I diecut a Double Stitched Rectangles using white cardstock and adhered to the card front. I diecut Lacy Layered Heart the solid using patterned paper and adhered to the card front. I diecut Double Stitched Squares using the pattern paper which included a sentiment and adhered to the card. I diecut Stitched Sentiment Strip using the patterned paper and adhere to card. For added interest I adhered some Heart Sprinkles.

    For this card I embossed a piece of white cardstock and diecut it with the Double Stitched Rectangles die and adhered it to the card front using foam tape. Using a scrap piece of cardstock I added Distress Oxide Inks and diecut it using the Lacy Layered Heart solid and white cardstock for the pattern. I adhered both to the card. I diecut I Love You Shadow colored for the shadow and white for the sentiment. I adhered both to the card stock. I kept this one clean but you could add some Crystal Nuvo Drops Morning Dew for some added interest.

    For this card I used the Nuvo Glimmer Paste Moonstone with a Heart Stencil on white cardstock. Once dry I diecut it with the Double Stitched Rectangles and adhered it to the card front. I diecut the Lacy Layered Heart solid and pattern using red cardstock and adhered it to the right edge of card. I trimmed off the excess.  I stamped and colored an image and adhered it using foam tape. I diecut some little hearts and covered them with Crystal Nuvo Drops Morning Dew. I stamped the sentiment from the Say It With Hearts Stamp Set.

    For my last card I used the Life Changing Brushes to create a soft pastel background. I diecut it with the Double Stitched Rectangles and adhered it to the card front landscape. I diecut the Lacy Layered Heart pattern in white cardstock and adhered over the inked background. I inked on a scrap piece of cardstock one of the colors from my background and stamped the sentiment from the Say It With Hearts using versamark and heat embossing. I adhered it to the card using foam tape.

    I hope you enjoyed the many ways you can use the Lacy Layered Heart dies. You can also use it as a stencil or dry emboss it in your diecut machine. Below is a link to all the products used. Thank you for stopping by and have a wonderful day!

    Products Used:

    https://linkdeli.com/widget.js?1547805645855

  • Say It With Hearts Valentine Card

    Say It With Hearts Valentine Card

    Good morning, crafters!  Design Team Member Cynthia here with you for a super-sweet Valentine’s Day card featuring the brand new KS Say It With Hearts stamp set.  This stamp set is just the cutest thing ever, and with so many different sentiments to choose from, you can send any message you like!  Let’s go ahead and start going through the steps you’ll need to follow to recreate this card for yourself.


    My first step was to go ahead and cut the paper layers for my card.  I used my favorite KS Stitched Scalloped Rectangle dies for the perfect touch.  The pink-on-pink hearts patterned paper was cut using the largest rectangle die, which is just a tiny bit smaller than my A2 size card base.  I added a diagonal black & white stripe paper next, trimmed to fit within the layers neatly.  Then I used the next largest rectangle die to cut my white card stock piece, where I’ll be adding the stamping.


    I selected four fun colors of ink from my ink pad stash, using dye inks so that they would dry immediately.  Remember, when using pigment inks, you’ll have to allow time for them to dry completely.  Using the solid heart stamp from the KS Say It With Hearts stamp set, I stamped a random pattern of hearts across my white rectangle (I used some washi tape strips to mask the scalloped edges.)  I then stamped the heart outline stamp over the colored ones using some Memento Tuxedo Black ink.  I was happily surprised at how easy it was to layer my hearts with these stamps!  The final touch was to stamp my sentiments inside the hearts. There are so many to choose from that I was able to use a different one for each of my hearts with no repeats.


    For my last step I decided to wrap some black & white baker’s twine around the center of my card and tie a little bow.  I absolutely LOVE this twine, and it worked perfectly with my colors and design.  This card turned out to be one of my favorites, and if you would like to recreate this for yourself, you can follow the links above and below to start shopping.  Please remember to use my coupon code “CYNTHIA10” to save 10% off your entire purchase.  Thank you so much for joining me today, and I will see you all again soon for more crafty goodness 🙂


    Kat Scrappiness shop

  • Love You!

    Love You!

    Has everyone seen the release that has been happening over the last three days?  There are some great new products that can be used on a variety of cards.

    For today’s card, I used two new products from Kat Scrappiness – the I Love You Shadow dies and the Say It With Hearts stamp set.

    I used the solid heart from the Say It With Hearts stamp set.  I stamped the heart six times onto a piece of white card stock.  I used a stamping positioning tool to get the hearts aligned perfectly.  I cut out the shadow part of the I Love You Shadow dies with vellum and for the letters I used some Lawn Fawn patterned paper.

    – – –– – –– – –– – –– – –– – –– – –– – –– – –– – –– – –– – –– – –– – –– – –– – –– – –– – –– – –– – –– – –– –

    Use code caren10 for a 10% discount in the Kat Scrappiness shop.

    Thanks for stopping by and happy stamping!

    – – – SUPPLIES for today’s project– – – – – – – – – – – – – – – – – – – – – – – – – – – – – – – – – – – – – – –

  • January Release – Day 3 – Say It With Hearts

    January Release – Day 3 – Say It With Hearts

    I am kind of a little bummed that it is the last day of the January release.  For today’s reveal, we are showcasing the Say It With Hearts 4 x 4 stamp set.  Did you manage to check out the first two days of the reveal?  Don’t forget to comment on the blog because we are picking one winner for each release day – total of 3 lucky winners!  Here’s what the stamp set looks like:


    Here are some samples made by the design team.  I hope you love them as much as I do:


    CAREN BARTHOLOMEW


    CYNTHIA FAHLGREN


    JESS CRAFTS


    LISA SCHNEIDER GOLZBEIN


    MARIA RUSSELL


    Isn’t my design team amazing?  The girls have worked so hard creating these samples for you.  During this month, they will be showing you how they made their cards either on our YouTube channel or on the blog.


    Here is the link to the Say It With Hearts 4×4 stamp set:  http://bit.ly/2M0K9im


    I just wanted to take this opportunity to thank you all for liking, commenting and subscribing to our blog, YouTube channel, Facebook Fan Page, etc.  You are all rockstars!  Please don’t forget to leave a comment today if you haven’t done so already.  Winners will be announced here on the blog on Friday at 8:00 am PST.  Good luck!  Happy crafting!