Tag: Peacock Backdrop Die

  • Creepy and Kooky Halloween Card

    Creepy and Kooky Halloween Card

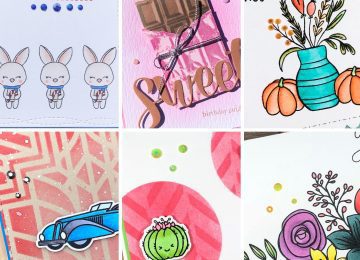
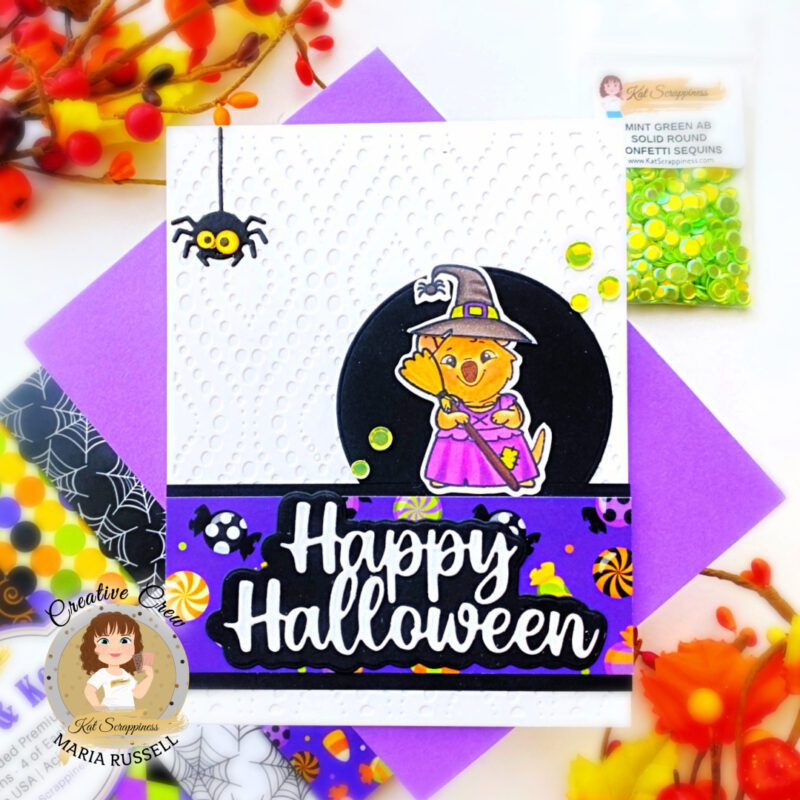
    Hello KS fans! Maria here on the blog with you today, sharing this super simple Halloween card, showcasing the Creepy and Kooky Halloween Paper Pad, along with the Happy Halloween Word Die with Shadow, Creepy Crawly Dies (spider), Peacock Backdrop Die, Dress-Up Quokka Stamp Set, Quokka Halloween Costume Add On Stamp and Mint Green AB Solid Round Confetti Sequins.

    Sometimes, you just don’t have the time or energy to die-cut a lot of pieces to create a scene for your card. I am showing you a simple way to create a cute Halloween card without spending too much time, and use up those cute pattern paper without overwhelming the design.

    Here’s how I made my project:

    • Stamp the image from the Quokka Halloween Costume Add On Stamp on Neenah solar white card stock. Stamp the image again on some masking paper and use precision snips to fussy-cut the masking image.
    • Stamp the Dress-Up Quokka Stamp Set onto the masked image. Remove the mask and color the images with alcohol markers.
    • Use Brother Scan N Cut machine to die-cut the image or precision snips if you don’t have the machine.
    • Die-cut the background panel using the Peacock Backdrop Die and adhere on some A2-size top-folding notecard.
    • Die-cut some black circle using the Never-Ending Circle Dies and cut some black strip as well measuring 2 1/4 by 4 1/4. Adhere both pieces on the card.

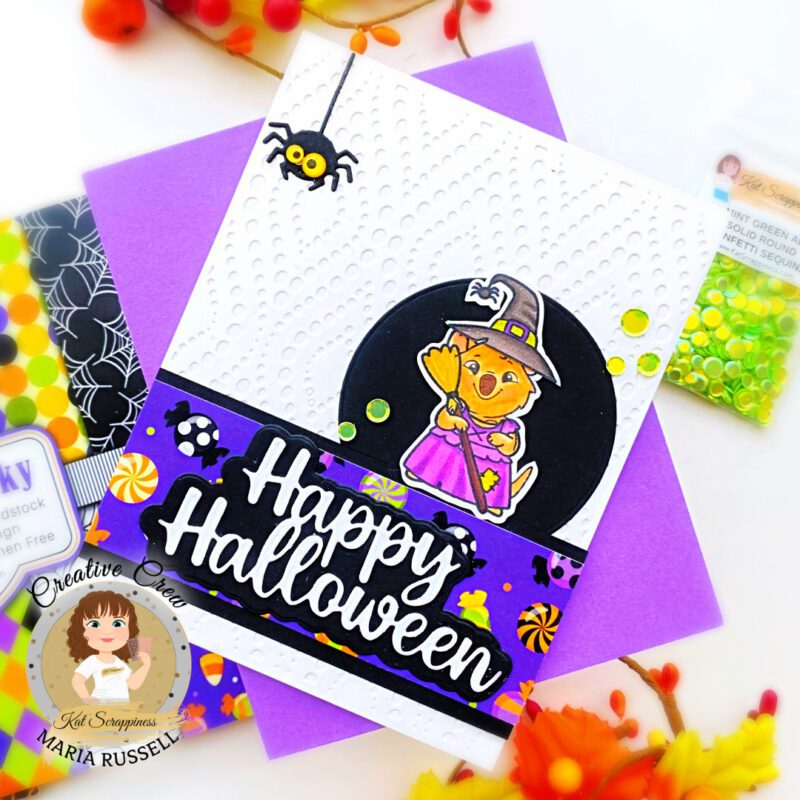
    Here’s another look at the card:


    I hope you like this super simple Halloween card today and got inspired. Below, you will find links to the supplies used to create this project(s). Where available, I use compensated affiliate links at no extra cost to you. Your support helps me to keep bringing you new projects and inspiration. Thank you for stopping by, and have an amazing day!

    ———SUPPLIES——-

  • Peacock Backdrop Thank You Card

    Peacock Backdrop Thank You Card

    Hello it’s Lisa and today I am up on the Kat Scrappiness blog with a card using some old and new products from the KS store! I made a thank you card because you can never have too many of those! One of my favorite techniques is ink blending and especially in rainbow colors! I just love to make an ink blended rainbow and then cut a pattern out of it.  Here’s the short and sweet on how I made my card.

    I started with a base of Bristol Smooth cardstock and did some ink blending with some Distress inks in rainbow colors.  I die cut the rainbow panel using the Peacock Backdrop Die. I love how the peacock pattern showed up really well through the rainbow colors!

    I cut the rainbow panel down to a smaller rectangle size so I could layer it on to another piece of cardstock.  I embossed another panel with some larger polka dots and adhered the rainbow panel to that.

    The last step was to die cut the Thank You Brush Script Word Die out of white paper and lay that on top of the rainbow panel. I decorated the entire card with Pink Heart Droplets, Blue Heart Droplets

    and White Jewels for some extra sparkle!

    Here’s another pic with all of the supplies pictured:

    I love how this card came out and I love the pattern in the Peacock Backdrop Die! I hope this gave you some new ideas about using your cover dies!

    That’s all for today, don’t forget to follow Kat Scrappiness on all

    social media platforms to be alerted to new release, sales and giveaways!

    Kat Scrappiness Shop

    Kat Scrappiness Blog

    Kat Scrappiness FB Fan Page

    Kat Scrappiness Instagram

    Kat Scrappiness YouTube Channel

    The clearance sale is still going on Kat Scrappiness. 

    There are lots of goodies there for terrific prices.

    Thanks for joining me today!

    Have a great day, I already am!

    Lisa  ?

  • Caren’s Favorite Kat Scrappiness Products

    Caren’s Favorite Kat Scrappiness Products

    Hi everyone!  Today I have a video that features my favorite Kat Scrappiness that have been released this year.  I’ve been with the Kat Scrappiness design team for a year, so I wanted to make a video showing my favorite and most used products.  I’m also happy to be staying on for another term!  Can’t wait for you guys to see some of the new things Kat has in store for us!


    * This is actually the Peacock backdrop Coverplate – not Petal Burst


    – – –– – –– – –– – –– – –– – –– – –– – –– – –– – –– – –– – –– – –– – –– – –– – –– – –– – –– – –– – –– – –– –

    Use code caren10 for a 10% discount in the Kat Scrappiness shop.

    Thanks for stopping by and happy stamping!

    – – – Caren’s Favorite Kat Scrappiness products – – – – – – – – – – – – – – – – – – – – – – – – – – – – – – – – – – – – – – –

  • Christmas Tags using Cover Plates

    Christmas Tags using Cover Plates

    Hi everyone!  I can’t believe Christmas is a little over a week away! Today, I have created some quick and easy tags using cover plate dies from Kat Scrappiness.

    My first set of tags features the Wood Grain Framed Diamond Wire die and the Merry Critters stamp set.  I used the banner die from the Crafters Essentials – Fall die set for the sentiment.

    My second set of tags used the Fancy Floral Coverplate die.  I used spray adhesive on the back of the die cuts and then attached them to the card stock.  I sprayed glitter mist on these tags and attached glitter words to the tags.

    For my third set of tags, I used the Peacock Backdrop die and two word dies – Jolly and Ho Ho Ho.

    – – –– – –– – –– – –– – –– – –– – –– – –– – –– – –– – –– – –– – –– – –– – –– – –– – –– – –– – –– – –– – –– –

    Use code caren10 for a 10% discount in the Kat Scrappiness shop.

    Thanks for stopping by and happy stamping!

    – – – SUPPLIES for today’s project– – – – – – – – – – – – – – – – – – – – – – – – – – – – – – – – – – – – – – –

    Snowman Card

    Gingerbread Man Card

    Christmas Tree Card

  • Owlsome Card and Video Tutorial by Jess Crafts

    Hello crafty friends! I was excited to use one of the new stamp sets available at Kat Scrappiness from Heffy Doodle call Hootiful. I thought it would pair wonderfully with some of my Kat Scrappiness favorites including the Peacock backdrop die.  I have a full video tutorial for the card that you can watch below or on YouTube.

    [youtube https://www.youtube.com/watch?v=Tks5H6dBHJM]

    When I couldn’t find just the right color of cardstock in my stash I reached for my Distress Oxide inks. If you haven’t yet completed your set Kat has the latest set. The Lowercase Condensed Alphabets were perfect to add a large focal point to my card. I finished the whole thing off with some stars from the Mint Sprinkles sequin mix. If you haven’t yet, check out the details for joining the Kat Scrappiness Coffee Oasis Charity Blog Hop.


    https://linkdeli.com/widget.js?1540275216575

  • Gate Fold Card

    Good morning, crafters!  Thank you for joining me today for my gate fold card project featuring some brand new items from Kat Scrappiness.  In this card I used the Wine Not stamp set, the Wine Not dies, the Peacock Backdrop die, and one of the Double Stitched Circle dies.  Let’s go ahead and walk through the steps I used to make this card project.


    The first step was to create an ink-blended background panel.  I used one of my favorite color combinations of Distress Ink in Picked Raspberry, Peacock Feathers, and Seedless Preserves.  Although my edges aren’t perfectly smooth and flawless, I will be die cutting this piece so I know that the imperfections will disappear 🙂  I also spritzed just a bit of water on it because I love the look of it and simply couldn’t resist!  Once the panel was completely dry, I ran it through my Big Shot with the Peacock Backdrop die, and then cut the panel lengthwise into two equal pieces.


    The second step was to create my gate fold card base, which is very easy to do.  I simply cut an 8.5×11″ piece of card stock in half so that I have an 8.5×5.5″ piece.  Then I scored a line at 2 1/8″ and another at 6 3/8.”  You could also score once at 2 1/8″, rotate your piece around and score again at the same measurement – whichever you prefer.  The idea is that you will have two flaps that fold over the front and meet neatly in the middle.  I then attached the two ink blended panels from step one to the outside of the gate flaps.


    For the focal piece, I cut a circle of the same color card stock with one of the Double Stitched Circle dies.  These dies are awesome – I particularly love the fact that you get a stitched line around the circle piece, and it also leaves behind a stitched line on the base piece (I save all of these to use in future projects.)  I also cut a strip of card stock to 8.5×1.5″ which will fold around the card and be secured in the middle with this stitched circle.  This will be my belly band to slide over the completed card and hold the gate closed.


    I used the Wine Not dies to cut out a little wine bottle, a wine glass, and the piece that makes the wine inside the glass.  I just love these cute dies!  They’re also a nice size – bigger than many other brands, which makes things SO much easier.  I really hate fiddling with itsy bitsy pieces!


    I decided to do some more ink blending on these pieces, and I am SO thrilled with how they turned out!  I used the same Distress Inks in Seedless Preserves and Peacock Feathers, but only brushed against one edge and let it fade away to white.  This gives such a soft look, especially against the more vibrant background panel and rich card stock color.  I gave these pieces a moment to dry so they wouldn’t smudge, then attached them flat to my stitched circle.  The circle was then attached to my belly band piece, and I made sure to check my spacing by sliding the band on and off my card base.  You want your band to be fitted, but loose enough to slide easily.


    Whenever I used a colored card base, I like to insert a white panel on the card interior.  I also decided to put my sentiment stamp from the Wine Not stamp set on this piece, using the same Peacock Feathers ink.  Did you notice that the “i” in “wine” is a little wine bottle?  Love this!!


    And here is my finished card!  I am very happy with this one, and will have to send it to one of my wine-loving friends.  I will also have to spend some serious time making backgrounds with the Peacock Backdrop die – it is absolutely gorgeous.  If you ever struggle with what to do on a card front, I highly recommend that you get this die for yourself 🙂  I have included a shopping link below for the Kat Scrappiness website, and remember to use your discount code “CYNTHIA10” to save 10% off your entire purchase.  See you next time with more Kat Scrappiness goodness!

    Kat Scrappiness website


  • Stitched Scallop Heart Pocket Card

    Stitched Scallop Heart Pocket Card

    Hi Everyone, it’s Tina here today. I have a fun Pocket Card to share with you using the Peacock Backdrop Die, Stitched Fancy Scalloped Heart Die, Crafters Essentials II and the Everyday Brush Strokes Stamp Set. Below you will find the steps to replicate this card.

    Step 1 – Trim White Cardstock to 8 1/2″ x 5 1/2″, score at 4 1/4″ and fold in half for a vertical side fold card.

    Step 2 – Diecut Peacock Backdrop using soft patterned paper. Adhere to card using Collage Medium.

    Step 3 – Diecut Stitched Fancy Scalloped Hearts and cut out the center of the heart creating a window.

    Step 4 – Using the diecut Heart trace out the center of the heart to use as a template. Cut out 2 hearts using a sheet protector. Adhere the sheet protector cut out to the inside of the diecut Heart created in step 3 using collage medium. Be careful to pour the Snips & Snails Sequins mix to the middle. Adhere the 2nd sheet protector to cover the sequins. Now carefully apply collage medium to the edges of the pocket and adhere to the front of card. Adhere the diecut Heart on top of the pocket. Let dry.

    Step 5 – Diecut Crafters Essentials II stitched banner and the top arrow shape using White Cardstock. Stamp Everyday Brush Strokes stamp sentiment on the stitched banner diecut using Distress Oxide Bundled Sage. Trim the left side and adhere to the center of the heart using Collage Medium. Adhere the top arrow shape over the stitched banner diecut to create an arrow.

    I hope you enjoyed today’s card. This card can be used for any occasion by changing the colors and sentiment. To receive 10% off on your next order at Kat Scrappiness use code: TINA10 at checkout. Below is a link to all the products used. Thank you for stopping by and have a wonderful day!

    Products Used:


    https://linkdeli.com/widget.js?1537178393842

  • Peacock Backdrop Card

    Peacock Backdrop Card

    Hello everyone!  I can’t get enough of the Peacock Backdrop die – it is so beautiful and elegant.

    For today’s card, I cut the Peacock backdrop die out of turquoise card stock and glued it to a dark brown card base.  I heat embossed the sentiment from the Let’s Get Caffeinated stamp set using Versamark ink and turquoise embossing powder.  I cut the sentiment out with a die from the Stitched Postage Stamp Edge Rectangle dies.  I popped that up on the card using foam squares.  I them added some Sparkling Clear Jewels for a finishing touch on the card.


    – – –– – –– – –– – –– – –– – –– – –– – –– – –– – –– – –– – –– – –– – –– – –– – –– – –– – –– – –– – –– – –– –

    Use code caren10 for a 10% discount in the Kat Scrappiness shop.

    Thanks for stopping by and happy stamping!

    – – – SUPPLIES for today’s project– – – – – – – – – – – – – – – – – – – – – – – – – – – – – – – – – – – – – – –

  • Pumpkin Spice & Everything Nice

    Pumpkin Spice & Everything Nice

    It’s Lisa here on the blog today and guess what Kat Scrappiness fans?  Pumpkin Spice season is fast approaching and today’s card should put you in the mood!  I wanted to use the Layered Coffee Cup Die to create a Pumpkin Spice Latte card and I thought it would look great against a fall colored background.  To make such a background I decided to watercolor with some Distress Inks.  I took 3 colors, Mustard SeedSpiced Marmalade and Peeled Paint and I watercolored a background and then splattered it with black paint.

    After it dried I took my Peacock Backdrop Die and cut it out.  The next step was to cut out a piece of brown paper with the Stitched Scalloped Rectangle Die.  I used the 2 largest sizes in the set and I nested them in each other and ran them through my vagabond.  That left me with a frame that I could put around the watercolor panel to finish it off.

    Once I had my background done I moved on to creating the coffee cup for the front of the card. I die cut the Layered Coffee Cup Die in dark brown, the koozie in craft and the top in white. I used a white gel pen to add stitching around the coffee cup and koozie to give it a finished look.

    I added a pumpkin die cut from my stash to the front of the koozie. I cut it out in orange paper and  dry embossed it using a polka dot embossing folder to give it some texture.

     I thought that this pumpkin could use a little something extra so I popped a dark brown heart to the front for some extra cuteness.

    Now that the coffee cup was finished, I needed a little something to adorn the top of the coffee cup. I wrapped a piece of twine around the top of the cup and hand punched the word “enjoy” out with a mini tag punch.  I didn’t have the word enjoy in a stamp in a font I liked so I computer generated it.

    Now I needed a sentiment so I printed out a cute one using the same font as the little “enjoy” tag.  I layered the sentiment onto a piece of orange card stock.

    Inking the edges really allowed it to stand out.

    Last but not least I added Orange Jewels all around the sentiment and the

    coffee cup for some added sparkle!

    If you use my code “Lisa10” in the shop you can save 10% on your order!

    All in all I think that this card came out beautiful!

    Hope you enjoy!
    Have a great day, I already am!

    ☕️ Lisa  ☕️

    Products Used:

  • Wine Cards with the September Release by Maria

    Wine Cards with the September Release by Maria

    Hello Kat Scrappiness fans! Maria here with you today with some simple cards featuring the new Peacock Backdrop die, the Wine Not stamp set and the Wine Not Custom craft dies.


    For my first card, I started out by die-cutting the Peacock Backdrop die some Bristol smooth white card stock.  I inked up this piece with some squeezed lemonade, spiced marmalade and picked raspberry distress oxide inks with my mini ink blending tool.  I set this piece aside to dry while I worked on die-cutting the Wine Not Custom craft dies.  I used Neenah smooth white card stock to color the bottle with my Copic markers and used a silver card stock for the wine glass.  I added glossy accents to make it look more realistic.   I also die-cut a frame by using the double stitched rectangle die and the stitched rectangle die.  Here’s the first card:


    I adorned my card with some images from a stamp set by Newton’s Nook and also added the beautiful Champagne jewels.  I love the new jewels collection from the shop.  They are available in a variety of colors.  Here’s another look:


    For my second card, I die-cut the pieces again with some Neenah solar white card stock and colored the die-cut pieces with my Copic markers.  I inked up an A2 size piece of some Bristol smooth white card stock with a stencil from my stash.   I stamped the sentiment from the Wine Not stamp set.  Here’s my second card:


    To finish the design, I also added the cheers sentiment from my stash and the tiny bow is from a die-set by Lawn Fawn.  Here’s another look:


    For my third card, I wanted to create something simple just using the Wine Not stamp set.  I die-cut a piece of some Neenah solar white card stock with the Stitched Fancy Scalloped rectangle die.  I colored the images in with my Copic markers.  To finish my design, I stamped the sentiment using Versafine Vintage Sepia ink.

    I hope you like my cards today.  Which one is your favorite?  The supplies I used are listed and linked below.  Don’t forget to use my coupon code “MARIA10” for 10% off your order at the shop.  Have a nice day!

    ———–SUPPLIES————