Tag: Nuvo Deluxe Adhesive

  • Easy Peasy Cards using Crafters Essentails II Dies

    Easy Peasy Cards using Crafters Essentails II Dies

    Hello everybody and Happy Friday!!!! Design Team Member Jana here today, stopping in to share another easy-peasy super quick card tutorial with you all. Today I am showcasing two card that I created in just under ten minutes using the newly released Crafters Essentials II Dies by Kat Scrappiness.

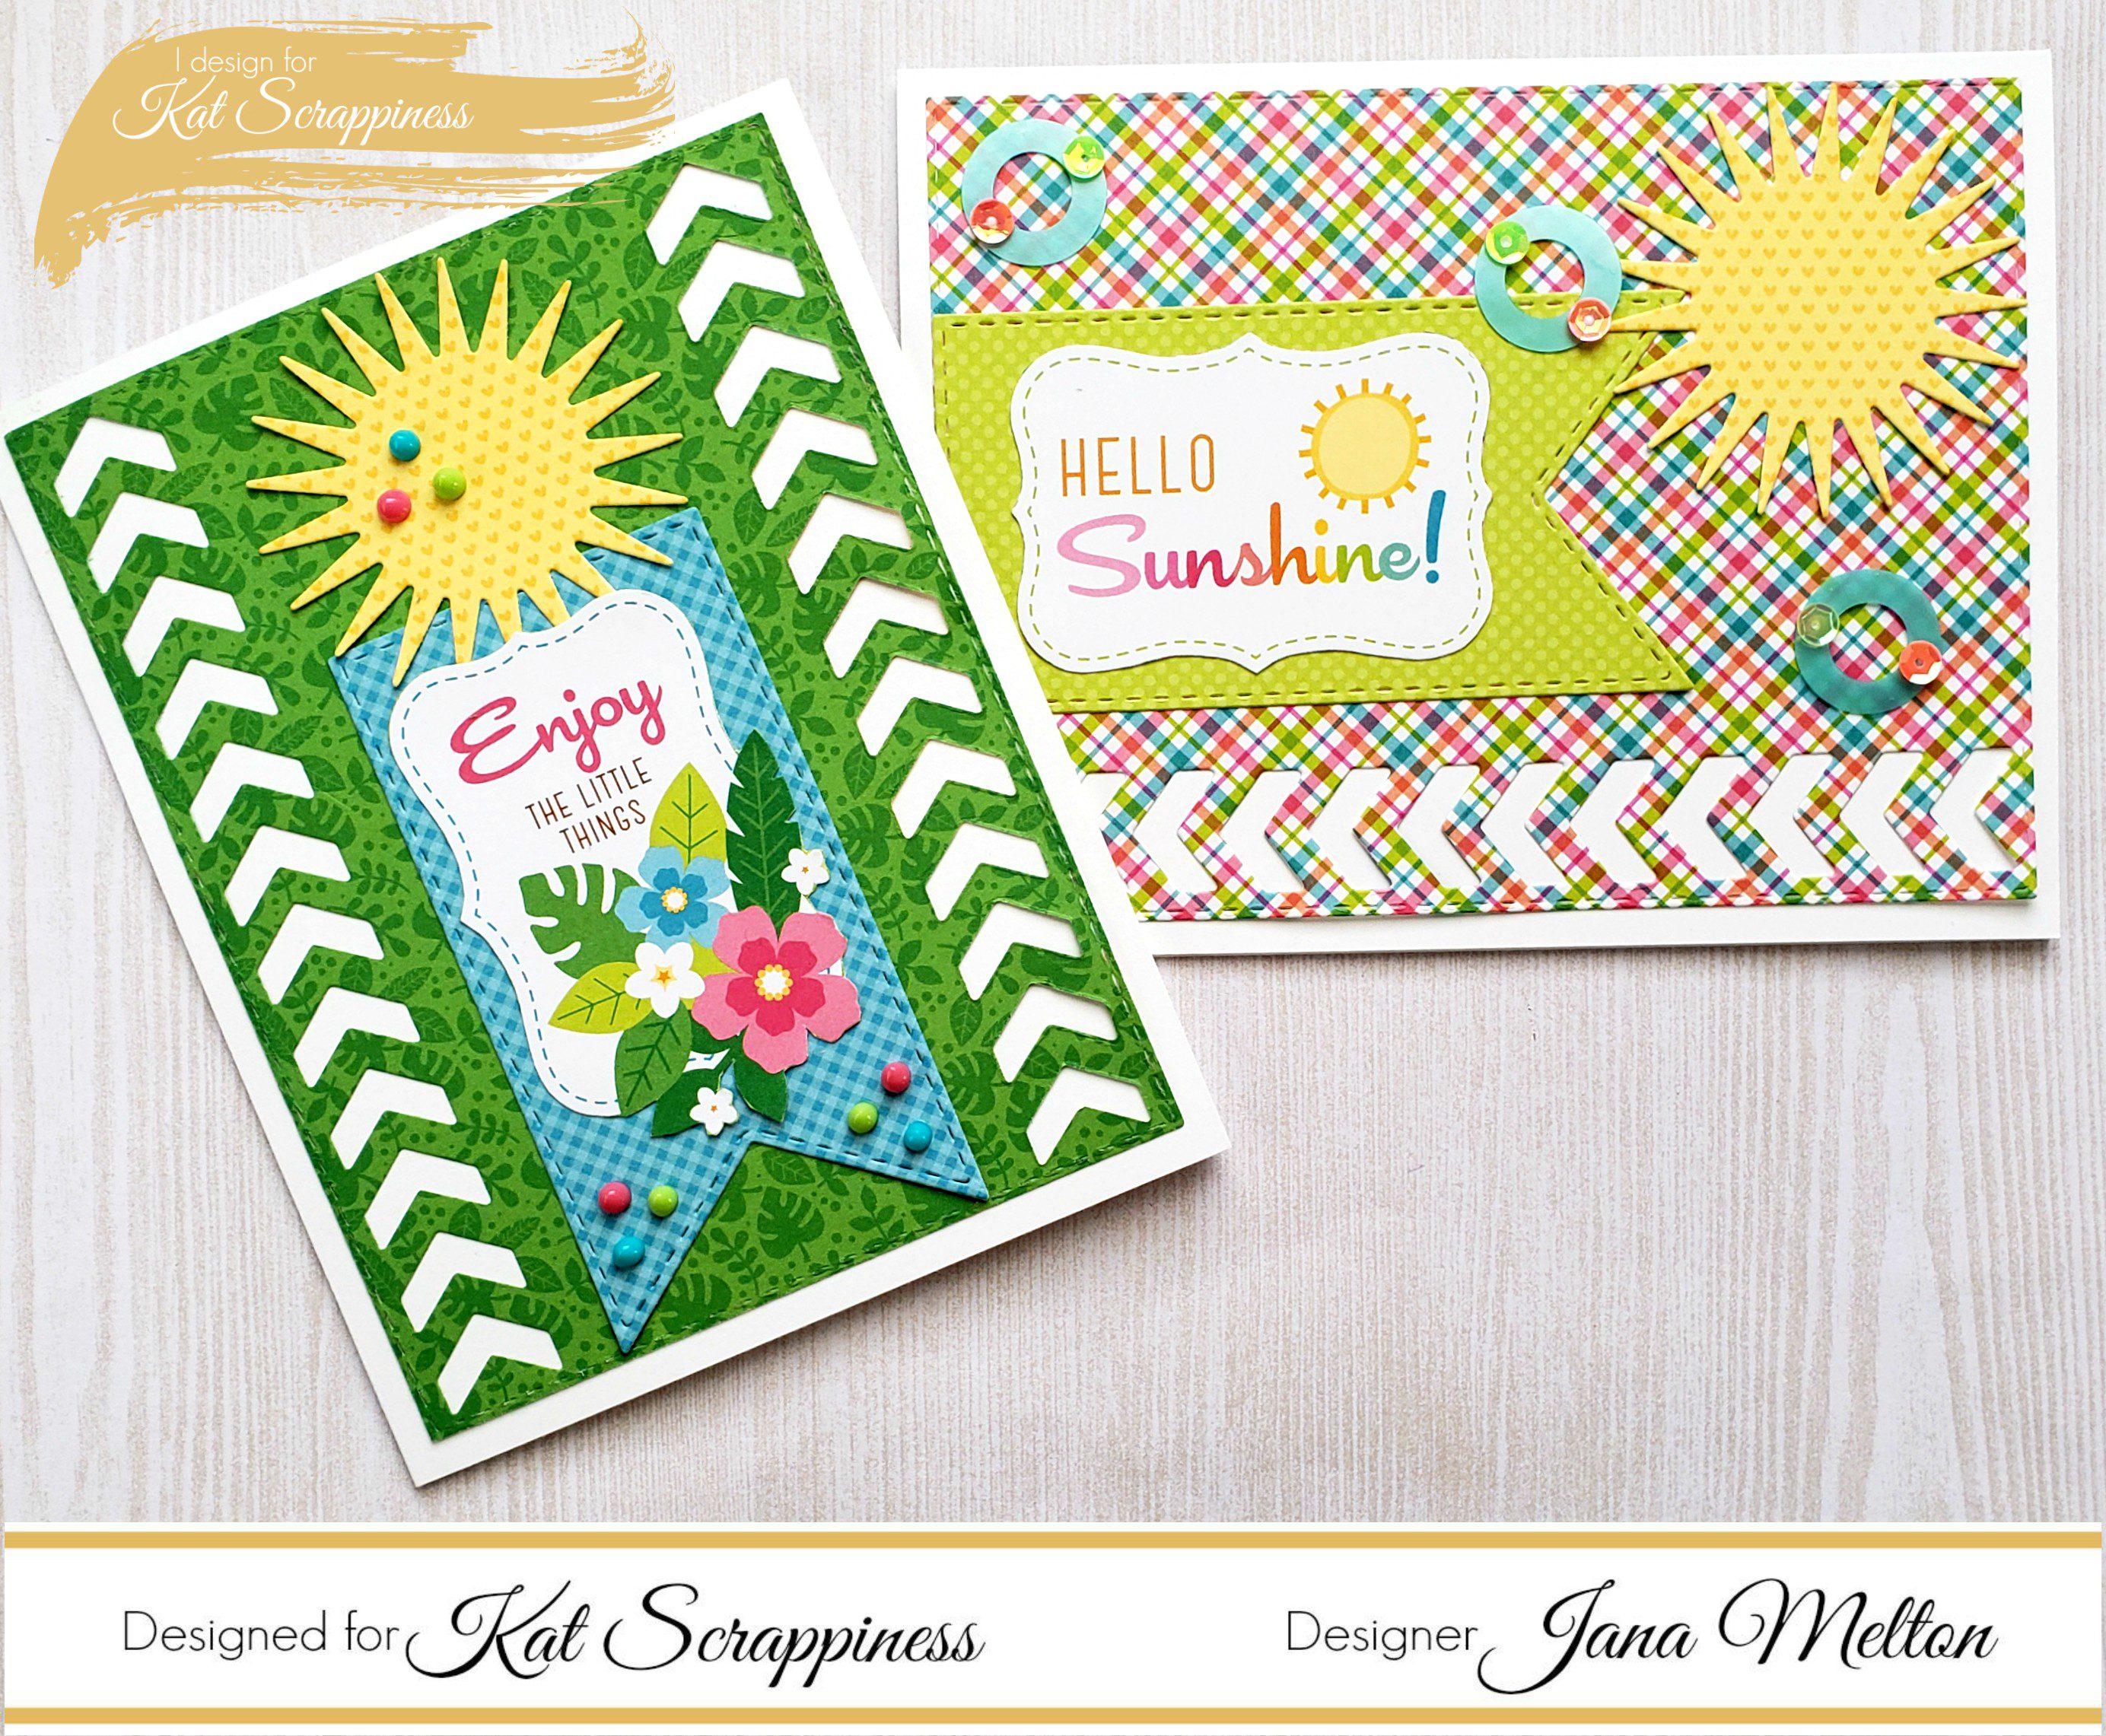
    To begin, I started off by creating my two card bases using 110lb. white Recollection Card Stock. I cut each piece of card stock down to 8 1/2″ X 5 1/2″ and scored at 4 1/4″ on the 8 1/2″ side creating an A2 sized card measuring 4 1/4″ X 5 1/2″. I then used the Crafters Essentials II Dies by Kat Scrappiness and die cut my pieces out of card stock from the Doodle Bug Design Inc. “Fun In the Sun” double-sided 6X6 Paper Pad.

    I decided that I wanted to use the cut-aparts from the paper pad as my sentiments for my cards. For the first card I chose the “Hello Sunshine” cut-apart and fussy cut it out.

    I then used my Nuvo Deluxe Adhesive (my favorite adhesive at the moment!!), to adhere all of my die cut pieces onto my card base.

    To finish off my card, of course I had to add some sequins (because who doesn’t love sequins !?!?) Kat Scrappiness has the most amazing sequins!! I went with the Neon Summer Sequin Mix and pulled a few different sequins out of the mix and applied to my card using the Nuvo Deluxe Adhesive.

    For the second card, I again used the same die cuts from the Crafters Essentials II Dies by Kat Scrappiness and die cut my pieces using the Doodlebug Design Inc. “Fun In the Sun” double-sided 6X6 Paper Pad. Only this time, I wanted the die cut arrows to be on both sides of my paper. To do this I flipped the paper over and aligned it up perfectly with the die cut and ran it through my machine again, giving me the die cut arrows on both sides of my die cut.

    Again, I decided to go with a simple cut-apart from the Paper Pad and fussy cut it out.

    I adhered all of my die cut pieces as well as my fussy cut sentiment onto my card base using Nuvo Deluxe Adhesive.

    And to finish off my card, I decided to add some fun bright Nuvo Crystal Drops in Apple Green, Caribbean Ocean and Carnation Pink.

    And that completes my two easy-peasy cards for today using dies from just one die set.

    I hope that you enjoyed today’s quick tutorial and it has inspired you to create you own “easy-peasy” cards as well (which we would love for you to share with us here at Kat Scrappiness!!)

    Below, you will find a list of all the materials and supplies that I have used for these cards. When visiting the Kat Scrappiness Store, please remember to use code: JANA10 at checkout to receive 10% off of your order.

    Thanks for stopping by and have a Fabulous Crafty Day!!!

    Supplies & Materials Used:

    Crafters Essentials II Dies by Kat Scrappiness

    “Neon Summer” Sequin Mix – Shaker Card Fillers by Kat Scrappiness

    Nuvo Deluxe Adhesive 200N

    Nuvo Crystal Drops – Gloss Apple Green

    Nuvo Crystal Drops – Gloss Caribbean Ocean

    Nuvo Crystal Drops – Gloss Carnation Pink

    110lb. White ReCollections Card Stock

    Doodlebug Design Inc. “Fun In the Sun” Double-Sided 6X6 Paper Pad

  • “Meet Me Where the Sky Can Kiss the Sea”…featuring Crafters Essentials 1 Dies by Kat Scrappiness

    “Meet Me Where the Sky Can Kiss the Sea”…featuring Crafters Essentials 1 Dies by Kat Scrappiness

    Good day crafty friends! Design Team Member Jana stopping in to share a quick and easy card tutorial with you all today. I don’t know about you, but there are numerous times when I need to create a quick card at the last minute and I am usually scrambling to do so. I also don’t necessarily have time to dig out my stamps and get inky either. Well the good news is that I can now create just about any card I need with the help of the newly released “Crafters Essentials I Dies” by Kat Scrappiness. These dies have been a life saver recently and I am super excited to show you just one of the quick cards that I have whipped up using it.

    To begin, I created my card base using 110lb. ReCollections White Cardstock. My card base is an A2 sized card which measures 4 1/4″ X 5 1/2″. I then die cut some patterned cardstock from the ReCollections “Mermazing” Paper Book that I have as my card mat using the largest die from the Stitched Scalloped Rectagle Dies by Kat Scrappiness.

    I then die cut the above piece out of some plain textured cardstock, again from the ReCollections “Mermazing” Paper Book using one of the dies from the Crafters Essentials I Dies by Kat Scrappiness.

    Using some of the “cut aparts” in the ReCollections “Magic Hour” 6X6 Paper Pad, I cut out the sentiment I wanted to add to the bottom of my die cut along with another piece that I wanted to adhere to the middle of the Crafter Essential Die as my focal point. I adhered everything onto my card base using Nuvo Deluxe Adhesive. And of course, my card would not be complete without some beautiful sequins! I used a few sequins from the “Fluffy Clouds” Sequin Mix and pulled out some green sequins from the “Grandma’s Garden” Sequin Mix as it matched perfectly with the green color in the cardstock that I wanted to pull out.

    And there you have it….. a completed card in pretty much less than ten minutes….Perfect!!! I hope that this quick and simple tutorial will help you out when you might be in a pinch for creating a card at the last minute. I have listed all of the products I used in this tutorial below. Please remember to use Code: JANA10 at checkout to receive 10% off of your order at the Kat Scrappiness Store. Thank you for visiting today and as always, Have a Fabulously Crafty Day!!!

    Supply List

    -110lb. ReCollections White Cardstock

    -ReCollections “Mermazing” Paper Book

    -ReCollections “Magic Hour” 6X6 Paper Pad

    Stitched Scalloped Rectangle Dies by Kat Scrappiness

    Crafter’s Essentials I Dies by Kat Scrappiness

    Nuvo Deluxe Adhesive 200N

    Fluffy Clouds Sequin Mix – Shaker Card Fillers by Kat Scrappiness

    Grandma’s Garden Sequin Mix – Shaker Card Fillers by Kat Scrappiness

  • You Make the World a Beautiful Place…

    You Make the World a Beautiful Place…

    Good morning crafty friends! Design Team Member Jana stopping in today to share how I have created this simple but pretty card using some amazing products from Kat Scrappiness.

    To begin, I created my card base (which is an A2 sized card) using 110lb. ReCollections White Card Stock. I then cut down my background mat for my card using card stock from the Heidi Swapp 6X6 “Dreamy” Paper Pad and adhered it to my card base.

    Using 65lb. ReCollections Gray Card Stock, I then die cut the Wood Grain Framed Diamond Wire Background Die by Kat Scrappiness and adhered it to my card base.

    Next, I die cut a scalloped circle from the Swiss Dot Petite Prints 6X6 Double-Sided Paper Pad by Doodlebug using the Scalloped Circle Dies by Kat Scrappiness. Using the stamp, “you make the world a beautiful place” from the Everyday Brush Strokes Stamp Set by Kat Scrappiness, I stamped it onto my scalloped circle die cut using Tsukineko Versamark Clear Embossing Ink and heat embossed it with Hero Arts Silver Embossing Powder.

    I added some Scotch Foam Adhesive strips onto the back of my scalloped circle to allow it to “pop” from the card and adhered it on.

    To finish off my card and add a bit of life and color to it, I adhered a few paper flowers and a butterfly that I had found in my stash, as well as a few sequins from the Brilliant Blush Sequin Mix from Kat Scrappiness using Nuvo Deluxe Adhesive.

    And that now completes my card for today. It was rather simple to create and I am happy with how it has turned out. I hope that you have enjoyed this quick tutorial today and will share all of the wonderful projects that you create using the fabulous products from the Kat Scrappiness Store. When shopping, please remember to use code: Jana10 at checkout to receive 10% off of your order.

    A complete list of supplies used for this project are listed below for your convenience:

  • Happy Father’s Day Shaker Card

    Hello crafty friends!! It is Design Team Member Jana stopping by today to share a tutorial on how I have created this fun shaker card for Father’s Day using lots of amazing products from Kat Scrappiness.

    How super fun does this card look ?!?! I am very happy with how it has turned out and can’t wait to send it off for Father’s Day! So without any further delay, let’s get to it…..

    To begin, I die cut a piece of card stock (which will be used as my shaker base) as well as a piece of acetate using the largest sized scalloped circle die from the newly released Stitched Scalloped Circle Dies by Kat Scrappiness. This die set is awesome and comes with a total of 7 different sized dies.

    I knew that I wanted to create a shaker and I wanted to created a frame for my shaker. In order to do this, I used a simple Sizzix Circle die which fit perfectly inside the largest scalloped circle die which was used in the previous step. I used Removable Purple Tape to help hold my dies in place as I die cut several pieces (8 to be exact) of card stock which will later help me to form the frame of my shaker element.

    Continuing with my die cutting, I used the Happy Father’s Day Die by Kat Scrappiness to cut out my cards sentiment. I used the negative left over card stock from my previous die cutting as to not waste any paper.

    In order to create my shaker element, I began to glue my previously cut frames together, perfectly on top of each other, making sure that all of the scalloped edges lined up. I used Nuvo Deluxe Adhesive and glued seven of the eight frames together. I use this method of creating a shaker quite a bit. As you can see from the picture above, the combined layers of card stock help to create a deep enough space between the base of the shaker and the top layer of acetate to allow the sequins or shaker filler to move around freely. This method also allows you to save your foam adhesive dots and will also help to allow your sequins to move freely, rather than allowing the possibility of the sequins becoming stuck to the adhesive foam on the sides.

    The next step was to take the layered frame which I had glued together in the previous step and adhere the acetate on top. Again, I used a thin strip of Nuvo  Deluxe Adhesive on the top of my frame and placed the acetate on top, making sure that my scalloped edges were matched up. Once the acetate was in place, I then took my last piece of frame (remember, I had cut out 8 originally, glued 7 of them together and saved the last one to go over the top of the acetate as a finishing piece).

    While my acetate frame was set off to the side to dry, I adhered my “Happy Father’s Day” die cut sentiment on to the first scalloped circle card stock that was die cut (my shaker base). I decided that I wanted to use the Madison Avenue Sequin Mix as my filler for my shaker. I adhered a few of these sequins randomly on my shaker base (as seen above).

    While I was allowing my shaker base and frame to continue drying, I die cut several tags using the Stitched Flag Dies by Kat Scrappiness.

    Once my shaker elements were completely dried, I added more of the Madison Avenue Sequins to the center of the shaker element. I added a small strip of Nuvo Deluxe Adhesive around the outer edge and then carefully lined up the scalloped edges of the acetate frame with the shaker base and applied them together to complete my shaker.

    While I let my completed shaker portion dry, I began to play around with the stitched flags that I had die cut and adhered them together, making sure to overlap them so that all of the card stock used could be seen. I arranged them in a pattern I was happy with then adhered my shaker element over the top of the flags, which as you can see has created a nice Father’s Day award ribbon.

    Because the entire finished piece measures approximately 5″ x 8″, I created an A9 card base which measures about 5-1/2″ x 8-1/2″, using 110lb. Ivory Card Stock. I cut a piece of gray card stock about 1/8″ smaller than my card base and applied it as my mat. I adhered my completed shaker award ribbon to the center on my card and for a simple finishing touch, I added some matte enamel dots I had in my stash on the top left and bottom right corners.

    I hope that I have helped to inspire you to create your own shaker card and if so, I can’t wait for you to share it with us all. You may find a complete list with all of the products and supplies I have used for this project below.  Remember to use Code: Jana10 at the Kat Scrappiness Store to receive 10% off your order at checkout.  Thank you for stopping by and have a Fabulously Crafty Day!!!

    Product/Supply List:

    Stitched Scalloped Circle Dies by Kat Scrappiness

    Happy Father’s Day Die by Kat Scrappiness

    Stitched Flag Dies by Kat Scrappiness

    Removable Purple Tape 1.5″ x 15yd Roll by iCraft

    Madison Avenue Sequin Mix – Shaker Card Fillers

    Nuvo Deluxe Adhesive 200N

    110lb. Ivory Card Stock

    Bazzill Card Stock (Navy)

    Acetate

    Recollections Gray Card Stock

    Patterned Paper – Doodlebug Designs Inc. “Kraft in Color” Card Stock

    Matte Blue Enamel Dots – Various Sizes