Tag: Nicki Hearts Cards

  • Pawsome Dogs Shaker Card

    Pawsome Dogs Shaker Card

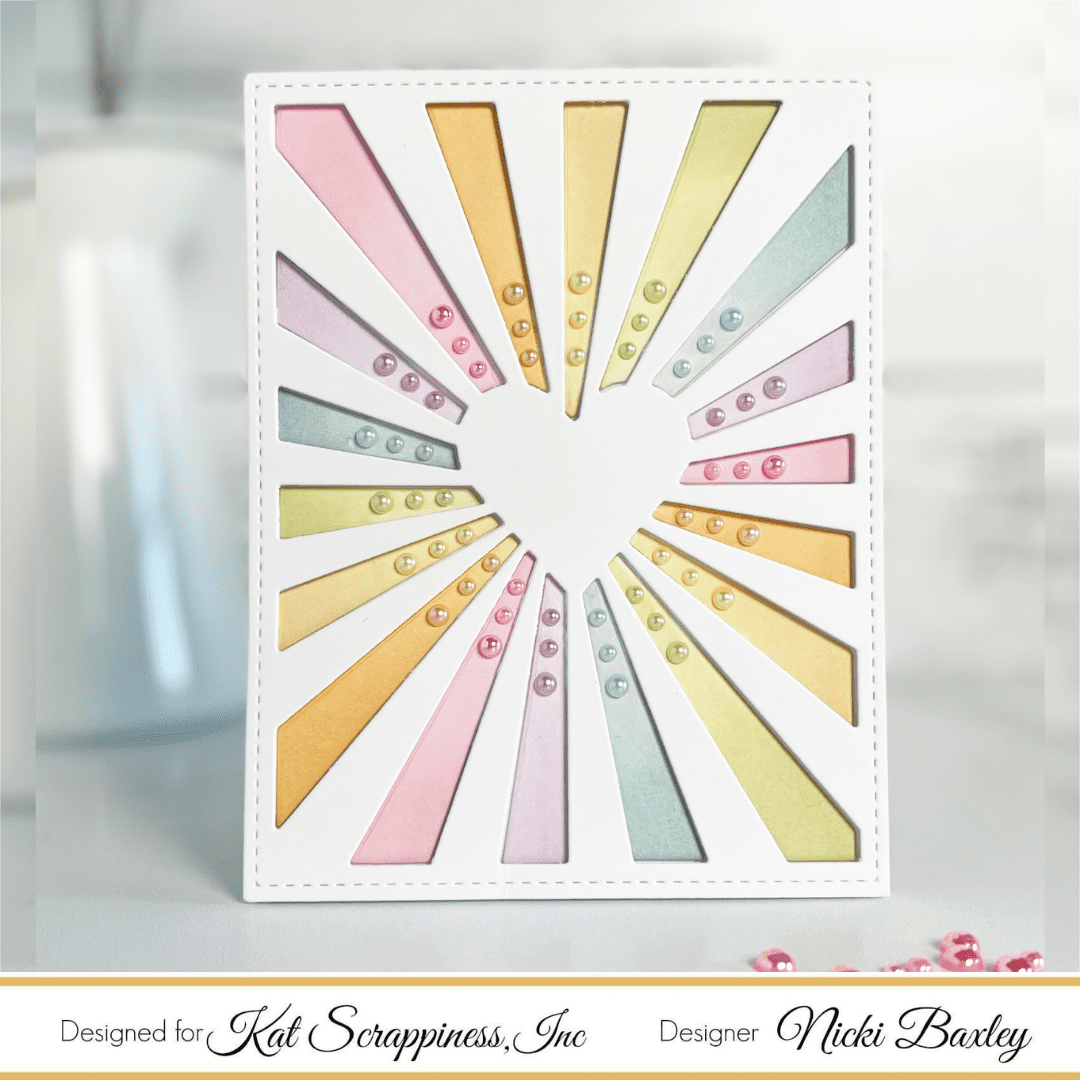
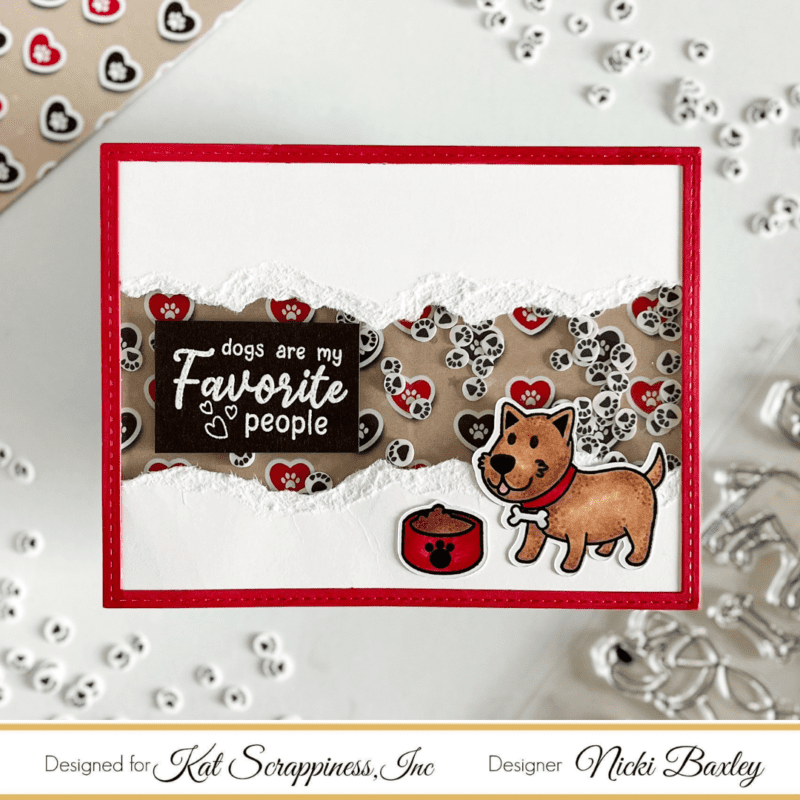
    Hi, everyone! This is Nicki from the Design Team. I’m so excited to be sharing a torn paper shaker card with the new Pawsome Dogs release from Kat Scrappiness! For all the details, make sure to watch the YouTube video.

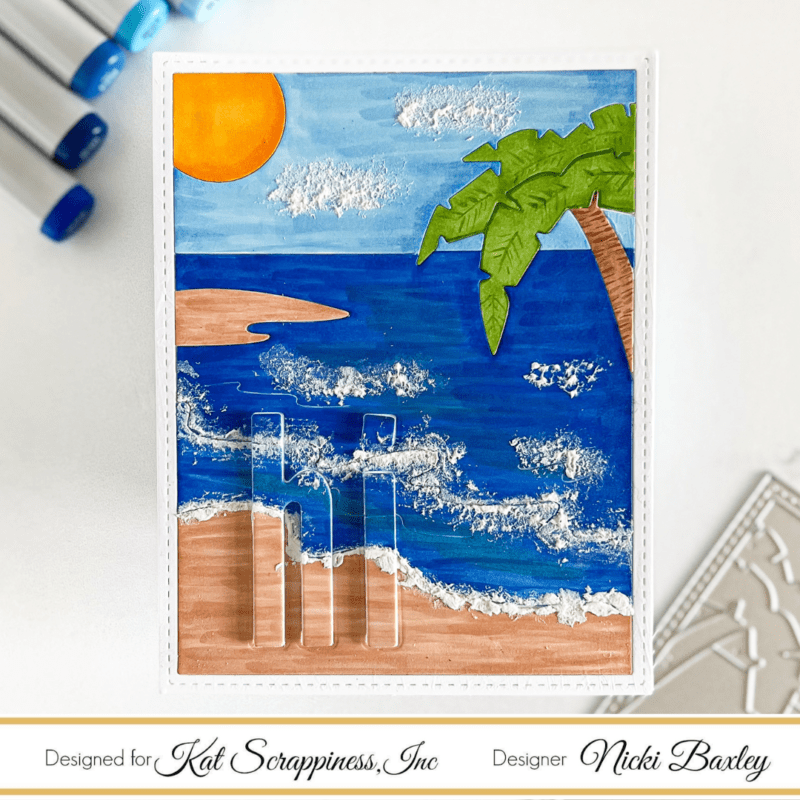
    To start, I am going to use a plain piece of white paper and a mini slimline acetate sheet. I tore the paper into even sections and added these to the top of the acetate sheet, leaving about 1/3 of the card front as acetate. Next, I used the frame cut from the A2 Waterside Die

    Then, I used foam strips on the back of the shaker front to create a space for the shaker pieces.


    Next, use the telescopic powder tool around the edges of the foam strips to make sure the shaker pieces don’t stick to the them. Then, add the shaker pieces and place the back of the card.

    All that is left is to decorate the front of the card! I used copic markers to color the dog and the dog bowl. The sentiment is from Pawsome Dogs Sentiments and is heat embossed on brown card stock.

    Thanks so much for being here! Make sure to click through the links below if you are interested in any of the products used for this card. Tell me what you think in the comments – have you made a shaker like this?

    Supplies:

    Pawsome Dogs Sentiments

    Pawsome Dog Stamp Set

    Pawsome Boy 6×8 Paper Pad

    Paw Print Sprinkles

    Mini Slimline Acetate Sheets

    A2 Waterside Die

    Scrapbook Adhesives 3D Foam Strips

    Telescopic Embossing Powder Tool with Retractable Brush

    WOW! Opaque Bright White Super Fine Embossing Powder


    <!– LinkDeli Code Start –><!– KS 827 video blog post only KS –><a class=”linkdeli-image” target=_blank href=”https://linkdeli.com/view/6d2ccb32-225a-4f12-8a55-f785f7709e26″ rel=”nofollow”><img src=”https://linkdeli.s3.amazonaws.com/public/placeholders/6d2ccb32-225a-4f12-8a55-f785f7709e26.jpg”></a>
    https://linkdeli.com/widget.js?id=f5e8378456858c916708<!– LinkDeli Code End –>

  • One Layer Beach Scene Card with Texture

    One Layer Beach Scene Card with Texture

    Hi, this is Nicki from the design team! I’m excited to share this bright beach scene card with you today. For all the details make sure to check out the YouTube video on the Kat Scrappiness channel.

    To start this card, you will need the A2 Waterside Die and the Condensed Lowercase Alphabet dies. You could color this card with any medium but I am going to use Copic Markers today with very fast coloring. I did long strokes to imitate all the changes/texture in the water and sand.

    Once the coloring was complete, it was time to add texture with some embossing paste.

    Once the embossing paste was dry, I could put the scene back together like a puzzle. Next, I used the lowercase condensed alpha “hi” to create an inlaid die cutting area. Foam tape was applied to pop up the letters.

    Nicki Hearts Cards, Nicki Baxley, Kat Scrappiness

    Let me know what you think in the comments! All the supplies from Kat Scrappiness are listed below. For full list of copic markers, check out my IG @nickiheartscards. The links below provide a small commission to me at NO cost to you! Thank you for your support!!

    Supplies:

    A2 Waterside Die

    Condensed Lowercase Alpha Dies

    Elizabeth Craft Double Sided Adhesive Sheets

    Gina K Connect Glue

  • Shaker Card Tips featuring the NEW Summer Release!

    Shaker Card Tips featuring the NEW Summer Release!

    Hi, this is Nicki from the DT! I’m here today to share some fun shaker card tips. For all the details, make sure to watch the YouTube video.

    First, I used the A2 Reverse Scallop frames, A2 Quilted Backdrop Die and acetate sheets to make the shaker window.

    acetate sheets, quilted cover, reverse scallop

    After securing the acetate to the frame, I added 2 layers of foam tape strips. Once the foam tape is in place, you must use a powder tool to make sure that extra adhesive doesn’t attach to the shaker pieces.

    Next, attach the shaker window to the front of the card with shaker pieces in place. Now, add the foliage and sentiment to the front of the window. Make sure to use double sided adhesive instead of liquid glue to do this for the best results.

    Here is another look at the final card! Make sure to check out the supply list and click on these links if you are shopping soon. Happy crafting!

    Nicki Baxley, Nicki Hearts Cards, card making

    Supplies:

    A2 Quilted Backdrop Die

    A2 Reverse Scallop Dies

    Stitched Foliage Dies

    White Diamond Sequin Mix

    Friendship Greetings Stamp Set

    Telescopic Embossing Powder Tool with Retractable Brush

    A2 Acetate Sheets

    3D Foam Strips White by Couture Creations

    Elizabeth Craft Double Sided Adhesive Sheets

    Elizabeth Craft Double Sided Adhesive 0.125

    WOW! Metallic Silver Super Fine Embossing Powder

    Versamark Embossing Ink


    <!– LinkDeli Code Start –>
    <a class=”linkdeli-image” target=_blank href=”https://linkdeli.com/view/7b6cb70e-11e2-440a-9bdd-9e9df403bfc5″ rel=”nofollow”><img src=”https://linkdeli.s3.amazonaws.com/public/placeholders/7b6cb70e-11e2-440a-9bdd-9e9df403bfc5.jpg”></a>
    <!– LinkDeli Code End –>

  • Unicorn in a Heart Shaker Kit Card

    Unicorn in a Heart Shaker Kit Card

    Hi, everyone! This is Nicki from the design team here to show you how to use our shaker kits while making this fun unicorn card. For all the details make sure to watch the video!

    Let’s start by looking at the product. The pack comes with a sturdy frame, a piece of acetate cut to fit the window and a sturdy piece of foam that is the shape of the frame.

    unicorn in a heart, card making. shaker card, Nicki Hearts Cards

    For my frame, I used Tattered Rose Distress Oxide Ink. After ink blending, I attached the acetate piece with liquid glue to the frame. Next, I used liquid glue to adhere the foam to the frame. While the glue was drying, I prepared the background.

    I started with a piece of light pink paper from the Spring Fling pack. Next, I wanted to add some extra sparkle so used the Falling Hearts Stencil and some glitter paste.

    falling hearts

    After the glitter paste dried, I can start placing my shaker window. I added pastel sprinkles and sparkling clear diamond jewels to the center of the card. Next, I glued the shaker window in place over the shaker pieces.

    shaker card, unicorn in heart

    All that was left, was to back the card with dark grey card stock.

    unicorn in heart, shaker card, card making, Nicki Hearts Cards

    If you are shopping today, please make sure to go through my links to support me. These do NOT cost you anything and help support my crafty business. Thank you and Happy Crafting!

    Nicki


    https://linkdeli.com/widget.js?id=f5e8378456858c916708

  • How to Make an Infinity Shaker Card

    How to Make an Infinity Shaker Card

    Hi, everyone! This Nicki from the design team here with some tips and tricks on making infinity shaker cards. Check out the YouTube video for all the details!

    Let’s start with what we need to make the card today. All of these items will be listed at the end of the post.

    Kat Scrappiness, spring fling, proud of you, Nicki Hearts Cards

    First, I cut the card stock to 4.25 x 5.5 inches. Next, I carefully slid the card stock into the large Avery Elle Stamp Pocket. Then I made a fold with the bone folder.

    Next, I added the shaker element. Don’t forget to do this before sealing the pocket!

    Once the shaker element is in place, it’s time to seal the pocket with double sided tape. With the pocket sealed, all that is left to do is add the sentiment and the black card stock backing.

    Nicki Hearts Cards, card making, card making ideas, spring fling, graduation card

    I hope you enjoyed this project! For all the details, check out the YouTube video. All the items used in today’s video are listed and do contain an affiliate link. Make sure to click on the links below if you are shopping soon. Happy Crafting!


    https://linkdeli.com/widget.js?id=f5e8378456858c916708

  • 3 Ways to Use the Pencil Bone Folder to Add Dimension to Your Cards

    3 Ways to Use the Pencil Bone Folder to Add Dimension to Your Cards

    Hi, everyone! This is Nicki from the Design Team here with fun ways to add dimension to your projects. I used the pencil bone folder in 3 different ways to create these cards. Make sure to check out the video for all the details!

    Let’s start with the first card which uses ink blending to create the background. I was so excited to get to use the new Saltwater Taffy Distress Oxide for this sunrise.


                                                                          Dried Marigold, Saltwater Taffy, Abandoned Coral

    Next, it was time to use the pencil bone folder and a stencil to create the sun rays.

    stencil, pencil bone folder

    Finally, I added some Lawn Fawn Liquid Stardust and some Enamel Dots to accent the sun rays. I cut the cross from gold paper and placed it on the from of the card.

    The “He is Risen” sentiment was added to the inside of the card with coordinating card stock to finish the card.

    The next card is a good example of using the pencil bone folder with patterned paper. First, I cut the square window out of the patterned paper. Next, I used the pencil bone folder to follow the lines in the paper.

    This adds subtle shadows to the lines which creates dimension. Here is how the final card turned out.

    For the last card, I used the pencil bone folder to score around an area that I ink blended.

    I hope you enjoyed these fun ways to add dimension to your cards with the pencil bone folder! Make sure to check out the video if you want even more detail. The products used are listed here. Please make sure to click these links, as they provide me a small commission at no cost to you. I appreciate your support so much!

    Happy crafting!

    Nicki


    https://linkdeli.com/widget.js?id=f5e8378456858c916708

  • Pastel Sunburst Rainbow with Inlaid Die Cutting

    Pastel Sunburst Rainbow with Inlaid Die Cutting

    heart sunburst, pastel rainbow, Nicki Hearts Cards, Kat Scrappiness

    Hi, everyone! I am Nicki from the design team and I am here to share this fun card with you. This card uses inlaid die cutting as its main technique so make sure to check out my video for tips on this technique.

    First, I am going to use the die to emboss an image. Then, I will use this as a pattern to put the puzzle together.

    embossed image, heart sunburst, Kat Scrappiness

    Next, I die cut the image and labeled all the pieces so it would be easier to get everything back together. After I had the pieces labeled, it was time to ink blend my rainbow.

    pastel rainbow, distress oxide ink, inlaid die cutting, Kat Scrappiness

    heart sunburst die, Kat Scrappiness, pearls

    Once the ink blending was finished, I just need to put the puzzle back together. After I had it lined up and put back together, I took the corresponding pearls and added 3 to each section. Make sure to check out the video for all the details. If you are going shopping today, please click through the link below to help support me. These links do not cost you anything. Thanks so much!


    https://linkdeli.com/widget.js?id=f5e8378456858c916708

  • Make a Shaker Card with Word Dies

    Make a Shaker Card with Word Dies

    Hi, everyone! This is Nicki of Nicki Hearts Cards here today with a fun shaker card. If you have been following my @Home expo talks, you know I have been dying to make a shaker card with this word die. So, let me take you through it.

    Kat Scrappiness, merry christmas, card making, Nicki hearts cards

    For all the details, make sure to check out the YouTube video on the Kat Scrappiness channel

    First, let’s start with lots of fun Kat Scrappiness supplies. I will put links to all of these at the end of the post.

    Kat Scrappiness, shaker mix, dies, card making, Nicki Hearts Cards


    First, let’s use the slimline paper pad and cut the shadow of “Merry Christmas” out of the center. Next, we will adhere a mini slimline acetate piece which fits this opening perfectly.

    Next, we will ink blend the card base so that when you look through the acetate window you will see a complimentary color.

    waffle flower media mat, Kat Scrappiness, ink blending, Nicki Hearts Cards

    Once this is finished, we need to use foam tape to build our shaker window. I used two layers to create more height because some of the shaker pieces are big enough that we needed some extra height.

    Next, I add a generous amount of the shaker mix to the card base and carefully place the window over the pieces. Now, we need to work on the sentiment.

    die cutting, merry Christmas, Kat Scrappiness, Nicki Hearts Cards

    After die cutting this piece, I add 2 extra layers of thick white card stock to give it height and stability. Once the glue is dry, I will add these to the shaker window with double sided adhesive.

    Kat Scrappiness, card making, Nicki Hearts Cards

    Last, let’s add some of the cute shaker pieces to the front of the card.

    shaker card, Kat Scrappiness, Nicki Hearts Cards Kat Scrappiness, shaker card, merry christmas, Nicki Hearts Cards

    I hope you enjoyed this card. Have you tried a shaker card with word dies? Let me know in the comments and make sure to check out the YouTube video. If you are interested in any of the supplies, please click through the link below to go to them on the site.


    https://linkdeli.com/widget.js?id=f5e8378456858c916708

  • Ink Blended Rainbow Get Well Card

    Ink Blended Rainbow Get Well Card

    Nicki Hearts Cards

    Hi, everyone! This is DT member Nicki of Nicki Hearts Cards here with a cheery ink blended rainbow card. Make sure to hop over to YouTube for all the details on this card.

    Let’s get started with the colors you will need to create this beautiful rainbow.

    distress oxide, rainbow card, Kat Scrappiness, Nicki Hearts Cards

    I did a diagonal pattern with my stripes to add extra interest.

    ink blending, Kat Scrappiness, Nicki Hearts Cards, get well card

    Once the ink blended panel was finished, I added some shimmer spray. The shimmer is beautiful on this project and really adds to the design.

    shimmer shot, rainbow card, Nicki Hearts Cards

    After the panel dried, I used the fall foliage die to cut the pattern. I peeled up the leafs to add depth and so that I could add a holographic panel beneath the leaves. I used the same holographic paper to create the sentiment.

    Kat Scrappiness, Nicki Hearts Cards, rainbow card

    Thank you so much for joining me on this project. Make sure to check out the YouTube video for all the details. The links below provide me with a small commission at NO cost to you, so please click through them if you are shopping for anything today!


    https://linkdeli.com/widget.js?id=f5e8378456858c916708

  • 5 x 7 Thanksgiving Card Featuring Dress Up Quokkas

    5 x 7 Thanksgiving Card Featuring Dress Up Quokkas


    Kat Scrappiness, thanksgiving, DT project, Nicki Hearts Cards, card making, 5x7

    Hi, everyone! I am here today with my first blog post as a DT member. I am Nicki Baxley of Nicki Hearts Cards and I am so excited to be a part of the team! Today, I will be using the new 5 x 7 dies and the dress up quokkas. I created a video with the entire process, so check it out for all the details.

    Here’s one more picture of the final product!

    Kat Scrappiness, 5x7 cards, thanksgiving quokkas, Nicki Hearts Cards, card making

    Check out these links below to go to the Kat Scrappiness shop and view the products used in the video!


    https://linkdeli.com/widget.js?id=f5e8378456858c916708