Tag: newton’s nook

  • Cheers to 2021! | You Can’t Come Soon Enough!

    Cheers to 2021! | You Can’t Come Soon Enough!

    Hi Everyone! Priscilla here from Nubble Light Designs. Today I have another “Happy New Year” card for you. I don’t think anyone can make too many of these this year, do you? LOL!


    I used “Salty Ocean,” “Blueprint Sketch,” and “Chipped Sapphire” Distress Oxide inks to make the night sky and an Echo Park stencil and gold embossing paster to create the fireworks. Next I colored and die cut the celebratory Newton the cat, from Newton Nook‘s “Newton’s New Year Stamp & Die Combo.


    I finished the card by gold heat embossing “2021”  at the bottom and die cutting the sentiment “Happy New Year” using the Kat Scrappiness “Happy New Year Brush Script Word & Sentiment Die” and hot pink card stock.

    Happy New Year to You All!

    Thank you so much for stopping by! Don’t forget to check out what’s NEW in Kat’s Shop, and follow my blog and Instagram for more “Kat Scrappiness Amazingness”!


    NewNew


    Stay Safe . . .

    Priscilla 🌲🌲

    The supplies I used are listed and linked below.

    SUPPLIES

  • Christmas and New Year’s Cards with Kat Scrappiness and Newton’s Nook

    Christmas and New Year’s Cards with Kat Scrappiness and Newton’s Nook

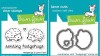
    Hey Guys! I’m back again with both some Christmas cards and “Happy New Year” cards for you today. And “Newton” the kitty, from Newton’s Nook, makes a guest appearance in two of them.

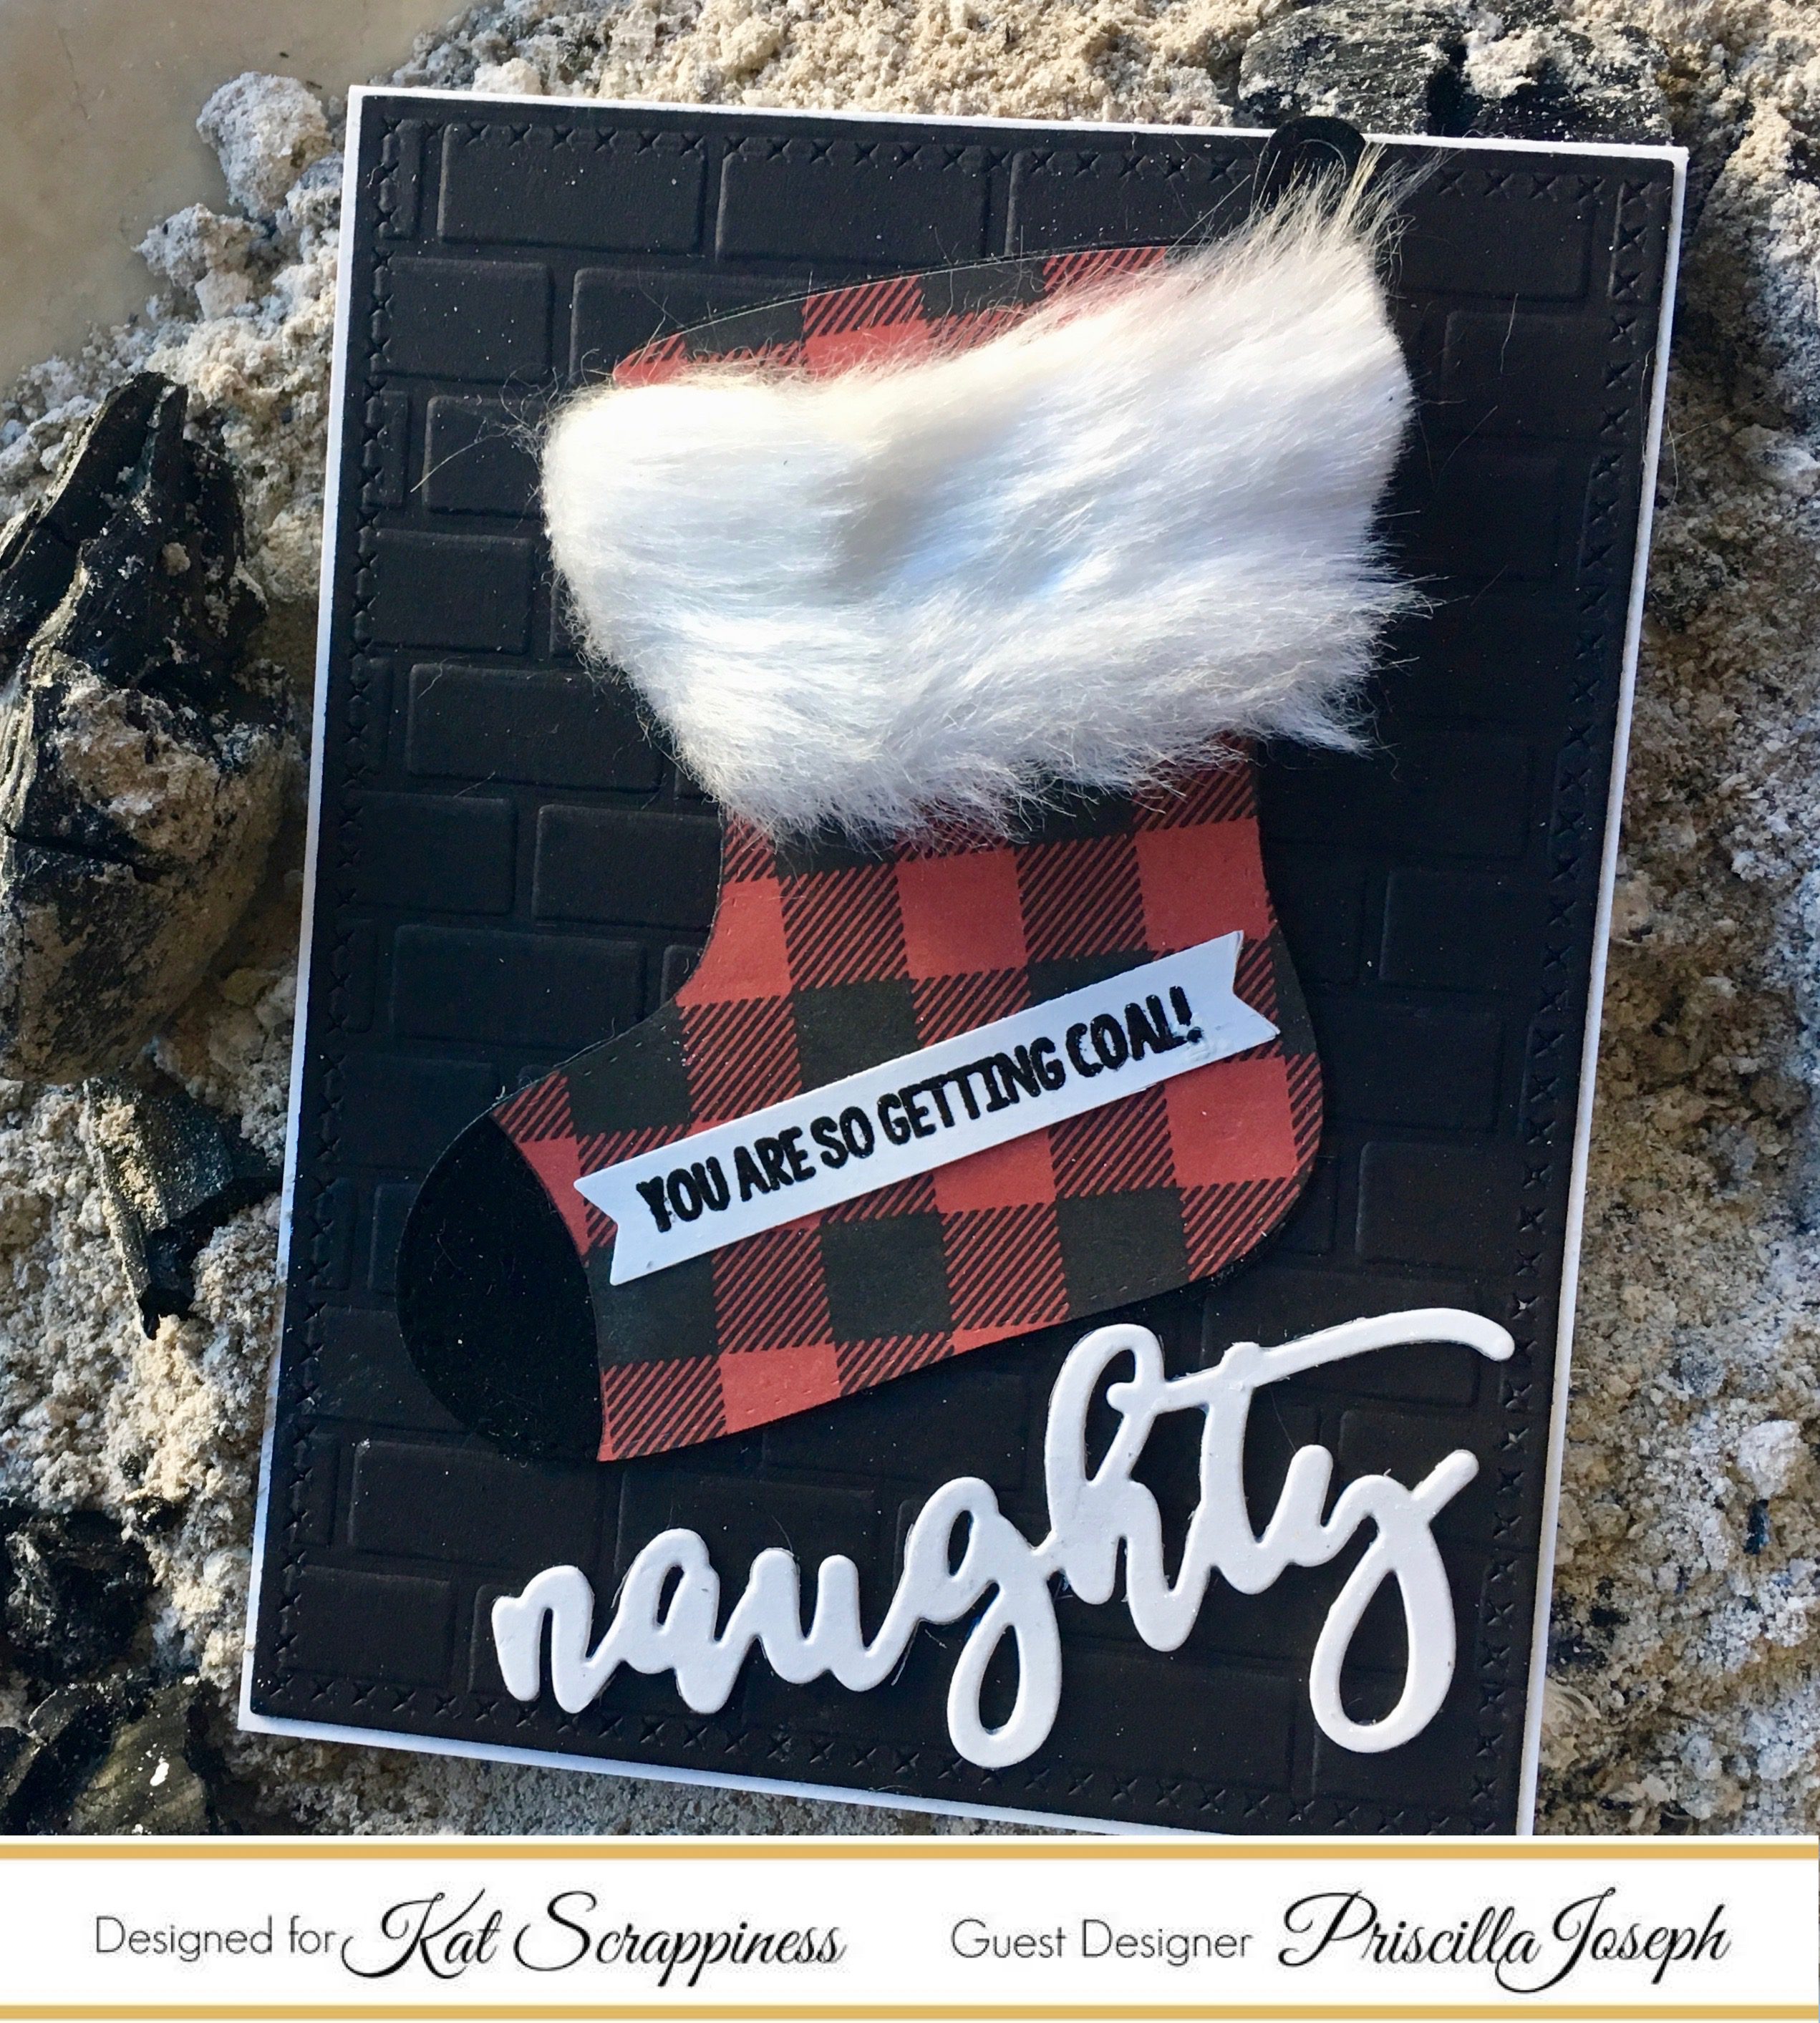
    For my first Christmas card, I brought back one of my favorites, the Kat Scrappiness“Build a Stocking”die with my favorite “Buffalo Plaid” patterned paper and “fur” similar to a previous Kat Scrappiness blog post   I did in November.


    I adhered the finished stocking to a black brick-embossed background and added the coal sentiment and the “naughty” die cut to finish the card. Both came from Kat Scrappiness‘s “Naughty Christmas Stamp & Matching Die” combo set.


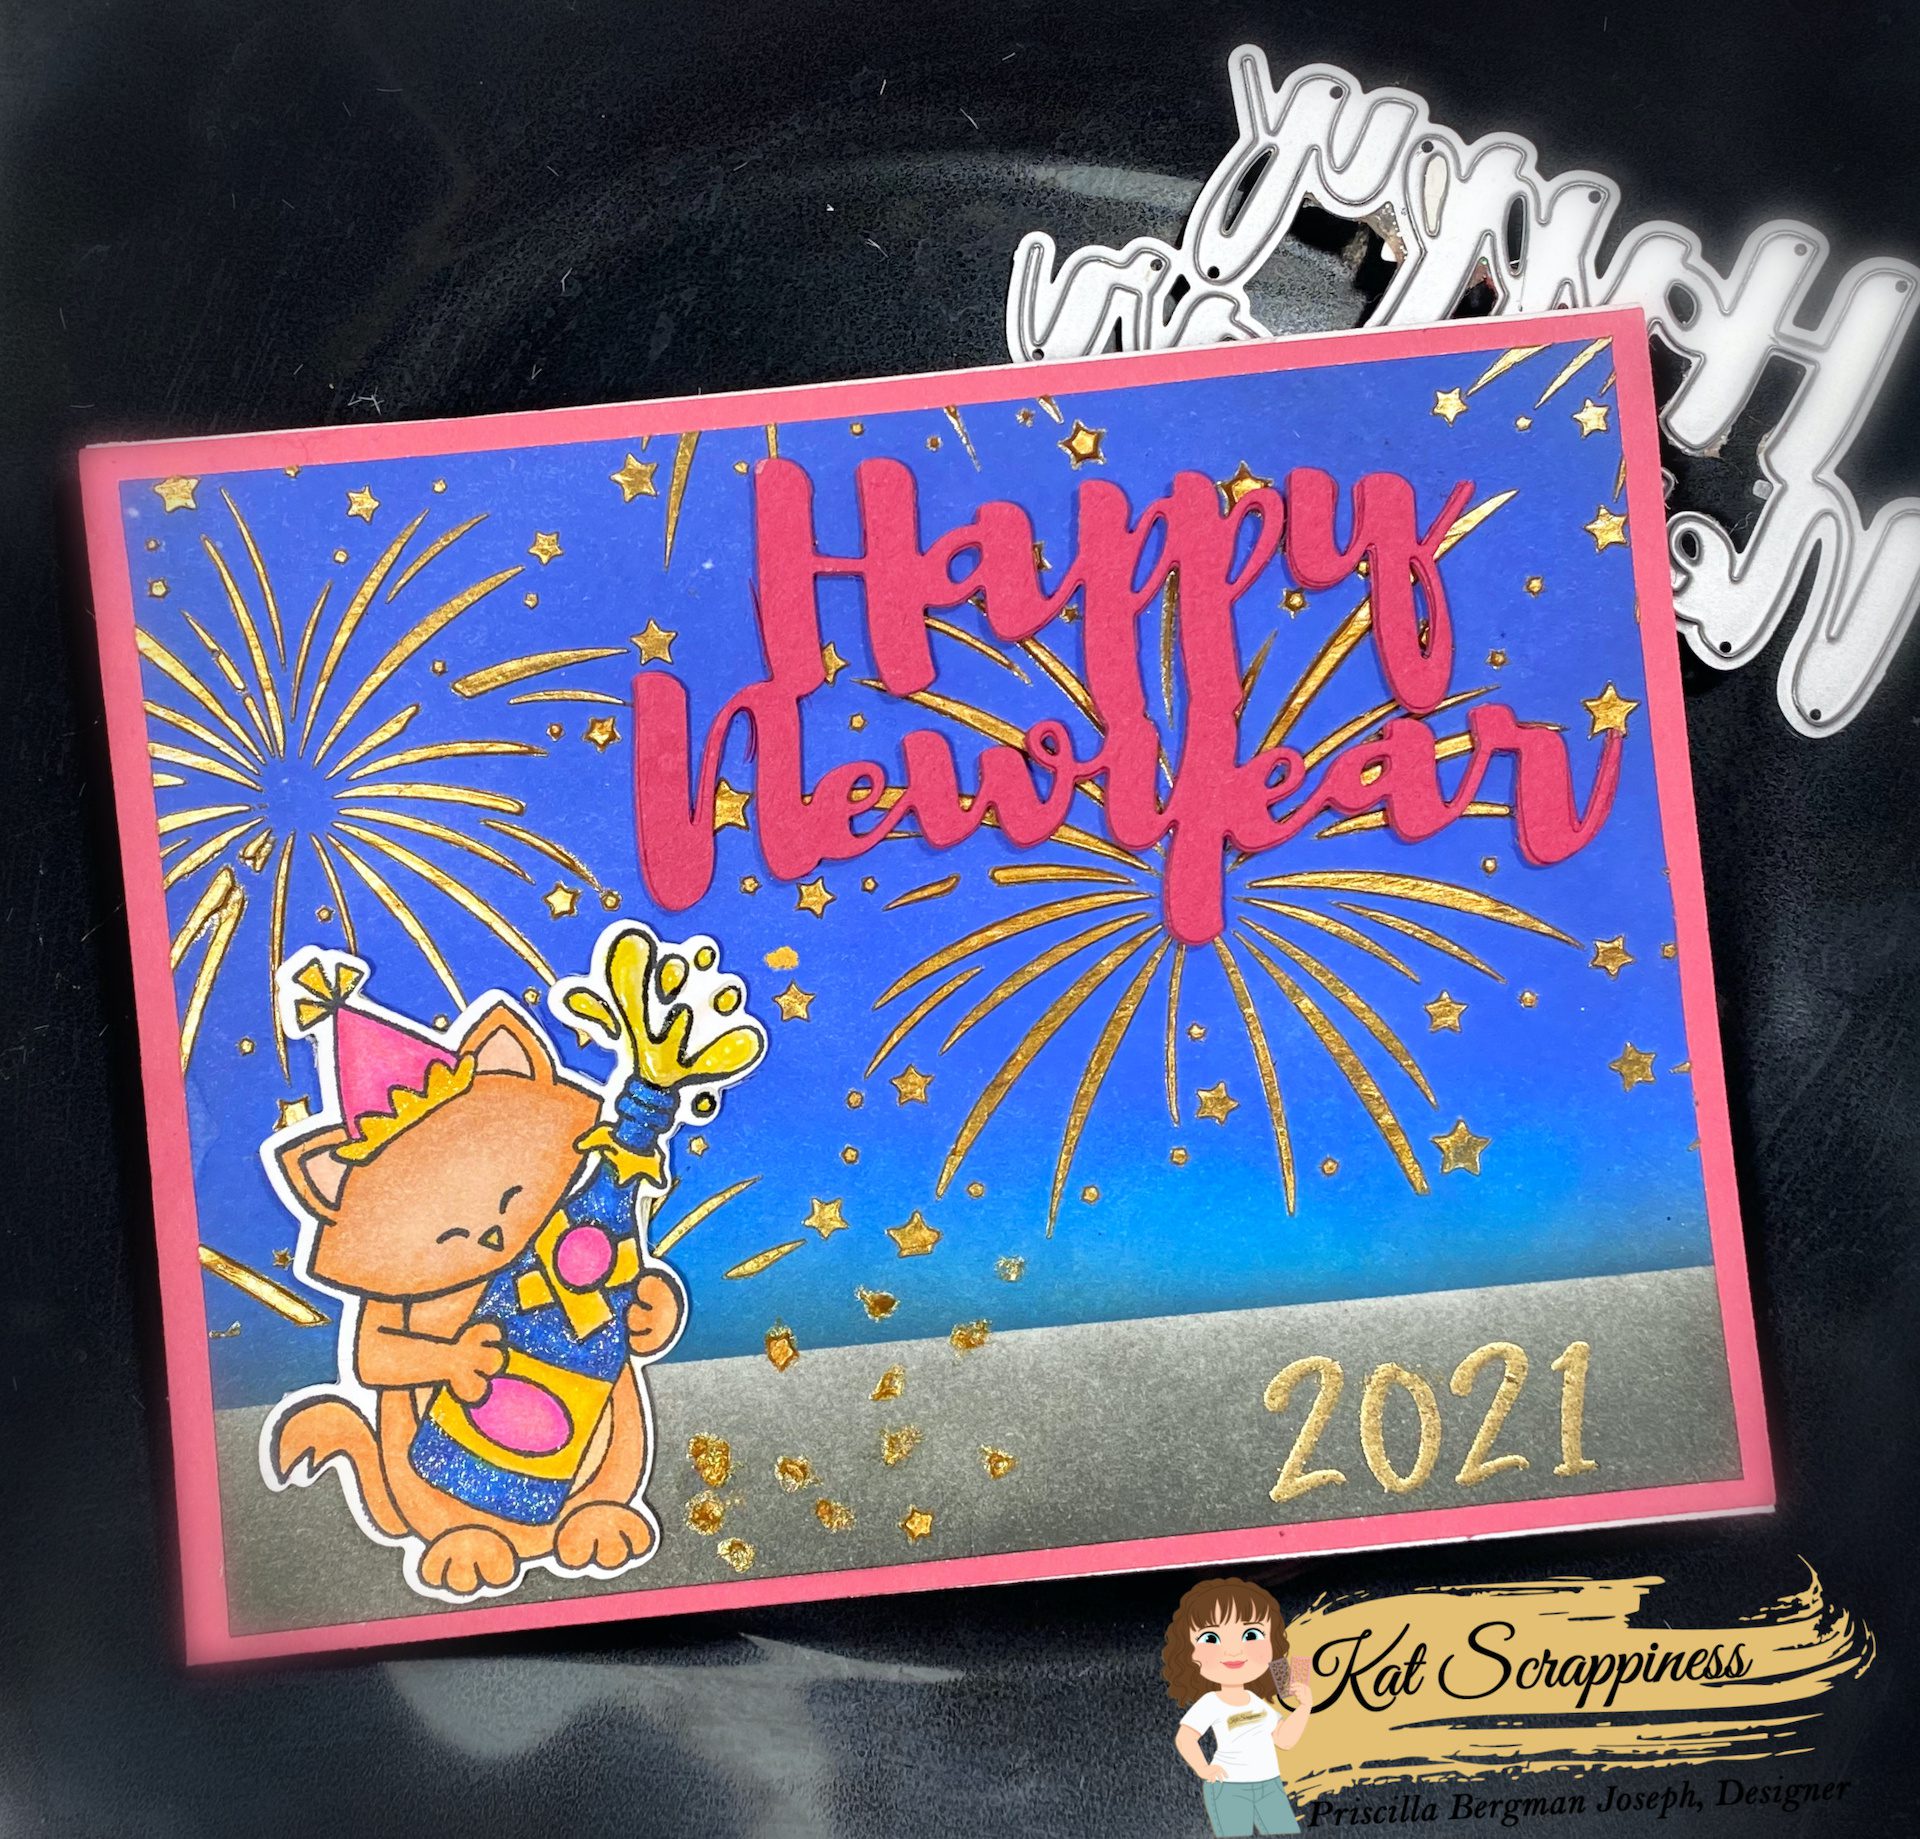
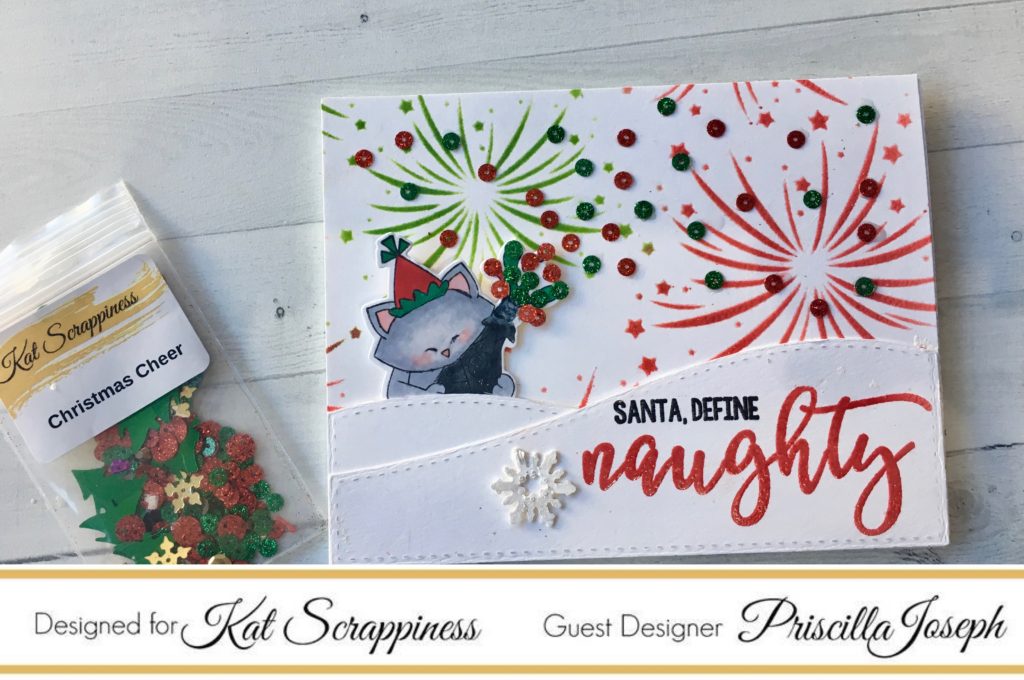
    For my second Christmas card, “Newton”, the kitty, is misbehaving, shooting Christmas fireworks everywhere!

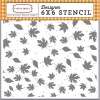
    First, I used Echo Park ‘s “Fireworks Stencil” for the background with “Candied Apple” and “Mowed Lawn” Distress Oxideinks. I then adhered snow banks from the Kat ScrappinessCrafters Essentials-Winter” die set at the bottom and stamped the sentiment from  Kat’s “Naughty Christmas Stamp & Matching Die” combo set.


    I colored “Newton” from the Newton Nook’s  “New Year’s Stamp and Die Combo Set” with Copic Markers and placed him behind the snow banks. By coloring his champagne bottle to look like a black cannon, this kitty is ready for mischief. LOL! I used  the Kat ScrappinessChristmas Cheer” sequin collection for the fireworks and added a snowflake from Kat‘s “Snowflake Kisses” die set.


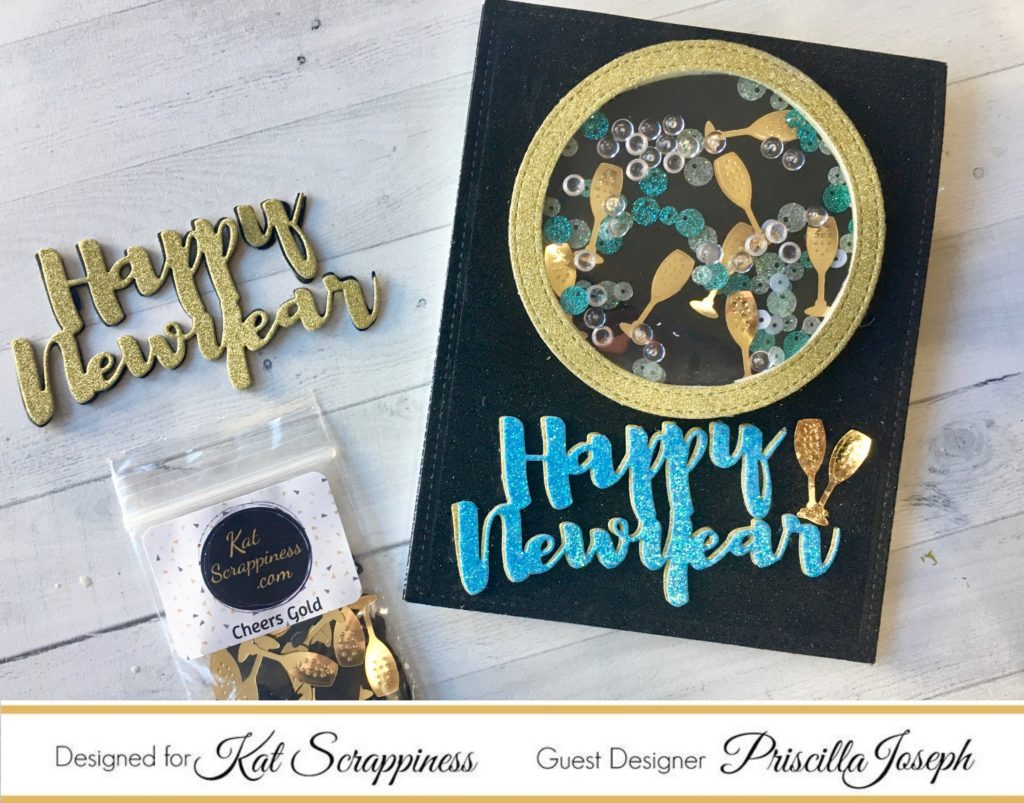
    For card #3, I switched gears (and holidays) and created a New Year’s card. I created a shaker card by die cutting a circle, framing it in gold glimmer card stock, and then filling it with two of Kat’s sequin mixes: “Snow Flurries” and “Cheers Gold,” with some added clear bubble sequins from my stash.


    I die cut the Kat ScrappinessHappy New Year Brush Script and Sentiment Die” out of blue glimmer card stock, layered a second one behind it in gold glimmer card stock, and then adhered it to a black glimmer card base. Two champagne glasses from the “Cheers Gold” sequin collection were the finishing touch next to the sentiment.


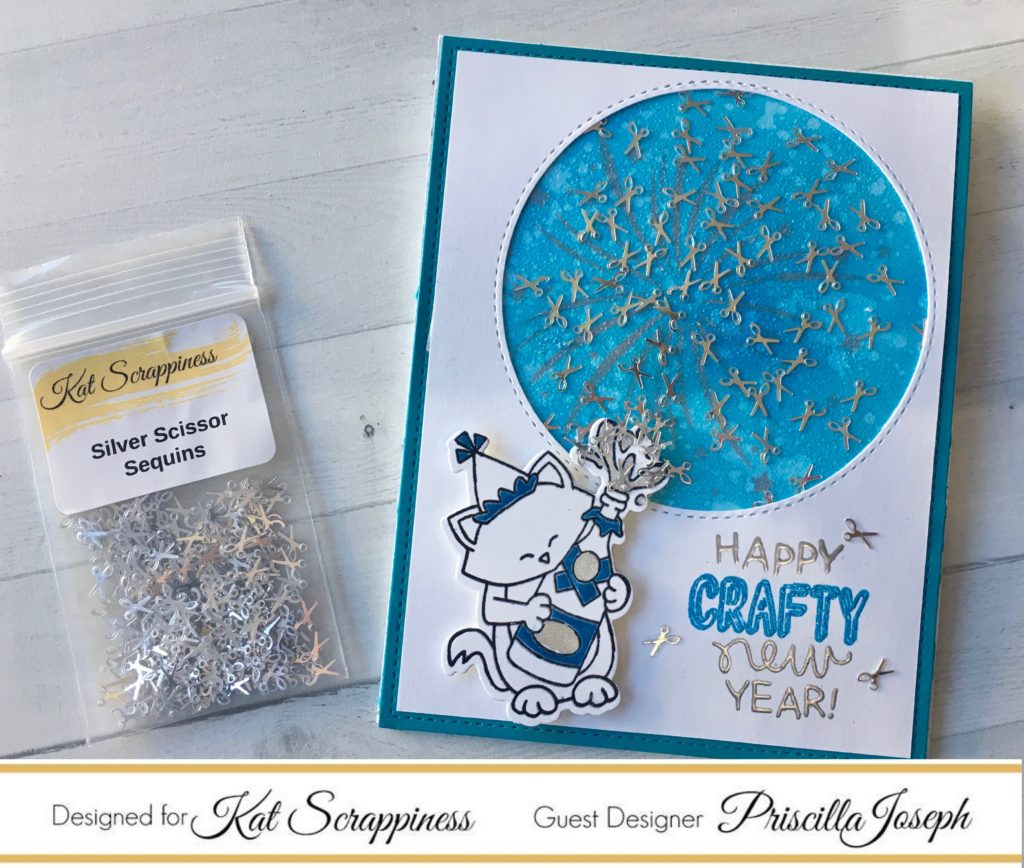
    My final card wishes all crafters a “Happy New Year.” And what could be more appropriate than scissor sequins shooting out of Newton’s champagne bottle!


    I die cut a large circle in a white panel and placed it over a background that was sponged with “Mermaid Lagoon” Distress Oxidesink. I then sponged silver pigment ink through the Echo Park “Fireworks Stencil.”

    I die cut “Newton” from the Newton Nook’s  “New Year’s Stamp and Die Combo Set“, added a little color to him, and then adhered him to the front of the card. I added the Kat ScrappinessSilver Scissor Sequin Mix” onto the spewing champagne and up into the sky. The “Happy New Year” sentiment is from same stamp set, although I added the “Crafty” from a stamp set in my stash.


    And on that note, “Happy Crafty New Year” to all my fellow crafters. May 2019 bring you joy and even greater creativity!

    The supplies I used are listed and linked below.  Please don’t forget to use my coupon code “Priscilla10” for 10% off your order at the shop.

    PRISCILLA

    SUPPLIES

  • Just Chicken-In Card – New Die at Kat Scrappiness

    Just Chicken-In Card – New Die at Kat Scrappiness

    Hello my crafty peeps!  I am super excited to share this post because today, we are launching a new die by Kat Scrappiness called Wood Grain Framed Diamond Wire Background Die.  This die is designed by Kathleen herself and it is AMAZING!  It gives a nice woodgrain-embossed details on the die-cut.  Here’s what it looks like:


    IMG_8538


    I stamped my images on Neenah solar white card stock with my Lawn Fawn Jet Black ink and colored them in with my Copic markers.  I fuzzy-cut the images using my precision cut scissors.


    I used some older dies by Lawn Fawn to die-cut the grass hills and the picket fence.


    I die-cut some silver foiled card stock using the new die.  I also used another light tan card stock to die-cut the same piece so I can layer them together.  For the second piece, I cut the wires using my scissors, and adhered this piece onto the silver foiled card stock.  I adhered an acetate sheet to this piece, then added foam adhesive to create my little well for my shaker card.


    I cut an A2 size card stock for my card base.  I used the Sunburst Layering Stencils by Honeybee Stamps (also available at the shop) to color my card base.  I used a clouds stencil die to add the clouds.


    I added the Walking on Sunshine sequin mix inside the well and adhered my card base on top to create my shaker card.  I adhered the chicken and the little chicks onto the foreground.


    To finish my design, I die-cut a white card stock using the Stitched Flag Dies and stamped the sentiment.  I added this piece to my card with a pink bow.


    KatScrapChickenWire1A


    I love, love, love this new die!  I love that it also embosses the die-cut.  This die will also be great to create some layers, or do an inlaid technique.  The possibilities are endless!


    KatScrapChickenWire1B


    You guys should also check out the new sequin mixes at the shop.  This Walking on Sunshine sequin mix is so cheerful and the colors are so vibrant!  I chose this mix to make it look like corn kernels 🙂


    KatScrapChickenWire1


    Please check out the new products available now at www.katscrappiness.com.   This new die is a must-have!  I hope you like my shaker card and wishing you all a wonderful day!  Happy crafting!


    ————-SUPPLIES—————-


    https://linkdeli.com/widget.js?1528877046279

  • Naughty Newton

    Naughty Newton

    Hey, guys! Kevin here sharing another clean and simple card using some supplies from Kat Scrappiness!

    I cut a strip of striped patterned paper from Echo Parks’s Summer Fun paper pad and adhered it to my card base. Then I added another strip of paper, this time kraft card stock to act as a grounding point for my main image. Naughty Newton from Newton’s Nook has some really funny stamps so I thought that I would use the image where Newton is knocking over some flower pots, perfect for spring! Some Copic coloring and fussy cutting along with some foam dots finished off this clean and simple card!

    Thanks for stopping by and have a great day!


  • How to Create a Simple Mixed Media Valentine’s Tag

    How to Create a Simple Mixed Media Valentine’s Tag

    Newton's Nook TagHello there, Josefine is back 😛 Today I wanted to share a Valentine’s tag with you using Kat’s new tag dies and a really cute stamp set from Newton’s Nook. You know that I’m “a little” into mixed media, so I wanted to create something more towards that direction with the new Kat Scrappiness dies. But I also wanted to create something that fits to the current season so I decided to go with something pink 🙂

    I always think it’s easier to follow a mixed media project in a video vs explanations as text. So I just had to create a new tutorial video for you. I hope you’ll enjoy it 😉

    As you can see I didn’t use a lot of planning or precision while creating my Valentine’s tag. I just love to play around and just be messy without thinking about it. What I love about the new tags is that they give you a new design to play with. Usually I use the same old boring form.

    Tip

    When you get some manila file folders, you can use these tag dies to create your own manila tags. Because their surface can handle wet medium much better than regular card stock, you can use all sorts of paints, inks and mediums on it without worrying about the paper being destroyed.

    Supplies Used

    https://static.inlinkz.com/ppr.js

    Close Ups

    Newton's Nook Tag close up

    Newton's Nook Tag close up

  • Lovely, Amazing You – Notecards for Your Valentine

    Lovely, Amazing You – Notecards for Your Valentine

    valentine note cardsLovely, amazing you was the first sentiment that jumped at me when I looked at the Newton’s Nook “Happy Little Thoughts” stamp set. I love stamp sets like that. You can use them all year around and they fit to so many occasions, it’s not a fancy set or one that follows a specific trend. You can use it on any type of card with numerous techniques.

    Today I decided to create two little note cards using this stamp set and two more from Lawn Fawn. I started with blending three Distress Inks onto the card base. To get an even look, I blended the inks back and forth a couple of times, from the lightest to the darkest color and back.
    preparing 1

    Then I stamped all the critters, the wreath and some hearts and die cut them with the coordinating dies. I did some simple Copic coloring, nothing fancy. Just two shades per combination.
    preparing 2

    I had some leftover vellum with hearts already printed on them, so I adhered the wreath on top and fuzzy cut the vellum around it. At the end I adhered the wreath directly to the card base and used foam tape for the critters. Finally, I added my favorite sentiment “Lovely, Amazing You” from the Newton’s Nook set to the card.
    preparing 3

    Of course I had to add a little sparkle to the hearts. I just love the Spectrum Noir sparkle pens for those little accents 😉

    I hope you enjoyed my two little note cards. Do you have a stamp set that works for every occasion? What’s your favorite?

    Supplies Used

    Close Ups

    hedgehog 1
    hedgehog 2
    skunk 1
    skunk 2

  • Using Clarity Stencil Brushes for a Fall Card

    clarity stencil brushesHello everyone, I’m up on the Kat Scrappiness blog again and this time with a process video 🙂

    I’m featuring the Clarity Stencil Brushes with this card, as I just recently got a pack and fell in love with them immediately! I like them so much better than the Ranger ink blending tool to apply Distress Ink through stencils. I’m also using a hilarious stamp set from Newton’s Nook, a Carta Bella paper pack and stencil, and a really pretty sequins mix from Kat Scrappiness. But see for yourself:

    I hope you enjoyed my video for this snarky birthday card with Newton the cat. I still giggle about it and probably will for a while 😀

    Supplies Used

    Kat Scrappiness – Crisp Autumn Stencil 6″X6″ – Autumn Leaves Stencil by Carta Bella
    Kat Scrappiness – Clarity Brushes
    Kat Scrappiness – Spooky Tree Die by Gina Marie
    Kat Scrappiness – Carta Bella “Autumn” Double-Sided Paper Pad 6″X6″

    Close Ups

    close up 1
    close up 2
    close up 3
    And the inside:
    inside

  • (Breast) Cancer Awareness Card Challenge and a Coupon Code for Kat Scrappiness

    (Breast) Cancer Awareness Card Challenge and a Coupon Code for Kat Scrappiness

    October is Breast Cancer Awareness Month and we wanted to show our support along with our sponsor, Newton’s Nook, by hosting a card challenge and offering you a coupon code for Kat Scrappiness.

    The card challenge (and coupon code) begins October 17th and ends on October 21st.  We will choose the winner on October 22nd and post it here on our blog so be sure to subscribe to see if you are a winner!

    Kat Scrappiness Coupon Code

    Save 10% off your *entire order using coupon code BCA2016 at www.KatScrappiness.com.  Coupon is valid from October 17th through October 21st.

    *some exclusions apply

    Card Challenge Prizes

    Prizes:

    • Newton’s Nook is giving away a $20.00 gift card to their store to one lucky winner!
    • Kat Scrappiness is giving away one “Newton’s Support” stamp set to three lucky winners!

    Featured Card Challenge Projects

    Newton's Support

    Some of our design team members created some cards to share with you for today’s challenge and they all feature the Newton’s Support Stamp Set Newton’s Support Stamp Set (which is also a prize in this challenge!).

    Please stop by and visit the team members and let them know how much you love their projects!  Just click on the team member’s name or card photo to see their blog post.

    Josefine

    1


    Kelley Kohout 

    This card is in honor of my friend Tiffany Gunther! She had this tattooed shortly before she passed this last July.

    1


    Stephanie Jones

    1


    AJ Bodine (Amanda)


    Kevin Bray

    1


    Card Challenge Entry

    The only requirement is that you create a new card or craft project of any kind (no backlinking – meaning using cards made previously for other projects) that is encouraging and supportive. It does not have to be related to cancer, it just needs to show your support and encouragement for someone else.

    We can’t wait to see what you create! Good luck everyone!